深入理解 Go 中断路器(circuit breaker)的实现
在这篇文章中,我想谈谈一个基于流行的开源项目 hystrix 的 circuit breaker (断路器)模式(实际上,我会看看 golang 版本的hystrix-go[1],而不是用 Java 编写的原始版本[2])。
在本文的第一部分中,我将对 circuit breaker 进行一般性介绍,让你了解它是什么以及它为什么重要。此外,让我们回顾一下 hystrix-go 和 hystrix 的项目背景,并通过一个小演示示例了解基本用法。
Circuit breaker
分布式架构中的软件通常具有许多依赖项,并且每个依赖项(即使是最可靠的服务)在某些时候失败是不可避免的。
如果我们失败的服务变得无响应会发生什么?所有依赖它的服务也有变得无响应的风险。这就是所谓的 catastrophic cascading failure(灾难性级联故障)。
断路器背后的基本思想非常简单。断路器通过包装对目标服务的调用来工作,并持续监控故障率。一旦故障达到某个阈值,断路器将跳闸,并且对电路的所有进一步调用都返回故障或错误。
断路器模式背后的设计理念是fail fast:当一个服务变得无响应时,依赖它的其他服务应该停止等待它并开始处理失败的服务可能不可用的事实。通过防止单个服务的故障在整个系统中发生级联故障,断路器模式有助于快速恢复整个系统。
断路器模式可以实现为如下所示的有限状态机:
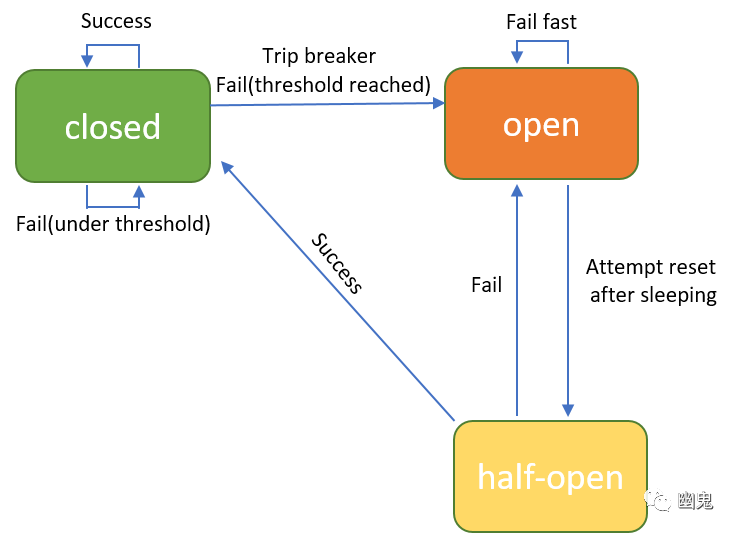
有三种状态 open、closed 和 half-open:
- closed:请求被传递到目标服务。继续监控错误率、请求数和超时等指标。当这些指标超过特定阈值(由开发人员设置)时,断路器将跳闸并转换为
open状态。 - open:请求不传递给目标服务,而是
fallback调用逻辑(由开发人员定义)来处理失败。断路器会在open调用状态保持一段时间sleeping window,之后断路器可以从open过渡到half-open。 - half-open:在此状态下,将有限数量的请求传递给目标服务,旨在重置状态。如果目标服务可以成功响应,则
reset中断返回closed状态。否则断路器将转换回open状态。
这是断路器的基本背景,你可以在网上找到更多有关[3]它的信息。
接下来,让我们调查一下 hystrix 这个项目。
hystrix
hystrix 是一个非常流行的开源项目。你可以在此链接[4]中找到有关它的所有信息。
我想从上面的链接中引用几个要点。Hystrix 旨在执行以下操作:
- 通过第三方客户端库访问(通常通过网络)依赖关系,保护和控制延迟和故障。
- 停止复杂分布式系统中的级联故障。
- 快速失败并迅速恢复。
- 尽可能回退并优雅降级。
- 实现近乎实时的监控、警报和操作控制。
你可以看到hystrix完美地实现了我们在上一节中谈到的断路器模式的想法,对吧?
该hystrix项目是用Java 实现的。在本文中,我更喜欢使用 golang 版本hystrix-go,它是一个简化版本,但实现了有关断路器的所有主要设计和想法。
hystrix-go的用法可以在这个链接[5]中找到,非常简单易懂。你可以轻松地在网上找到许多其他带有演示示例的文章,以展示更多使用级别的内容。请前往阅读。
在我的文章中,我想深入研究 hystrix-go 的源代码,并对 circuit breaker 的实现方式进行深入调研。请继续阅读以下部分。
三种服务降级策略
Hystrix提供了三种不同的服务降级策略来避免在整个系统中发生 cascading failure 这种情况:timeout(超时)、maximum concurrent request numbers(最大并发请求数) 和 request error rate(请求错误率)。
- timeout:如果服务调用在预定义的时间内没有成功返回响应,则回退逻辑将运行。这个策略是最简单的。
- 最大并发请求数:当并发请求数超过阈值时,回退逻辑将处理接下来的请求。
- request error rate:
hystrix会记录每次服务调用的响应状态,当错误率达到阈值后,breaker 会打开,在 breaker 状态变回 close 之前会执行 fallback 逻辑。error rate策略是最复杂的一种。
从 hystrix 的基本用法可以看出:
import (
    "github.com/afex/hystrix-go/hystrix"
    "time"
)

hystrix.ConfigureCommand("my_command", hystrix.CommandConfig{
    Timeout:               int(10 * time.Second),
    MaxConcurrentRequests: 100,
    ErrorPercentThreshold: 25,
})

hystrix.Go("my_command", func() error {
    // talk to dependency services
    return nil
}, func(err error) error {
    // fallback logic when services are down
    return nil
})
在上面的使用案例中,可以看到 timeout 设置为 10 秒,最大并发请求数为 100,错误率阈值为 25%。
在消费者应用程序级别,这几乎是你需要设置的所有配置。hystrix 将使魔术在内部发生。
在本文中,我计划通过查看 hystrix 源代码向你展示其内部结构。
让我们从简单的开始:max concurrent requests和timeout。然后继续探索复杂的策略request error rate。
GoC 函数
根据上面的例子,你可以看到 Go 函数是 hystrix 源代码的大门,所以我们从它开始:
func Go(name string, run runFunc, fallback fallbackFunc) chan error {
    runC := func(ctx context.Context) error {
        return run()
    }
    var fallbackC fallbackFuncC
    if fallback != nil {
        fallbackC = func(ctx context.Context, err error) error {
            return fallback(err)
        }
    }
    return GoC(context.Background(), name, runC, fallbackC)
}
Go 函数接受三个参数:
- name:命令名,绑定到 hystrix 内部创建的
circuit。 - run:一个包含向依赖服务发送请求的正常逻辑的函数。
- fallback:一个包含回退逻辑的函数。
Go 函数只是封装了带 Context 的 run 和 fallback,Context 用于控制和取消 goroutine,不熟悉的可以参考这篇文章[6]。最后它会调用 GoC 函数。
GoC 函数如下:
func GoC(ctx context.Context, name string, run runFuncC, fallback fallbackFuncC) chan error {
    // construct a new command instance
    cmd := &command{
        run:      run,
        fallback: fallback,
        start:    time.Now(),
        errChan:  make(chan error, 1),
        finished: make(chan bool, 1),
    }
    // get circuit by command name
    circuit, _, err := GetCircuit(name)
    if err != nil {
        cmd.errChan <- err
        return cmd.errChan
    }
    cmd.circuit = circuit
    //declare a condition variable sync.Cond: ticketCond, to synchronize among goroutines
    //declare a flag variable: ticketChecked, work together with ticketCond
    ticketCond := sync.NewCond(cmd)
    ticketChecked := false
    // declare a function: returnTicket, will execute when a concurrent request is done to return `ticket`
    returnTicket := func() {
        cmd.Lock()
        for !ticketChecked {
            ticketCond.Wait()
        }
        cmd.circuit.executorPool.Return(cmd.ticket)
        cmd.Unlock()
    }
    // declare a sync.Once instance: returnOnce, make sure the returnTicket function execute only once
    returnOnce := &sync.Once{}

    // declare another function: reportAllEvent, used to collect the metrics
    reportAllEvent := func() {
        err := cmd.circuit.ReportEvent(cmd.events, cmd.start, cmd.runDuration)
        if err != nil {
            log.Printf(err.Error())
        }
    }
    // launch a goroutine which executes the `run` logic
    go func() {
        defer func() { cmd.finished <- true }()

        if !cmd.circuit.AllowRequest() {
            cmd.Lock()
            ticketChecked = true
            ticketCond.Signal()
            cmd.Unlock()
            returnOnce.Do(func() {
                returnTicket()
                cmd.errorWithFallback(ctx, ErrCircuitOpen)
                reportAllEvent()
            })
            return
        }

        cmd.Lock()
        select {
        case cmd.ticket = <-circuit.executorPool.Tickets:
            ticketChecked = true
            ticketCond.Signal()
            cmd.Unlock()
        default:
            ticketChecked = true
            ticketCond.Signal()
            cmd.Unlock()
            returnOnce.Do(func() {
                returnTicket()
                cmd.errorWithFallback(ctx, ErrMaxConcurrency)
                reportAllEvent()
            })
            return
        }

        runStart := time.Now()
        runErr := run(ctx)
        returnOnce.Do(func() {
            defer reportAllEvent()
            cmd.runDuration = time.Since(runStart)
            returnTicket()
            if runErr != nil {
                cmd.errorWithFallback(ctx, runErr)
                return
            }
            cmd.reportEvent("success")
        })
    }()
    // launch the second goroutine for timeout strategy
    go func() {
        timer := time.NewTimer(getSettings(name).Timeout)
        defer timer.Stop()

        select {
        case <-cmd.finished:
        case <-ctx.Done():
            returnOnce.Do(func() {
                returnTicket()
                cmd.errorWithFallback(ctx, ctx.Err())
                reportAllEvent()
            })
            return
        case <-timer.C:
            returnOnce.Do(func() {
                returnTicket()
                cmd.errorWithFallback(ctx, ErrTimeout)
                reportAllEvent()
            })
            return
        }
    }()

    return cmd.errChan
}我承认它很复杂,但它也是整个hystrix项目的核心。耐心点,让我们仔细一点一点地回顾它。
首先,GoC 函数的代码结构如下:

- 构造一个新
Command对象,其中包含每次调用GoC函数的所有信息。 - 通过调用
GetCircuit(name)函数按名称获取circuit breaker(如果不存在则创建它)。 - 声明(
sync.Cond)条件变量 ticketCond 和 ticketChecked 用于 goroutine 之间的通信。 - 声明函数 returnTicket。什么是 ticket?returnTicket 是什么意思?让我们稍后详细讨论。
- 声明另一个函数 reportAllEvent。此函数对
error rate策略至关重要。 - 声明一个
sync.Once的实例,这是 golang 提供的另一个有趣的synchronization primitives(同步原语)。 - 启动两个 goroutine,每个 goroutine 也包含许多逻辑。简单来说,第一个包含向目标服务发送请求的逻辑和
max concurrent request number策略,第二个包含timeout策略。 - 返回一个
channel类型值
让我们一一回顾它们。
command
command 结构体如下,它嵌入了 sync.Mutex 并定义了几个字段:
type command struct {
    sync.Mutex

    ticket      *struct{}
    start       time.Time
    errChan     chan error
    finished    chan bool
    circuit     *CircuitBreaker
    run         runFuncC
    fallback    fallbackFuncC
    runDuration time.Duration
    events      []string
}请注意,command 对象本身不包含命令名称信息,其生命周期仅在一次GoC调用的范围内。这意味着有关服务请求的统计指标,类似 error rate 和 concurrent request number ,不存储在命令对象中。相反,这些指标存储在类型 CircuitBreaker 的circuit字段中。
CircuitBreaker
正如我们在函数 GoC 的工作流程中提到的,调用 GetCircuit(name) 来获取或创建circuit breaker。它的实现在circuit.go文件内:
func init() {
    circuitBreakersMutex = &sync.RWMutex{}
    circuitBreakers = make(map[string]*CircuitBreaker)
}

func GetCircuit(name string) (*CircuitBreaker, bool, error) {
    circuitBreakersMutex.RLock()
    _, ok := circuitBreakers[name]
    if !ok {
        circuitBreakersMutex.RUnlock()
        circuitBreakersMutex.Lock()
        defer circuitBreakersMutex.Unlock()

        if cb, ok := circuitBreakers[name]; ok {
            return cb, false, nil
        }
        circuitBreakers[name] = newCircuitBreaker(name)
    } else {
        defer circuitBreakersMutex.RUnlock()
    }

    return circuitBreakers[name], !ok, nil
}
逻辑非常简单。所有的断路器都存储在一个映射对象 circuitBreakers 中,以命令名作为键。
构造函数 newCircuitBreaker 和CircuitBreaker 结构体如下:
type CircuitBreaker struct {
    Name                   string
    open                   bool
    forceOpen              bool
    mutex                  *sync.RWMutex
    openedOrLastTestedTime int64

    executorPool *executorPool   // used in the strategy of max concurrent request number
    metrics      *metricExchange // used in the strategy of request error rate
}

func newCircuitBreaker(name string) *CircuitBreaker {
    c := &CircuitBreaker{}
    c.Name = name
    c.metrics = newMetricExchange(name)
    c.executorPool = newExecutorPool(name)
    c.mutex = &sync.RWMutex{}

    return c
}
CircuitBreaker 的所有字段对于理解断路器的工作原理都很重要。
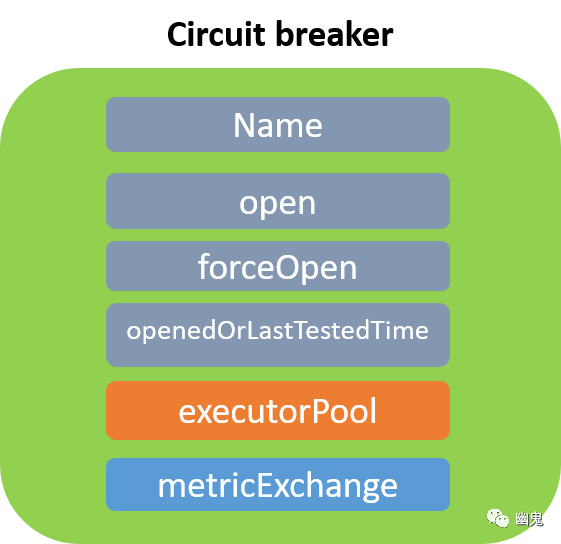
有两个非简单类型的字段需要更多分析,executorPool 和 metrics。
- executorPool:用于
max concurrent request number策略。 - metrics:用于
request error rate策略。
executorPool
我们可以在文件 pool.go 中找到 executorPool 逻辑:
type executorPool struct {
    Name    string
    Metrics *poolMetrics
    Max     int
    Tickets chan *struct{} // Tickets channel
}

func newExecutorPool(name string) *executorPool {
    p := &executorPool{}
    p.Name = name
    p.Metrics = newPoolMetrics(name)
    p.Max = getSettings(name).MaxConcurrentRequests

    p.Tickets = make(chan *struct{}, p.Max)
    // send Max numbers of value into the Tickets channel
    for i := 0; i < p.Max; i++ {
        p.Tickets <- &struct{}{}
    }

    return p
}
它利用 golangchannel来实现 max concurrent request number 策略。请注意创建了具有MaxConcurrentRequests容量缓冲通道的 Tickets 字段。在下面的 for 循环中,通过将值发送到通道直到达到容量,使缓冲的通道充满。
如上所示,在GoC函数的第一个 goroutine 中,Ticketschannel 的使用如下:
go func() {
    ...
    select {
    case cmd.ticket = <-circuit.executorPool.Tickets: // receive ticket from Tickets channel
        ticketChecked = true
        ticketCond.Signal()
        cmd.Unlock()
    default:
        ticketChecked = true
        ticketCond.Signal()
        cmd.Unlock()
        returnOnce.Do(func() {
            returnTicket()
            cmd.errorWithFallback(ctx, ErrMaxConcurrency) // run fallback logic when concurrent requests reach threshold
            reportAllEvent()
        })
        return
    }
    ...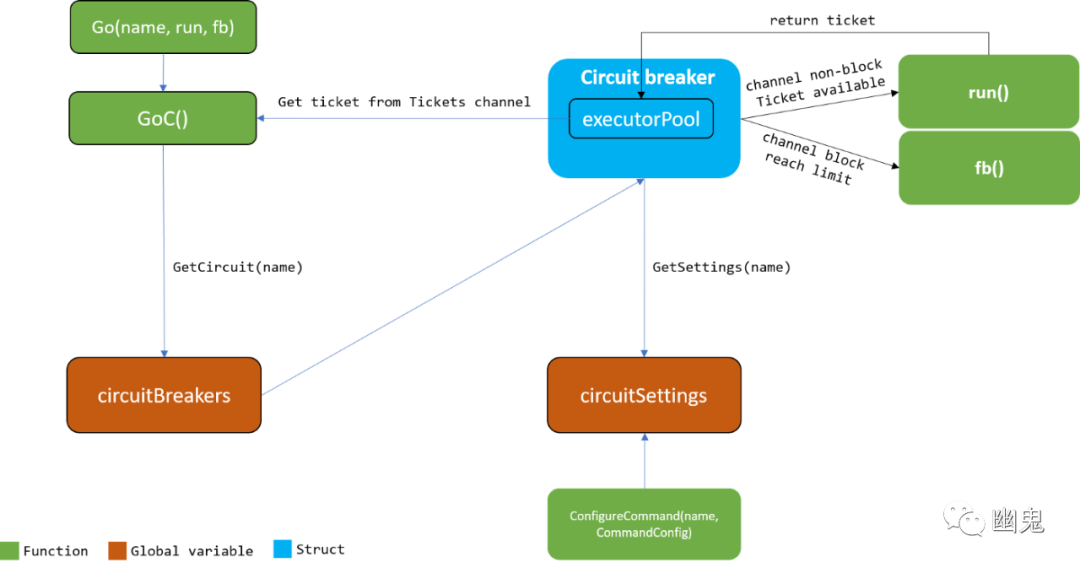
}()每次调用GoC函数都会从 circuit.executorPool.Tickets 通道中获取一张 ticket,直到没有 ticket 为止,这意味着并发请求的数量达到了阈值。在这种情况下,default case 将执行,并且服务将使用回退逻辑优雅地降级。
另一方面,每次调用GoC完成后,都需要将ticket发送回 circuit.executorPool.Tickets,对吗?你还记得上面提到的 returnTicket 函数吗?是的,它用于此目的。GoC 中定义的 returnTicket 函数如下:
returnTicket := func() {
    cmd.Lock()
    for !ticketChecked {
        ticketCond.Wait()
    }
    cmd.circuit.executorPool.Return(cmd.ticket) // return ticket to the executorPool
    cmd.Unlock()
}它调用executorPool.Return 函数:
// Return function in pool.go file
func (p *executorPool) Return(ticket *struct{}) {
    if ticket == nil {
        return
    }

    p.Metrics.Updates <- poolMetricsUpdate{
        activeCount: p.ActiveCount(),
    }
    p.Tickets <- ticket // send ticket back to Tickets channel
}
ticket 的设计和实现是golang channel真实世界应用的一个很好的例子。
总之, max concurrent request number 策略可以说明如下:
在上面的部分中,我们仔细回顾了 hystrix 中的 max concurrent requests策略,希望你能从中学到一些有趣的东西。
现在让我们在下一节中一起研究 timeout 策略。
Timeout
与max concurrent request number策略相比,timeout理解起来非常直白。
正如我们在上一节中提到的,hystrix 核心逻辑在 GoC 函数内部。GoC函数内部运行了两个 goroutine。你已经看到第一个 goroutine 包含向目标服务发送请求的逻辑和max concurrent request number。第二个 goroutine 怎么样?让我们回顾一下:
go func() {
 timer := time.NewTimer(getSettings(name).Timeout)
 defer timer.Stop()

 select {
 case <-cmd.finished:
  // returnOnce has been executed in another goroutine
 case <-ctx.Done():
  returnOnce.Do(func() {
   returnTicket()
   cmd.errorWithFallback(ctx, ctx.Err())
   reportAllEvent()
  })
  return
 case <-timer.C:
  returnOnce.Do(func() {
   returnTicket()
   cmd.errorWithFallback(ctx, ErrTimeout)
   reportAllEvent()
  })
  return
 }
}()
请注意,使用设置中的超时持续时间值创建 Timer。一个 select 语句让这个 goroutine 等待,直到一个case条件从通道接收到值。timeout 情况只是第三种情况(前两种情况未触发时),它将运行带有 ErrTimeout 错误消息的后备逻辑。
到目前为止,你应该清楚这两个 goroutine 的主要结构和功能。但具体来说,有两种 Golang 技术需要你注意:sync.Once和 sync.Cond。
## sync.Once
你可能已经注意到以下代码块,它在 GoC 函数内部重复了多次:
returnOnce.Do(func() {
 returnTicket()
 cmd.errorWithFallback(ctx, ErrTimeout) // with various error types
 reportAllEvent()
})
returnOnce 是 sync.Once 类型实例,它确保Do方法的回调函数在不同的 goroutine 中只运行一次。
在这种特定情况下,它可以保证 returnTicket() 和 reportAllEvent() 都只执行一次。这确实是有道理的,因为如果一个 GoC 调用会运行 returnTicket() 多次,那么当前的并发请求数将不正确,对吧?
我写了另一篇关于sync.Once详细的文章,你可以参考那篇文章[7]以获得更深入的解释。
sync.Cond
returnTicket 函数的实现如下:
ticketCond := sync.NewCond(cmd)
ticketChecked := false
returnTicket := func() {
 cmd.Lock()
 for !ticketChecked {
  ticketCond.Wait() // hang the current goroutine
 }
 cmd.circuit.executorPool.Return(cmd.ticket)
 cmd.Unlock()
}
ticketCond 是一个条件变量,在 Golang 中它是sync.Cond。
条件变量在不同 goroutine 之间的通信中很有用。具体来说,sync.Cond 的 Wait 方法会挂起当前的 goroutine,Signal 方法会唤醒阻塞的 goroutine 继续执行。
在 hystrix 中,当 ticketChecked 为 false 时,表示当前调用尚未结束,ticket不应退还。因此,ticketCond.Wait() 被调用来阻塞这个 goroutine 并等待 GoC 调用完成,这是由 Signal 方法通知的。
ticketChecked = true
ticketCond.Signal()注意上面两行代码总是一起调用的。ticketChecked 设置为 true 表示当前GoC调用已完成,ticket 已准备好返回。而且,Wait 挂起 goroutine 的方法放在了一个 for 循环中,这也是一种最佳实践技术。
更多关于 sync.Cond 的解释,我以后会写另一篇文章来解释,请稍等。
Fallback
最后,让我们看看当目标服务没有响应时,fallback 函数是如何被调用的。
让我们回想一下,每次 GoC 调用都会创建一个新的命令实例。并且 fallback 函数会被分配给同名的字段,后面会用到。
cmd := &command{
 run:      run,
 fallback: fallback, // fallback logic here
 start:    time.Now(),
 errChan:  make(chan error, 1),
 finished: make(chan bool, 1),
}正如我们在上面的部分中看到的,errorWithFallback 方法在 timeout 或max concurrent request number 达到阈值时被触发。
func (c *command) errorWithFallback(ctx context.Context, err error) {
 eventType := "failure"
 if err == ErrCircuitOpen {
  eventType = "short-circuit"
 } else if err == ErrMaxConcurrency {
  eventType = "rejected"
 } else if err == ErrTimeout {
  eventType = "timeout"
 } else if err == context.Canceled {
  eventType = "context_canceled"
 } else if err == context.DeadlineExceeded {
  eventType = "context_deadline_exceeded"
 }

 c.reportEvent(eventType)
 fallbackErr := c.tryFallback(ctx, err)
 if fallbackErr != nil {
  c.errChan <- fallbackErr
 }
}
errorWithFallback 方法将通过调用 tryFallback 运行 fallback 并报告指标事件,例如 fallback-failure 和 fallback-success。
func (c *command) tryFallback(ctx context.Context, err error) error {
 if c.fallback == nil {
  return err
 }
 fallbackErr := c.fallback(ctx, err) // execute the fallback logic here
 if fallbackErr != nil {
  c.reportEvent("fallback-failure")
  return fmt.Errorf("fallback failed with '%v'. run error was '%v'", fallbackErr, err)
 }

 c.reportEvent("fallback-success")

 return nil
}
在上面,我们谈到 timeout 是 hystrix 中提供的所有策略中最简单的一种策略。还回顾了一些详细的 Golang 技术,以便更好地理解复杂的代码逻辑。
总结
在这篇文章中,我们谈到了 hystrix 中详细实现的 max concurrent requests和timeout 策略。还回顾了一些详细的 Golang 技术,以便更好地理解复杂的代码逻辑。
我把 error rate 策略留给你,请深入代码库并探索更多关于熔断的信息。
原文链接:https://levelup.gitconnected.com/how-to-write-a-circuit-breaker-in-golang-9ebd5644738c。
参考资料
[1]hystrix-go: https://github.com/afex/hystrix-go
[2]原始版本: https://github.com/Netflix/Hystrix
[3]有关: https://martinfowler.com/bliki/CircuitBreaker.html
[4]链接: https://github.com/Netflix/Hystrix/wiki
[5]链接: https://github.com/afex/hystrix-go
[6]这篇文章: https://baoqger.github.io/2021/04/26/golang-context-source-code/
[7]那篇文章: https://baoqger.github.io/2021/05/11/golang-sync-once/