Nest 实现扫码登录
本文年涉及到的所有代码,已上传至:https://github.com/QuarkGluonPlasma/nestjs-course-code/tree/main/qrcode-login
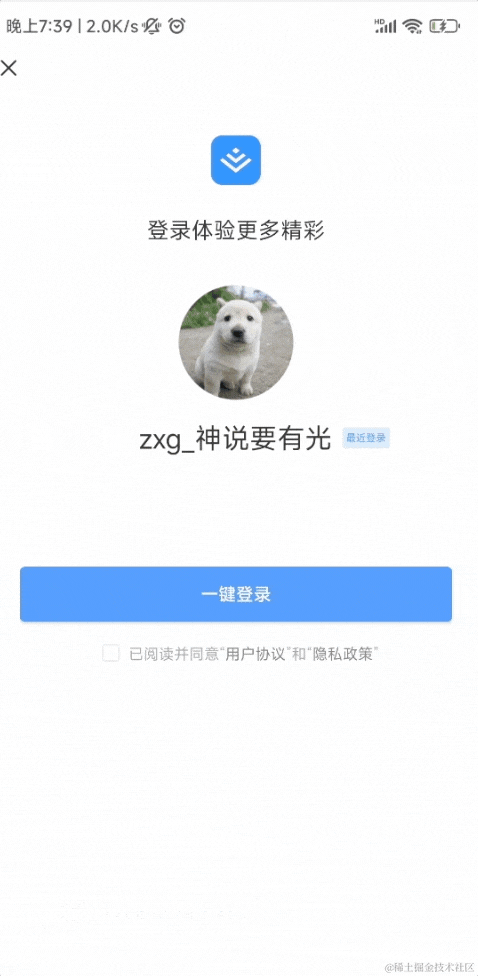
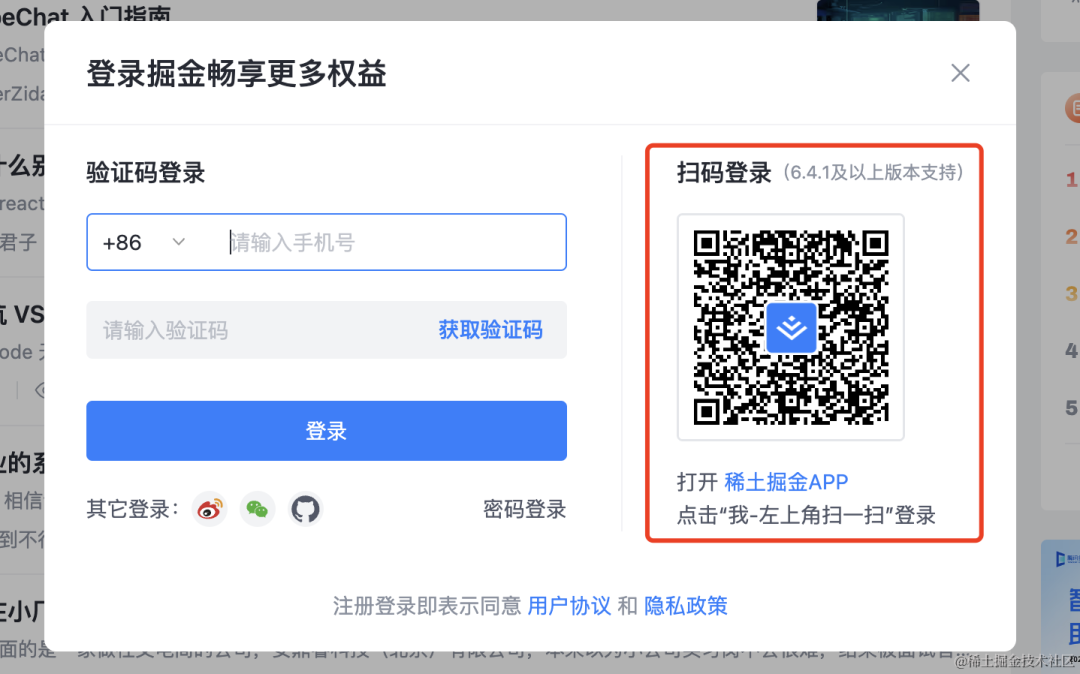
扫码登录是常见的功能,基本各种网站都支持。
比如掘金的登录就支持 APP 扫码的方式:

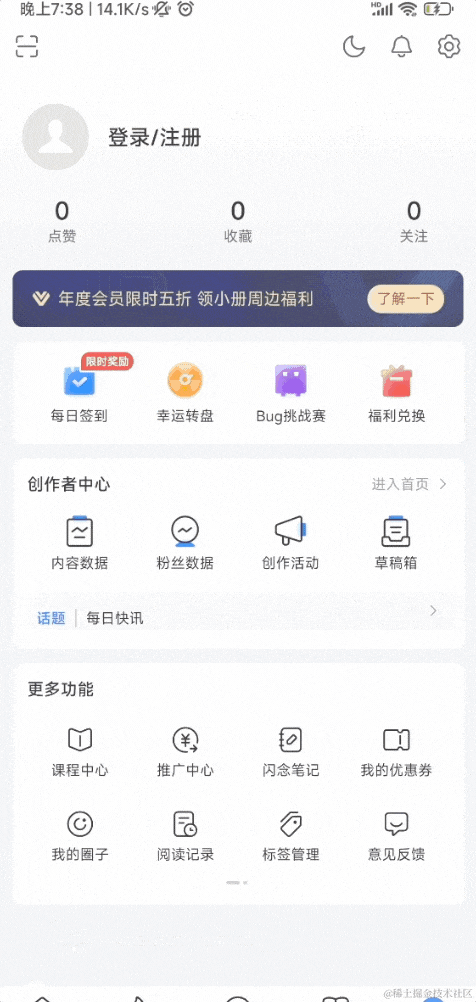
如果你 APP 没登录,扫码后会跳到登录页面:

登录之后,会进入确认界面,你可以选择授权登录或者取消:
这边确认之后,pc 网站就登录了。
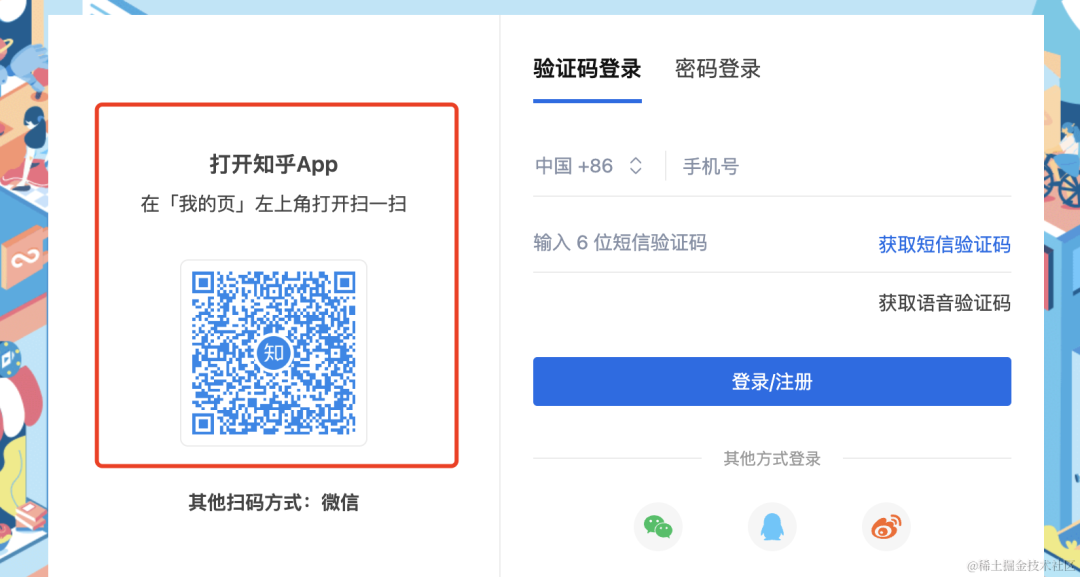
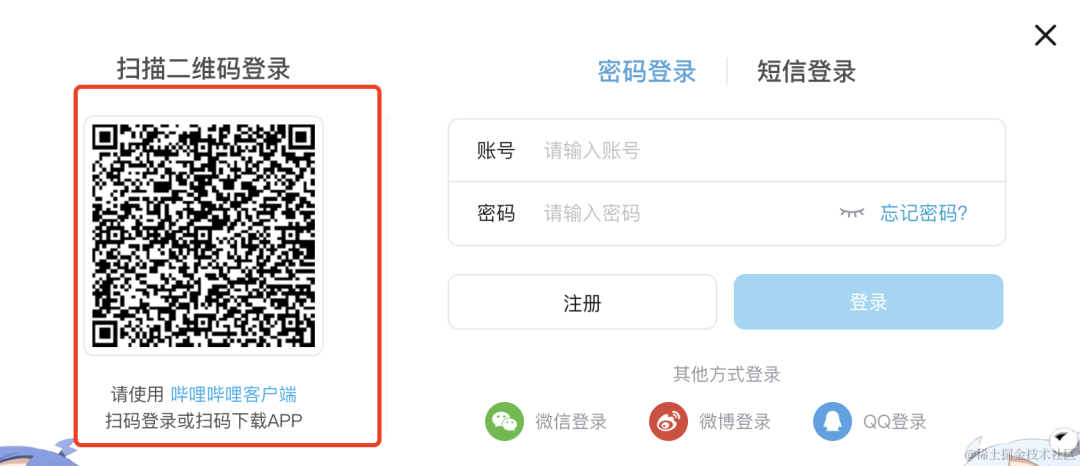
知乎,b 站等也是这样的:
有没有感觉很神奇,为什么一扫二维码,然后确认下,那边就自动登录了呢?
其实原理也很简单。
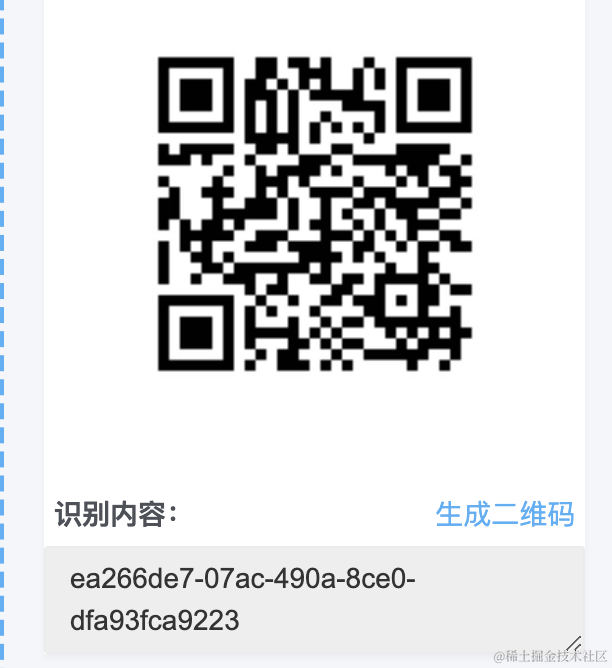
我们先用解析工具解码下二维码的内容:
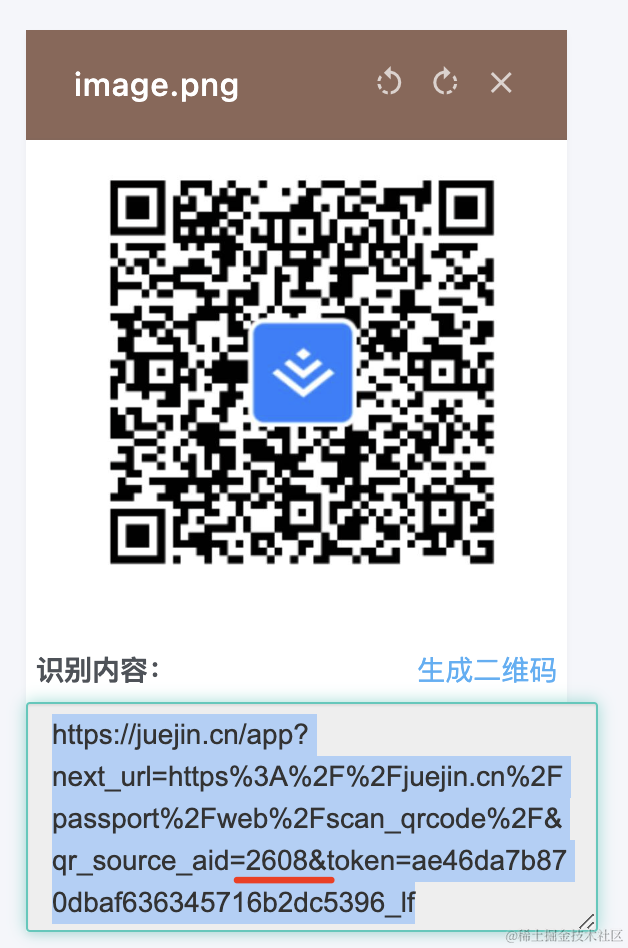
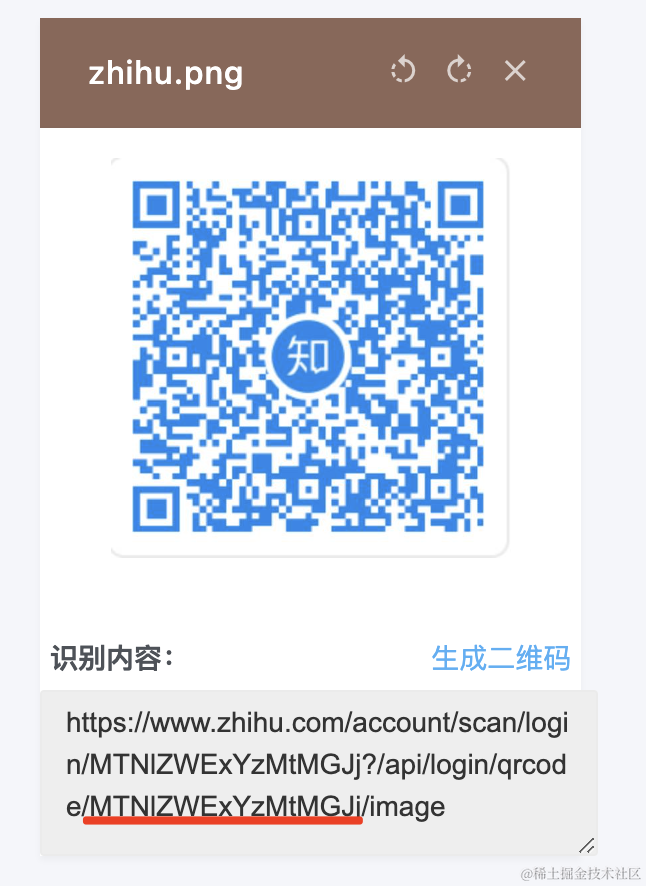
可以看到,二维码的内容是一个 url,如果在手机浏览器打开,是这样的:
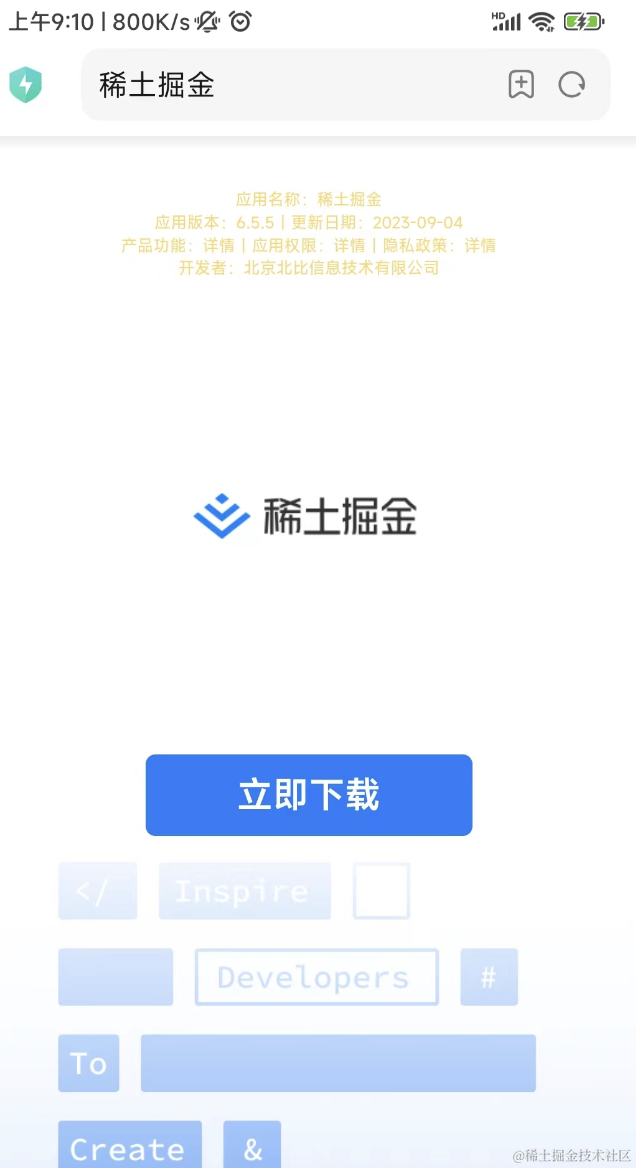
会让你下载 APP。
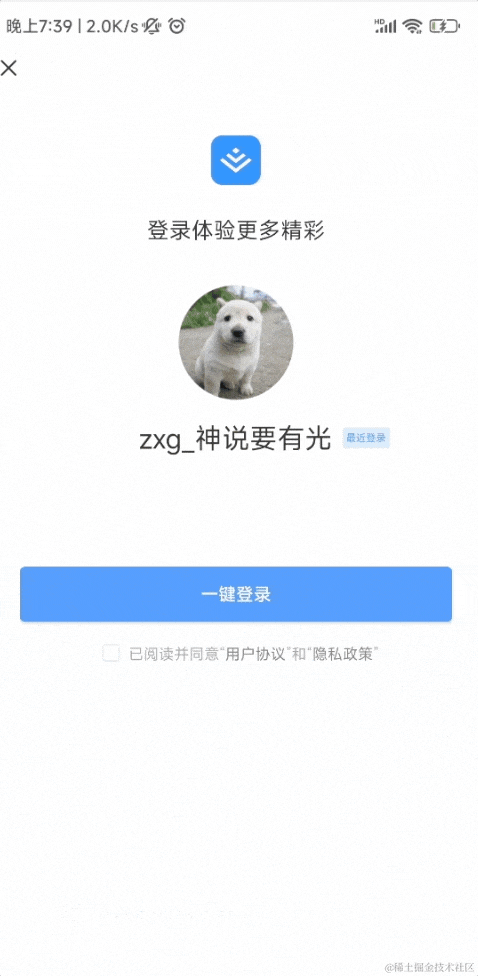
而在 APP 里打开,就是登录确认界面了:

那确认的是哪个二维码呢?
二维码这里是有个唯一 id 的,通过这个 id 就知道是哪个二维码。
这个二维码有 5 个状态:
- 未扫描
- 已扫描,等待用户确认
- 已扫描,用户同意授权
- 已扫描,用户取消授权
- 已过期
最开始是未扫描状态:

扫码后会进入等待用户确认状态:

确认后会进入同意授权状态:

取消的话会进入取消授权状态:
长时间不操作会进入过期状态:

也就是说,扫码后进行不同的操作就是修改这个 id 对应的二维码的状态。
另一边修改了状态,这边是怎么知道二维码状态变了呢?
websocket 么?
不用,一般都是轮询来做。
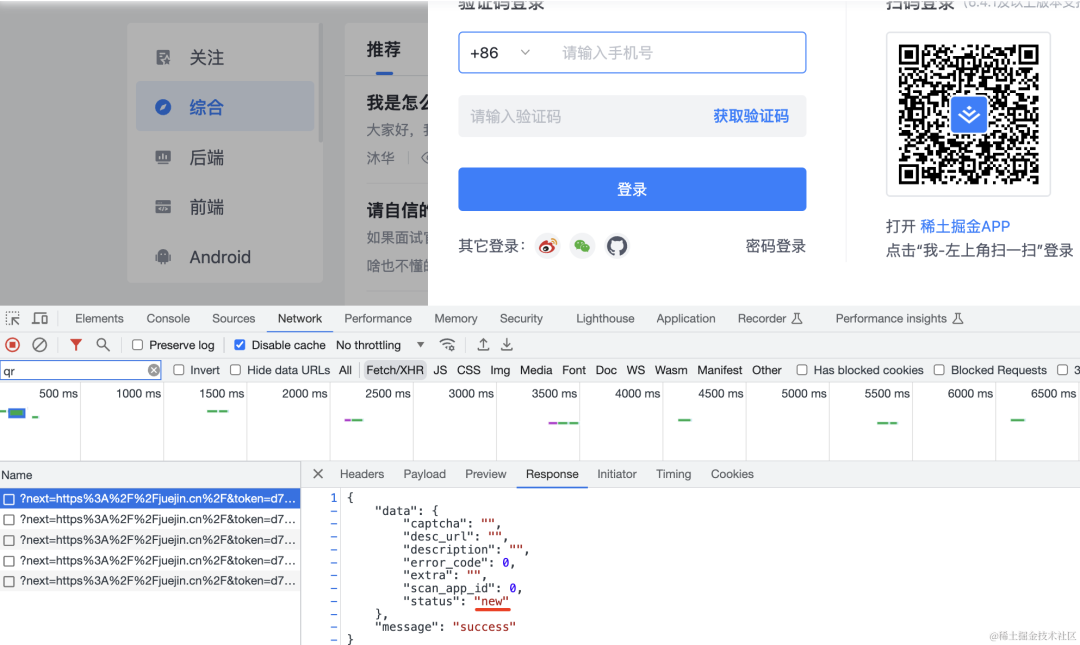
比如掘金:
二维码出现后,会有一个每秒一次的轮询请求来查询二维码状态:
最开始是 new:
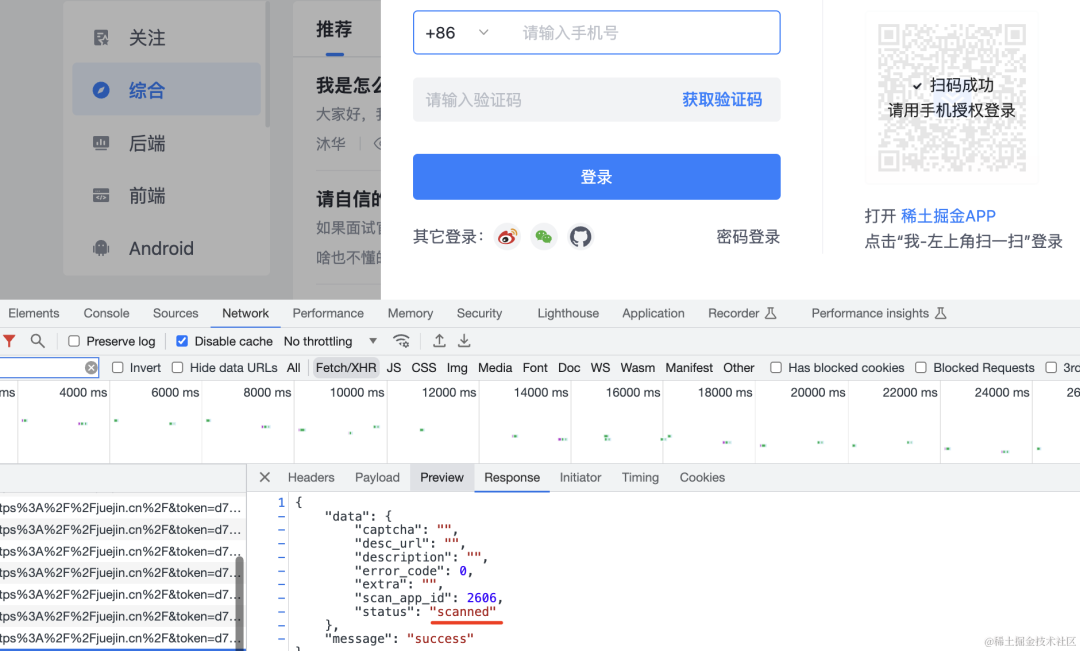
扫码后会变成 scanned:
知乎也是一样:
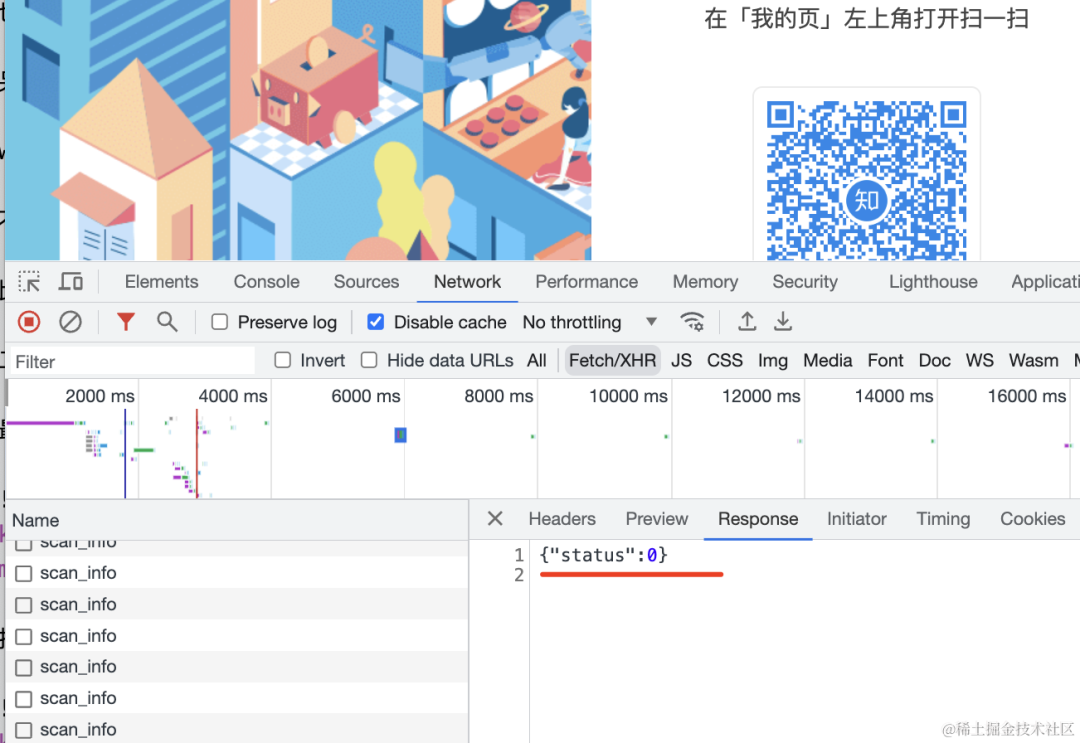
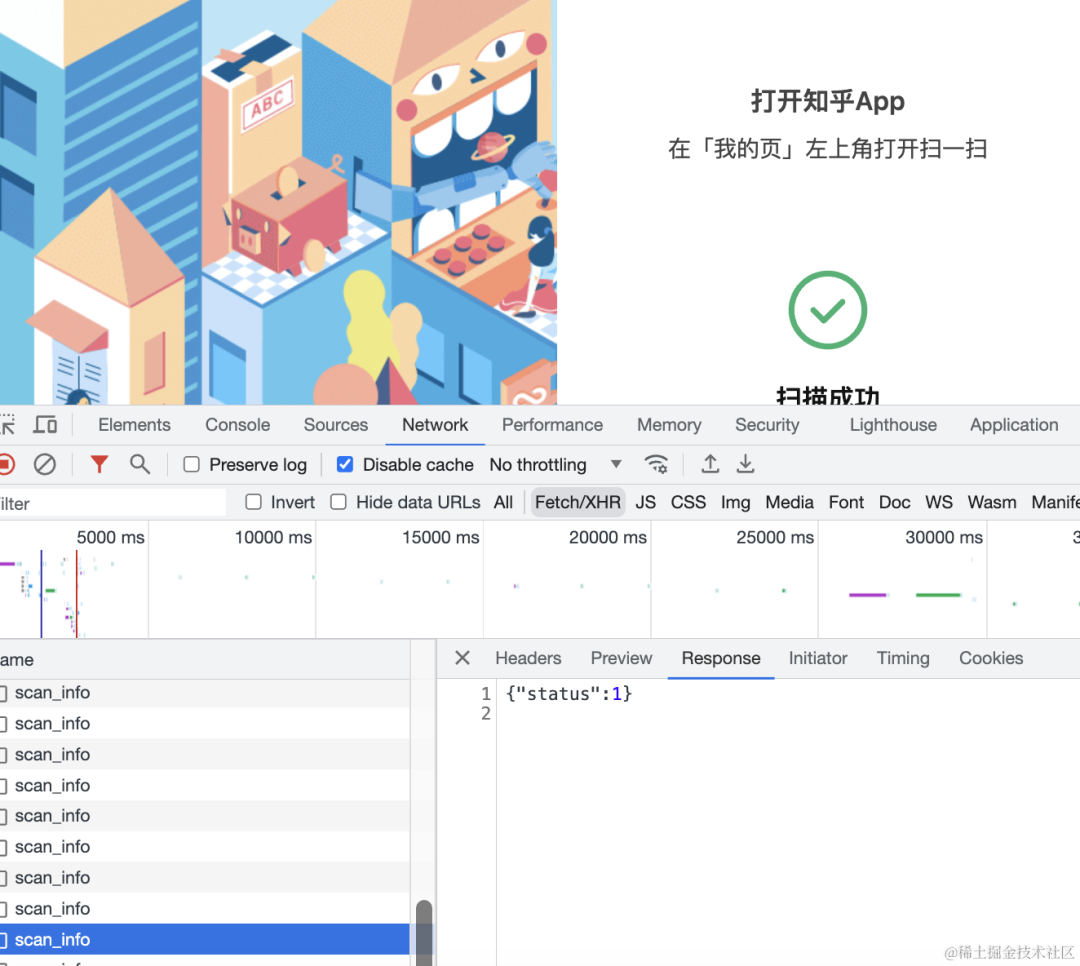
这时候,手机会进入登录确认页面:
bilibili 的登录确认页面:
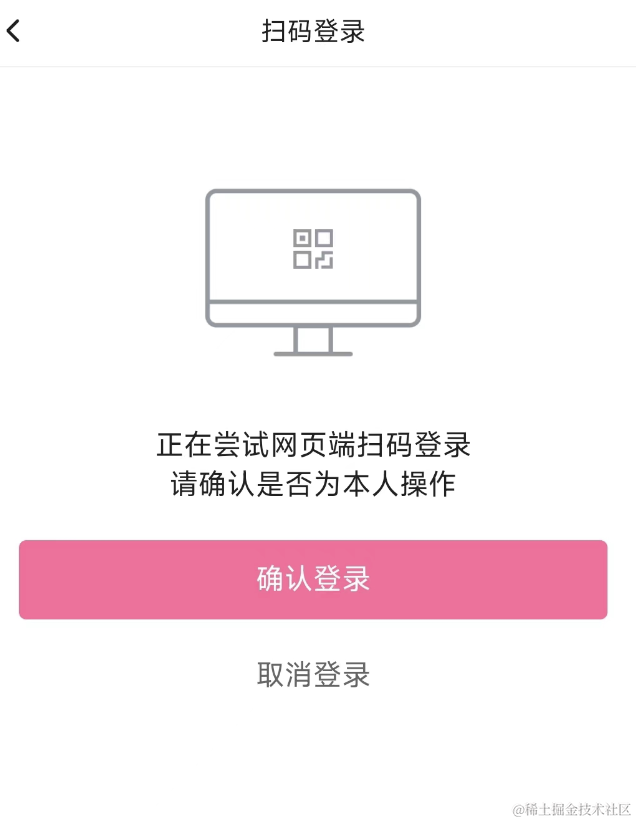
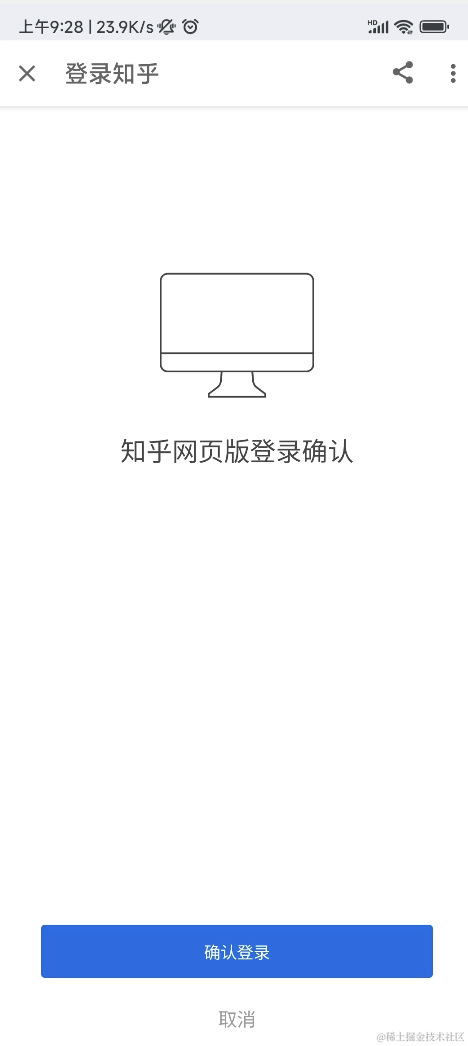
知乎的登录确认页面:
这边点击确认登录或者取消之后,会发请求修改 id 对应的二维码的状态。
那边一直在轮询,自然就知道了二维码状态的变更。
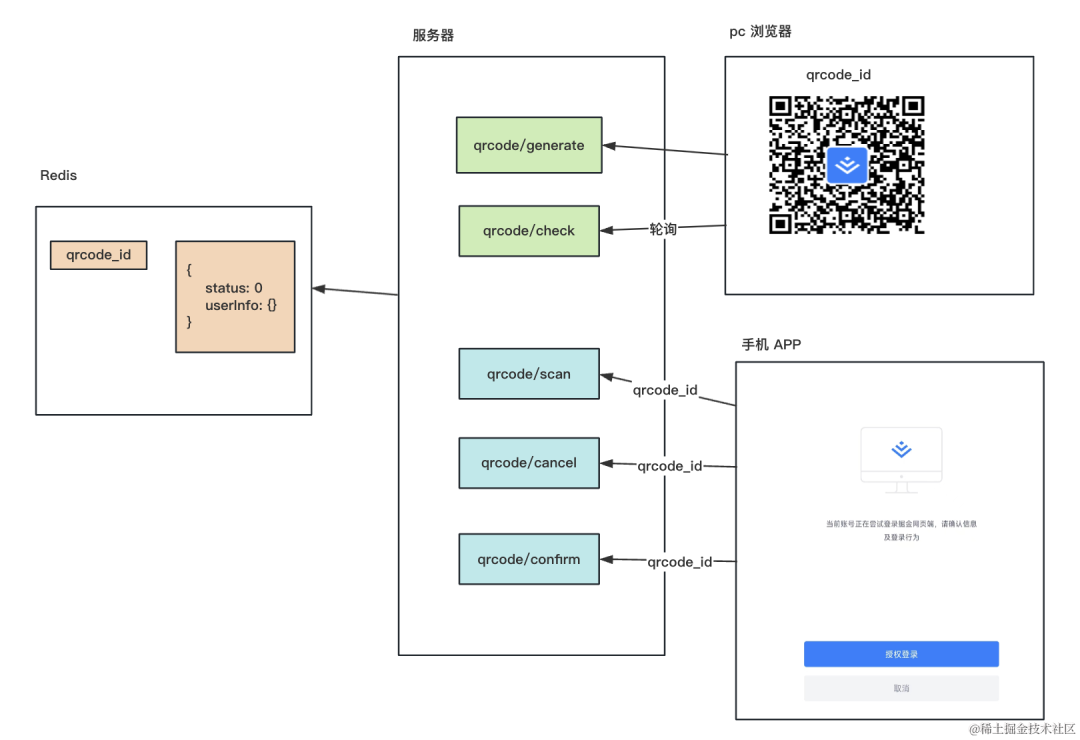
也就是这样的:
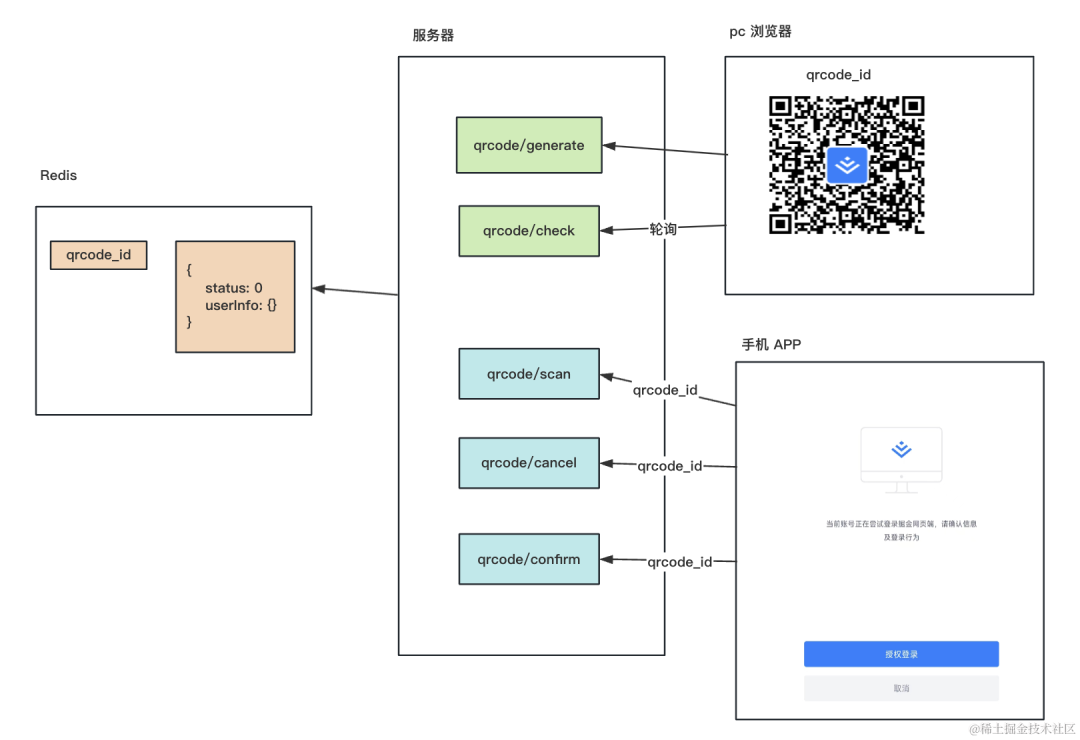
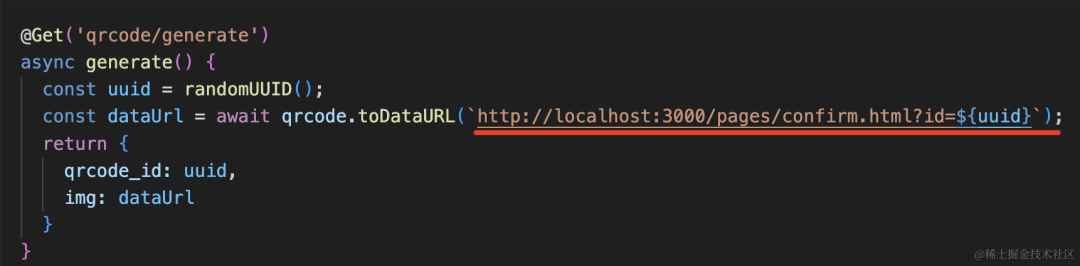
服务端有个 qrcode/generate 接口,会生成一个随机的二维码 id,存到 redis 里,并返回二维码。
还有个 qrcode/check 接口,会返回 redis 里的二维码状态,浏览器里可以轮询这个接口拿到二维码状态。
然后手机 APP 扫码之后,如果没登录,会先跳转到登录页面,登录之后会进入登录确认页面。
这个时候就从二维码中拿到了 id,然后调用 qrcode/scan、qrcode/cancel、qrcode/confirm 就是修改二维码为不同的状态。
这时候用户是登录了的,jwt 的登录认证方式会携带 token,服务端只要从 token 中取出用户信息,存入 redis 即可。
然后另一边的轮询接口发现是确认状态,会根据用户信息生成 jwt 返回。
这样,手机 APP 里确认之后,pc 的浏览器就自动登录了该用户账号。
这里的 jwt 是保存登录状态的一种方案,会把用户信息放在 token 里返回,然后每次访问接口带上 authorization 的 header,携带 token。
思路理清了,我们来实现一下吧!
创建个 nest 项目:
npm install -g @nestjs/cli

nest new qrcode-login
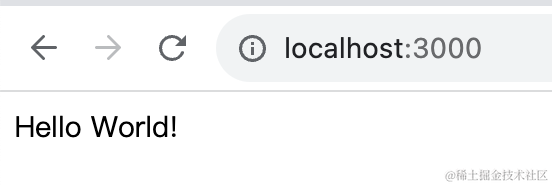
把它跑起来:
npm run start:dev
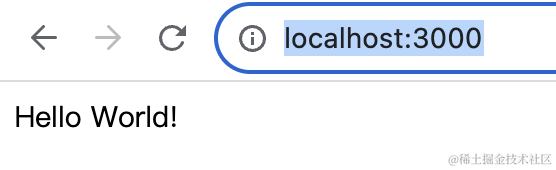
浏览器访问 http://localhost:3000 就可以可以看到 hello world,就代表服务跑起来了:
然后我们实现下生成二维码的接口:
安装下用到的包:
npm install qrcode @types/qrcode添加一个路由:
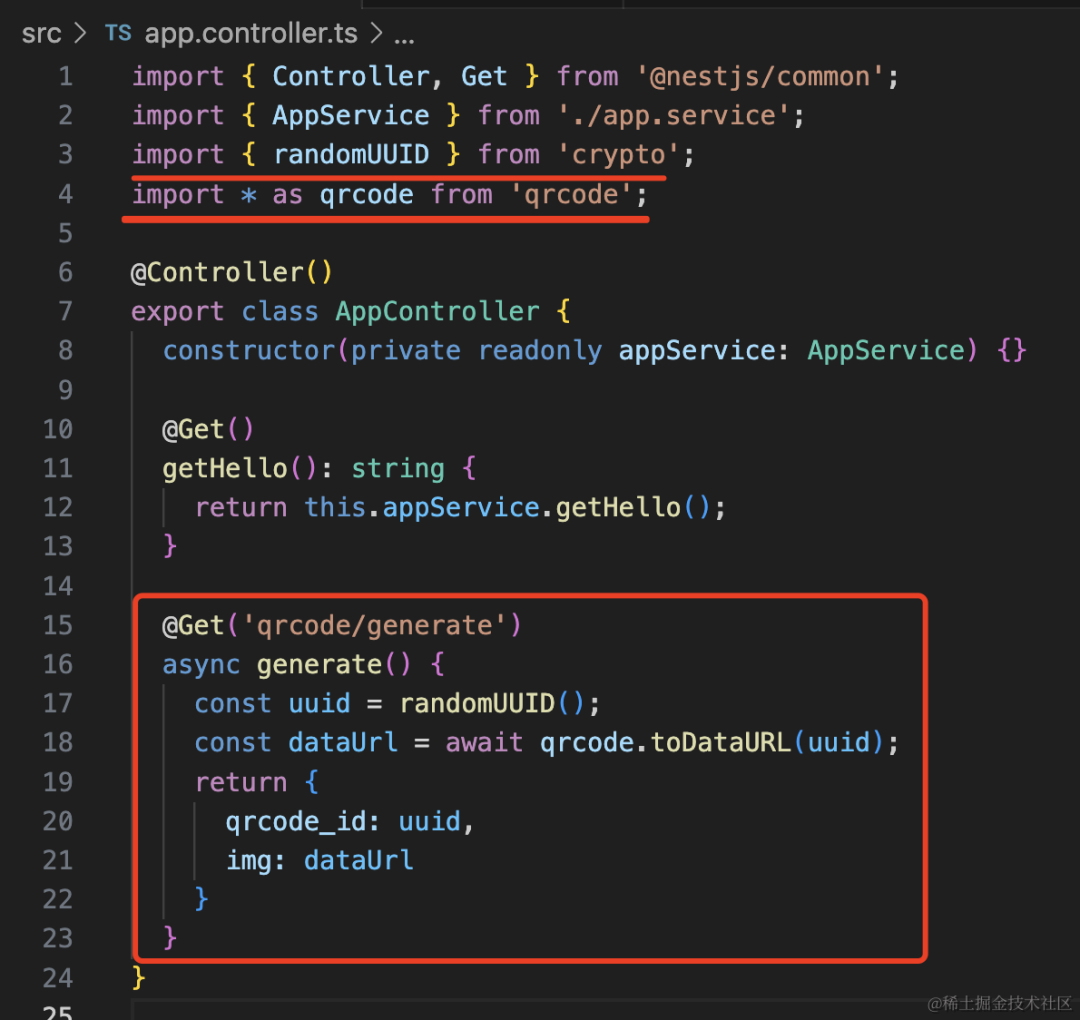
import { randomUUID } from 'crypto';
import * as qrcode from 'qrcode';
@Get('qrcode/generate')
async generate() {
const uuid = randomUUID();
const dataUrl = await qrcode.toDataURL(uuid);
return {
qrcode_id: uuid,
img: dataUrl
}
}这里用 node 的 crypto 模块生成一个随机的 uuid。
然后用 qrcode 生成二维码,只不过转成 base64 返回。
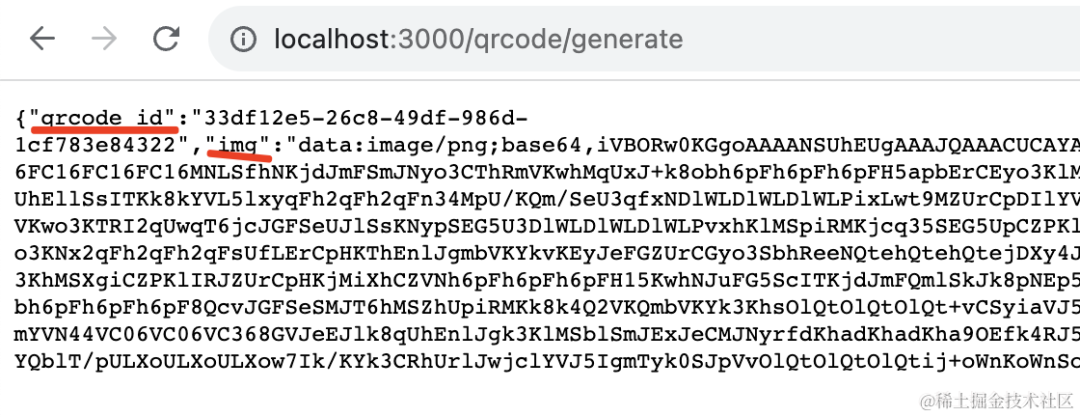
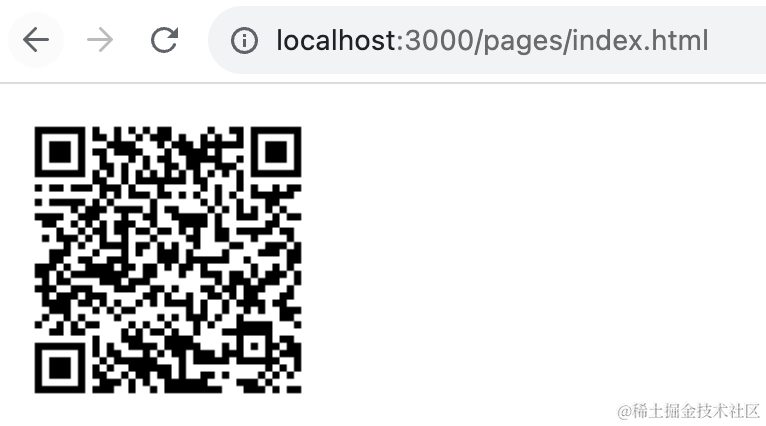
我们在 html 里把它渲染出来看一下:
新建 static/index.html
<!DOCTYPE html>
<html lang="en">
<head>
    <meta charset="UTF-8">
    <title>扫码登录</title>
    <meta name="viewport" content="width=device-width, initial-scale=1.0">
</head>
<body>
    <img src="data:image/png;base64,这里填入你生成的 url" alt=""/>
</body>
</html>
然后在 main.ts 里支持这个目录下静态资源的访问,用 pages 作为前缀:
import { NestFactory } from '@nestjs/core';
import { AppModule } from './app.module';
import { NestExpressApplication } from '@nestjs/platform-express';
async function bootstrap() {
const app = await NestFactory.create<NestExpressApplication>(AppModule);
app.useStaticAssets('static', { prefix: '/pages'});
await app.listen(3000);
}
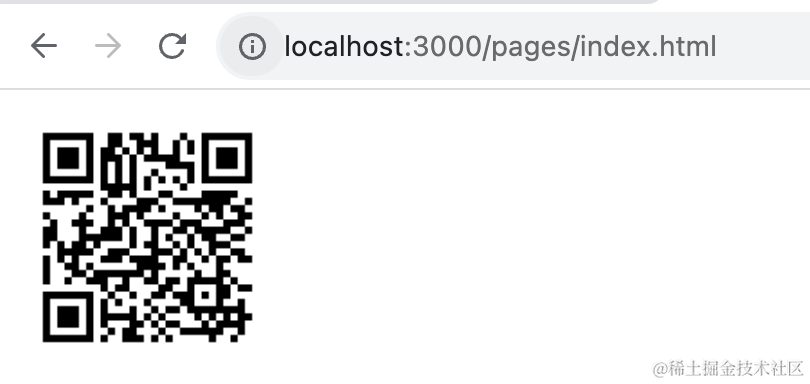
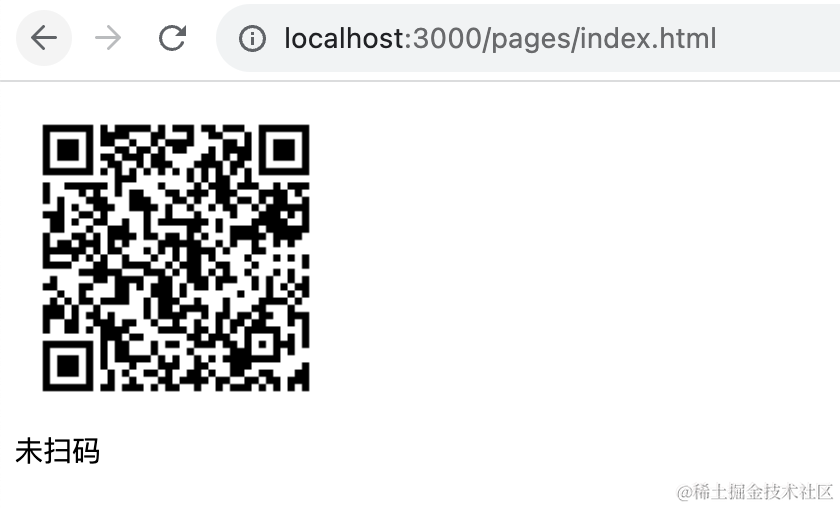
bootstrap();这样你访问 http://localhost:3000/pages/index.html 就可以看到二维码了:
我们用在线解码工具解码下看看:
确实,内容就是生成的 uuid。
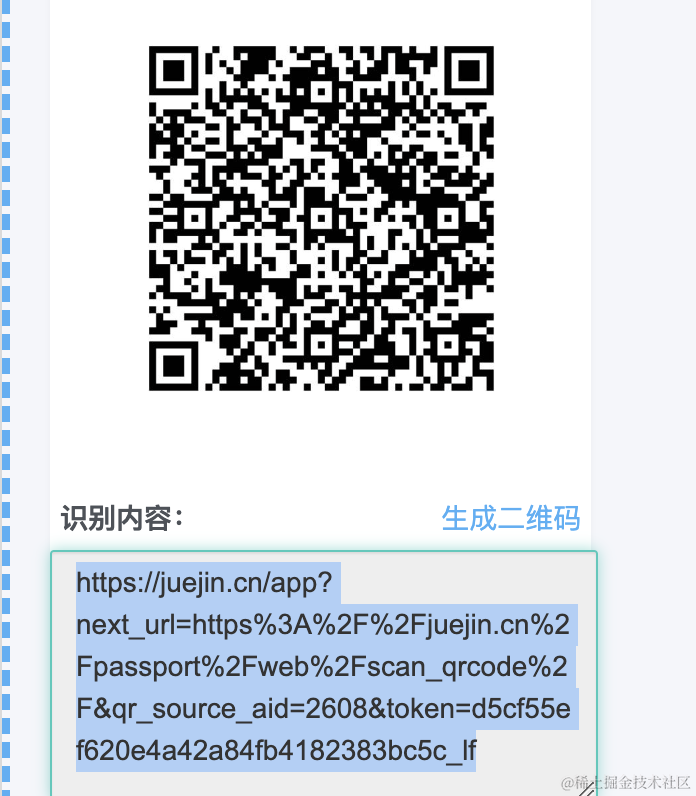
然后,其实这个二维码扫出的应该是个网址。
比如掘金的二维码解析出的内容:
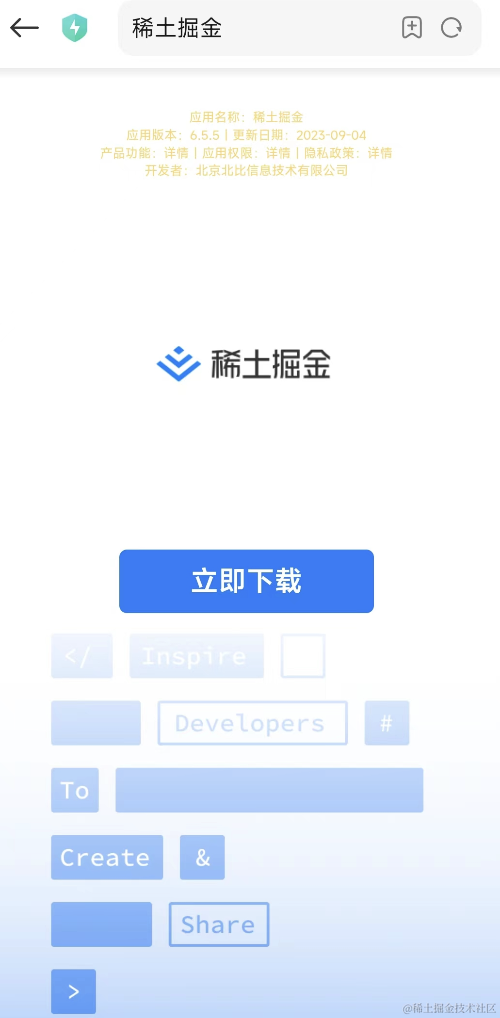
如果用手机浏览器扫这个码的话,打开的就是下载 APP 的页面:
而如果用掘金 APP 扫码,扫出的就是登录确认页面了:

所以掘金的二维码只能掘金 APP 扫,微信的二维码只能用微信 APP 扫。
这个页面做了检查,判断是 APP 打开的还是其他方式打开的,分别会显示不同的内容。
这里我们也改成一个 url:
我们写一下这个页面:
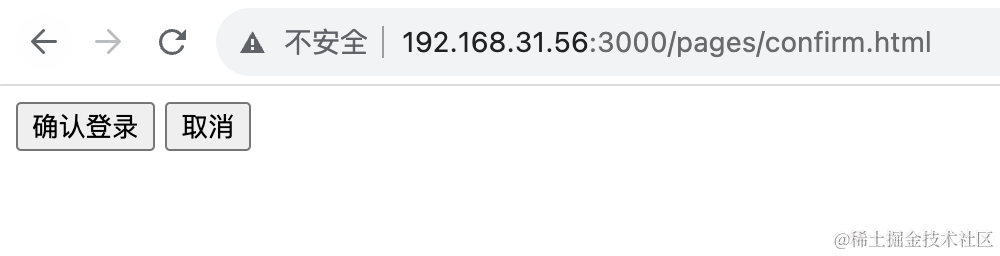
新建 src/static/confirm.html
<!DOCTYPE html>
<html lang="en">
<head>
    <meta charset="UTF-8">
    <meta name="viewport" content="width=device-width, initial-scale=1.0">
    <title>扫码登录确认</title>
</head>
<body>
    <button>确认登录</button>
    <button>取消</button>
</body>
</html>
但这里有个问题,开发服务是在电脑上的,手机怎么访问呢?
这里需要用 charles 来做代理:
下载 charles,打开
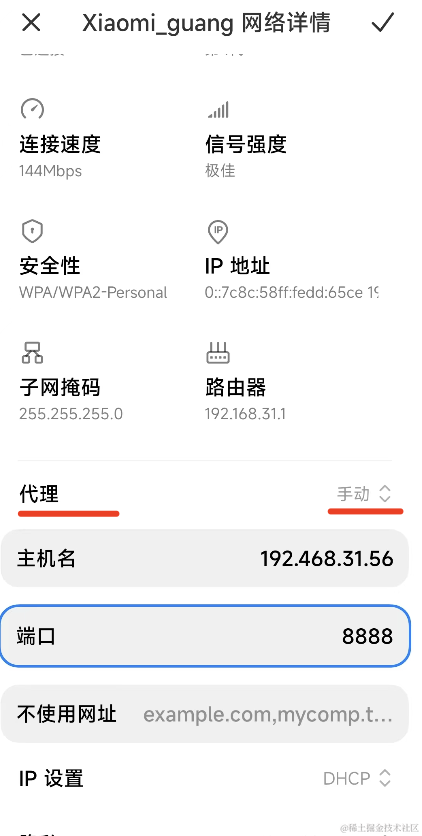
让电脑和手机连接同一个 wifi,然后在手机的 wifi 设置那里设置代理:
代理的 ip 是电脑 ip,端口号就是 charles 代理服务的默认端口 8888
这时候电脑上会收到连接提醒,同意下就好了:

然后手机就可以访问电脑上的 nest 服务:
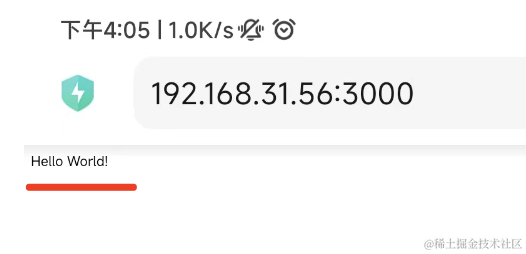
看到这个 hello world 了没?
这就是电脑上的这个 nest 服务返回的:
那个登录确认页面在电脑访问是这样的:
然后我把二维码的内容改为这个:

修改下展示二维码的页面:
<!DOCTYPE html>
<html lang="en">
<head>
    <meta charset="UTF-8">
    <title>扫码登录</title>
    <meta name="viewport" content="width=device-width, initial-scale=1.0">
    <script src="https://unpkg.com/axios@1.5.0/dist/axios.min.js"></script>
</head>
<body>
    <img id="img" src="" alt=""/>

    <script>
        axios.get('http://localhost:3000/qrcode/generate').then(res => {
            document.getElementById('img').src = res.data.img;
        })
    </script>
</body>
</html>
用 axios 请求生成二维码的接口,然后修改图片 src。
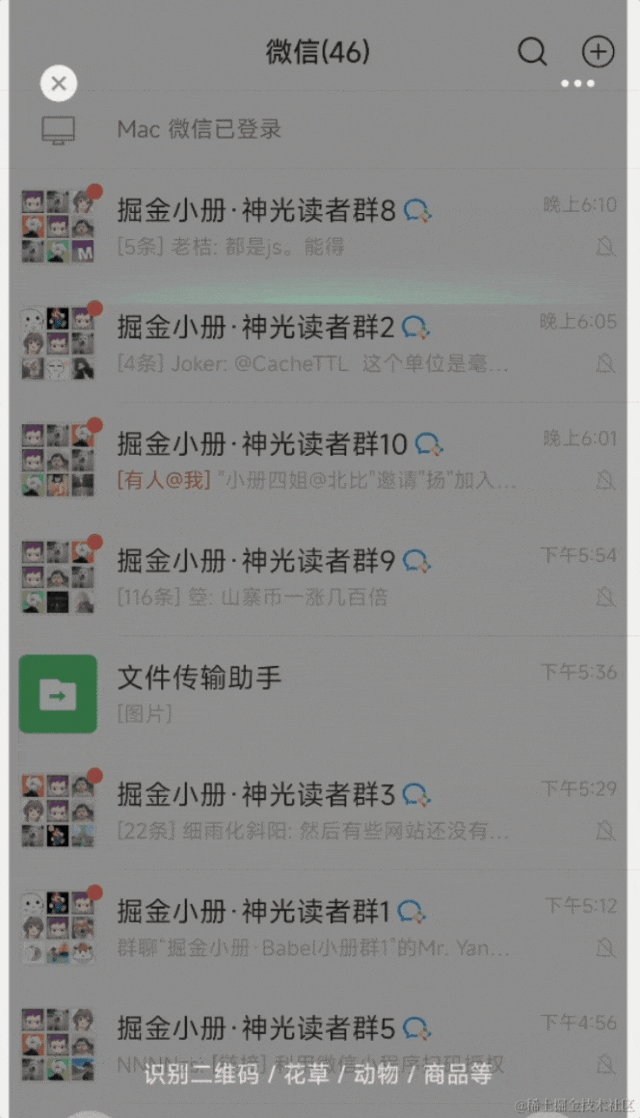
用手机扫码下:
用微信扫码,可以看到,打开了登录确认页面。
按钮有点小,我们设置下样式。
<!DOCTYPE html>
<html lang="en">
<head>
<meta charset="UTF-8">
<meta name="viewport" content="width=device-width, initial-scale=1.0">
<title>扫码登录确认</title>
<style>
#info {
height: 400px;
line-height: 400px;
font-size: 20px;
padding: 20px;
}
#confirm, #cancel{
display: block;
width: 80%;
line-height: 40px;
font-size: 20px;
margin-bottom: 20px;
}
#confirm {
background: skyblue;
}
</style>
</head>
<body>
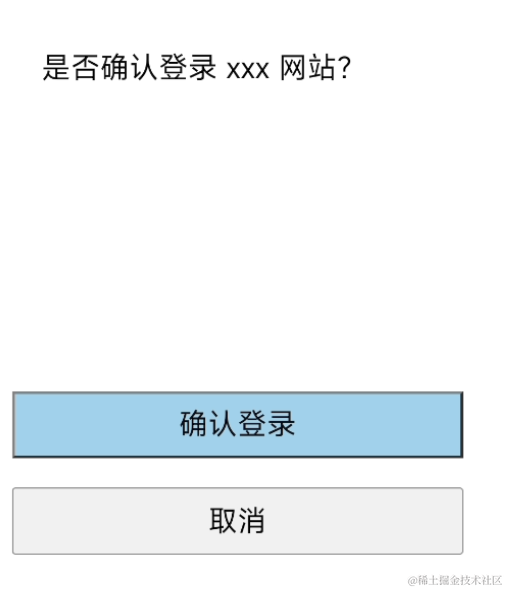
<div id="info">
是否确认登录 xxx 网站?
</div>
<button id="confirm">确认登录</button>
<button id="cancel">取消</button>
</body>
</html>
好看多了。
二维码的内容解码后是这样的:

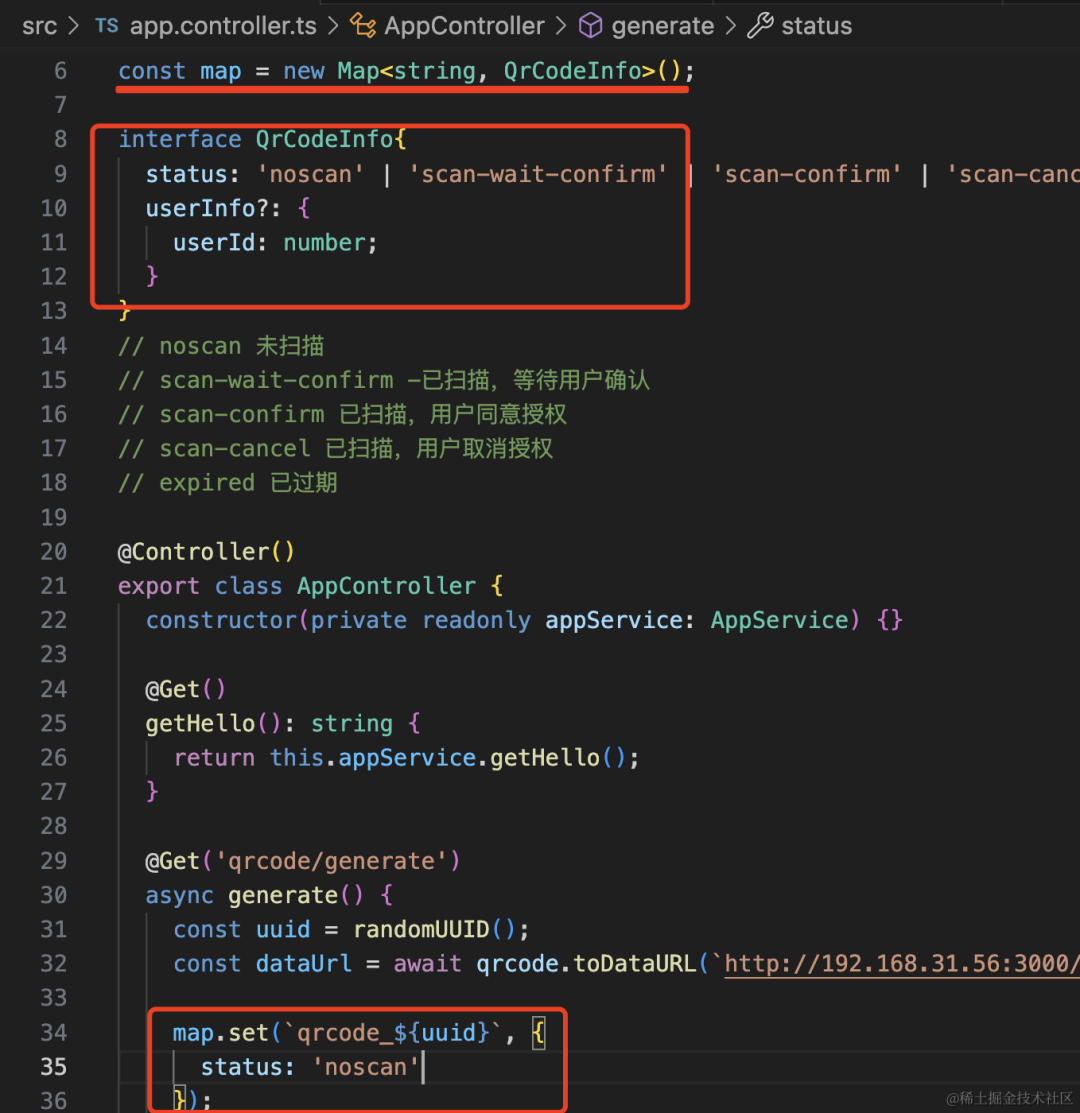
const map = new Map<string, QrCodeInfo>();

interface QrCodeInfo{
  status: 'noscan' | 'scan-wait-confirm' | 'scan-confirm' | 'scan-cancel' | 'expired',
  userInfo?: {
    userId: number;
  }
}
// noscan 未扫描
// scan-wait-confirm -已扫描,等待用户确认
// scan-confirm 已扫描,用户同意授权
// scan-cancel 已扫描,用户取消授权
// expired 已过期
map.set(`qrcode_${uuid}`, {
status: 'noscan'
});然后加一个 qrcode/check 接口,用来查询二维码状态:
@Get('qrcode/check')
async check(@Query('id') id: string) {
    return map.get(`qrcode_${id}`);
}
测试下:
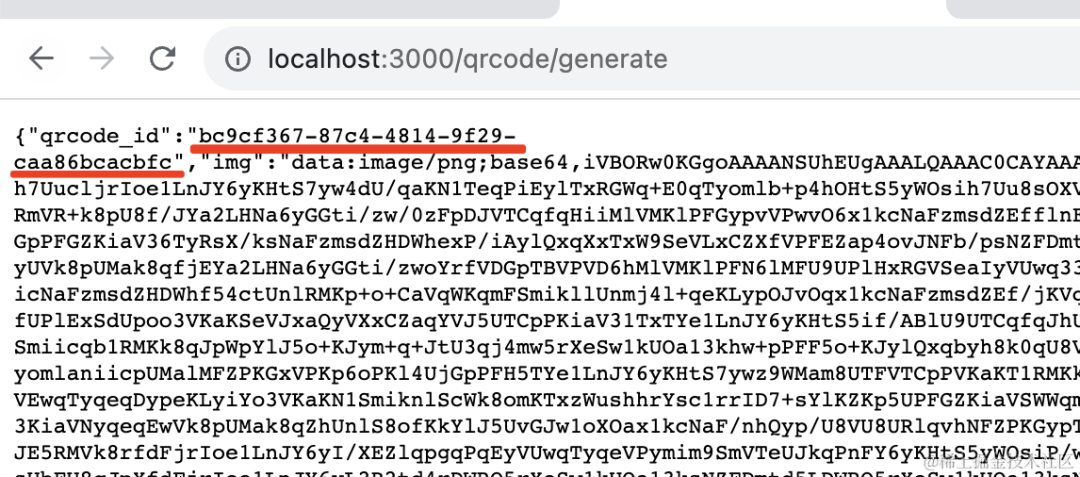
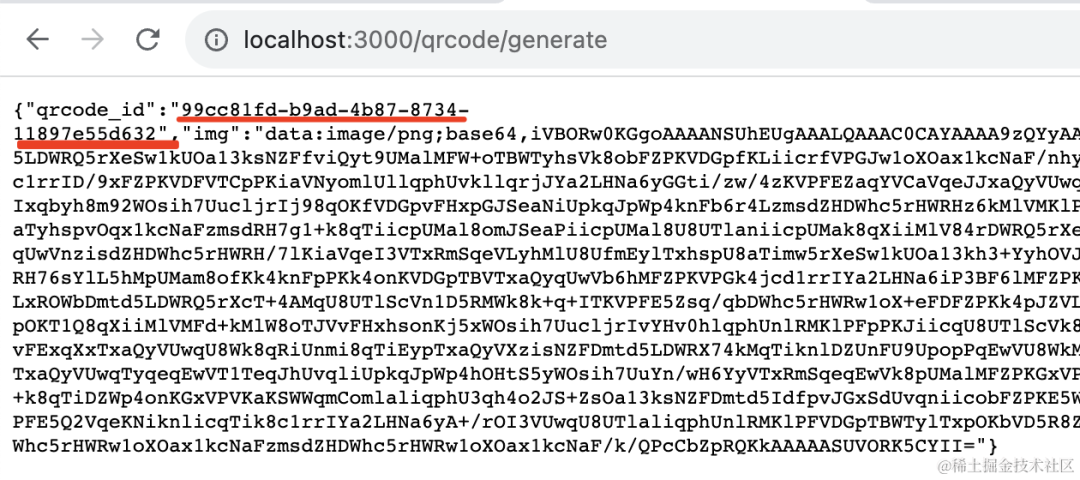
访问 /qrcode/generate 生成二维码和 id
然后访问 /qrcode/check 拿到这个 id 的状态:

然后再实现 /qrcode/confirm、/qrcode/cancel、/qrcode/scan 这三个接口:
@Get('qrcode/scan')
async scan(@Query('id') id: string) {
const info = map.get(`qrcode_${id}`);
if(!info) {
throw new BadRequestException('二维码已过期');
}
info.status = 'scan-wait-confirm';
return 'success';
}
@Get('qrcode/confirm')
async confirm(@Query('id') id: string) {
const info = map.get(`qrcode_${id}`);
if(!info) {
throw new BadRequestException('二维码已过期');
}
info.status = 'scan-confirm';
return 'success';
}
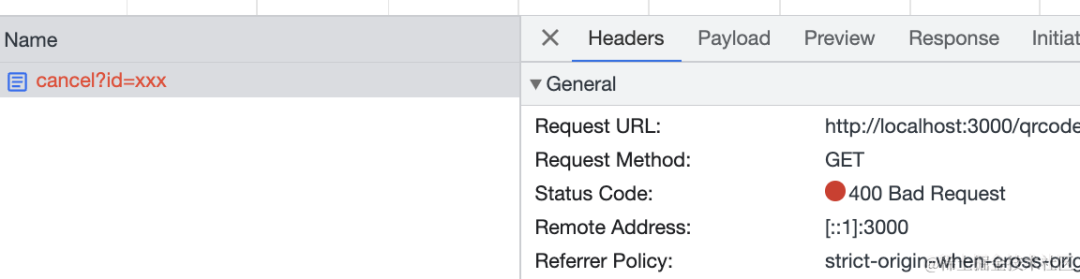
@Get('qrcode/cancel')
async cancel(@Query('id') id: string) {
const info = map.get(`qrcode_${id}`);
if(!info) {
throw new BadRequestException('二维码已过期');
}
info.status = 'scan-cancel';
return 'success';
}测试下:
先 qrcode/generate 生成二维码,拿到 id:
然后调用 qrcode/scan 修改状态,之后调用 qrcode/check 查询下状态:

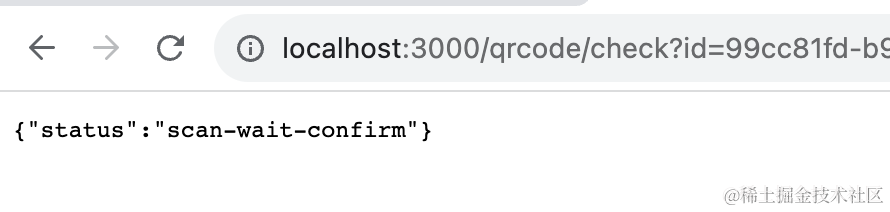
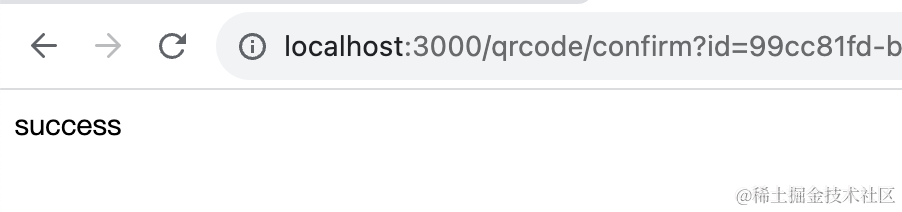
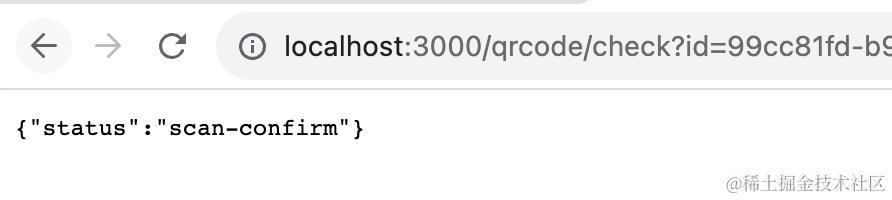
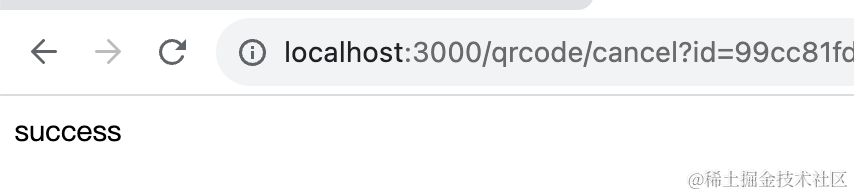
同样的方式测试 qrcode/cancel 和 qrcode/confirm 接口:


<!DOCTYPE html>
<html lang="en">
<head>
<meta charset="UTF-8">
<title>扫码登录</title>
<meta name="viewport" content="width=device-width, initial-scale=1.0">
<script src="https://unpkg.com/axios@1.5.0/dist/axios.min.js"></script>
</head>
<body>
<img id="img" src="" alt=""/>
<div id="info"></div>
<script>
axios.get('http://localhost:3000/qrcode/generate').then(res => {
document.getElementById('img').src = res.data.img;
queryStatus(res.data.qrcode_id);
})
function queryStatus(id) {
axios.get('http://localhost:3000/qrcode/check?id=' + id).then(res => {
const status = res.data.status;
let content = '';
switch(status) {
case 'noscan': content = '未扫码'; break;
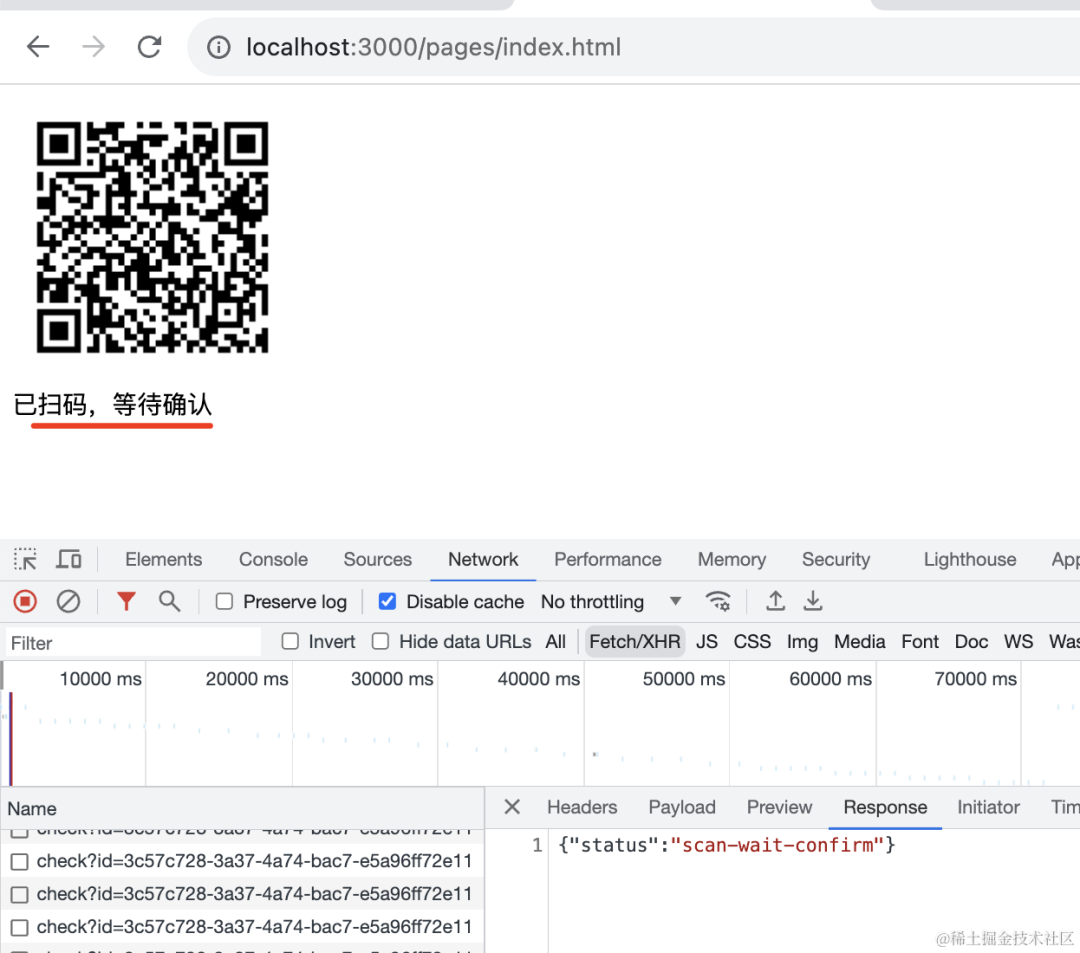
case 'scan-wait-confirm': content = '已扫码,等待确认'; break;
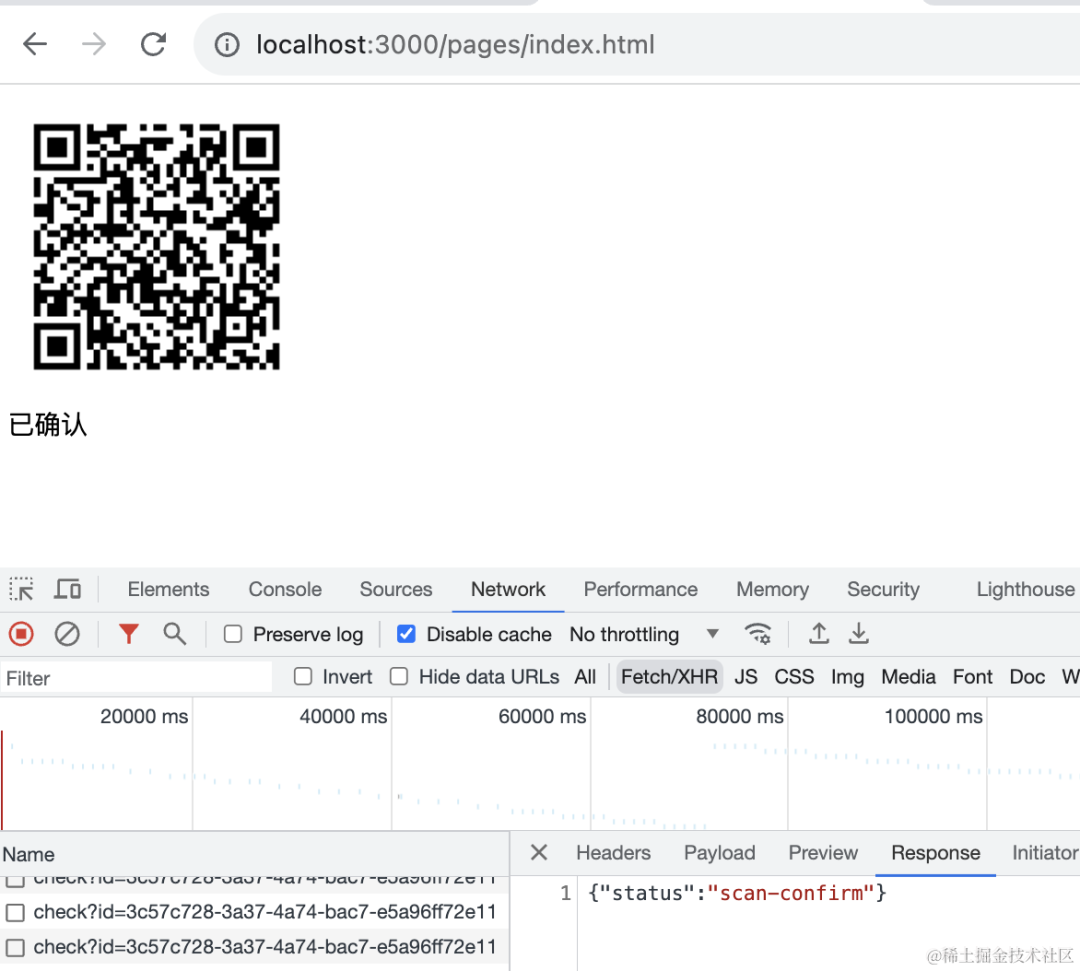
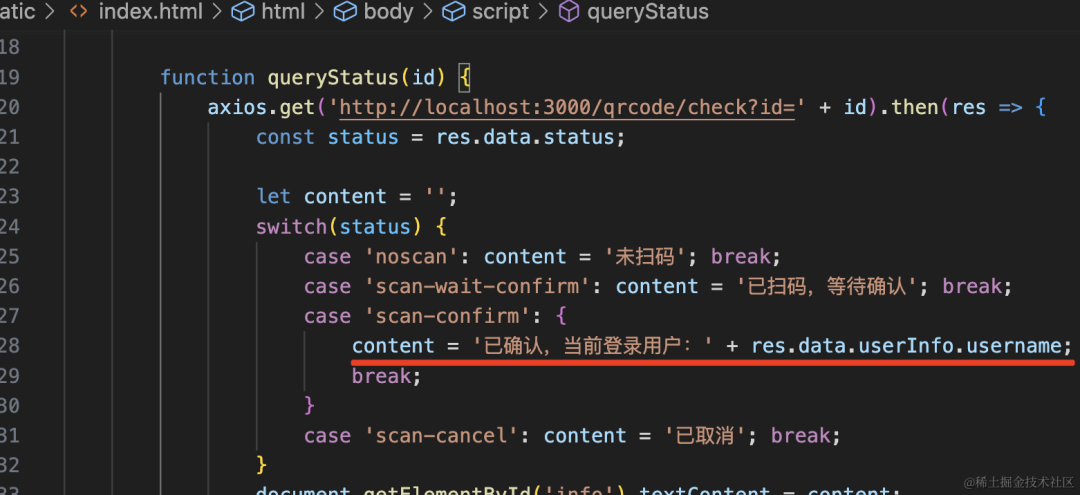
case 'scan-confirm': content = '已确认'; break;
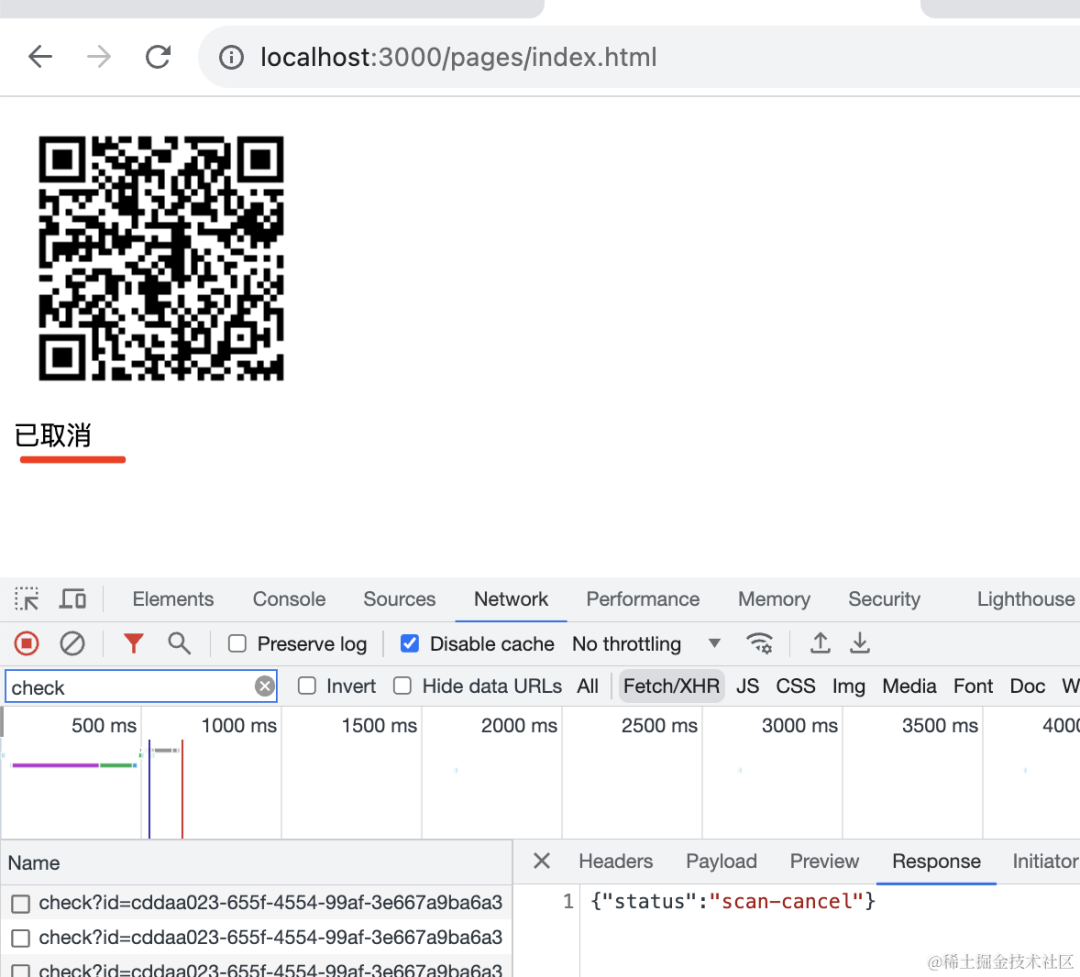
case 'scan-cancel': content = '已取消'; break;
}
document.getElementById('info').textContent = content;
if(status === 'noscan' || status === 'scan-wait-confirm') {
setTimeout(() => queryStatus(id), 1000);
}
})
}
</script>
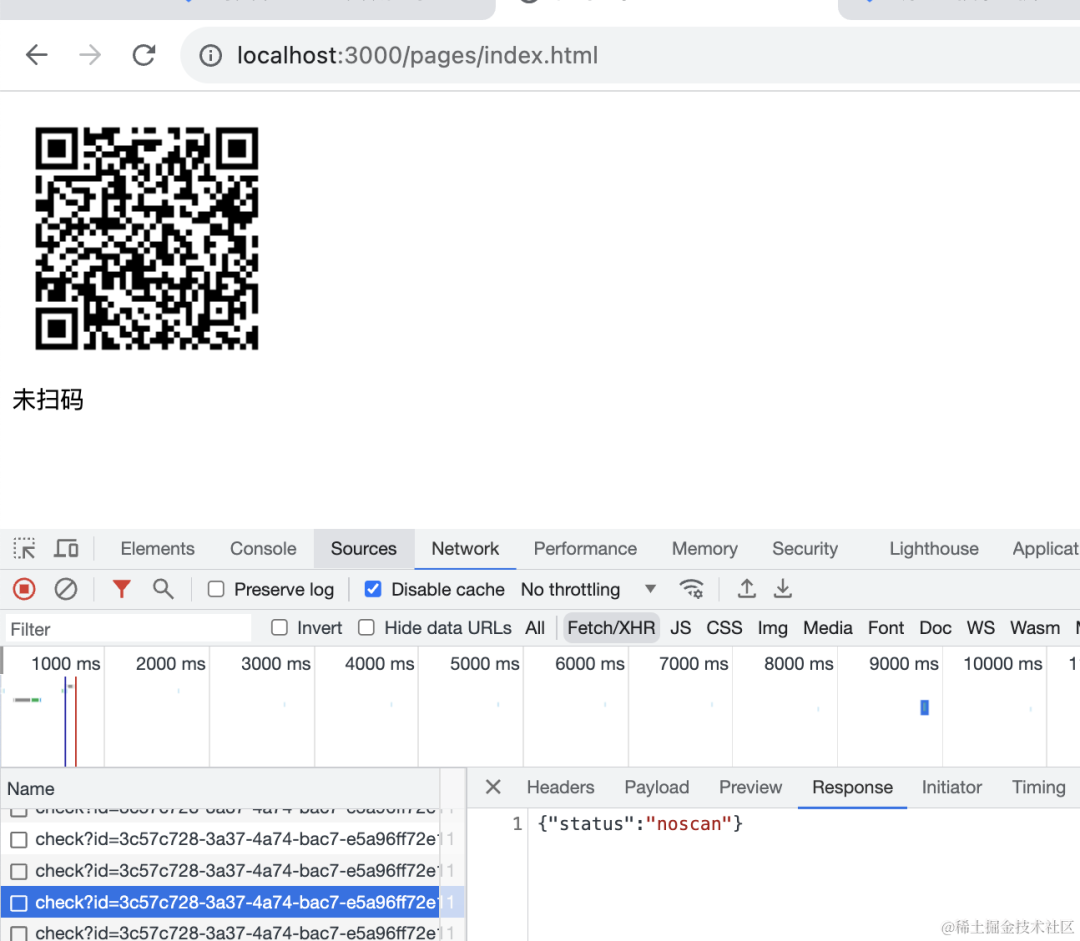
</body>
</html>生成二维码之后,就开始轮询状态了。
根据状态分别显示不同的文字,如果不是已确认或者已取消就在一秒后继续下次轮询。
然后,在登录确认页面也加上接口调用:
改下 static/confirm.html
使用 URLSearchParams 的 api 拿到 url 中的 id:
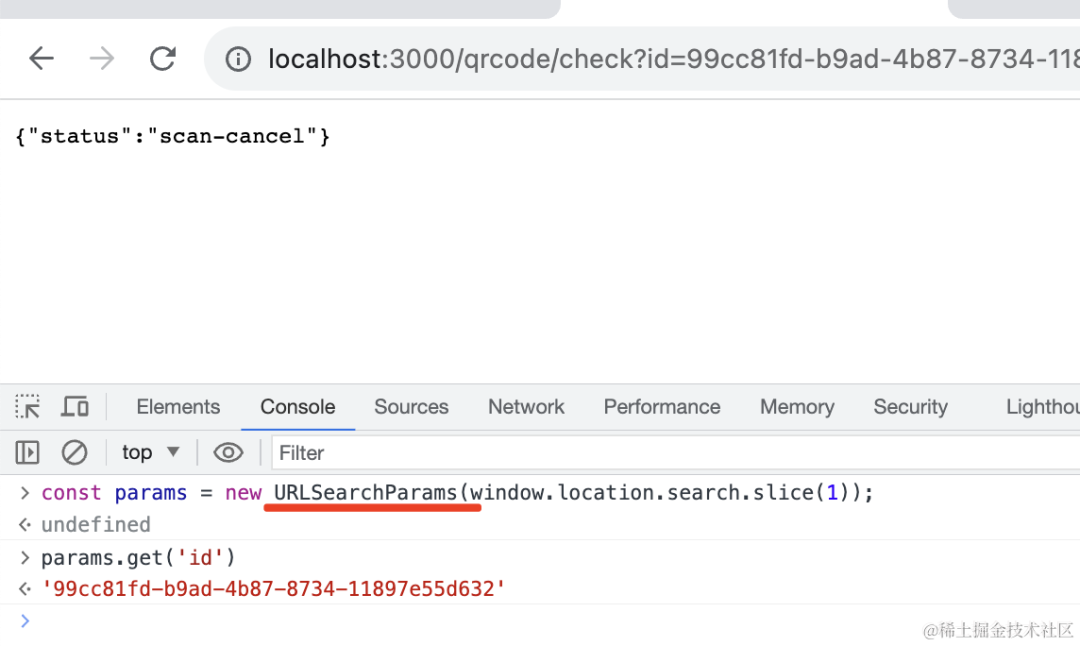
然后修改这个 id 对应的二维码的状态。
<!DOCTYPE html>
<html lang="en">
<head>
    <meta charset="UTF-8">
    <meta name="viewport" content="width=device-width, initial-scale=1.0">
    <title>扫码登录确认</title>
    <script src="https://unpkg.com/axios@1.5.0/dist/axios.min.js"></script>
    <style>
        #info {
            height: 400px;
            line-height: 400px;
            font-size: 20px;
            padding: 20px;
        }
        #confirm, #cancel{
            display: block;
            width: 80%;
            line-height: 40px;
            font-size: 20px;
            margin-bottom: 20px;
        }
        #confirm {
            background: skyblue;
        }
    </style>
</head>
<body>
    <div id="info">
        是否确认登录 xxx 网站?
    </div>
    <button id="confirm">确认登录</button>
    <button id="cancel">取消</button>

    <script>
        const params = new URLSearchParams(window.location.search.slice(1));

        const id = params.get('id');

        axios.get('http://192.168.31.56:3000/qrcode/scan?id=' + id).catch(e => {
            alert('二维码已过期');
        });

        document.getElementById('confirm').addEventListener('click', () => {
            axios.get('http://192.168.31.56:3000/qrcode/confirm?id=' + id).catch(e => {
                alert('二维码已过期');
            });
        });

        document.getElementById('cancel').addEventListener('click', () => {
            axios.get('http://192.168.31.56:3000/qrcode/cancel?id=' + id).catch(e => {
                alert('二维码已过期');
            });
        });
    </script>
</body>
</html>
进入这个页面,就访问 qrcode/scan 接口,来把 id 对应的二维码改为已扫描状态。
点击确认或者取消按钮也分别修改状态为确认和取消。
注意,这个页面是在手机打开的,需要通过 ip 的方式访问接口。
测试下:
打开页面后,生成二维码,这时候就开始轮询二维码状态。
这时候二维码页面的状态变为了等待确认:
当然,最终我们是要做登录的。
确认之后,就要拿到这边的登录状态,从中取出用户信息。
当然,现在我们还没做登录。
我们通过 jwt 搞一下:
引入 jwt 的 包:
npm install @nestjs/jwt在 AppModule 里引入它:
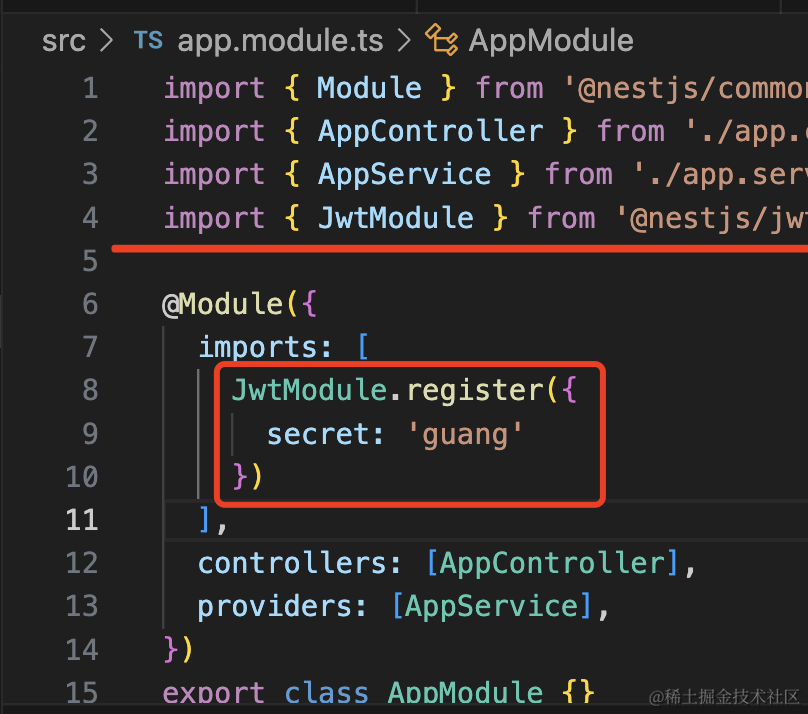
然后实现登录接口:
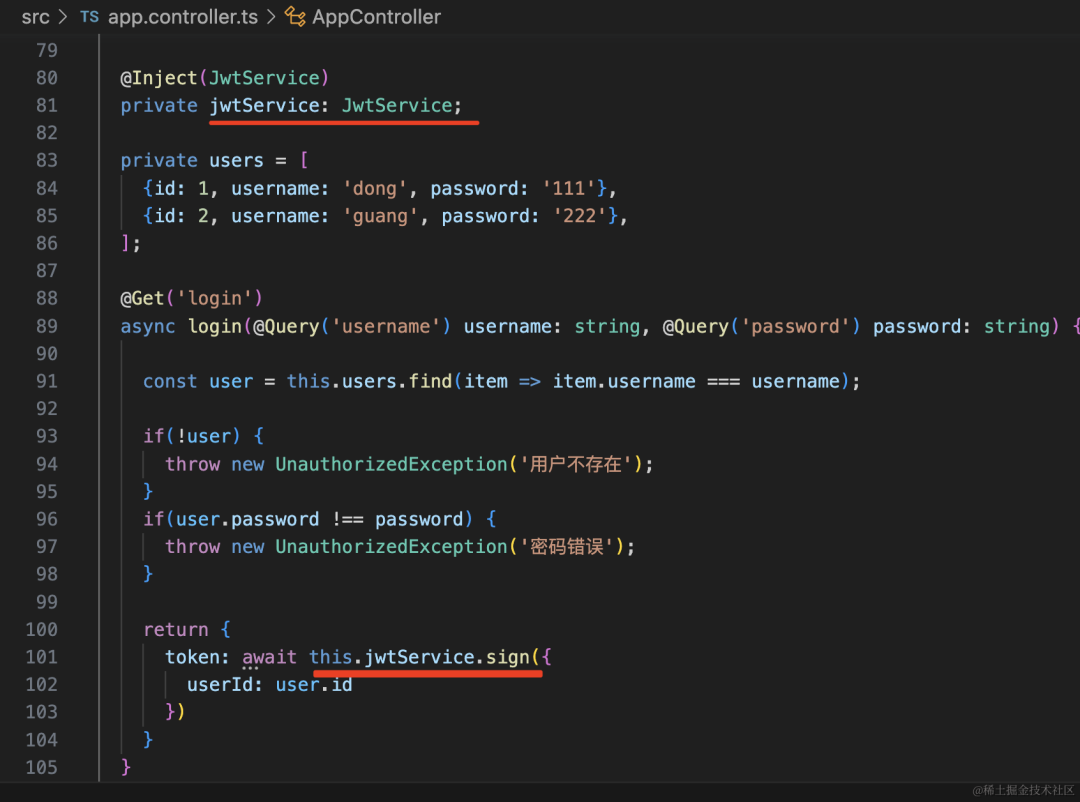
@Inject(JwtService)
private jwtService: JwtService;
private users = [
{id: 1, username: 'dong', password: '111'},
{id: 2, username: 'guang', password: '222'},
];
@Get('login')
async login(@Query('username') username: string, @Query('password') password: string) {
const user = this.users.find(item => item.username === username);
if(!user) {
throw new UnauthorizedException('用户不存在');
}
if(user.password !== password) {
throw new UnauthorizedException('密码错误');
}
return {
token: await this.jwtService.sign({
userId: user.id
})
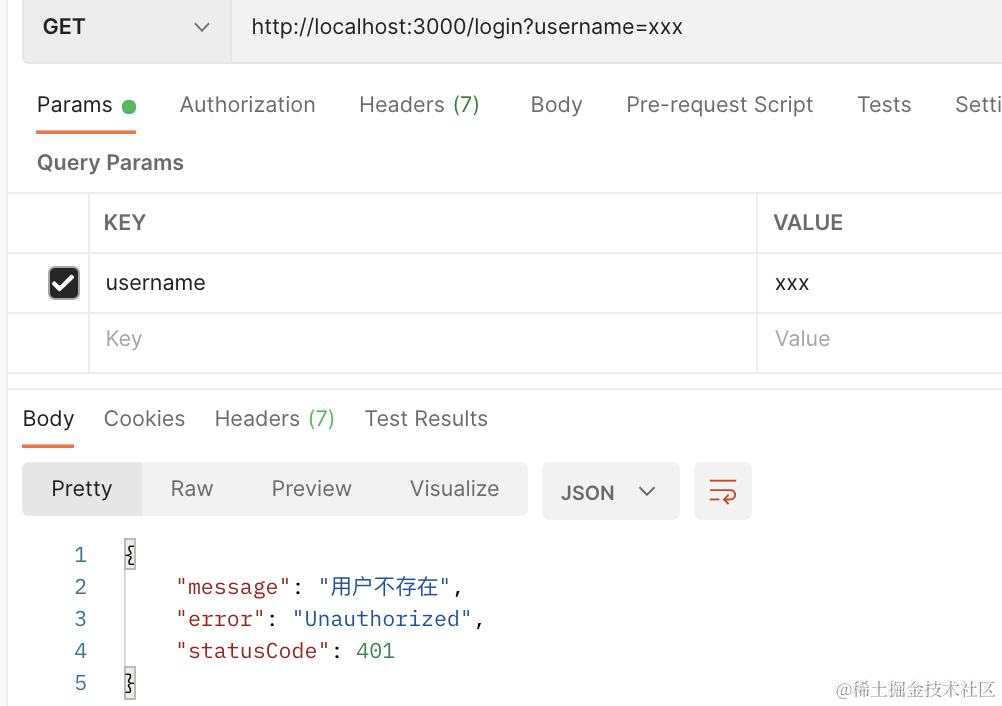
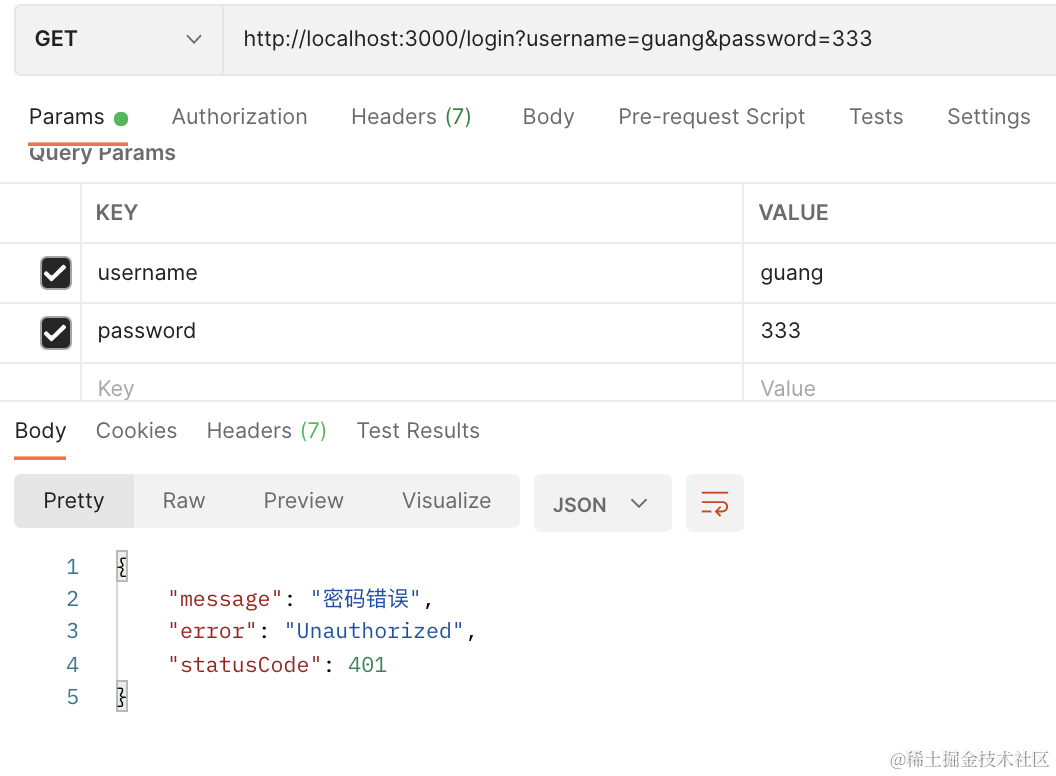
}postman 里测试下:
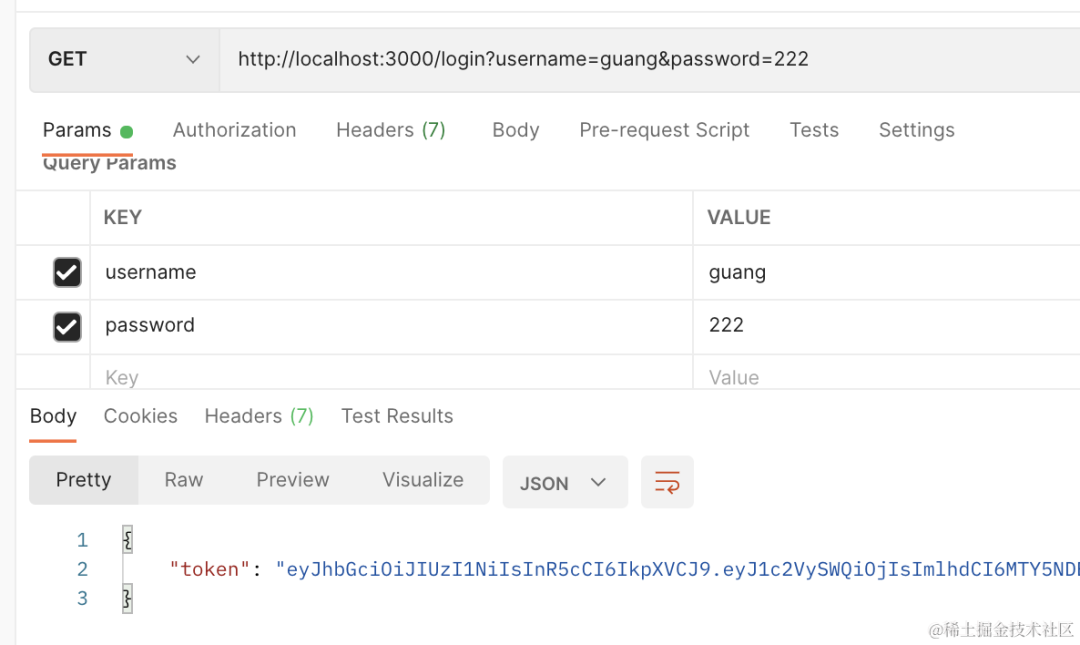
这个 token 一般都是在访问接口的时候放在 authorization 的 header 里,通过 Bearer xxx 的方式。
我们添加一个 userInfo 的接口来拿到用户信息:
@Get('userInfo')
async userInfo(@Headers('Authorization') auth: string) {
    try{
      const [, token] = auth.split(' ');
      const info = await this.jwtService.verify(token);

      const user = this.users.find(item => item.id == info.userId);
      return user;
    } catch(e) {
      throw new UnauthorizedException('token 过期,请重新登录');
    }
}
它会从 header 中取出 token,解析出其中的信息,从而拿到 userId,然后查询 id 对应的用户信息返回。
我们加上 authorization 的 header,访问下 userInfo 接口:
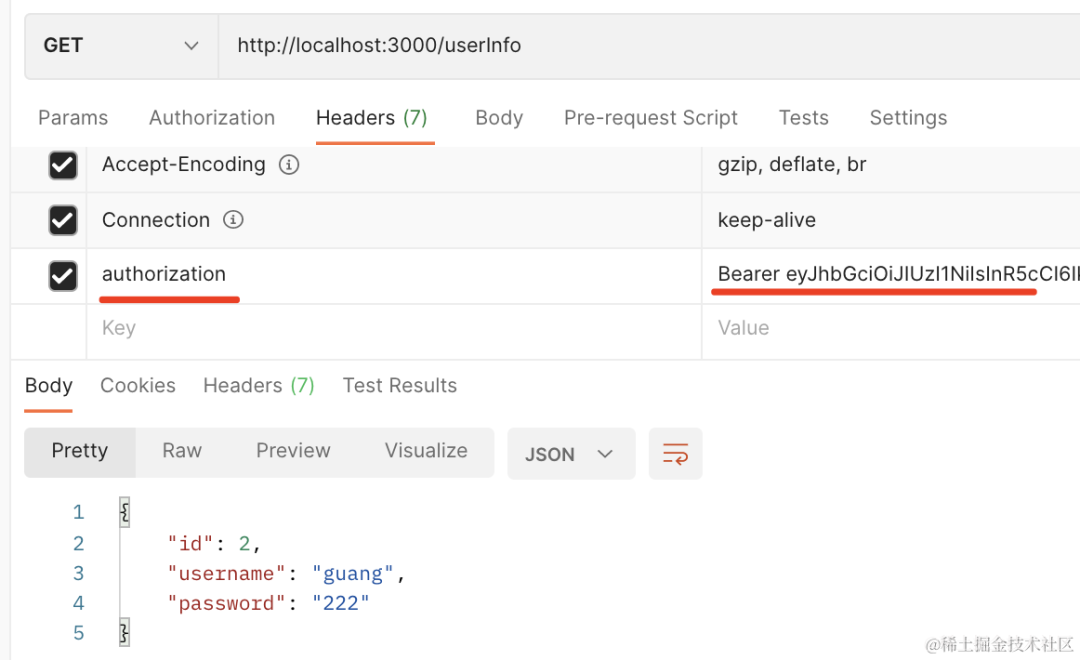
可以看到,拿到了用户的信息。
然后我们在登录确认页面加上登录:
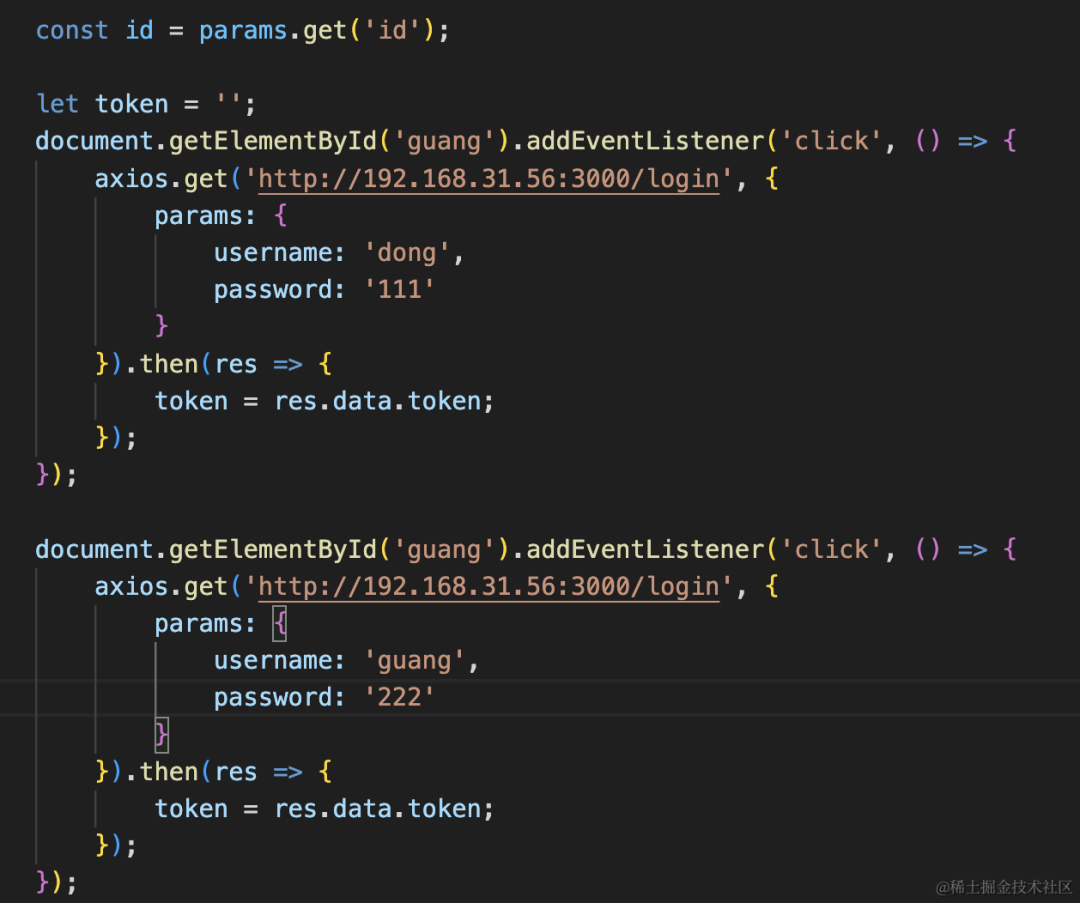
添加两个按钮:

这俩按钮分别是登录不同的账号,拿到 token:
<!DOCTYPE html>
<html lang="en">
<head>
<meta charset="UTF-8">
<meta name="viewport" content="width=device-width, initial-scale=1.0">
<title>扫码登录确认</title>
<script src="https://unpkg.com/axios@1.5.0/dist/axios.min.js"></script>
<style>
#info {
height: 400px;
line-height: 400px;
font-size: 20px;
padding: 20px;
}
#confirm, #cancel{
display: block;
width: 80%;
line-height: 40px;
font-size: 20px;
margin-bottom: 20px;
}
#confirm {
background: skyblue;
}
</style>
</head>
<body>
<button id="guang">登录光光账号</button>
<button id="dong">登录东东账号</button>
<div id="info">
是否确认登录 xxx 网站?
</div>
<button id="confirm">确认登录</button>
<button id="cancel">取消</button>
<script>
const params = new URLSearchParams(window.location.search.slice(1));
const id = params.get('id');
let token = '';
document.getElementById('dong').addEventListener('click', () => {
axios.get('http://192.168.31.56:3000/login', {
params: {
username: 'dong',
password: '111'
}
}).then(res => {
token = res.data.token;
});
});
document.getElementById('guang').addEventListener('click', () => {
axios.get('http://192.168.31.56:3000/login', {
params: {
username: 'guang',
password: '222'
}
}).then(res => {
token = res.data.token;
});
});
axios.get('http://192.168.31.56:3000/qrcode/scan?id=' + id).catch(e => {
alert('二维码已过期');
});
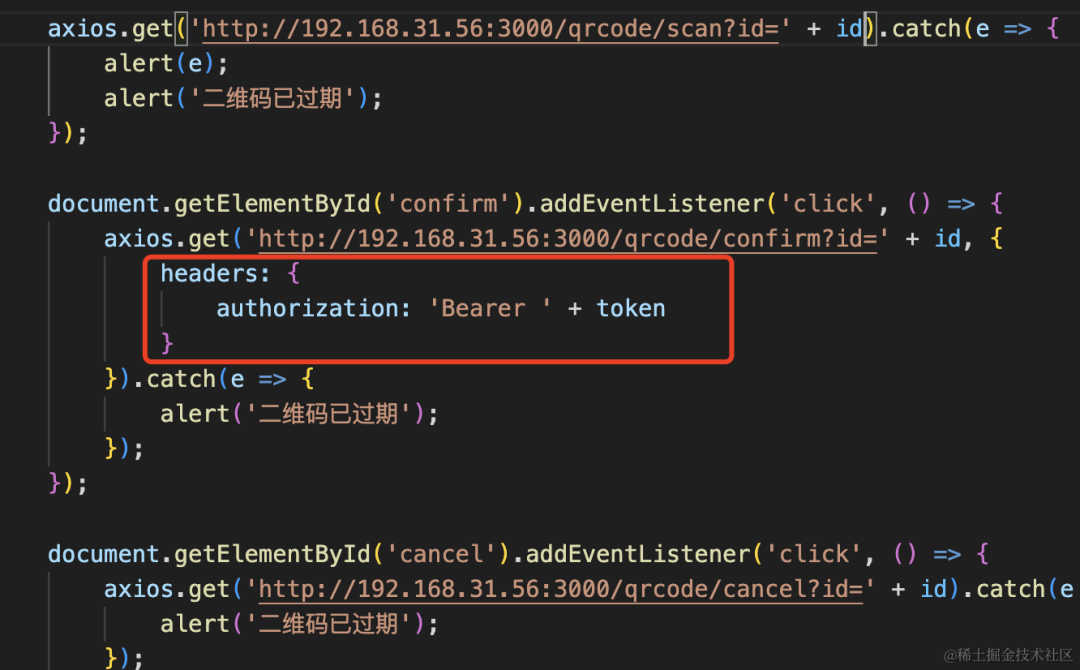
document.getElementById('confirm').addEventListener('click', () => {
axios.get('http://192.168.31.56:3000/qrcode/confirm?id=' + id, {
headers: {
authorization: 'Bearer ' + token
}
}).catch(e => {
alert('二维码已过期');
});
});
document.getElementById('cancel').addEventListener('click', () => {
axios.get('http://192.168.31.56:3000/qrcode/cancel?id=' + id).catch(e => {
alert('二维码已过期');
});
});
</script>
</body>
</html>然后我们在 qrcode/confirm 接口里把 token 取出来,拿到其中的用户信息,保存到 map 里:

@Get('qrcode/scan')
async scan(@Query('id') id: string, @Headers('Authorization') auth: string) {
    let user;
    try{
      const [, token] = auth.split(' ');
      const info = await this.jwtService.verify(token);

      user = this.users.find(item => item.id == info.userId);
    } catch(e) {
      throw new UnauthorizedException('token 过期,请重新登录');
    }

    const info = map.get(`qrcode_${id}`);
    if(!info) {
      throw new BadRequestException('二维码已过期');
    }
    info.status = 'scan-wait-confirm';
    info.userInfo = user;
    return 'success';
}
这样,当扫码确认后,那边就能拿到用户信息:
我们改下 static/index.html
确认的时候展示下登录用户的信息:
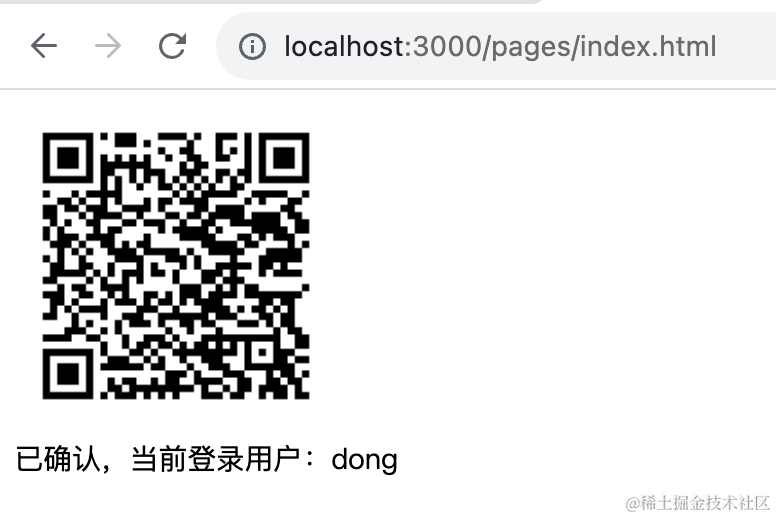
加上登录之后,我们再测试下:
手机扫码,点击登录光的账号,然后确认登录:
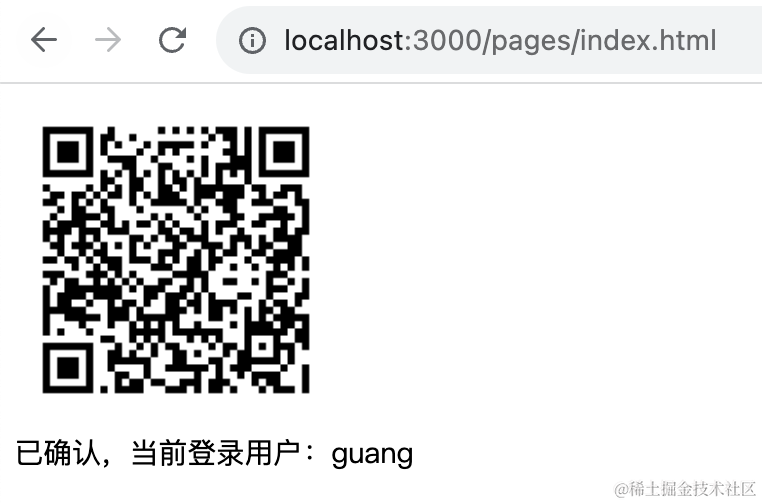
这时候 pc 网站就显示了当前登录用户是 dong
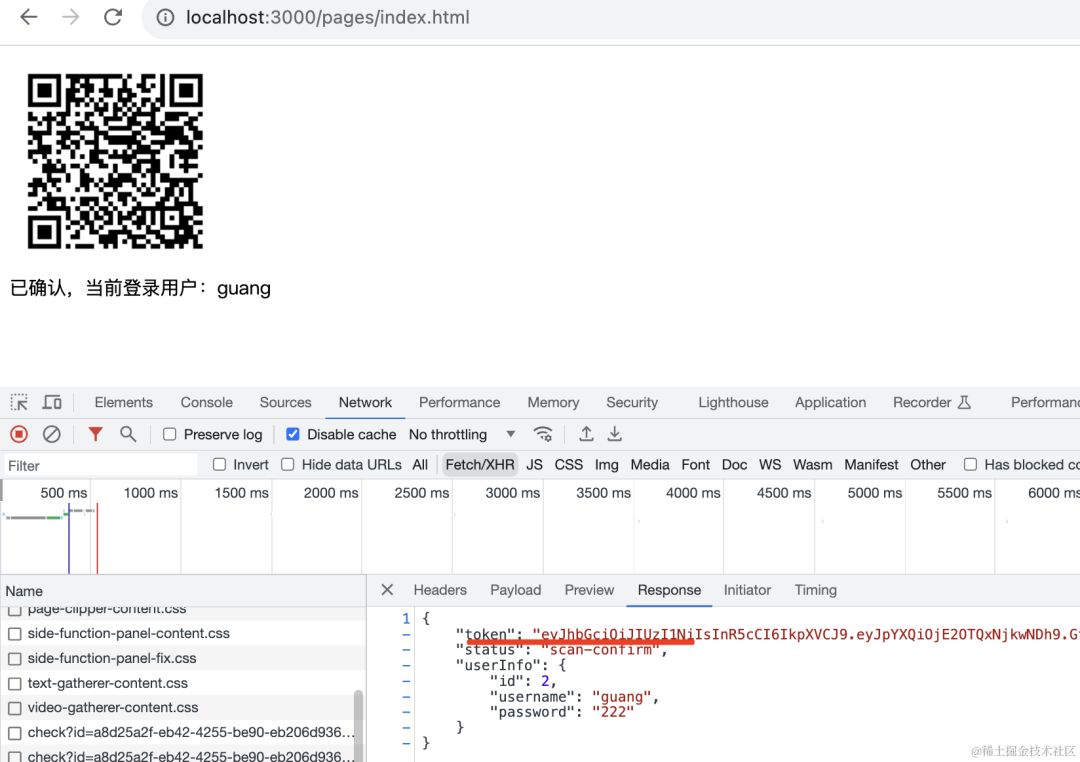
@Get('qrcode/check')
async check(@Query('id') id: string) {
    const info = map.get(`qrcode_${id}`);
    if(info.status === 'scan-confirm') {
        return {
          token: await this.jwtService.sign({
            userId: info.userInfo.userId
          }),
          ...info
        }
    }
    return info;
}
这样,当那边确认登录之后,这边就拿到了 jwt 的 token,也就是完成了登录了:
扫码登录就是这样实现的。
案例代码上传了 github: https://github.com/QuarkGluonPlasma/nestjs-course-code/tree/main/qrcode-login
总结
扫码登录是常用的功能,掘金、知乎、b 站等各大网站都有。
流程是在 pc 选择扫码登录的方式,用 APP 扫码,在 app 上登录之后进入登录确认页面。
可以点击确认登录或者取消,如果确认登录,那 pc 网站就会自动登录该账号。
它的实现原理是这样的:

APP 里扫码拿到 qrcode_id,然后分别调用 scan、confirm、cancel 来修改二维码状态。
并且登录之后会把 token 带过去。
在 redis 里保存着二维码的状态和用户信息,然后这边确认之后,另一边就可以用 userInfo 生成 jwt 的 token,从而实现登录。
这就是扫码登录的实现原理。