带你深入了解OC对象创建过程
在平时OC开发中我们经常用到的是对象的创建,使用alloc和init来初始化创建对象,开发中我们只是知道对象创建的基本操作,并不了解创建对象过程中到底调用了什么,下面来介绍一下OC创建对象的过程。
在说明创建对象过程之前,先来说一下创建OC对象的两种方法。
创建对象的两种方法
- [[Class alloc] init]
- [Class new]
通过[[Class alloc] init]创建对象:
+ (id)alloc {
    return _objc_rootAlloc(self);
}
// Base class implementation of +alloc. cls is not nil.
// Calls [cls allocWithZone:nil].
id
_objc_rootAlloc(Class cls)
{
    return callAlloc(cls, false/*checkNil*/, true/*allocWithZone*/);
}
// Replaced by CF (throws an NSException)
+ (id)init {
return (id)self;
}
- (id)init {
return _objc_rootInit(self);
}
id
_objc_rootInit(id obj)
{
// In practice, it will be hard to rely on this function.
// Many classes do not properly chain -init calls.
return obj;
}直接通过new方法来创建对象:
+ (id)new {
    return [callAlloc(self, false/*checkNil*/) init];
}

- (id)init {
    return _objc_rootInit(self);
}
从上面两种创建对象的方法可以看出第一种方式对象的创建是在alloc中,init方法只是返回已经创建的对象。通过new方法创建的对象本质还是alloc和init的结合。
对象创建过程
01alloc
从上可以知道对象的创建归根结底是通过alloc方法实现的,那么我们从此为出发点分析对象的创建过程。
#import <Foundation/Foundation.h>
#import "Person.h"
#import <objc/runtime.h>
#import <malloc/malloc.h>

int main(int argc, const char * argv[]) {
    @autoreleasepool {

        Person *p = [Person alloc];
        Person *p1 = [p init];
        Person *p2 = [p init];
    }
    return 0;
}
断点查看Person创建然后来到:
// Calls [cls alloc].
id
objc_alloc(Class cls)
{
    return callAlloc(cls, true/*checkNil*/, false/*allocWithZone*/);
}
使用Xcode调试调用[Person alloc]调用objc_alloc,而内部是调用callAlloc。
02callAlloc
// Call [cls alloc] or [cls allocWithZone:nil], with appropriate

// shortcutting optimizations.
static ALWAYS_INLINE id
callAlloc(Class cls, bool checkNil, bool allocWithZone=false)
{
    if (slowpath(checkNil && !cls)) return nil;

#if __OBJC2__
    if (fastpath(!cls->ISA()->hasCustomAWZ())) {
        // No alloc/allocWithZone implementation. Go straight to the allocator.
        // fixme store hasCustomAWZ in the non-meta class and
        // add it to canAllocFast's summary
        if (fastpath(cls->canAllocFast())) {
            // No ctors, raw isa, etc. Go straight to the metal.
            bool dtor = cls->hasCxxDtor();
            id obj = (id)calloc(1, cls->bits.fastInstanceSize());
            if (slowpath(!obj)) return callBadAllocHandler(cls);
            obj->initInstanceIsa(cls, dtor);
            return obj;
        }
        else {
            // Has ctor or raw isa or something. Use the slower path.
            id obj = class_createInstance(cls, 0);
            if (slowpath(!obj)) return callBadAllocHandler(cls);
            return obj;
        }
    }
#endif
    // No shortcuts available.
    if (allocWithZone) return [cls allocWithZone:nil];
    return [cls alloc];
}
2.1、首先我们先来看一下两个宏定义:slowpath和fastpath
// 表示x的值为真的可能性更大
#define fastpath(x) (__builtin_expect(bool(x), 1))
// 表示x的值为假的可能性更大
#define slowpath(x) (__builtin_expect(bool(x), 0))
__builtin_expect是GCC提供给程序员使用,目的是将“分支转移”的信息提供给编译器,这样编译器可以对代码进行优化,以减少指令跳转带来的性能下降。
其实代码中的slowpath和fastpath删除后并不会影响这段代码的功能,slowpath和fastpath的添加就是为了告诉编译器if条件语句中是大概率事件还是小概率事件,从而让编译器对代码进行优化。举个例子:
if (x)
       return 1;
   else
       return 30;
由于计算机并非一次只读取一条指令,而是读取多条指令,所以在读取if语句的时候也会把return 1读取,如果x值为0会再次读取return 30, 重读指令相对来说是耗时的。如果x有很大的概率是0,而return 1 这条指令不可避免的会被读取,但实际上几乎没有机会去执行的,造成不必要的指令重读。因此,定义了两个宏,fastpath(x)依然返回x,只是告诉编译器x的值一般不为0,从而编译可以进行优化。同理,slowpath(x)标识x的值很可能为0,编译时可以进行优化。
代码截图中,if (slowpath(checkNil && !cls)) return nil; 就是说明cls大概率是有值的,告诉编译器编译时优化,下面就到了cls->ISA()->hasCustomAWZ()。
2.2、hasCustomAWZ
hasCustomAWZ作用是判断当前类有没有实现allocWithZone方法。它是通过类的结构体objc_class中的hasCustomAWZ方法判断的:
struct objc_class : objc_object {
    // Class ISA;
    Class superclass;
    cache_t cache;             // formerly cache pointer and vtable
    class_data_bits_t bits;    // class_rw_t * plus custom rr/alloc flags

    class_rw_t *data() {
        return bits.data();
    }

    bool hasCustomAWZ() {
        return ! bits.hasDefaultAWZ();
    }
hasDefaultAWZ()的方法实现如下:
#else
    bool hasDefaultAWZ() {
        return data()->flags & RW_HAS_DEFAULT_AWZ;
    }
    void setHasDefaultAWZ() {
        data()->setFlags(RW_HAS_DEFAULT_AWZ);
    }
    void setHasCustomAWZ() {
        data()->clearFlags(RW_HAS_DEFAULT_AWZ);
    }
#endif
RW_HAS_DEFAULT_AWZ是用来标记用户有没有自己实现allocWithZone方法。由于类是有懒加载的概念的,所以第一次给该类发送消息之前,该类是没有加载的,因此当类收到alloc消息的时候,进入到hasCustomAWZ时并没有默认实现allocWithZone方法,所以hasCustomAWZ返回true,因此会直接进入到[cls alloc]。当再次调用callAlloc时候DefaultAWZ为ture,hasCustoAWZ为false这样会进入到下一个流程。
2.3、canAllocFast
canAllocFast作用是判断当前类是否可以快速开辟内存,需要注意的是这里永远不会调用,因为canAllocFast内部返回的是false。具体实现如下:
bool canAllocFast() {
        assert(!isFuture());
        return bits.canAllocFast();
    }

    bool canAllocFast() {
            return false;
        }
可以看到canAllocFast返回False,于是来到了下一流程:class_createInstance。
2.4、class_createInstance
id
class_createInstance(Class cls, size_t extraBytes)
{
    return _class_createInstanceFromZone(cls, extraBytes, nil);
}

static __attribute__((always_inline))
id
_class_createInstanceFromZone(Class cls, size_t extraBytes, void *zone,
                              bool cxxConstruct = true,
                              size_t *outAllocatedSize = nil)
{
    if (!cls) return nil;

    assert(cls->isRealized());
    // Read class's info bits all at once for performance
    bool hasCxxCtor = cls->hasCxxCtor();
    bool hasCxxDtor = cls->hasCxxDtor();
    bool fast = cls->canAllocNonpointer(); //!! 是否可以创建NonPointer

    size_t size = cls->instanceSize(extraBytes);
    if (outAllocatedSize) *outAllocatedSize = size;

    id obj;
    if (!zone  &&  fast) {
        obj = (id)calloc(1, size);
        if (!obj) return nil;
        obj->initInstanceIsa(cls, hasCxxDtor);
    }
    else {
        if (zone) {
            obj = (id)malloc_zone_calloc ((malloc_zone_t *)zone, 1, size);
        } else {
            obj = (id)calloc(1, size);
        }
        if (!obj) return nil;


        // Use raw pointer isa on the assumption that they might be
        // doing something weird with the zone or RR.
        obj->initIsa(cls);
    }

    if (cxxConstruct && hasCxxCtor) {
        obj = _objc_constructOrFree(obj, cls);
    }

    return obj;
}
2.4.1、hasCxxtor()和hasCxxDtor
在这里开始创建对象分配内存空间,hasCxxtor()和hasCxxDtor()是用来处理C++成员变量的构造和析构的,hasCxxtor是判断当前class或者superclass是否有.cxx_construct的实现,hasCxxDtor是用来判断当前class或者superclass是否有.cxx_destruct的实现,canAllocNonpointer是判断是否可以创建Nonpointer。
2.4.2、instanceSize计算要开辟的内存大小
size_t instanceSize(size_t extraBytes) {
        size_t size = alignedInstanceSize() + extraBytes;
        // CF requires all objects be at least 16 bytes.
        if (size < 16) size = 16;
        return size;
    }

    // Class's ivar size rounded up to a pointer-size boundary.
    uint32_t alignedInstanceSize() {
        return word_align(unalignedInstanceSize());
    }

    // May be unaligned depending on class's ivars.
    uint32_t unalignedInstanceSize() {
        assert(isRealized());
        return data()->ro->instanceSize;
    }

    static inline uint32_t word_align(uint32_t x) {
        return (x + WORD_MASK) & ~WORD_MASK;
    }

    #ifdef __LP64__
    #   define WORD_SHIFT 3UL
    #   define WORD_MASK 7UL
    #   define WORD_BITS 64
    #else
    #   define WORD_SHIFT 2UL
    #   define WORD_MASK 3UL
    #   define WORD_BITS 32
    #endif
调用instanceSize传入的参数extraBytes为0,从上面代码中可以看到属性在64位下是8字节对齐,在32位下是4字节对齐的。类结构体中的data()->ro->instanceSize大小在编译时期已经确定了即unaligneedInstanceSize()大小确定,最终size大小获取并且满足最小16字节,这就是对象创建过程中计算要开辟多大内存过程。
我们回到_class_createInstanceFromZone中,这时候传入的zone是nil,并且是支持创建Nonpointer的,这时候进入到下面代码。
    id obj;
    if (!zone  &&  fast) {
        obj = (id)calloc(1, size);
        if (!obj) return nil;
        obj->initInstanceIsa(cls, hasCxxDtor);
    }
2.4.3、calloc 内存开辟
calloc方法的实现如下,calloc的方法实现在libmalloc中查看。
void *
malloc(size_t size)
{
  void *retval;
  retval = malloc_zone_malloc(default_zone, size);
  if (retval == NULL) {
    errno = ENOMEM;
  }
  return retval;
}
传入size后,调用malloc_zone_malloc(default_zone,size)。
void *
malloc_zone_malloc(malloc_zone_t *zone, size_t size)
{
  MALLOC_TRACE(TRACE_malloc | DBG_FUNC_START, (uintptr_t)zone, size, 0, 0);

  void *ptr;
  if (malloc_check_start && (malloc_check_counter++ >= malloc_check_start)) {
    internal_check();
  }
  if (size > MALLOC_ABSOLUTE_MAX_SIZE) {
    return NULL;
  }

  ptr = zone->malloc(zone, size);    // if lite zone is passed in then we still call the lite methods

  if (malloc_logger) {
    malloc_logger(MALLOC_LOG_TYPE_ALLOCATE | MALLOC_LOG_TYPE_HAS_ZONE, (uintptr_t)zone, (uintptr_t)size, 0, (uintptr_t)ptr, 0);
  }

  MALLOC_TRACE(TRACE_malloc | DBG_FUNC_END, (uintptr_t)zone, size, (uintptr_t)ptr, 0);
  return ptr;
}
calloc开辟了内存空间,并且返回了一个指向该内存地址的指针,我们回到objc中的_class_createInstanceFromZone方法中接下来调用方法obj->initInstanceIsa()。
2.4.4、initInstanceIsa 将类和isa指针关联
inline void
objc_object::initInstanceIsa(Class cls, bool hasCxxDtor)
{
    assert(!cls->instancesRequireRawIsa());
    assert(hasCxxDtor == cls->hasCxxDtor());

    initIsa(cls, true, hasCxxDtor);
}

inline void
objc_object::initIsa(Class cls, bool nonpointer, bool hasCxxDtor)
{
    assert(!isTaggedPointer());

    if (!nonpointer) {
        isa.cls = cls;
    } else {
        assert(!DisableNonpointerIsa);
        assert(!cls->instancesRequireRawIsa());

        isa_t newisa(0);

#if SUPPORT_INDEXED_ISA
        assert(cls->classArrayIndex() > 0);
        newisa.bits = ISA_INDEX_MAGIC_VALUE;
        newisa.has_cxx_dtor = hasCxxDtor;
        newisa.indexcls = (uintptr_t)cls->classArrayIndex();
#else
        newisa.bits = ISA_MAGIC_VALUE;
        newisa.has_cxx_dtor = hasCxxDtor;
        newisa.shiftcls = (uintptr_t)cls >> 3;
#endif
        isa = newisa;
    }
}
从上面源码可以知道initInstanceIsa调用最终调用的是initIsa方法,这个过程其实就是对isa_t的初始化过程并绑定指向的cls。newiisa.shiftclss=(uintpttr_t)cls>> 3 将当前地址右移三位主要是将Class指针中无用的后三位清除减小内存的消耗,因为类的指针要按照字节8bits对齐内存,其指针后三位都是无用的0。
创建流程总结
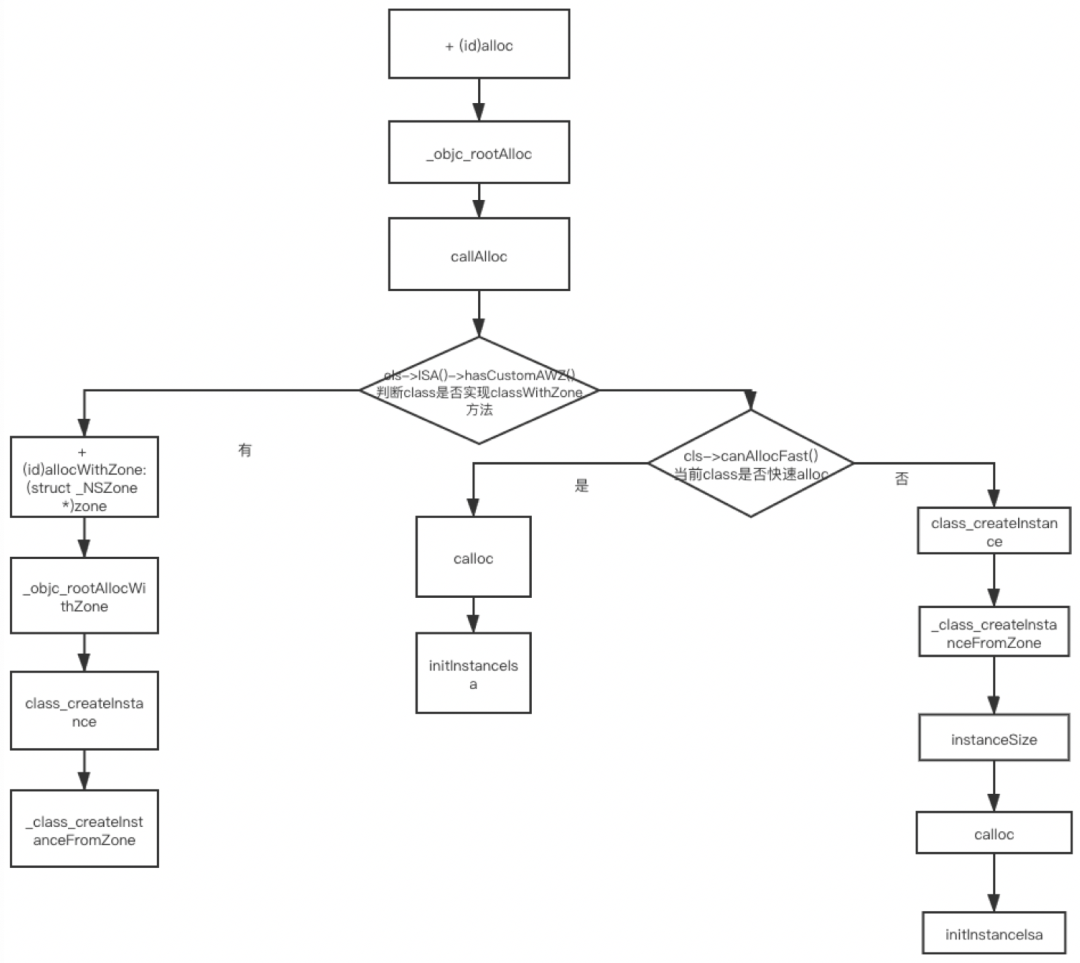
总结,至此我们对象的创建过程探索就结束了。对象创建的过程其核心流程是先计算所需要开辟的内存空间(instanceSize)、然后calloc开辟内存空间并返回一个指向该内存地址的指针,最终初始化isa并绑定指向的类返回创建的obj。具体的创建流程如下图:
参考资料1、 https://opensource.apple.com/tarballs/libmalloc/
2、 https://opensource.apple.com/source/objc4/
3、https://developer.apple.com/documentation/objectivec/nsobject/1571958-alloc
