Flutter开发中异步编程的那些事
/ 今日科技快讯 /
近日,据国外媒体报道,不少欧美公司抱怨称谷歌搜索广告价格在不断攀升,业务依赖于谷歌搜索的公司因而苦不堪言。当然,谷歌的搜索市场主导地位也正受到监管机构越来越多的关注。
/ 作者简介 /
咦,感觉这周有点漫长,周末却有点短。不过还是好好享受吧,我们下周见!
本篇文章来自very_mrq的投稿,分享了他对flutter开发中异步编程内容的理解,相信会对大家有所帮助!同时也感谢作者贡献的精彩文章。
/ 前言 /
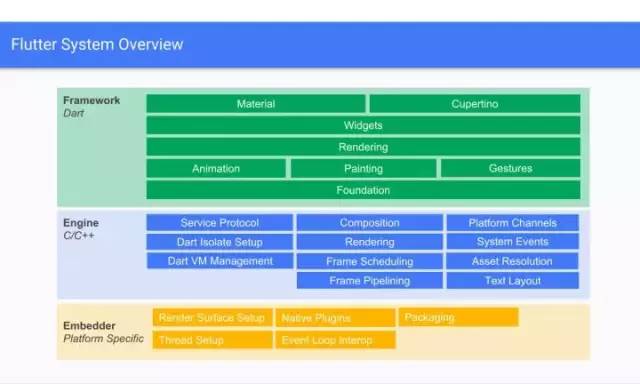
首先看一张Flutter体系结构图:
我们只关注线程相关信息:
- Framework:我们直接接触的层级
- engine:Dart Isolate Setup,创建Isolate,类似于DartVM中的线程,他的架构就是一个循环:event loops 但这一层并不创建及管理线程,它要求Embeder提供四个Task Runner,也就是和真正的线程类似的玩意,并不是真正的线程。 因为尽管Flutter Engine不在乎Runner具体跑在哪个线程,但是它需要线程配置在整一个生命周期里面保持稳定。也就是说一个Runner最好始终保持在同一线程运行
- embedder:Thread Setup,真正的线程创建及管理者,Embeder指的是将引擎移植到平台的中间层代码。
/ task runners /
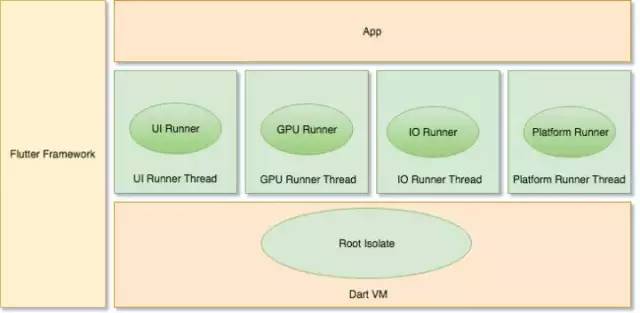
flutter没有线程和进程的概念,而是一个底层的任务运行器,是把各个task runners运行在不同线程的(也可以相同,不推荐),我们要牢记一点:embedder是真正的线程创建及管理者。
分为四种:
Platform Task Runner
对应线程
- Android:主线程
- iOS:主线程
一般来说,一个Flutter应用启动的时候会创建一个Engine实例,Engine创建的时候会创建一个线程供Platform Runner使用。
主要功能
- 跟Flutter Engine的所有交互(接口调用)必须发生在Platform Thread。
- 处理平台的消息
UI Task Runner
虽然名字叫UI,但是并不是Android,iOS的UI线程,只是flutter的UI线程,也就是我们平时开发的线程。用于执行Dart root isolate代码,Root isolate运行应用的main code。渲染逻辑,告诉Engine最终的渲染 对于每一帧,Engine要做的事情有:
- Root isolate通知Flutter Engine有帧需要渲染。
- Flutter Engine通知平台,需要在下一个vsync的时候得到通知。
- 平台等待下一个vsync(Android在需要绘制的时候系统发送的一个信号,16ms发送一次,代表一帧,具体请查阅资料)
- 对创建的对象和Widgets进行Layout并生成一个Layer Tree,这个Tree马上被提交给Flutter Engine。当前阶段没有进行任何光栅化,这个步骤仅是生成了对需要绘制内容的描述。
- 创建或者更新Tree,这个Tree包含了用于屏幕上显示Widgets的语义信息。这个东西主要用于平台相关的辅助Accessibility元素的配置和渲染。
处理来自Native Plugins的消息;timers;microtasks;异步 I/O 操作(sockets, file handles, 等) 。
GPU Task Runner
GPU执行的线程
UI Task Runner创建的Layer Tree信息是平台不相关,具体如何实现绘制取决于具体绘制平台和方式,可以是OpenGL,Vulkan等(注意两个平台所指不同。)
GPU Runner可以导致UI Runner的帧调度的延迟,GPU Runner的过载会导致Flutter应用的卡顿。
IO Task Runner
主要功能是从图片存储(比如磁盘)中读取压缩的图片格式,将图片数据进行处理为GPU Runner的渲染做好准备。
iOS和Android:flutter为每个引擎实例的UI,GPU和IO任务运行程序创建专用线程。所有引擎实例共享相同的Platform Thread和Platform Task Runner。
/ Isolate /
isolate是什么
首先我们需要知道:Dart是一个单线程语言。
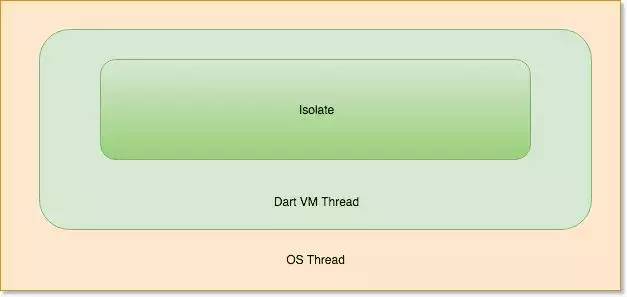
而isolate是Dart并发模式的实现。与一般意义上的线程不同,isolate翻译过来是’隔离‘的意思,所以他是顺序执行并且独享内存的,所以多个isolate之间不能共享内存,而正因为Dart没有共享内存的并发,没有竞争的可能性所以不需要锁,也就不用担心死锁的问题。
Dart本身抽象了isolate和thread,实际上底层还是使用操作系统的提供的OSThread。
而一个isolate就是由event loops方式来实现的。
event loops
我们在写Dart代码的时候,就只有两种代码。
同步代码:就是一行行写下来的代码;异步代码:就是以Future等修饰的代码。并不是指的我们平常异步,这两种代码的区别只有一个:代码运行的顺序是不同的,先运行同步代码,再运行异步代码,顺序执行。
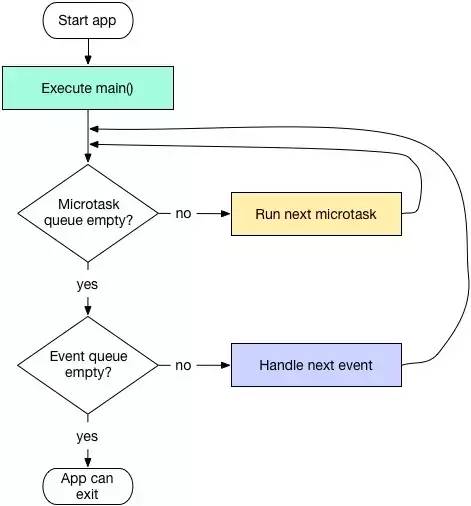
而异步代码是运行在event loop里的,event loops直译过来就是事件循环,对于Android开发者来说,再熟悉不过了,就是handler机制。 用两张图来表示:
和handler一样,不停的向event Queue里取事件执行。
这张图就更明显了,但是也看出了和handler不一样的地方: 首先会从microtask Queue中取事件,然后才向event Queue里取事件,也就是说microtask会优先执行。我从网上找了一个例子:
import 'dart:async';
void isolateTest() {
  print('isolateTest #1 of 2');
  scheduleMicrotask(() => print('microtask #1 of 3'));
  //使用delay方式,是将此task放到queue的尾部,
  //若前面有耗时操作,不一定能准时执行
  new Future.delayed(new Duration(seconds:1),
      () => print('future #1 (delayed)'));

  //使用then,是表示在此task执行后立刻执行
  new Future(() => print('future #2 of 4'))
      .then((_) => print('future #2a'))
      .then((_) {
        print('future #2b');
        scheduleMicrotask(() => print('microtask #0 (from future #2b)'));
      })
      .then((_) => print('future #2c'));

  scheduleMicrotask(() => print('microtask #2 of 3'));

  new Future(() => print('future #3 of 4'))
      .then((_) => new Future(
                   () => print('future #3a (a new future)')))
      .then((_) => print('future #3b'));

  new Future(() => print('future #4 of 4'))
  .then((_){
    new Future(() => print('future #4a'));
  })
  .then((_) => print('future #4b'));
  scheduleMicrotask(() => print('microtask #3 of 3'));
  print('isolateTest #2 of 2');
}
关键位置已做好注释,具体逻辑配合event loops原理理解,这里直接放出log:
isolateTest #1 of 2
isolateTest #2 of 2
microtask #1 of 3
microtask #2 of 3
microtask #3 of 3
future #2 of 4
future #2a
future #2b
future #2c
microtask #0 (from future #2b)
future #3 of 4
future #4 of 4
future #4b
future #3a (a new future)
future #3b
future #4a
future #1 (delayed)
而我们刚学习Flutter时,如果要实现’异步‘,一般是使用await,async关键字实现,就像这样:
void isolateTest() async {
    //Flutter的http框架Dio
    var future = await new Future.delayed(new Duration(seconds:1),
      () => print('future #1 (delayed)'));
    setState(() {
      _counter = future.data.hashCode;
    });
}
await 表达式之后也会生成一个future,而这样生成的有什么不一样呢。其实是一样的,只是执行顺序就会发生一些改变,我们把刚刚的代码稍微修改一下:
void isolateTest() async {
  print('isolateTest #1 of 2');
  scheduleMicrotask(() => print('microtask #1 of 3'));
  //await修饰
  await new Future.delayed(new Duration(seconds: 3),
          () => print('future #1 (delayed)'));

//...省略
}

//在main中调用
void main() {
  isolateTest();
  print('main');
}


//结果
I/flutter (13815): isolateTest #1 of 2
I/flutter (13815): main
I/flutter (13815): microtask #1 of 3
I/flutter (13815): future #1 (delayed)
I/flutter (13815): isolateTest #2 of 2
//....省略
其实就是执行到await语句时将async方法内的所有剩余代码都放到event loops队列尾部,直到await执行完毕后继续执行该task。
创建自己的isolate
根据异步知识,我们可以写一个普通的网络请求Demo-APP:
class _MyHomePageState extends State<MyHomePage> {
  var _counter = 0;
  var who = "You have pushed the button this many times:";

void _incrementCounter() async {
  var future = await new Dio().get('http://www.baidu.com');
  setState(() {
    _counter = future.hashCode;
  });
}

  @override
  Widget build(BuildContext context) {
    return Scaffold(
      appBar: AppBar(
        title: Text(widget.title),
      ),
      body: Center(
        child: Column(
          mainAxisAlignment: MainAxisAlignment.center,
          children: <Widget>[
            Text(
              who,
            ),
            Text(
              '$_counter',
              style: Theme.of(context).textTheme.display1,
            ),
            IconButton(
              icon: Icon(Icons.thumb_up),
              onPressed: () {
                setState(() {
                  if (who == "You have pushed the button this many times:") {
                    who = "I have pushed the button this many times:";
                  } else {
                    who = "You have pushed the button this many times:";
                  }
                });
              },
            )
          ],
        ),
      ),
      floatingActionButton: FloatingActionButton(
        onPressed: _incrementCounter,
        tooltip: 'Increment',
        child: Icon(Icons.add),
      ), // This trailing comma makes auto-formatting nicer for build methods.
    );
  }
}
点击floatingActionButton会做一个网络请求的耗时操作,使用await关键字实现异步效果,可以在网络请求的同时,点击IconButton,UI会做相应的变化。下面我们修改_incrementCounter方法,让他做一个计算的耗时操作:
void _incrementCounter() async {
  var future = await new Future(() {
    var i = 0;
    while (true) {
      print("${i++}");
      if (i > 200000) {
        break;
      }
    }
    return new Dio().get('http://www.baidu.com');
  });
  setState(() {
    _counter = future.hashCode;
  });
}
在future里面做一个20万次打印的操作,这个时候我们再次点击floatingActionButton,然后点击IconButton,UI就会卡顿。
这里就要分IO耗时和CPU耗时了,网络请求和文件读取一类的操作不会使用CPU,而是纯等待IO而已,所以我们CPU可以去event Queue里取其他Task执行,而CPU耗时就是实实在在的CPU计算了。由于Dart是单线程的,Futrue的异步并不是真正的异步,所以会造成卡顿。
那我们如何真正新开一个线程呢?也就是需要新建一个isolate!需要用到的API:Isolate.spawn,下面是一个网上找的例子:
import 'dart:async';
import 'dart:isolate';

main() async {
  var receivePort = new ReceivePort();
  //关键代码,新建一个isolate
  await Isolate.spawn(echo, receivePort.sendPort);

  // The 'echo' isolate sends it's SendPort as the first message
  var sendPort = await receivePort.first;

  var msg = await sendReceive(sendPort, "foo");
  print('received $msg');
  msg = await sendReceive(sendPort, "bar");
  print('received $msg');
}

// the entry point for the isolate
// 异步代码
echo(SendPort sendPort) async {
  // Open the ReceivePort for incoming messages.
  var port = new ReceivePort();

  // Notify any other isolates what port this isolate listens to.
  sendPort.send(port.sendPort);

  await for (var msg in port) {
    var data = msg[0];
    SendPort replyTo = msg[1];
    replyTo.send(data);
    if (data == "bar") port.close();
  }
}

/// sends a message on a port, receives the response,
/// and returns the message
Future sendReceive(SendPort port, msg) {
  ReceivePort response = new ReceivePort();
  port.send([msg, response.sendPort]);
  return response.first;
}

====================================
$ isolates.dart
received foo
received bar
过程过于复杂,我就简单描述一下大致流程:
就是通过Isolate.spawn新建线程,该函数的第一个参数是一个函数,该函数由我们自己实现且运行在新线程中,并通过ReceivePort来进行线程间通信。
看着这个Dart新建线程的方式我的第一反应是蛋疼的,这也太麻烦了吧!!没关系,Flutter体贴的为我们准备了封装好的API:compute。
void main() async{
  //调用compute函数,传入耗时函数
  print( await compute(LongTimeTask, 20));
  runApp(MyApp());
}
//参数是上面传入20
int LongTimeTask(int n){
  return //一个耗时操作;
}
compute使用超级简单,但也有缺陷,就是不能多次进行线程间通讯,但是很多时候我们并不需要多次通讯,只需要耗时操作后的值就OK,所以还是很实用的。


