Flutter中的http网络请求
前言
由于刚过完年工作比较紧张,文章已经四周没有更新了,非常抱歉!接下来依然会尽量保持每周更新!
本篇介绍Flutter中网络请求相关api的使用,Flutter在Flutter engine中提供了一个sky_engine开发工具包,其包含了一个_http的库,该库中有封装的http请求相关的各种操作类。本文我们将介绍_http相关操作类的使用和基于_http封装的三方dio网络库的使用。
自带网络库_http
_http库中的http.dart文件中封装的HttpClient类是我们常用的网络请求操作类,该类是一个抽象类,其具体操作由http_impl.dart文件中_HttpClient类实现,该类中封装了各种http请求的方法,包括get、post、put、delete、patch和head等请求。
get和post请求方法是我们常用的两种方法,通过下面的例子看下其使用方法。
_getHttpData() async {
    var httpClient = new HttpClient();
    //为charles抓包设置代理,为什么在代码中设置?请参考上篇文章。
    httpClient.findProxy = (url) {
      return HttpClient.findProxyFromEnvironment(url, environment: {"http_proxy": 'http://192.168.124.94:8888',});
    };
    //请求参数设置
    Map<String, String> queryParameters = {'format': '2', 'key': '939e592487c33b12c509f757500888b5', 'lon': '116.39277', 'lat': '39.933748'};
    var uri = Uri.http('v.juhe.cn', '/weather/geo', queryParameters);
    var request = await httpClient.getUrl(uri);
    //下面一行是post请求
    //var request = await httpClient.postUrl(uri);

    var response = await request.close();
    if (response.statusCode == 200) {
      print('请求成功');
      var responseBody = await response.transform(utf8.decoder).join();
      print('responseBody = $responseBody');
    } else {
      print('请求失败');
    }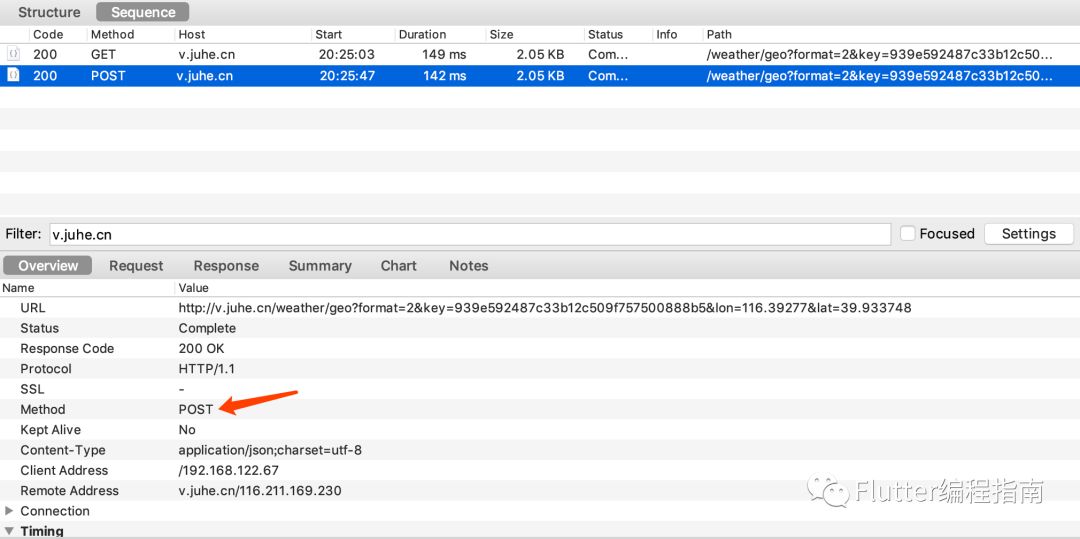
}以上代码中httpClient.getUrl(uri)方法即是根据uri发起get请求,post请求用法和get请求只是调用方法不同,包括参数设置等其他用法都一样。请求抓包结果如下:
- get请求

- post请求
请求成功之后以上代码输出结果如下:
I/flutter (19183): 请求成功
I/flutter (19183): responseBody={"resultcode":"200","reason":"查询成功","result":{"sk":{"temp":"8","wind_direction":"西南风","wind_strength":"2级","humidity":"51%","time":"21:54"},"today":{"temperature":"1℃~15℃","weather":"晴","weather_id":{"fa":"00","fb":"00"},"wind":"南风微风","week":"星期五","city":"北京","date_y":"2019年03月01日","dressing_index":"较冷","dressing_advice":"建议着厚外套加毛衣等服装。年老体弱者宜着大衣、呢外套加羊毛衫。","uv_index":"中等","comfort_index":"","wash_index":"较适宜","travel_index":"较不宜","exercise_index":"较不宜","drying_index":""},"future":[{"temperature":"1℃~15℃","weather":"晴","weather_id":{"fa":"00","fb":"00"},"wind":"南风微风","week":"星期五","date":"20190301"},{"temperature":"3℃~15℃","weather":"霾","weather_id":{"fa":"53","fb":"53"},"wind":"西南风微风","week":"星期六","date":"20190302"},{"temperature":"3℃~15℃","weather":"霾转晴","weather_id":{"fa":"53","fb":"00"},"wind":"西南风微风","
由此可以看出结果输出不完整,部分字符串被丢弃了,前段时间有个同学留言问过这个问题,在这里说明一下。Flutter官方文档有这个问题的说明:
The Dart print() function outputs to the system console, which you can view using flutter logs (which is basically a wrapper around adb logcat).
If you output too much at once, then Android sometimes discards some log lines. To avoid this, you can use debugPrint(), from Flutter’s foundation library. This is a wrapper around print which throttles the output to a level that avoids being dropped by Android’s kernel.
具体地址在:
https://flutter.dev/docs/testing/debugging#print-and-debugprint-with-flutter-logs
官方建议我们输出日志过多的时候使用debugPrint()函数,作者使用debugPrint()函数之后发现依然是输出不完整,查看debugPrint()函数的具体代码实现后发现以上输出的内容是一行的内容,一行内容过多的情况下debugPrint()函数依然无法完整进行输出,最后我采用了一个技巧,对以上返回的responseBody结果进行了简单处理,根据特殊字符串进行字符串替换,加入换行符,代码如下:
var responseBody = await response.transform(utf8.decoder).join();
//‘{’符号前加个换行符
responseBody = responseBody.replaceAll("{", "\n{");
debugPrint('responseBody=$responseBody');
于是输出了完整的请求返回结果:
I/flutter (19183): 请求成功
I/flutter (19183): responseBody=
I/flutter (19183): {"resultcode":"200","reason":"successed!","result":
I/flutter (19183): {"sk":
I/flutter (19183): {"temp":"8","wind_direction":"西南风","wind_strength":"2级","humidity":"51%","time":"22:09"},"today":
I/flutter (19183): {"temperature":"1℃~15℃","weather":"晴","weather_id":
I/flutter (19183): {"fa":"00","fb":"00"},"wind":"南风微风","week":"星期五","city":"北京","date_y":"2019年03月01日","dressing_index":"较冷","dressing_advice":"建议着厚外套加毛衣等服装。年老体弱者宜着大衣、呢外套加羊毛衫。","uv_index":"中等","comfort_index":"","wash_index":"较适宜","travel_index":"较不宜","exercise_index":"较不宜","drying_index":""},"future":[
I/flutter (19183): {"temperature":"1℃~15℃","weather":"晴","weather_id":
I/flutter (19183): {"fa":"00","fb":"00"},"wind":"南风微风","week":"星期五","date":"20190301"},
I/flutter (19183): {"temperature":"3℃~15℃","weather":"霾","weather_id":
I/flutter (19183): {"fa":"53","fb":"53"},"wind":"西南风微风","week":"星期六","date":"20190302"},
I/flutter (19183): {"temperature":"3℃~15℃","weather":"霾转晴","weather_id":
I/flutter (19183): {"fa":"53","fb":"00"},"wind":"西南风微风","week":"星期日","date":"20190303"},
I/flutter (19183): {"temperature":"2℃~15℃","weather":"晴","weather_id":
I/flutter (19183): {"fa":"00","fb":"00"},"wind":"北风微风","week":"星期一","date":"20190304"},
I/flutter (19183): {"temperature":"3℃~16℃","weather":"晴","weather_id":
I/flutter (19183): {"fa":"00","fb":"00"},"wind":"北风微风","week":"星期二","date":"20190305"},
I/flutter (19183): {"temperature":"3℃~15℃","weather":"霾","weather_id":
I/flutter (19183): {"fa":"53","fb":"53"},"wind":"西南风微风","week":"星期三","date":"20190306"},
I/flutter (19183): {"temperature":"3℃~15℃","weather":"霾","weather_id":
I/flutter (19183): {"fa":"53","fb":"53"},"wind":"西南风微风","week":"星期四","date":"20190307"}]},"err
第三方网络库dio
dio是目前使用最多的Flutter三方网络库,它是对http请求的一个封装,功能非常强大,支持拦截器、全局配置、表单数据、请求取消、文件下载、超时等。目前dio的最新版本为2.0.15,2.x版本对1.x版本代码进行了一些重构,所以之前使用过1.x版本的同学,再升级到2.x时要注意需要修改一些代码。
下面基于2.0.15版本举个请求天气信息的例子:
  Future<Null> _getWeatherInfo() async {
    Dio dio = Dio();
    //设置代理
    DefaultHttpClientAdapter adapter = dio.httpClientAdapter;
    adapter.onHttpClientCreate = (HttpClient client) {
      if(client == null) {
        client = HttpClient();
      }
      client.findProxy = (url) {
        return HttpClient.findProxyFromEnvironment(url, environment: {"http_proxy": 'http://192.168.124.94:8888',});
      };
      return client;
    };
    dio.options.baseUrl = "http://v.juhe.cn/";
    //设置连接超时时间
    dio.options.connectTimeout = 10000;
    //设置数据接收超时时间
    dio.options.receiveTimeout = 10000;
    try {
        //以表单的形式设置请求参数
      Map<String, String> queryParameters = {'format': '2', 'key': '939e592487c33b12c509f757500888b5', 'lon': '116.39277', 'lat': '39.933748'};
      Response response = await dio.get("/weather/geo", queryParameters: queryParameters);
      if (response.statusCode == 200) {
        print('请求成功');
        var responseData = response.data.toString();
        responseData = responseData.replaceAll("{", "\n{");
        debugPrint('response.data=$responseData');
      }
    } on DioError catch (e) {
      print("exception: $e");
    }

    return;
  }
关于代理设置代码块,在Dio 2.x版本和1.x版本上设置的方式是不同的,这是因为Dio 2.x版本代码重构的原因,1.x代码上onHttpClientCreate方法放在了Dio类中,而2.x版本将该方法封装到了一个名为DefaultHttpClientAdapter的类中,Dio类中的httpClientAdapter即是默认实现了DefaultHttpClientAdapter类的对象,所以此时根据httpClientAdapter对象来设置onHttpClientCreate为自定义方法即可。
1.x版本代理设置方法的代码块如下:
Dio dio = Dio();
dio.onHttpClientCreate = (HttpClient client) {
  if(client == null) {
    client = HttpClient();
  }
  client.findProxy = (url) {
    return HttpClient.findProxyFromEnvironment(url, environment: {"http_proxy": 'http://192.168.124.94:8888',});
  };
  return client;
};
拦截器
使用Dio处理网络请求可以设置拦截器,dio中定义了两个拦截器:LogInterceptor和CookieManager,这两个拦截器都是抽象类Interceptor的实现,具体是对抽象类中onRequest、onResponse、onError三个方法的实现,我们也可以自定义拦截器处理一些自己的需求。下面使用LogInterceptor来举例说明拦截器的作用:
//在上文dio使用的代码中加入如下代码,即添加了Log拦截器
dio.interceptors.add(LogInterceptor());
添加拦截器之后,执行请求,会看到控制台打印如下信息:
I/flutter (28939): *** Request ***
I/flutter (28939): uri: http://v.juhe.cn/weather/geo?format=2&key=939e592487c33b12c509f757500888b5&lon=116.39277&lat=39.933748
I/flutter (28939): method: GET
I/flutter (28939): contentType: application/json; charset=utf-8
I/flutter (28939): responseType: ResponseType.json
I/flutter (28939): followRedirects: true
I/flutter (28939): connectTimeout: 10000
I/flutter (28939): receiveTimeout: 10000
I/flutter (28939): extra: {}
I/flutter (28939): header:
I/flutter (28939):
I/flutter (28939): *** Response ***
I/flutter (28939): uri: http://v.juhe.cn/weather/geo?format=2&key=939e592487c33b12c509f757500888b5&lon=116.39277&lat=39.933748
I/flutter (28939): statusCode: 200
I/flutter (28939): headers:
I/flutter (28939):  proxy-connection: Keep-alive
I/flutter (28939):  etag: 063d270dc44003f39cf480b7ec6ff843
I/flutter (28939):  content-type: application/json;charset=utf-8
I/flutter (28939):  set-cookie: aliyungf_tc=AQAAAP85/D47jwIAsongemk2vUOG/ZUW; Path=/; HttpOnly
I/flutter (28939):  transfer-encoding: chunked
I/flutter (28939):  date: Sat, 02 Mar 2019 04:29:17 GMT
I/flutter (28939):
I/flutter (28939): 由打印结果可以看出LogInterceptor拦截器其实就是对request和response相关信息的打印,这有助于我们对http请求进行调试。
全局配置
由以上代码可以看出使用dio实现网络请求时,可以通过dio.options的进行全局通用配置,比如baseUrl、超时时间、请求的header信息等。
表单数据
使用post请求我们可以使用form表单的形式发送参数数据,代码如下:
Map<String, String> queryParameters = {'format': '2', 'key': '939e592487c33b12c509f757500888b5', 'lon': '116.39277', 'lat': '39.933748'};
Response response = await dio.post("/weather/geo", data: FormData.from(queryParameters), options: Options());
通过抓取请求包,我们会发现content-type类型如下:

请求取消
比如跳转到某个页面请求了一条远程数据,但在数据没有回来之前关闭了该页面,那这条请求是可以在关闭页面时取消掉的,这要求你在发请求时使用cancelToken参数,如下:
CancelToken _cancelToken = CancelToken();
Map<String, String> queryParameters = {'format': '2', 'key': '939e592487c33b12c509f757500888b5', 'lon': '116.39277', 'lat': '39.933748'};
Response response = await dio.post("/weather/geo", data: FormData.from(queryParameters), cancelToken: _cancelToken);在页面退出之前可以通过调用_cancelToken.cancel()方法取消该请求。多个请求可以使用同一个CancelToken对象,故调用该对象的cancel()方法时所有的未完成的请求均会被取消。
文件下载
Dio中实现的文件下载功能也非常简单好用,实例代码如下:
Future<String> getSavePath() async {
    Directory externalStorageDir = await getExternalStorageDirectory();
    String externalStoragePath = externalStorageDir.path + "/flutterdemo";
    Directory dir = Directory(externalStoragePath);
    if(!dir.existsSync()) {
      dir.createSync();
    }
    File file = File(dir.path + "/test.jpg");
    if(!file.existsSync()) {
      file.createSync();
    }
    print('file.path = ${file.path}');
    return file.path;
}

Future<Null> _downloadImage() async {
    Dio dio = Dio();
    dio.options.baseUrl = "http://img.ipintu.cn/images/";
    dio.interceptors.add(LogInterceptor());
    String savePath = await getSavePath();
    try {
      Response response = await dio.download(
          "/baomanwayong_04.jpg",
          savePath,
          onReceiveProgress: (int count, int total) {
            if(total > 0) {
              print((count / total * 100).toStringAsFixed(0) + "%");
            }
          });
      if (response.statusCode == 200) {
        print('下载完成');
      }
    } on DioError catch (e) {
      print("exception: $e");
    }

    return;
}
点击按钮调用下载方法,控制台输出信息如下:
I/flutter ( 5603): file.path = /storage/emulated/0/flutterdemo/test.jpg
I/flutter ( 5603): *** Request ***
I/flutter ( 5603): uri: http://img.ipintu.cn/images/baomanwayong_04.jpg
I/flutter ( 5603): method: GET
I/flutter ( 5603): contentType: application/json; charset=utf-8
I/flutter ( 5603): responseType: ResponseType.stream
I/flutter ( 5603): followRedirects: true
I/flutter ( 5603): connectTimeout: 0
I/flutter ( 5603): receiveTimeout: 0
I/flutter ( 5603): extra: {}
I/flutter ( 5603): header:
I/flutter ( 5603):
I/flutter ( 5603): *** Response ***
I/flutter ( 5603): uri: http://img.ipintu.cn/images/baomanwayong_04.jpg
I/flutter ( 5603): statusCode: 200
I/flutter ( 5603): headers:
I/flutter ( 5603):  last-modified: Fri, 11 May 2018 08:45:42 GMT
I/flutter ( 5603):  date: Sat, 02 Mar 2019 07:17:01 GMT
I/flutter ( 5603):  x-reqid: BwAAABaE5ayYe4YV
I/flutter ( 5603):  access-control-expose-headers: X-Log, X-Reqid
I/flutter ( 5603):  x-m-reqid: mmcAAMu4tv7GEogV
I/flutter ( 5603):  server: marco/2.8
I/flutter ( 5603):  x-request-id: 8836d6cebf799bbe22c678f2c9cdb5d3; 6b3ff4ec13b9de472e4bae298d38d9c9
I/flutter ( 5603):  x-log: redis.g/404;mc.g/404;redis.g;rs40_shard.sel:4/not found;rdb.g;bs.r.48.179.10783842506;DBD;v4.get;rwro.get:5;RS.dbs:5;RS:6;redis.s;redis.g;IO:42
I/flutter ( 5603):  content-disposition: inline; filename="baomanwayong_04.jpg"; filename*=utf-8' 'baomanwayong_04.jpg
I/flutter ( 5603):  accept-ranges: bytes
I/flutter ( 5603):  content-length: 151887
I/flutter ( 5603):  etag: "Fnlr7Ngb3uIdCjft615r4IJd6-BU"
I/flutter ( 5603):  x-qiniu-zone: 0
I/flutter ( 5603):  connection: keep-alive
I/flutter ( 5603):  cache-control: max-age=2592000
I/flutter ( 5603):  access-control-allow-origin: *
I/flutter ( 5603):  age: 304
I/flutter ( 5603):  content-type: image/jpeg
I/flutter ( 5603):  access-control-max-age: 2592000
I/flutter ( 5603):  x-source: C/200
I/flutter ( 5603):  x-m-log: QNM:jjh1504;QNM3:80
I/flutter ( 5603):  x-svr: IO
I/flutter ( 5603):  content-transfer-encoding: binary
I/flutter ( 5603):  via: S.mix-sd-dst1-081, T.78.M, V.mix-sd-dst1-078, T.13.H, M.ctn-js-taz1-015
I/flutter ( 5603):  x-qnm-cache: Hit
I/flutter ( 5603):  expires: Mon, 01 Apr 2019 07:11:57 G
I/flutter ( 5603):
I/flutter ( 5603): 1%
I/flutter ( 5603): 8%
I/flutter ( 5603): 18%
I/flutter ( 5603): 29%
I/flutter ( 5603): 32%
I/flutter ( 5603): 33%
I/flutter ( 5603): 44%
I/flutter ( 5603): 45%
I/flutter ( 5603): 48%
I/flutter ( 5603): 54%
I/flutter ( 5603): 59%
I/flutter ( 5603): 69%
I/flutter ( 5603): 74%
I/flutter ( 5603): 76%
I/flutter ( 5603): 78%
I/flutter ( 5603): 79%
I/flutter ( 5603): 81%
I/flutter ( 5603): 82%
I/flutter ( 5603): 84%
I/flutter ( 5603): 100%
I/flutter ( 5603): 下载完成dio.download()方法中提供了一个回调方法onReceiveProgress可以很好的跟踪下载的进度,方便做UI上的进度展示。
写在最后
以上就是两种常用的Flutter网络请求库,Dio为我们封装了丰富的网络请求相关功能,所以Dio基本可以满足我们的日常开发需求,就不用再重复造轮子了。