Flutter实战 | 从 0 搭建「网易云音乐」APP(一、创建项目、添加插件、通用代码)
本系列可能会伴随大家很长时间,这里我会从0开始搭建一个「网易云音乐」的APP出来。
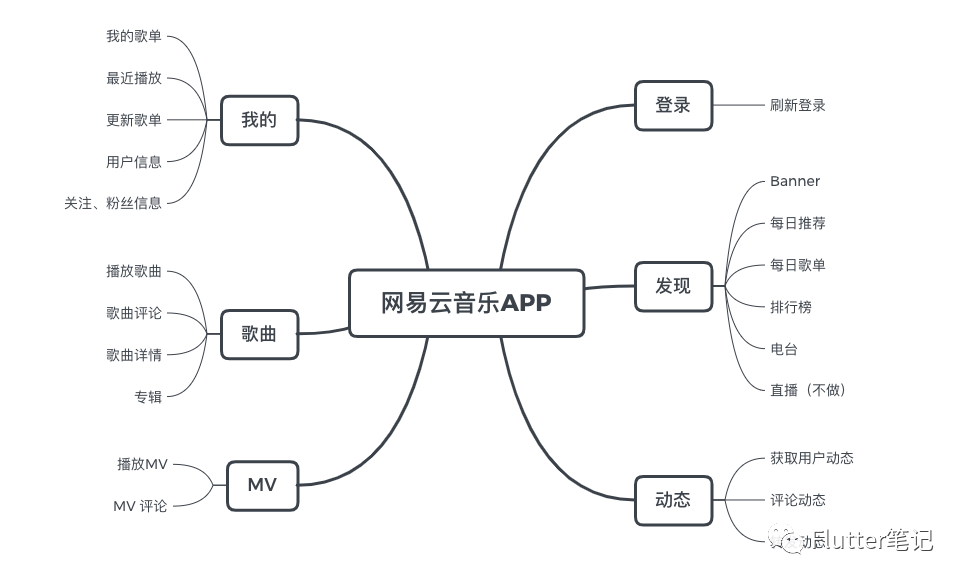
下面是该APP 功能的思维导图:
因为工作的原因,一星期有可能只更新一篇该系列的文章,不过一星期最少一篇。
本章节为第一节,从创建项目说起。
创建「网易云音乐」项目
首先看一下本地 Flutter 环境:
创建命令就都知道了,不用命令的话,用 AS 或者 VS 更简单。
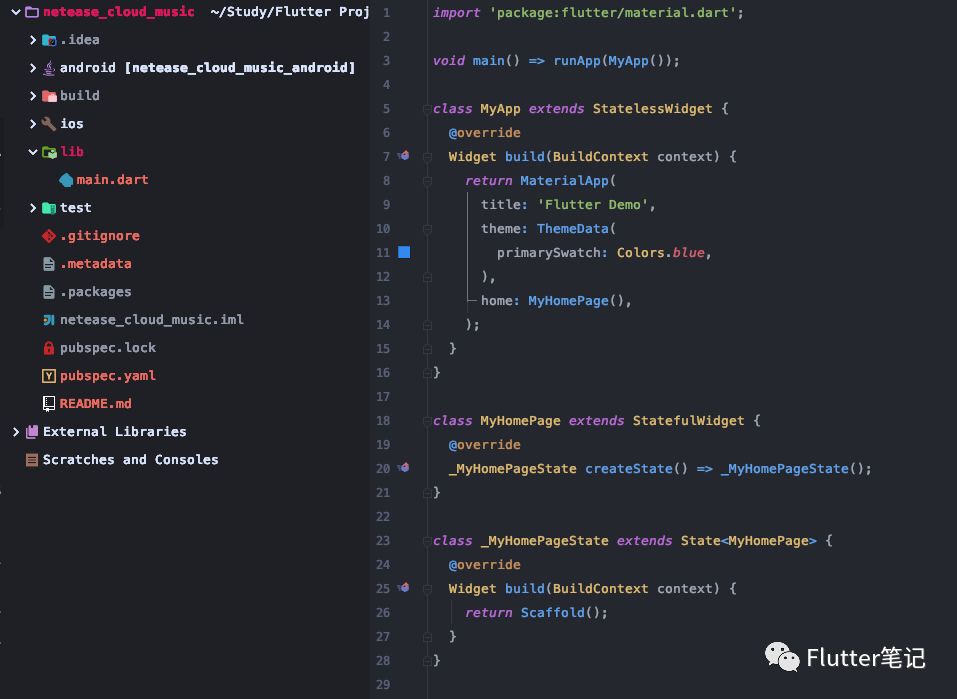
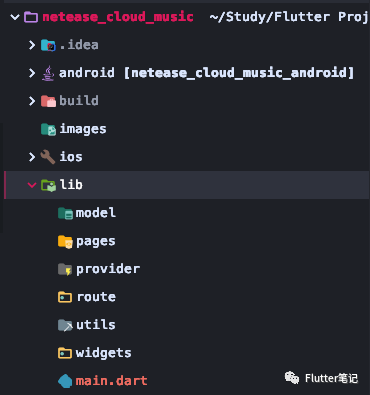
项目创建好后,删除无用代码,然后开始创建文件夹:
一共分为六个文件夹:
•model:存放所有数据类 •pages:存放所有的页面 •provider:存放所有的 Provider •route:存放路由相关 •utils:存放所有的工具类 •widgets:存放所有封装好的组件
下面我们开始添加依赖。
添加插件
首先对我们一些大概的功能有一个了解,
例如 网络请求肯定有,那我会选择 Dio 来当做网络请求的插件,
下面是目前所想到的插件:
插件作用 Provider:状态管理,UI、数据 分离 shared_preferences:本地存储数据,持久化 dio:网络请求 flutter_screenutil:屏幕适配 fluro:路由管理 common_utils:Dart 常用工具类 dio_cookie_manager:dio cookie 工具 cookie_jar:Cookie 管理 permission_handler:权限处理 path_provider:沙盒路径 extended_image:屌炸天的 Image 扩展
通用代码
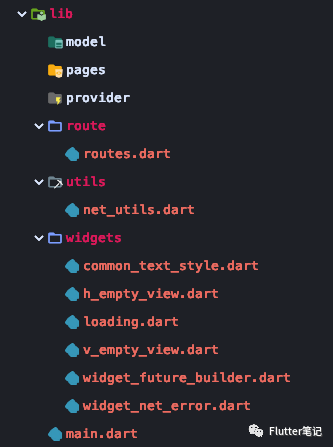
功能如下:
插件作用 routes.dart:fluro 的路由管理 net_utils.dart:网络请求管理 common_text_style.dart:一些通用的 text 样式 h_empty_view.dart:横向空组件(用于占位) v_empty_view.dart:纵向空组件(用于占位) loading.dart:加载组件 widget_future_builder.dart:网络请求组件 widget_net_error.dart:网络请求失败组件
其中 widget_future_builder.dart 在我上一篇文章:Flutter | 定义一个通用的多功能网络请求 Widget 中已经说过了,这里就不多说了。
挑几个没说过的说一下。
loading.dart
用于显示加载中的组件。
开始的时候考虑用 showDialog 来做,但是它默认会把背景变成半透明的黑色。
然后查看源码,发现他是调用 showGeneralDialog 来创建的对话框,传入了一个 barrierColor: Colors.black54 来控制的半透明背景。
那我可以自己来使用 showGeneralDialog,关于该控件的介绍及使用,我这里就不多赘述了,可以查看caijinglong的博客 - Flutter dialog (2) - showGeneralDialog的使用。[12]
最后我这里的代码就是这样(截取一部分):
class Loading {
  static bool isLoading = false;

  static void showLoading(BuildContext context) {
    if (!isLoading) {
      isLoading = true;
      showGeneralDialog(
          context: context,
          pageBuilder: (BuildContext context, Animation animation,
              Animation secondaryAnimation) {
            return xxx;
          }).then((v) {
            // 消失的时候把状态置为 false
        isLoading = false;
      });
    }
  }

  static void hideLoading(BuildContext context) {
    if (isLoading) {
      Navigator.of(context).pop();
    }
  }
}只提供了两个静态方法:showLoading()、hideLoading()。
showLoading 逻辑如下:
1.首先判断 isLoading 是否为 true,如果正在显示 loading,那么则不作操作2.如果不为 true,则显示 loading,并把状态置为 true3.调用 then 方法,在 dialog 消失的时候把状态置为 false
net_utils.dart
网络请求的管理&工具类。
在这个文件中,我们要进行 Dio 的初始化和网络请求的封装。
在查看 API 文档的时候,发现登录状态是由 Cookie 来管理的。 所以我要使用 cookie 的插件来满足需求。
写一个初始化的方法,在 runApp 时调用:
static Dio _dio;

static void init() async {
   // 获取沙盒路径,用于存储 cookie
  Directory tempDir = await getTemporaryDirectory();
  String tempPath = tempDir.path;
  CookieJar cj = PersistCookieJar(dir: tempPath);
  _dio = Dio(BaseOptions(baseUrl: 'http://127.0.0.1:3000'))
    ..interceptors.add(CookieManager(cj))
    ..interceptors.add(LogInterceptor(responseBody: true, requestBody: true));
}
然后再写一个通用的 _get() 方法,所有的网络请求最终都经过它:
static Future<Response> _get(BuildContext context, String url,
                             {Map<String, dynamic> params}) async {
  Loading.showLoading(context);
  try {
    return await _dio.get(url, queryParameters: params);
  } on DioError catch (e) {
    if (e.response is Map) {
      return Future.value(e.response);
    } else {
      return Future.error(0);
    }
  } finally {
    Loading.hideLoading(context);
  }
}
这个逻辑我在上一篇文章中也提到过,如果返回状态不是 2xx,那就会抛出 DioError,然后我们在这里处理逻辑即可。
common_text_style.dart
一些通用的 text 样式。
我们在这里创建一些 顶级变量 :
final commonTextStyle = TextStyle(fontSize: 16, color: Colors.black87);
final smallCommonTextStyle = TextStyle(fontSize: 12, color: Colors.black87);
final smallGrayTextStyle = TextStyle(fontSize: 12, color: Colors.grey);
这样其他类使用起来就很方便,万一以后要改文字样式也很方便。


