【iOS开源库】SDWebImage源码阅读&原理解析
汇总记录:
本文基于SDWebImage 4.2.3版本进行分析和整理。
整体目录结构:
SDWebImage
|----SDWebImageCompat 处理不同平台(iOS、TV、OS、Watch)宏,以及根据文件名@2x、@3x进行图片处理和缩放
|----SDWebImageOperation.h 添加cancel的delegate
+----Cache
|--------SDImageCache 主要处理缓存逻辑,重点集中在:NSCache(Memory)、Disk读写、清理Old File
|--------SDImageCacheConfig 配置缓存参数:是否压缩、iCloud、InMemory、ReadingOption、时间和CacheSize
+----Downloader
|--------SDWebImageDownloaderOperation 主要提供下载的Operation操作
|--------SDWebImageDownloader 提供下载管理入口
+----Utils
|--------SDWebImageManager 提供外层管理cache和download入口
|--------SDWebImagePrefetcher 预处理获取Image,主要应用预加载的地方
+----Categories
|--------NSData+ImageContentType 提供类型判断和ImageIO类型转换
|--------UIImage+GIF Data转UIImage(GIF)扩展
|--------UIImage+MultiFormat 提供BitMap或者未知类型的Data转UIImage扩展
|--------UIImage+WebP Data转WebP扩展
|--------UIImage+ForceDecode 解压操作
|--------UIView+WebCacheOperation 提供顶层关于取消和下载记录的扩展
+----Decoder
|--------SDWebImageCodersManager 整体Coders的入口,提供是否可Coder和Coder转发
|--------SDWebImageCoder 主要说明Coder Delegate 需要实现的接口
|--------SDWebImageImageIOCoder PNG/JPEG的Encode和解压操作
|--------SDWebImageGIFCoder GIF的Coder操作
|--------SDWebImageWebPCoder WebP的Coder操作
|--------SDWebImageFrame 辅助类,主要在GIF等动态图使用
|--------SDWebImageCoderHelper 辅助类,包括方向、Gif图合成等
整体组件结构
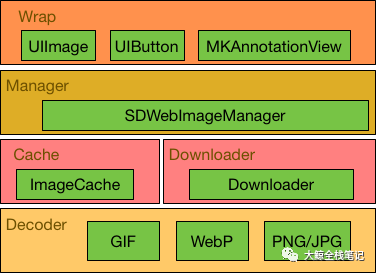
整体框架结构比较清晰,因为Decoder部分相对比较独立,业务逻辑处理主要在Cache、Downloader层级以及以上。 下文会以Cache、Downloader、Manager、Wrap的顺序进行分解,最后讨论Decoder部分。
1、缓存部分解析
缓存部分逻辑主要是在SDImageCache,包括如下几个方面:
- 新增
- 删除
- 查询
- 缓存管理(过期)
SDWebImage的缓存中,主要走了一套NSCache管理内存和根据传入的Key转换MD5作为文件名存储。以及创建了一个IO操作的Queue进行管理IO操作。 这里重点注意,任何耗时:包括IO读写、转码等操作,都不应该放到主线程里面使用。
缓存部分其他地方都比较简单易懂,直接看源码即可。
重点说下如下两个值得学习的地方:
1、通过NSOperation管理queue任务
- (nullable NSOperation *)queryCacheOperationForKey:(nullable NSString *)key done:(nullable SDCacheQueryCompletedBlock)doneBlock {
    if (!key) {
        if (doneBlock) {
            doneBlock(nil, nil, SDImageCacheTypeNone);
        }
        return nil;
    }

    // First check the in-memory cache...
    UIImage *image = [self imageFromMemoryCacheForKey:key];
    if (image) {
        NSData *diskData = nil;
        if (image.images) {
            diskData = [self diskImageDataBySearchingAllPathsForKey:key];
        }
        if (doneBlock) {
            doneBlock(image, diskData, SDImageCacheTypeMemory);
        }
        return nil;
    }

    NSOperation *operation = [NSOperation new];
    dispatch_async(self.ioQueue, ^{
        if (operation.isCancelled) {
            // do not call the completion if cancelled
            return;
        }

        @autoreleasepool {
            NSData *diskData = [self diskImageDataBySearchingAllPathsForKey:key];
            UIImage *diskImage = [self diskImageForKey:key];
            if (diskImage && self.config.shouldCacheImagesInMemory) {
                NSUInteger cost = SDCacheCostForImage(diskImage);
                [self.memCache setObject:diskImage forKey:key cost:cost];
            }

            if (doneBlock) {
                dispatch_async(dispatch_get_main_queue(), ^{
                    doneBlock(diskImage, diskData, SDImageCacheTypeDisk);
                });
            }
        }
    });

    return operation;
}
查询缓存的时候,这里采用了NSOperation进行是否取消的操作,因为当下载/缓存内容过多时,毕定存在先后处理顺序的问题,这时候可能由于用户操作等需要取消当前缓存处理,那么NSOperation这里起的唯一作用就是提供取消操作。可以参考具体的Manager里面缓存调起逻辑。
2、申请系统后台时间处理任务
- (void)backgroundDeleteOldFiles {
    Class UIApplicationClass = NSClassFromString(@"UIApplication");    if(!UIApplicationClass || ![UIApplicationClass respondsToSelector:@selector(sharedApplication)]) {        return;
    }    UIApplication *application = [UIApplication performSelector:@selector(sharedApplication)];
    __block UIBackgroundTaskIdentifier bgTask = [application beginBackgroundTaskWithExpirationHandler:^{        // Clean up any unfinished task business by marking where you
        // stopped or ending the task outright.
        [application endBackgroundTask:bgTask];
        bgTask = UIBackgroundTaskInvalid;
    }];    // Start the long-running task and return immediately.
    [self deleteOldFilesWithCompletionBlock:^{
        [application endBackgroundTask:bgTask];
        bgTask = UIBackgroundTaskInvalid;
    }];
}
这里有个疑问点要注意,为啥会存在前后两部分都去释放Task任务。 iOS的后台任务有个背景,不管任何时候,都需要手动去调用endBackgroundTask结束后台任务,其实开启一个后台job的时候,因为时长有限,所以会存在两种结局:
- 在允许的时间内执行完成
- 规定时间内未执行完成 如上两种情况,在结束后都必须手动调用endBackgroundTask:;
2、下载器(Downloader)
下载部分,主要是提供了一个Operation和一个Manager,其中SDWebImageDownloaderOperation里面提供了常用的Operation操作,也支持自定义的下载逻辑(实现SDWebImageDownloaderOperationInterface即可)。
2.1 SDWebImageDownloaderOperation 逻辑
该文件里面重点是Delegate:SDWebImageDownloaderOperationInterface 的设计和一种实现方式SDWebImageDownloaderOperation(PS:优秀的开源库基本都会设计一套接口,再做一套基础的实现)。
// 这里描述写的很清楚,如果需要自定义的Downloader op,那么需要继承NSOperation并且实现SDWebImageDownloaderOperation

/**
 Describes a downloader operation. If one wants to use a custom downloader op, it needs to inherit from `NSOperation` and conform to this protocol
 */
@protocol SDWebImageDownloaderOperationInterface<NSObject>

- (nonnull instancetype)initWithRequest:(nullable NSURLRequest *)request
                              inSession:(nullable NSURLSession *)session
                                options:(SDWebImageDownloaderOptions)options;

- (nullable id)addHandlersForProgress:(nullable SDWebImageDownloaderProgressBlock)progressBlock
                            completed:(nullable SDWebImageDownloaderCompletedBlock)completedBlock;

- (BOOL)shouldDecompressImages;
- (void)setShouldDecompressImages:(BOOL)value;

- (nullable NSURLCredential *)credential;
- (void)setCredential:(nullable NSURLCredential *)value;

@endSDWebImageDownloaderOperation主要是提供内置的下载实现,重点是使用NSURLSessionTask进行下载,逻辑不复杂,详细的参考源码。里面重点有如下部分需要关注:
- 1、
_barrierQueue是共用的并发队列,而且不同的Op都是共用的同一个Queue,这里为啥要做成并发的呢?主要是优化多个线程查询callbacks的时间。
- (nullable NSArray<id> *)callbacksForKey:(NSString *)key {
    __block NSMutableArray<id> *callbacks = nil;
    dispatch_sync(self.barrierQueue, ^{
        // We need to remove [NSNull null] because there might not always be a progress block for each callback
        callbacks = [[self.callbackBlocks valueForKey:key] mutableCopy];
        [callbacks removeObjectIdenticalTo:[NSNull null]];
    });
    return [callbacks copy];    // strip mutability here
}然后再配合dispatch_barrier_(a)sync操作来进行增删 操作。
- 2、在URLSession的Delegate实现中,存在如下函数实现:
- (void)URLSession:(NSURLSession *)session task:(NSURLSessionTask *)task didReceiveChallenge:(NSURLAuthenticationChallenge *)challenge completionHandler:(void (^)(NSURLSessionAuthChallengeDisposition disposition, NSURLCredential *credential))completionHandler {

    NSURLSessionAuthChallengeDisposition disposition = NSURLSessionAuthChallengePerformDefaultHandling;
    __block NSURLCredential *credential = nil;

    if ([challenge.protectionSpace.authenticationMethod isEqualToString:NSURLAuthenticationMethodServerTrust]) {
        if (!(self.options & SDWebImageDownloaderAllowInvalidSSLCertificates)) {
            disposition = NSURLSessionAuthChallengePerformDefaultHandling;
        } else {
            credential = [NSURLCredential credentialForTrust:challenge.protectionSpace.serverTrust];
            disposition = NSURLSessionAuthChallengeUseCredential;
        }
    } else {
        if (challenge.previousFailureCount == 0) {
            if (self.credential) {
                credential = self.credential;
                disposition = NSURLSessionAuthChallengeUseCredential;
            } else {
                disposition = NSURLSessionAuthChallengeCancelAuthenticationChallenge;
            }
        } else {
            disposition = NSURLSessionAuthChallengeCancelAuthenticationChallenge;
        }
    }

    if (completionHandler) {
        completionHandler(disposition, credential);
    }
}该部分重点是实现Https证书信任请求的,关于Https在iOS上的信任使用,可以搜索学习 iOS上的Https。
2.2 SDWebImageDownloader说明
SDWebImageDownloader主要是基于SDWebImageDownloaderOperation进行任务的添加和管理。使用NSOperationQueue进行任务执行操作。
-
设置了同一时间最多可执行task为6.
-
提供设置Http头信息入口
-
允许使用自定义的
SDWebImageDownloaderOperationInterfaceOperation进行操作,如果没有指定,那么就用默认的SDWebImageDownloaderOperation -
详细的逻辑参考代码即可,比较简单
-
3、针对通用组件封装(Wrap)
该部分的代码主要是在WebCache Categories文件夹下面,除了UIView+WebCache 以外,其他的涉及UIImage、UIButton等都是下载完成后赋值给到Image的区别,下载过程处理都是在UIView+WebCache中实现。
这里主要说下UIView+WebCache中的细节,其他的阅读源码即可,里面主要的逻辑函数为:
- (void)sd_internalSetImageWithURL:(nullable NSURL *)url
                  placeholderImage:(nullable UIImage *)placeholder
                           options:(SDWebImageOptions)options
                      operationKey:(nullable NSString *)operationKey
                     setImageBlock:(nullable SDSetImageBlock)setImageBlock
                          progress:(nullable SDWebImageDownloaderProgressBlock)progressBlock
                         completed:(nullable SDExternalCompletionBlock)completedBlock
                           context:(nullable NSDictionary *)context
详细的步骤逻辑如下:
  // 第一步:取消老的下载,这就是UITableViewCell重用后,快速滑动时,中间部分的图片不会被下载的原因。
    NSString *validOperationKey = operationKey ?: NSStringFromClass([self class]);
    [self sd_cancelImageLoadOperationWithKey:validOperationKey];
    objc_setAssociatedObject(self, &imageURLKey, url, OBJC_ASSOCIATION_RETAIN_NONATOMIC);
    //////////////////////////////////////////////
    // 第二步:看是否设置默认图片,这里一个点。如果[context valueForKey:SDWebImageInternalSetImageGroupKey],那么就enter group,这个是干啥的呢,其实主要是给到FLAnimatedImageView+WebCache使用,
    // 这里是等待setImageBlock会调用的,会结合dispatch_group_leave 和 dispatch_group_notify 使用
    if (!(options & SDWebImageDelayPlaceholder)) {
        if ([context valueForKey:SDWebImageInternalSetImageGroupKey]) {
            dispatch_group_t group = [context valueForKey:SDWebImageInternalSetImageGroupKey];
            dispatch_group_enter(group);
        }
        dispatch_main_async_safe(^{
            [self sd_setImage:placeholder imageData:nil basedOnClassOrViaCustomSetImageBlock:setImageBlock];
        });
    }

    if (url) {
    // 这里是状态栏的扩展,主要是显示流量那个菊花,可以忽略
        // check if activityView is enabled or not
        if ([self sd_showActivityIndicatorView]) {
            [self sd_addActivityIndicator];
        }
        ///////////////////////////////////////////////////////////////////
        // 第三步:获取Manager进行下载
        SDWebImageManager *manager;
        if ([context valueForKey:SDWebImageExternalCustomManagerKey]) {
            manager = (SDWebImageManager *)[context valueForKey:SDWebImageExternalCustomManagerKey];
        } else {
            manager = [SDWebImageManager sharedManager];
        }

        __weak __typeof(self)wself = self;
        id <SDWebImageOperation> operation = [manager loadImageWithURL:url options:options progress:progressBlock completed:^(UIImage *image, NSData *data, NSError *error, SDImageCacheType cacheType, BOOL finished, NSURL *imageURL) {
            __strong __typeof (wself) sself = wself;
            [sself sd_removeActivityIndicator];
            if (!sself) { return; }

            ////////////////////////////////////////////////////////
            // 第四步:下载完成后,进行状态设置和相关状态回调
            BOOL shouldCallCompletedBlock = finished || (options & SDWebImageAvoidAutoSetImage);
            BOOL shouldNotSetImage = ((image && (options & SDWebImageAvoidAutoSetImage)) ||
                                      (!image && !(options & SDWebImageDelayPlaceholder)));
            SDWebImageNoParamsBlock callCompletedBlockClojure = ^{
                if (!sself) { return; }
                if (!shouldNotSetImage) {
                    [sself sd_setNeedsLayout];
                }
                if (completedBlock && shouldCallCompletedBlock) {
                    completedBlock(image, error, cacheType, url);
                }
            };

            // case 1a: we got an image, but the SDWebImageAvoidAutoSetImage flag is set
            // OR
            // case 1b: we got no image and the SDWebImageDelayPlaceholder is not set
            if (shouldNotSetImage) {
                dispatch_main_async_safe(callCompletedBlockClojure);
                return;
            }

            UIImage *targetImage = nil;
            NSData *targetData = nil;
            if (image) {
                // case 2a: we got an image and the SDWebImageAvoidAutoSetImage is not set
                targetImage = image;
                targetData = data;
            } else if (options & SDWebImageDelayPlaceholder) {
                // case 2b: we got no image and the SDWebImageDelayPlaceholder flag is set
                targetImage = placeholder;
                targetData = nil;
            }

            if ([context valueForKey:SDWebImageInternalSetImageGroupKey]) {
                dispatch_group_t group = [context valueForKey:SDWebImageInternalSetImageGroupKey];
                dispatch_group_enter(group);
                dispatch_main_async_safe(^{
                    [sself sd_setImage:targetImage imageData:targetData basedOnClassOrViaCustomSetImageBlock:setImageBlock];
                });
                // ensure completion block is called after custom setImage process finish
                dispatch_group_notify(group, dispatch_get_main_queue(), ^{
                    callCompletedBlockClojure();
                });
            } else {
                dispatch_main_async_safe(^{
                    [sself sd_setImage:targetImage imageData:targetData basedOnClassOrViaCustomSetImageBlock:setImageBlock];
                    callCompletedBlockClojure();
                });
            }
        }];
        [self sd_setImageLoadOperation:operation forKey:validOperationKey];
    } else {
        dispatch_main_async_safe(^{
            [self sd_removeActivityIndicator];
            if (completedBlock) {
                NSError *error = [NSError errorWithDomain:SDWebImageErrorDomain code:-1 userInfo:@{NSLocalizedDescriptionKey : @"Trying to load a nil url"}];
                completedBlock(nil, error, SDImageCacheTypeNone, url);
            }
        });
    }
4、Decoder模块
Decoder模块部分的源码重点是在目录Decoder和Categories两个地方,其中Categories提供NSData、UIImage等的直接调用extend。核心实现还是基于Decoder。
相关模块的详细说明可以参考目录说明部分。
这里主要说下几个部分,主要包括个人觉得可能产生障碍的点,便于理解:
- 为啥要压缩和Decompressed?
SDWebImageFrame和SDWebImageCoderHelper中animatedImageWithFrames的逻辑- 大图片缩放逻辑辅助说明
4.1 为啥要压缩和Decompressed
我们都知道,在iOS中,我加载PNG和JPEG,直接调用[UIImage imageNamed:@"pic"];就好,而且本来从网络上下载的图片也都是PNG或者JPEG的,又没用Zip等去进行压缩,为啥还有这么一个Decoder模块呢。
其实这里重点就是针对性能做优化,我们平时直接加载图片的时候,因为图片都很小,所以基本不会消耗时间,但是我们从url中拉取的图片,一般都是运营配置,基本都不小。
如果加载过本地未处理的PNG(文件比较大)的兄弟应该有过这种感觉,跑完加载的时候,刷出界面开始会白那么一下,图片才出来。那就是因为图片太大了。
那么针对PNG和JPEG,SDWebImage的Decompressed又是做什么操作呢,我们知道图片显示到设备上,是按照RGBA等显示,但是PNG和JPEG自身的格式并非RGBA的。这里的解压其实就是创建一个BitmapImage,先在非UI线程渲染图片,然后拿到UIImage去显示。
代码参考如下:
    const size_t partialHeight = CGImageGetHeight(partialImageRef);
    CGColorSpaceRef colorSpace = SDCGColorSpaceGetDeviceRGB();
    CGContextRef bmContext = CGBitmapContextCreate(NULL, _width, _height, 8, 0, colorSpace, kCGBitmapByteOrderDefault | kCGImageAlphaPremultipliedFirst);
    if (bmContext) {
       CGContextDrawImage(bmContext, (CGRect){.origin.x = 0.0f, .origin.y = 0.0f, .size.width = _width, .size.height = partialHeight}, partialImageRef);
        CGImageRelease(partialImageRef);
        partialImageRef = CGBitmapContextCreateImage(bmContext);
        CGContextRelease(bmContext);
}4.2SDWebImageFrame 和SDWebImageCoderHelper中animatedImageWithFrames的逻辑
这两个类里面,有部分函数主要是提供GIF图片的辅助,当我们从NSData拿到图片数据的时候,其实是拿到了多张图片的Data,当我们分成多张图(参考SDWebImageGIFCoder)后,我们要合成到UIImage的images中。
每个SDWebImageFrame就代表了一张图片,每个图片有个播放时长,但是总的一个animationImage并未对每个Image进行时长设置。他的逻辑是怎样的呢?
假如我们有两张图AB,动画要显示A3s,显示B1s,那么我们可以指定显示四张图片:AAAB,总时长是4s。
所以当拿到GIF对应的UIImage和显示时长后,怎么去合成AAAB 和 4s 的时长呢,流程如下: -获取每个图片总时长,totalTimes -计算没个图片时长的最大公约数,再用每张图片的时长除以最大公约数,就是每张图片要显示的次数 -根据显示次数构建UIImage的Array,根据UIImage的Array和总时长,就能通过GIF转成UIImage动画了
4.3 大图片缩放逻辑辅助说明
图片缩放逻辑主要函数:
- (nullable UIImage *)sd_decompressedAndScaledDownImageWithImage:(nullable UIImage *)image {
    if (![[self class] shouldDecodeImage:image]) {
        return image;
    }

    if (![[self class] shouldScaleDownImage:image]) {
        return [self sd_decompressedImageWithImage:image];
    }

    CGContextRef destContext;

    // autorelease the bitmap context and all vars to help system to free memory when there are memory warning.
    // on iOS7, do not forget to call [[SDImageCache sharedImageCache] clearMemory];
    @autoreleasepool {
        CGImageRef sourceImageRef = image.CGImage;

        CGSize sourceResolution = CGSizeZero;
        sourceResolution.width = CGImageGetWidth(sourceImageRef);
        sourceResolution.height = CGImageGetHeight(sourceImageRef);
        float sourceTotalPixels = sourceResolution.width * sourceResolution.height;
        // Determine the scale ratio to apply to the input image
        // that results in an output image of the defined size.
        // see kDestImageSizeMB, and how it relates to destTotalPixels.
        float imageScale = kDestTotalPixels / sourceTotalPixels;
        CGSize destResolution = CGSizeZero;
        destResolution.width = (int)(sourceResolution.width*imageScale);
        destResolution.height = (int)(sourceResolution.height*imageScale);

        // current color space
        CGColorSpaceRef colorspaceRef = [[self class] colorSpaceForImageRef:sourceImageRef];

        // kCGImageAlphaNone is not supported in CGBitmapContextCreate.
        // Since the original image here has no alpha info, use kCGImageAlphaNoneSkipLast
        // to create bitmap graphics contexts without alpha info.
        destContext = CGBitmapContextCreate(NULL,
                                            destResolution.width,
                                            destResolution.height,
                                            kBitsPerComponent,
                                            0,
                                            colorspaceRef,
                                            kCGBitmapByteOrderDefault|kCGImageAlphaNoneSkipLast);

        if (destContext == NULL) {
            return image;
        }
        CGContextSetInterpolationQuality(destContext, kCGInterpolationHigh);

        // Now define the size of the rectangle to be used for the
        // incremental blits from the input image to the output image.
        // we use a source tile width equal to the width of the source
        // image due to the way that iOS retrieves image data from disk.
        // iOS must decode an image from disk in full width 'bands', even
        // if current graphics context is clipped to a subrect within that
        // band. Therefore we fully utilize all of the pixel data that results
        // from a decoding opertion by achnoring our tile size to the full
        // width of the input image.
        CGRect sourceTile = CGRectZero;
        sourceTile.size.width = sourceResolution.width;
        // The source tile height is dynamic. Since we specified the size
        // of the source tile in MB, see how many rows of pixels high it
        // can be given the input image width.
        sourceTile.size.height = (int)(kTileTotalPixels / sourceTile.size.width );
        sourceTile.origin.x = 0.0f;
        // The output tile is the same proportions as the input tile, but
        // scaled to image scale.
        CGRect destTile;
        destTile.size.width = destResolution.width;
        destTile.size.height = sourceTile.size.height * imageScale;
        destTile.origin.x = 0.0f;
        // The source seem overlap is proportionate to the destination seem overlap.
        // this is the amount of pixels to overlap each tile as we assemble the ouput image.
        float sourceSeemOverlap = (int)((kDestSeemOverlap/destResolution.height)*sourceResolution.height);
        CGImageRef sourceTileImageRef;
        // calculate the number of read/write operations required to assemble the
        // output image.
        int iterations = (int)( sourceResolution.height / sourceTile.size.height );
        // If tile height doesn't divide the image height evenly, add another iteration
        // to account for the remaining pixels.
        int remainder = (int)sourceResolution.height % (int)sourceTile.size.height;
        if(remainder) {
            iterations++;
        }
        // Add seem overlaps to the tiles, but save the original tile height for y coordinate calculations.
        float sourceTileHeightMinusOverlap = sourceTile.size.height;
        sourceTile.size.height += sourceSeemOverlap;
        destTile.size.height += kDestSeemOverlap;
        for( int y = 0; y < iterations; ++y ) {
            @autoreleasepool {
                sourceTile.origin.y = y * sourceTileHeightMinusOverlap + sourceSeemOverlap;
                destTile.origin.y = destResolution.height - (( y + 1 ) * sourceTileHeightMinusOverlap * imageScale + kDestSeemOverlap);
                sourceTileImageRef = CGImageCreateWithImageInRect( sourceImageRef, sourceTile );
                if( y == iterations - 1 && remainder ) {
                    float dify = destTile.size.height;
                    destTile.size.height = CGImageGetHeight( sourceTileImageRef ) * imageScale;
                    dify -= destTile.size.height;
                    destTile.origin.y += dify;
                }
                CGContextDrawImage( destContext, destTile, sourceTileImageRef );
                CGImageRelease( sourceTileImageRef );
            }
        }

        CGImageRef destImageRef = CGBitmapContextCreateImage(destContext);
        CGContextRelease(destContext);
        if (destImageRef == NULL) {
            return image;
        }
        UIImage *destImage = [UIImage imageWithCGImage:destImageRef scale:image.scale orientation:image.imageOrientation];
        CGImageRelease(destImageRef);
        if (destImage == nil) {
            return image;
        }
        return destImage;
    }
}
这里光看代码,肯定会一头雾水,其实逻辑很简单,避免要缩放的图片太大,采用的方式是将图片分割成一系列大小的小方块,然后每个方块去获取Image并draw到目标BitmapContext上。重点还是在于内存优化方面。