手摸手Electron + Vue实战教程(一)
1 为什么要写这个系列教程
相信看到这篇文章的人,都是对Electron感兴趣的, 网上关于Electron的教程其实已经不少了,但是大多都是一些功能点的实现,对于从零开始搭建一个适合自己的项目,估计还是有不少人有点懵逼的。刚好自己也学习Electron一段时间了,想着整理一下自己学习期间的一些笔记和踩坑的地方,从零开始编写一个小项目。一个由浅入深(或者说从入门到放弃)的套路,一步步带你敲代码实现一个小项目,希望能给大家带来一点点启发。
2 项目搭建
网上有个比较火的脚手架electron-vue,github 上 12.2k 的 star,大家应该都听说过或者使用过,但现在我们不使用它,electron-vue是vue-cli2.0的版本,现在都已经出道 4.0 了,再者electron-vue已经很久没有更新,我们可以使用 vue 最新的脚手架加上插件vue-cli-plugin-electron-builder来搭建项目,项目结构也更加清晰明了。好了不废话了,开撸吧……
2.1 用vue-cli创建一个项目
打开命令行工具,安装 node,安装 yarn,安装vue-cli脚手架,我这里使用的版本是:
MacBook-Pro:~ Bill$ node -v
v12.16.1
MacBook-Pro:~ Bill$ yarn -v
1.22.4
MacBook-Pro:~ Bill$ vue -V
@vue/cli 4.3.1
MacBook-Pro:~ Bill$
vue-cli创建初始化项目:
vue create vue-electron-notes我们选择自定义创建:
Vue CLI v4.3.1
? Please pick a preset:
  default (babel, eslint)
❯ Manually select features
我们选择自定义创建,使用babel(语法编译器)、Router(路由)、CSS Pre-processors(css预处理器)、Linter / Formatter(代码风格、格式校验):
Vue CLI v4.3.1
? Please pick a preset: Manually select features
? Check the features needed for your project:
 ◉ Babel
 ◯ TypeScript
 ◯ Progressive Web App (PWA) Support
 ◉ Router
 ◉ Vuex
 ◉ CSS Pre-processors
❯◉ Linter / Formatter
 ◯ Unit Testing
 ◯ E2E Testing
router我们使用history模式,输入y,进入下一步:
Vue CLI v4.3.1
? Please pick a preset: Manually select features
? Check the features needed for your project: Babel, Router, Vuex, CSS Pre-processors, Linter
? Use history mode for router? (Requires proper server setup for index fallback in production) (Y/n) y
css预处理器我这里选择Less,大家也可以选择自己喜欢的Sass、Stylus:
Vue CLI v4.3.1
? Please pick a preset: Manually select features
? Check the features needed for your project: Babel, Router, Vuex, CSS Pre-processors, Linter
? Use history mode for router? (Requires proper server setup for index fallback in production) Yes
? Pick a CSS pre-processor (PostCSS, Autoprefixer and CSS Modules are supported by default):
  Sass/SCSS (with dart-sass)
  Sass/SCSS (with node-sass)
❯ Less
  Stylus
选择ESLint代码检查工具,我这里选择的是“ESLint + Airbnb config”,强烈建议大家一定要在项目内使用ESLint,一直用一直爽,懂的自然懂……该有的规范还是要遵循的:
Vue CLI v4.3.1
? Please pick a preset: Manually select features
? Check the features needed for your project: Babel, Router, Vuex, CSS Pre-processors, Linter
? Use history mode for router? (Requires proper server setup for index fallback in production) Yes
? Pick a CSS pre-processor (PostCSS, Autoprefixer and CSS Modules are supported by default): Less
? Pick a linter / formatter config:
  ESLint with error prevention only
❯ ESLint + Airbnb config
  ESLint + Standard config
  ESLint + Prettier
选择什么时候执行ESLint检查,我这里两个都选了,保存时检查“Lint on save”,向仓库提交代码时也检查“Lint and fix on commit”,不符合规范的代码我们不允许提交到仓库:
Vue CLI v4.3.1
? Please pick a preset: Manually select features
? Check the features needed for your project: Babel, Router, Vuex, CSS Pre-processors, Linter
? Use history mode for router? (Requires proper server setup for index fallback in production) Yes
? Pick a CSS pre-processor (PostCSS, Autoprefixer and CSS Modules are supported by default): Less
? Pick a linter / formatter config: Airbnb
? Pick additional lint features:
 ◉ Lint on save
❯◉ Lint and fix on commit
这里是询问 babel, postcss, eslint这些配置是单独的配置文件还是放在package.json 文件中,这里我们选择“In dedicated config files”单独放置:
Vue CLI v4.3.1
? Please pick a preset: Manually select features
? Check the features needed for your project: Babel, Router, Vuex, CSS Pre-processors, Linter
? Use history mode for router? (Requires proper server setup for index fallback in production) Yes
? Pick a CSS pre-processor (PostCSS, Autoprefixer and CSS Modules are supported by default): Less
? Pick a linter / formatter config: Airbnb
? Pick additional lint features: Lint on save, Lint and fix on commit
? Where do you prefer placing config for Babel, ESLint, etc.? (Use arrow keys)
❯ In dedicated config files
  In package.json
这里是最后的操作,是否保存该配置,如果你下次需要使用相同的配置,那么可以选择 yes,我这选择 no:
Vue CLI v4.3.1
? Please pick a preset: Manually select features
? Check the features needed for your project: Babel, Router, Vuex, CSS Pre-processors, Linter
? Use history mode for router? (Requires proper server setup for index fallback in production) Yes
? Pick a CSS pre-processor (PostCSS, Autoprefixer and CSS Modules are supported by default): Less
? Pick a linter / formatter config: Airbnb
? Pick additional lint features: Lint on save, Lint and fix on commit
? Where do you prefer placing config for Babel, ESLint, etc.? In dedicated config files
? Save this as a preset for future projects? (y/N) no
执行完以上操作,剩下的我们等待项目下载依赖包,vue项目初始化就算搞定了哈。
cd vue-electron-notes进入项目跑一遍yarn serve,这个时候没什么问题就已经成功运行起来了!
2.2 在项目内集成Electron
进入我们项目的根目录,我们执行以下命令来安装插件vue-cli-plugin-electron-builder
vue add vue-cli-plugin-electron-builder我们选择版本^6.0.0:
✔  Successfully installed plugin: vue-cli-plugin-electron-builder

? Choose Electron Version (Use arrow keys)
  ^4.0.0
  ^5.0.0
❯ ^6.0.0
这里静静等待安装即可,它会下载electron的依赖文件 60M 左右,过程可能有点长,跟你的网络息息相关……
在这等待安装的过程中,其实我们还可以再唠嗑唠嗑另一种页面可视化安装vue-cli-plugin-electron-builder的方式,执行以下命令
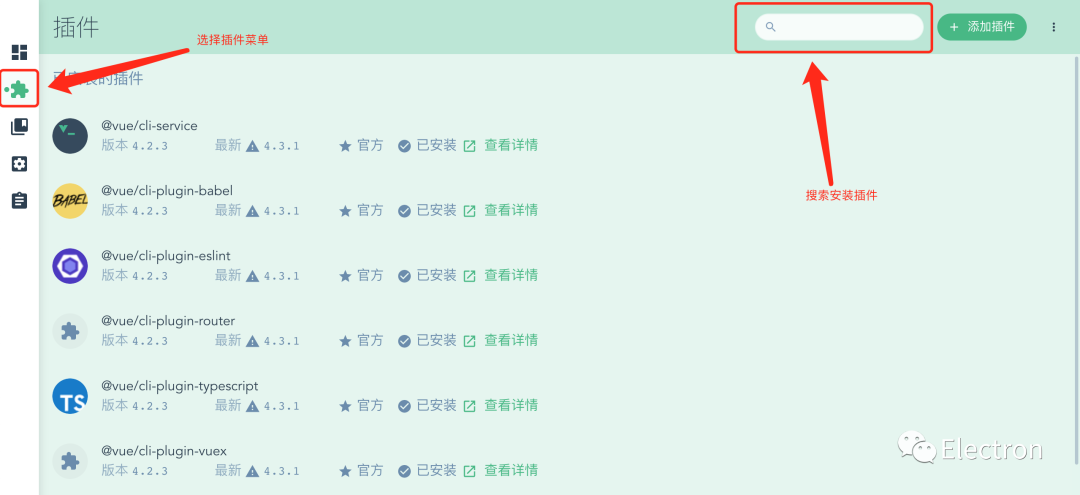
vue ui这个时候会自动打开浏览器页面,然后选择左侧插件菜单,搜索安装插件即可:
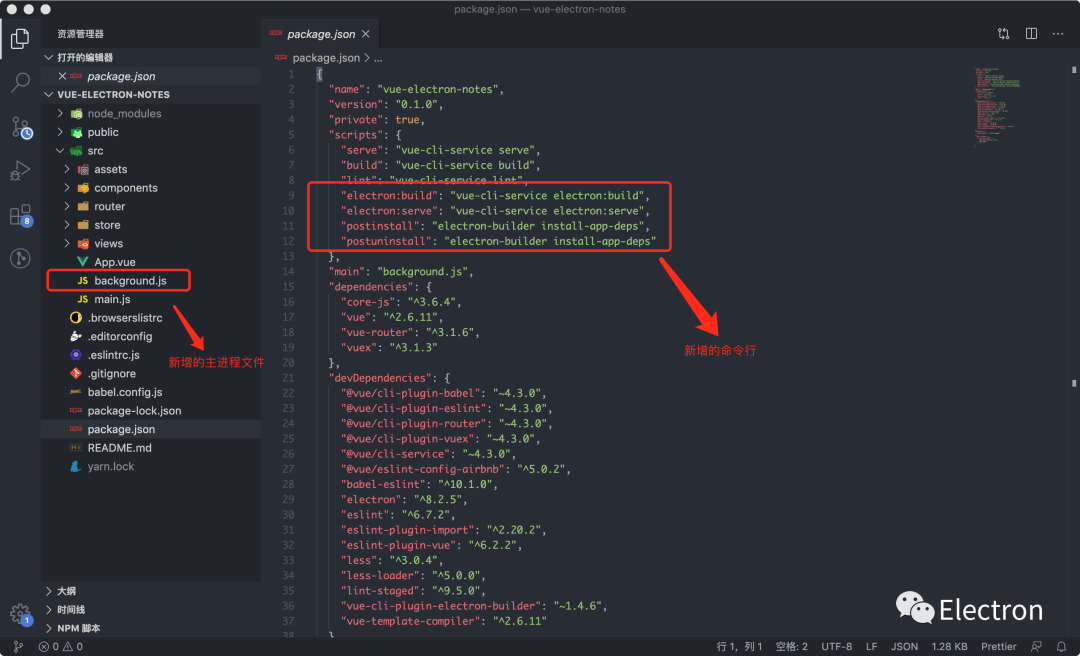
我个人更偏向于使用命令安装,更加简单方便快捷,当然不管使用上面哪种安装方法,其结果是一致的。等安装完毕后会重新构建项目架构,在src目录下生成background.js文件,并且还新增了启动命令,如下图:
到这里其实还有一个小问题,插件安装的Electron是 6.0 版本的,但官方最新的版本其实已经到了8.2.5了,为了后续我们可以使用最新的api,我们需要执行命令更新一下版本:
yarn add electron@8.2.5 -D到这一步,我们所有的安装都已经完成了,可以运行程序看效果了,要注意我们现在启动项目的命令已经变成这个了:
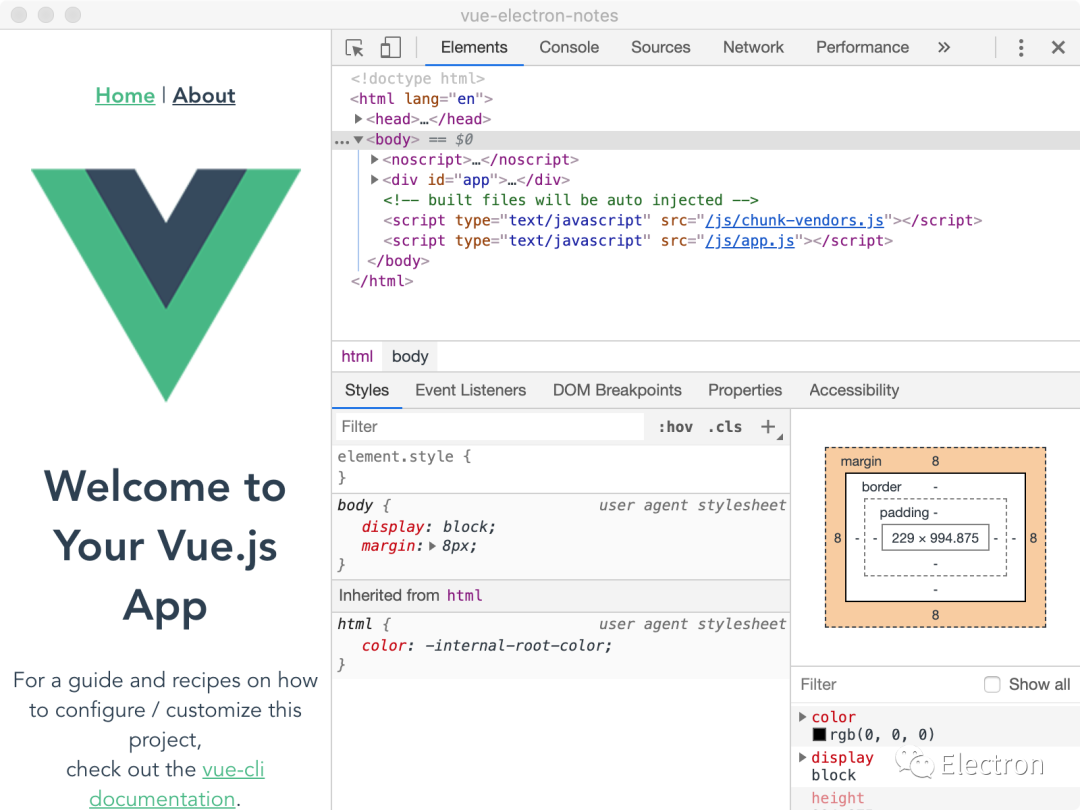
yarn electron:serve这个时候就已经会自动弹出一个程序了,终于大功告成了……
那个,再稍等一下呗,我们去看看刚才执行命令行的地方,是不是有这个警告⚠️呀:
 DONE  Compiled successfully in 1339ms                                                                                                                                     1:52:39 PM

  File                      Size                     Gzipped

  dist_electron/index.js    651.77 KiB               148.32 KiB

  Images and other types of assets omitted.

 INFO  Launching Electron...
(electron) The default value of app.allowRendererProcessReuse is deprecated, it is currently "false".  It will change to be "true" in Electron 9.  For more information please check [https://github.com/electron/electron/issues/18397](https://github.com/electron/electron/issues/18397)
有道翻译的结果是:allowrendererprocessreuse的默认值是不赞成的,它当前是“false”。在electron9中,它会变成“true”。(好吧我是个英语渣渣……)
为了解决以上告警,我们需要在主进程文件background.js中添加以下代码:
app.allowRendererProcessReuse = true今天的项目搭建就先到这里


