iOS面试题-UI篇
Size Classes 具体使用
- 对屏幕进行分类
UIView和CALayer是什么关系?
- UIView显示在屏幕上归功于CALayer,通过调用drawRect方法来渲染自身的内容,调节CALayer属性可以调整UIView的外观,
- UIView继承自UIResponder,比起CALayer可以响应用户事件,Xcode6之后可以方便的通过视图调试功能查看图层之间的关系
- UIView是iOS系统中界面元素的基础,所有的界面元素都继承自它。它内部是由Core Animation来实现的,它真正的绘图部分,是由一个叫CALayer(Core Animation Layer)的类来管理。UIView本身,更像是一个CALayer的管理器,访问它的跟绘图和坐标有关的属性,如frame,bounds等,实际上内部都是访问它所在CALayer的相关属性
- UIView有个layer属性,可以返回它的主CALayer实例,UIView有一个layerClass方法,返回主layer所使用的类,UIView的子类,可以通过重载这个方法,来让UIView使用不同的CALayer来显示,如:
- (class) layerClass {
    // 使某个UIView的子类使用GL来进行绘制
    return ([CAEAGLLayer class]);
}- UIView的CALayer类似UIView的子View树形结构,也可以向它的layer上添加子layer,来完成某些特殊的显示。例如下面的代码会在目标View上敷上一层黑色的透明薄膜。
grayCover = [[CALayer alloc]init];
grayCover.backgroudColor = [[UIColor blackColor]colorWithAlphaComponent:0.2].CGColor;
[self.layer addSubLayer:grayCover];- 补充部分,这部分有深度了,大致了解一下吧,UIView的layer树形在系统内部被系统维护着三份copy
- 逻辑树,就是代码里可以操纵的,例如更改layer的属性等等就在这一份
- 动画树,这是一个中间层,系统正是在这一层上更改属性,进行各种渲染操作
- 显示树,这棵树的内容是当前正被显示在屏幕上的内容
- 这三棵树的逻辑结构都是一样的,区别只有各自的属性
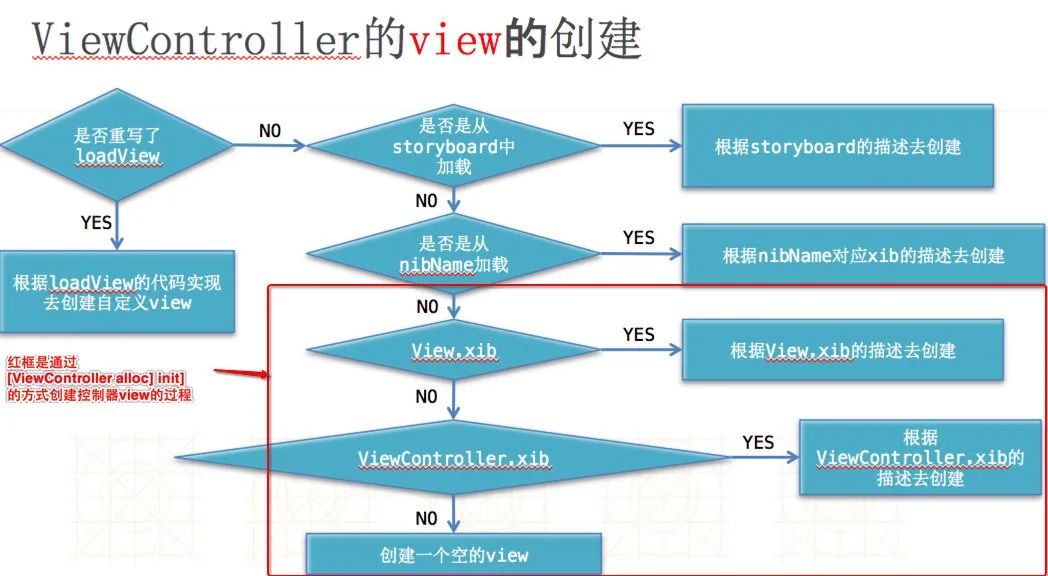
loadView的作用?
- loadView用来自定义view,只要实现了这个方法,其他通过xib或storyboard创建的view都不会被加载
- 看懂控制器view创建的这个图就行
IBOutlet连出来的视图属性为什么可以被设置成weak?
- 因为父控件的subViews数组已经对它有一个强引用
IB中User Defined Runtime Attributes如何使用?
- User Defined Runtime Attributes是一个不被看重但功能非常强大的的特性,它能够通过KVC的方式配置一些你在interface builder中不能配置的属性
- 当你希望在IB中作尽可能多得事情,这个特性能够帮助你编写更加轻量级的viewcontroller
沙盒目录结构是怎样的?各自用于那些场景?
-
Application:存放程序源文件,上架前经过数字签名,上架后不可修改
-
Documents:常用目录,iCloud备份目录,存放数据
-
Library
-
Caches:存放体积大又不需要备份的数据
-
Preference:设置目录,iCloud会备份设置信息
-
tmp:存放临时文件,不会被备份,而且这个文件下的数据有可能随时被清除的可能
pushViewController和presentViewController有什么区别
- 两者都是在多个试图控制器间跳转的函数
- presentViewController提供的是一个模态视图控制器(modal)
- pushViewController提供一个栈控制器数组,push/pop
请简述UITableView的复用机制
- 每次创建cell的时候通过dequeueReusableCellWithIdentifier:方法创建cell,它先到缓存池中找指定标识的cell,如果没有就直接返回nil
- 如果没有找到指定标识的cell,那么会通过initWithStyle:reuseIdentifier:创建一个cell
- 当cell离开界面就会被放到缓存池中,以供下次复用
如何高性能的给 UIImageView 加个圆角?
-
不好的解决方案
-
使用下面的方式会强制Core Animation提前渲染屏幕的离屏绘制, 而离屏绘制就会给性能带来负面影响,会有卡顿的现象出现
self.view.layer.cornerRadius = 5; self.view.layer.masksToBounds = YES; -
正确的解决方案:使用绘图技术
 - (UIImage *)circleImage
    {
        // NO代表透明
        UIGraphicsBeginImageContextWithOptions(self.size, NO, 0.0);

        // 获得上下文
        CGContextRef ctx = UIGraphicsGetCurrentContext();

        // 添加一个圆
        CGRect rect = CGRectMake(0, 0, self.size.width, self.size.height);
        CGContextAddEllipseInRect(ctx, rect);

        // 裁剪
        CGContextClip(ctx);

        // 将图片画上去
        [self drawInRect:rect];

        UIImage *image = UIGraphicsGetImageFromCurrentImageContext();

        // 关闭上下文
        UIGraphicsEndImageContext();

        return image;
}- 还有一种方案:使用了贝塞尔曲线"切割"个这个图片, 给UIImageView 添加了的圆角,其实也是通过绘图技术来实现的
UIImageView *imageView = [[UIImageView alloc] initWithFrame:CGRectMake(0, 0, 100, 100)];
imageView.center = CGPointMake(200, 300);
UIImage *anotherImage = [UIImage imageNamed:@"image"];
UIGraphicsBeginImageContextWithOptions(imageView.bounds.size, NO, 1.0);
[[UIBezierPath bezierPathWithRoundedRect:imageView.bounds
                       cornerRadius:50] addClip];
[anotherImage drawInRect:imageView.bounds];
imageView.image = UIGraphicsGetImageFromCurrentImageContext();
UIGraphicsEndImageContext();
[self.view addSubview:imageView];
使用drawRect有什么影响?
- drawRect方法依赖Core Graphics框架来进行自定义的绘制
- 缺点:它处理touch事件时每次按钮被点击后,都会用setNeddsDisplay进行强制重绘;而且不止一次,每次单点事件触发两次执行。这样的话从性能的角度来说,对CPU和内存来说都是欠佳的。特别是如果在我们的界面上有多个这样的UIButton实例,那就会很糟糕了
- 这个方法的调用机制也是非常特别. 当你调用 setNeedsDisplay 方法时, UIKit 将会把当前图层标记为dirty,但还是会显示原来的内容,直到下一次的视图渲染周期,才会将标记为 dirty 的图层重新建立Core Graphics上下文,然后将内存中的数据恢复出来, 再使用 CGContextRef 进行绘制
描述下SDWebImage里面给UIImageView加载图片的逻辑
- SDWebImage 中为 UIImageView 提供了一个分类UIImageView+WebCache.h, 这个分类中有一个最常用的接口sd_setImageWithURL:placeholderImage:,会在真实图片出现前会先显示占位图片,当真实图片被加载出来后在替换占位图片
- 加载图片的过程大致如下:
- 首先会在 SDWebImageCache 中寻找图片是否有对应的缓存, 它会以url 作为数据的索引先在内存中寻找是否有对应的缓存
- 如果缓存未找到就会利用通过MD5处理过的key来继续在磁盘中查询对应的数据, 如果找到了, 就会把磁盘中的数据加载到内存中,并将图片显示出来
- 如果在内存和磁盘缓存中都没有找到,就会向远程服务器发送请求,开始下载图片
- 下载后的图片会加入缓存中,并写入磁盘中
- 整个获取图片的过程都是在子线程中执行,获取到图片后回到主线程将图片显示出来
设计个简单的图片内存缓存器
- 类似上面SDWebImage实现原理即可
- 一定要有移除策略:释放数据模型对象
控制器的生命周期
- 就是问的view的生命周期,下面已经按方法执行顺序进行了排序
// 自定义控制器view,这个方法只有实现了才会执行
- (void)loadView
{
    self.view = [[UIView alloc] init];
    self.view.backgroundColor = [UIColor orangeColor];
}
// view是懒加载,只要view加载完毕就调用这个方法
- (void)viewDidLoad
{
    [super viewDidLoad];

    NSLog(@"%s",__func__);
}

// view即将显示
- (void)viewWillAppear:(BOOL)animated
{
    [super viewWillAppear:animated];

    NSLog(@"%s",__func__);
}
// view即将开始布局子控件
- (void)viewWillLayoutSubviews
{
    [super viewWillLayoutSubviews];

    NSLog(@"%s",__func__);
}
// view已经完成子控件的布局
- (void)viewDidLayoutSubviews
{
    [super viewDidLayoutSubviews];

    NSLog(@"%s",__func__);
}
// view已经出现
- (void)viewDidAppear:(BOOL)animated
{
    [super viewDidAppear:animated];

    NSLog(@"%s",__func__);
}
// view即将消失
- (void)viewWillDisappear:(BOOL)animated
{
    [super viewWillDisappear:animated];

    NSLog(@"%s",__func__);
}
// view已经消失
- (void)viewDidDisappear:(BOOL)animated
{
    [super viewDidDisappear:animated];

    NSLog(@"%s",__func__);
}
// 收到内存警告
- (void)didReceiveMemoryWarning
{
    [super didReceiveMemoryWarning];

    NSLog(@"%s",__func__);
}
// 方法已过期,即将销毁view
- (void)viewWillUnload
{

}
// 方法已过期,已经销毁view
- (void)viewDidUnload
{

}
你是怎么封装一个view的
- 可以通过纯代码或者xib的方式来封装子控件
- 建立一个跟view相关的模型,然后将模型数据传给view,通过模型上的数据给view的子控件赋值
/**
 *  纯代码初始化控件时一定会走这个方法
 */
- (instancetype)initWithFrame:(CGRect)frame
{
    if(self = [super initWithFrame:frame])
    {
        [self setup];
    }

    return self;
}

/**
 *  通过xib初始化控件时一定会走这个方法
 */
- (id)initWithCoder:(NSCoder *)aDecoder
{
    if(self = [super initWithCoder:aDecoder])
    {
        [self setup];
    }

    return self;
}

- (void)setup
{
    // 初始化代码
}
如何进行iOS6、7的适配
- 通过判断版本来控制,来执行响应的代码
- 功能适配:保证同一个功能在6、7上都能用
- UI适配:保证各自的显示风格
// iOS版本为7.0以上(包含7.0)
#define iOS7 ([[UIDevice currentDevice].systemVersion doubleValue]>=7.0)
如何渲染UILabel的文字?
- 通过NSAttributedString/NSMutableAttributedString(富文本)
UIScrollView的contentSize能否在viewDidLoad中设置?
- 能
- 因为UIScrollView的内容尺寸是根据其内部的内容来决定的,所以是可以在viewDidLoad中设置的
- 补充:(这仅仅是一种特殊情况)
- 前提,控制器B是控制器A的一个子控制器,且控制器B的内容只在控制器A的view的部分区域中显示
- 假设控制器B的view中有一个UIScrollView这样一个子控件
- 如果此时在控制器B的viewDidLoad中设置UIScrollView的contentSize的话会导致不准确的问题
- 因为任何控制器的view在viewDidLoad的时候的尺寸都是不准确的,如果有子控件的尺寸依赖父控件的尺寸,在这个方法中设置会导致子控件的frame不准确,所以这时应该在下面的方法中设置子控件的尺寸
-(void)viewDidLayoutSubviews;触摸事件的传递
-
触摸事件的传递是从父控件传递到子控件
-
如果父控件不能接收触摸事件,那么子控件就不可能接收到触摸事件
-
不能接受触摸事件的四种情况
-
不接收用户交互,即:userInteractionEnabled = NO
-
隐藏,即:hidden = YES
-
透明,即:alpha <= 0.01
-
未启用,即:enabled = NO
-
提示:UIImageView的userInteractionEnabled默认就是NO,因此UIImageView以及它的子控件默认是不能接收触摸事件的
-
如何找到最合适处理事件的控件:
-
首先,判断自己能否接收触摸事件
-
可以通过重写hitTest:withEvent:方法验证
-
其次,判断触摸点是否在自己身上
-
对应方法pointInside:withEvent:
-
从后往前(先遍历最后添加的子控件)遍历子控件,重复前面的两个步骤
-
如果没有符合条件的子控件,那么就自己处理
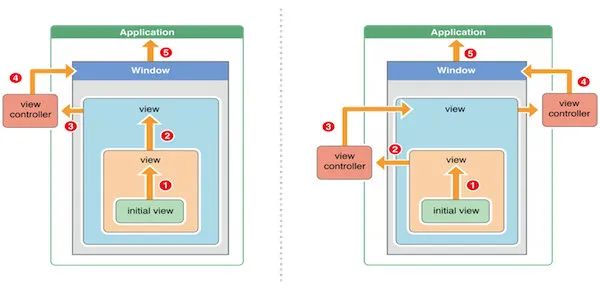
事件响应者链
- 如果当前view是控制器的view,那么就传递给控制器
- 如果控制器不存在,则将其传递给它的父控件
- 在视图层次结构的最顶层视图也不能处理接收到的事件或消息,则将事件或消息传递给UIWindow对象进行处理
- 如果UIWindow对象也不处理,则将事件或消息传递给UIApplication对象
- 如果UIApplication也不能处理该事件或消息,则将其丢弃
- 补充:如何判断上一个响应者
- 如果当前这个view是控制器的view,那么控制器就是上一个响应者
- 如果当前这个view不是控制器的view,那么父控件就是上一个响应者


