响应视窗属性动画 | 让您的软键盘动起来 (二)

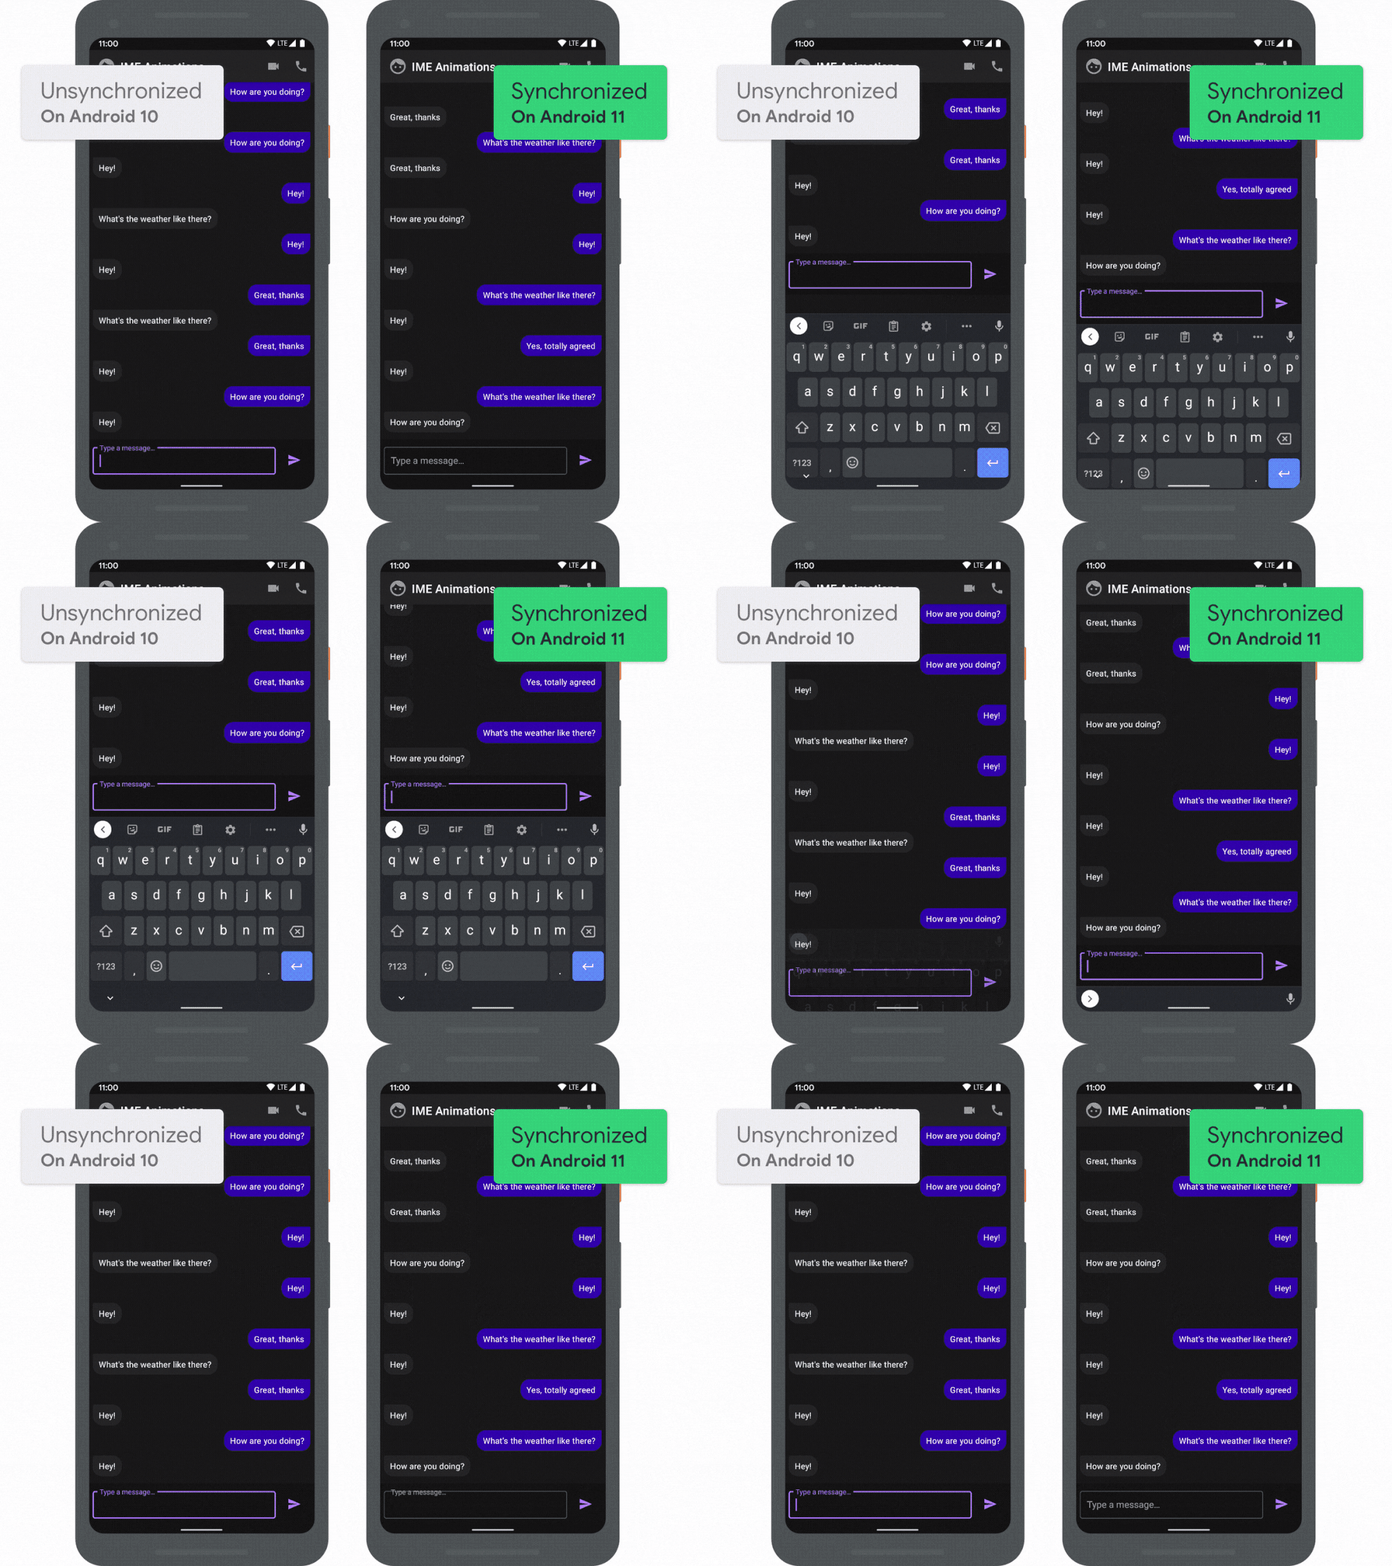
如上动图所示: 在 Android 10 以及以前版本的设备上,当用户点击文字输入框来输入回复,软键盘会带着动画效果移动到预期的位置,但是应用在两个状态间的动画很突兀。这是一个您在设备上已经看过很久的效果,降慢速度到实际速度的 20% 使得它更为明显。
您可以在右边看到相同的场景运行在 Android 11 上的效果。这一次,当用户点击文字输入框的时候,应用跟随着软键盘一起移动并且创造了一个更流畅的体验。
所以您如何才能在您的应用中添加这种体验呢?这都依赖新 API 的支持...
-
Android 11
https://developer.android.google.cn/android11
WindowInsetsAnimation 类
在 Android 11 中支持实现这种效果的 API 就是新的 WindowInsetsAnimation 类,它包含一个涉及视窗属性的动画。应用可以通过 WindowInsetsAnimation.Callback 类监听各种动画事件,这个回调可以被设置到一个视图上:
-
WindowInsetsAnimation
https://developer.android.google.cn/reference/android/view/WindowInsetsAnimation
-
WindowInsetsAnimation.Callback
https://developer.android.google.cn/reference/android/view/WindowInsetsAnimation.Callback
val cb = object : WindowInsetsAnimation.Callback(DISPATCH_MODE_STOP) {
    // TODO
}

view.setWindowInsetsAnimationCallback(cb)
让我们来看一下这个回调类,以及它提供的方法:
想象一下当前软键盘是关闭的,用户刚刚点击了 EditText。系统现在马上要显示软键盘,由于我们已经设置了 WindowInsetsAnimation.Callback,我们会按顺序收到如下的调用:
val cb = object : WindowInsetsAnimation.Callback(DISPATCH_MODE_STOP) {

    override fun onPrepare(animation: WindowInsetsAnimation) {
        // #1: 第一,onPrepare 被调用会允许应用记录当前布局的任何状态
    }

    // #2: 在 onPrepare 之后,正常的 WindowInsets 会被下发到视图层次
    // 结构中,它包含了结束状态。这意味着您的视图的
    // OnApplyWindowInsetsListener 会被调用,这会导致一个布局传递
    // 以反映结束状态

    override fun onStart(
        animation: WindowInsetsAnimation,
        bounds: WindowInsetsAnimation.Bounds
    ):  WindowInsetsAnimation.Bounds {

        // #3: 接下来是 onStart ,这个会在动画开始的时候被调用。
        // 这允许应用记录下视图的目标状态或者结束状态
        return bounds
    }

    override fun onProgress(
      insets: WindowInsets,
      runningAnimations: List<WindowInsetsAnimation>
    ): WindowInsets {

        // #4: 接下来是一个很重要的调用:onProgress 。这个会在动画中每次视窗属性
        // 更改的时候被调用。在软键盘的这个例子中,这个调用会发生在软键盘在屏幕
        // 上滑动的时候。
        return insets
    }

    override fun onEnd (animation: WindowInsetsAnimation) {

        // #5: 最后 onEnd 在动画已经结束的时候被调用。使用这个来
        // 清理任何旧的状态。
    }
}
这就是回调在理论上是如何工作的,现在让我们在场景中实践一下...
实现示例
我们会使用 WindowInsetsAnimation.Callback 来实现在文章开头您看到的示例。让我们从实现我们的回调函数开始:
-
WindowInsetsAnimation.Callback
https://developer.android.google.cn/reference/android/view/WindowInsetsAnimation.Callback
onPrepare() 方法
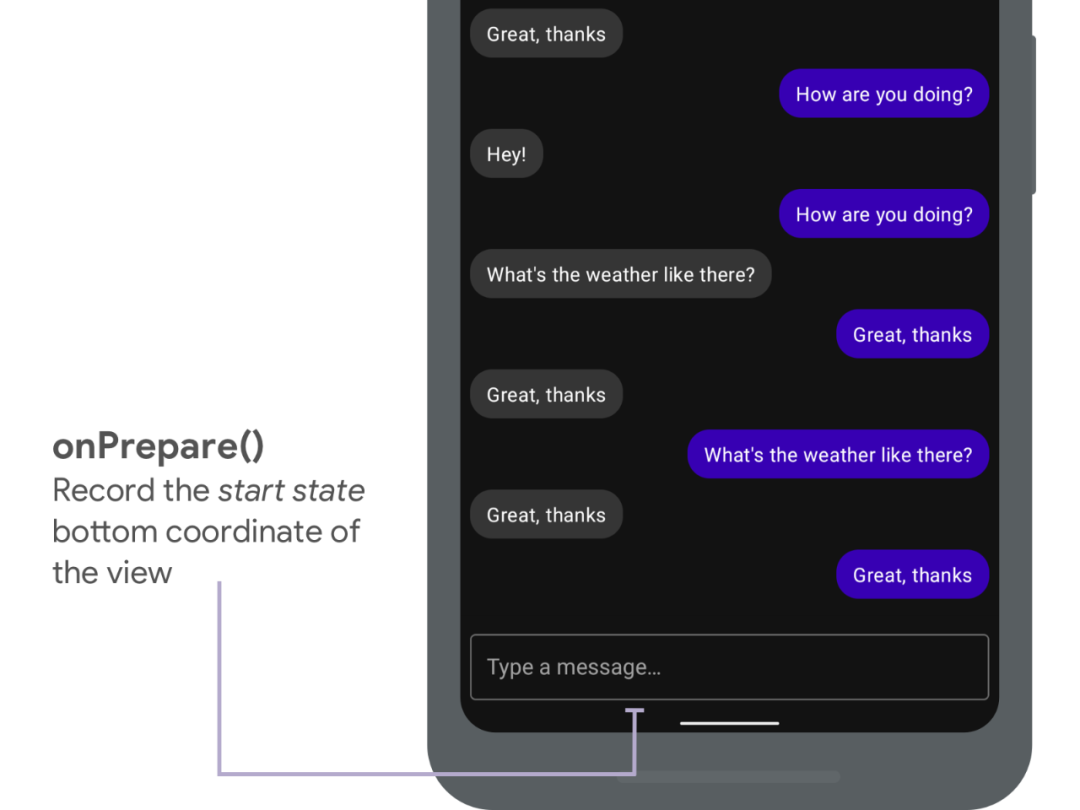
首先我们要复写 onPrepare(),并且在其他布局改变发生之前记录下视图的底部坐标:
-
onPrepare()
https://developer.android.google.cn/reference/android/view/WindowInsetsAnimation.Callback#onPrepare(android.view.WindowInsetsAnimation)
val view = binding.conversationList

val cb = object : WindowInsetsAnimation.Callback(DISPATCH_MODE_STOP) {
    var startBottom = 0
    var endBottom = 0

    override fun onPrepare(animation: WindowInsetsAnimation) {
        // #1: 首先 onPrepare 被调用,这允许应用记录下当前布局中的任何视图状态。
        // 我们要记录下这个视图在视窗中的底部坐标。
        startBottom = view.calculateBottomInWindow()
    }
}
属性分发
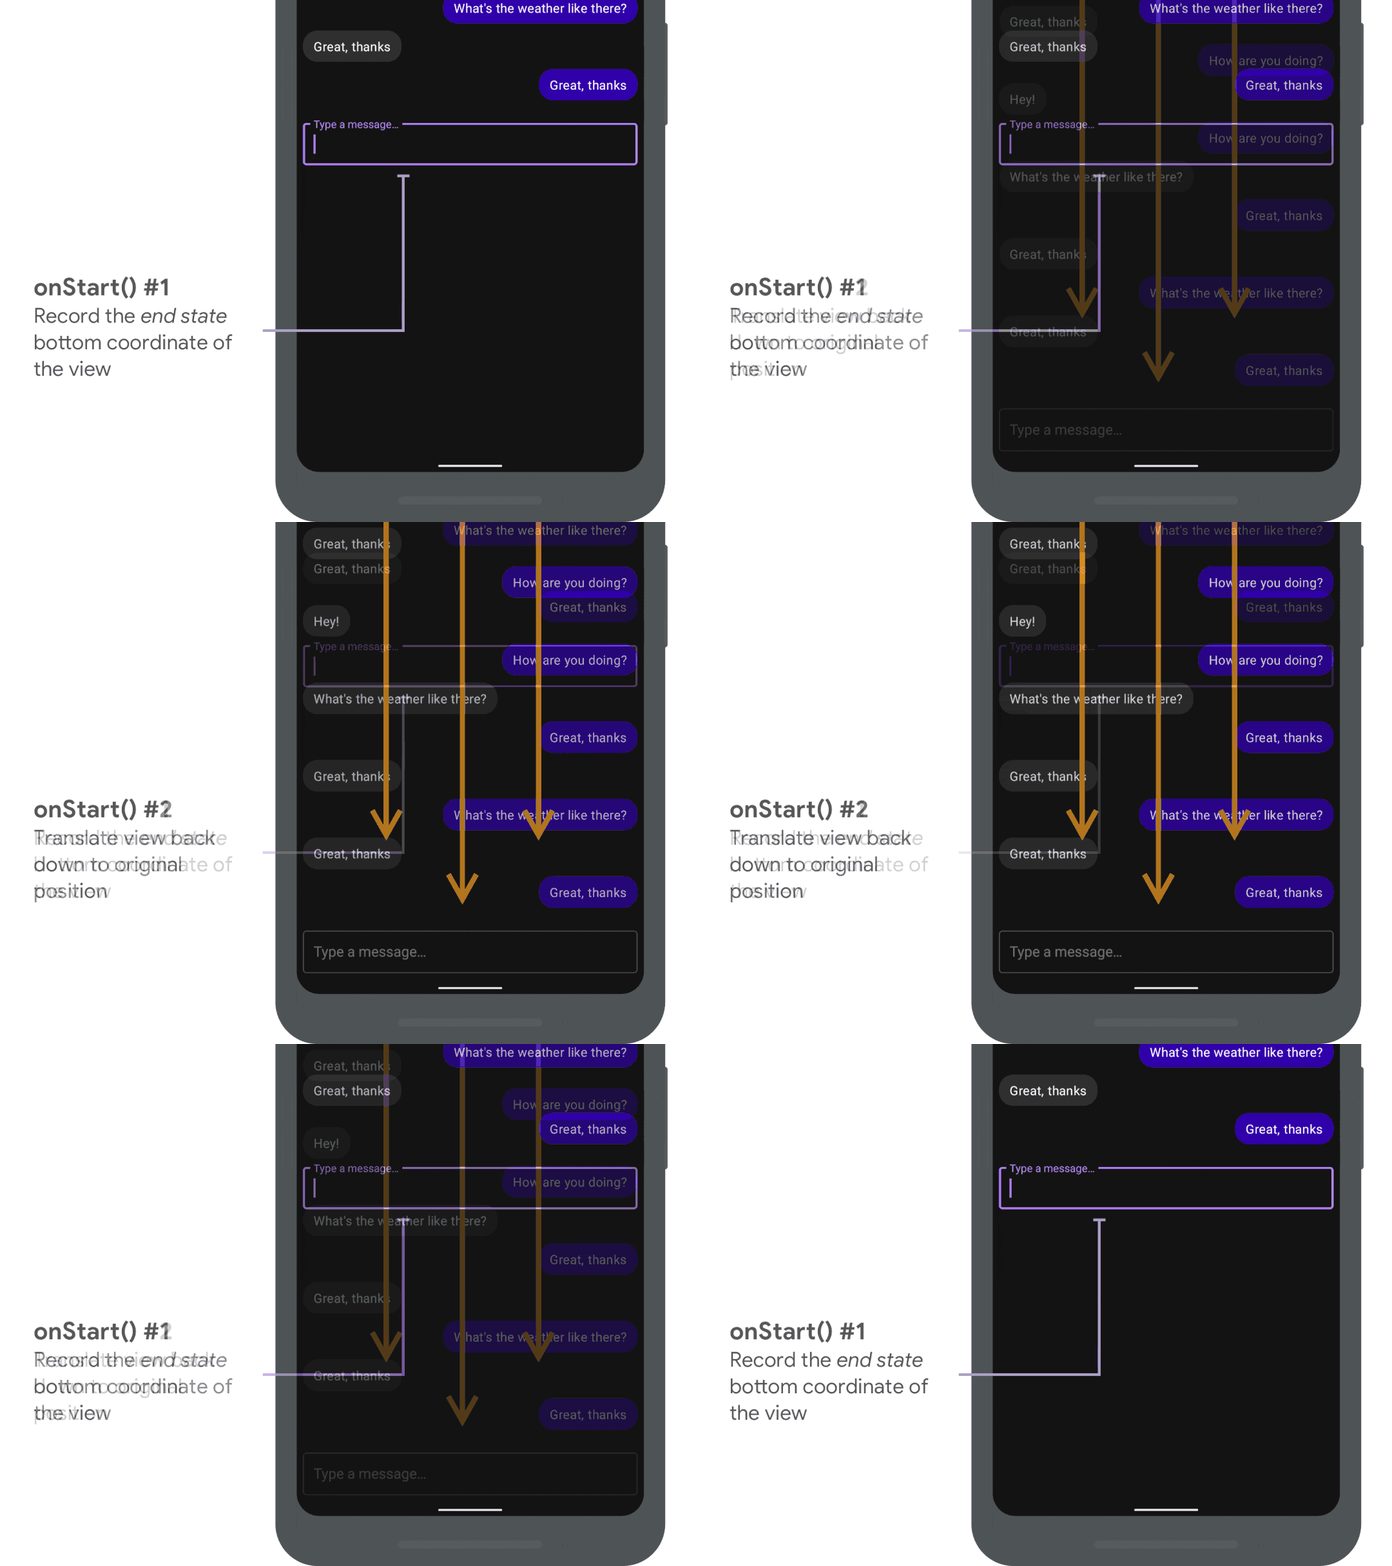
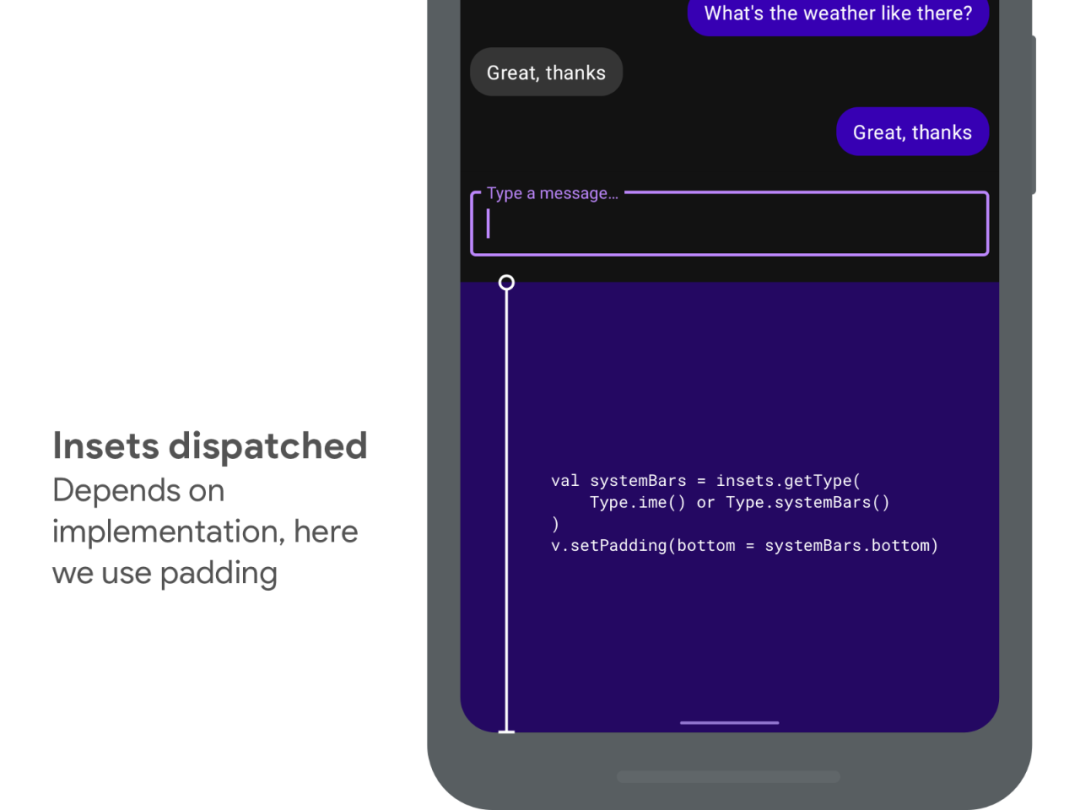
这时候结束状态的属性会被分发,而我们的 OnApplyWindowInsetsListener 会被调用,监听器会更新容器视图的内边距,这会导致内容被推上去。
- OnApplyWindowInsetsListener https://developer.android.google.cn/reference/androidx/core/view/OnApplyWindowInsetsListener
然而用户不会看到这个如下图所示的状态。
接下来我们实现 onStart() 方法,这会让我们先记录下这个视图结束时候的位置。
-
onStart()
https://developer.android.google.cn/reference/android/view/WindowInsetsAnimation.Callback#onStart(android.view.WindowInsetsAnimation,%20android.view.WindowInsetsAnimation.Bounds)
我们利用 translationY 在视觉上将视图移动回初始位置,因为我们不想现在就让用户看到结束状态。由于系统保证了任何由视窗属性变更导致的重新布局都会在 onStart() 的同一帧被调用,所以用户此时不会看到闪动。
val view = binding.conversationList

val cb = object : WindowInsetsAnimation.Callback(DISPATCH_MODE_STOP) {
    var startBottom = 0
    var endBottom = 0

    override fun onStart(
        animation: WindowInsetsAnimation,
        bounds: WindowInsetsAnimation.Bounds
    ):  WindowInsetsAnimation.Bounds {
        // #3: 接下来是 onStart,它会在动画开始的时候被调用
        // 我们记录下视窗中视图的底部
        endBottom = view.calculateBottomInWindow()

        // 然后我们移动视图回到它视觉上的初始位置
        view.translationY = startBottom - endBottom

        // 我们不会更改边界,所以我们会返回传入的边界值
        return bounds
    }
}
onProgress() 方法
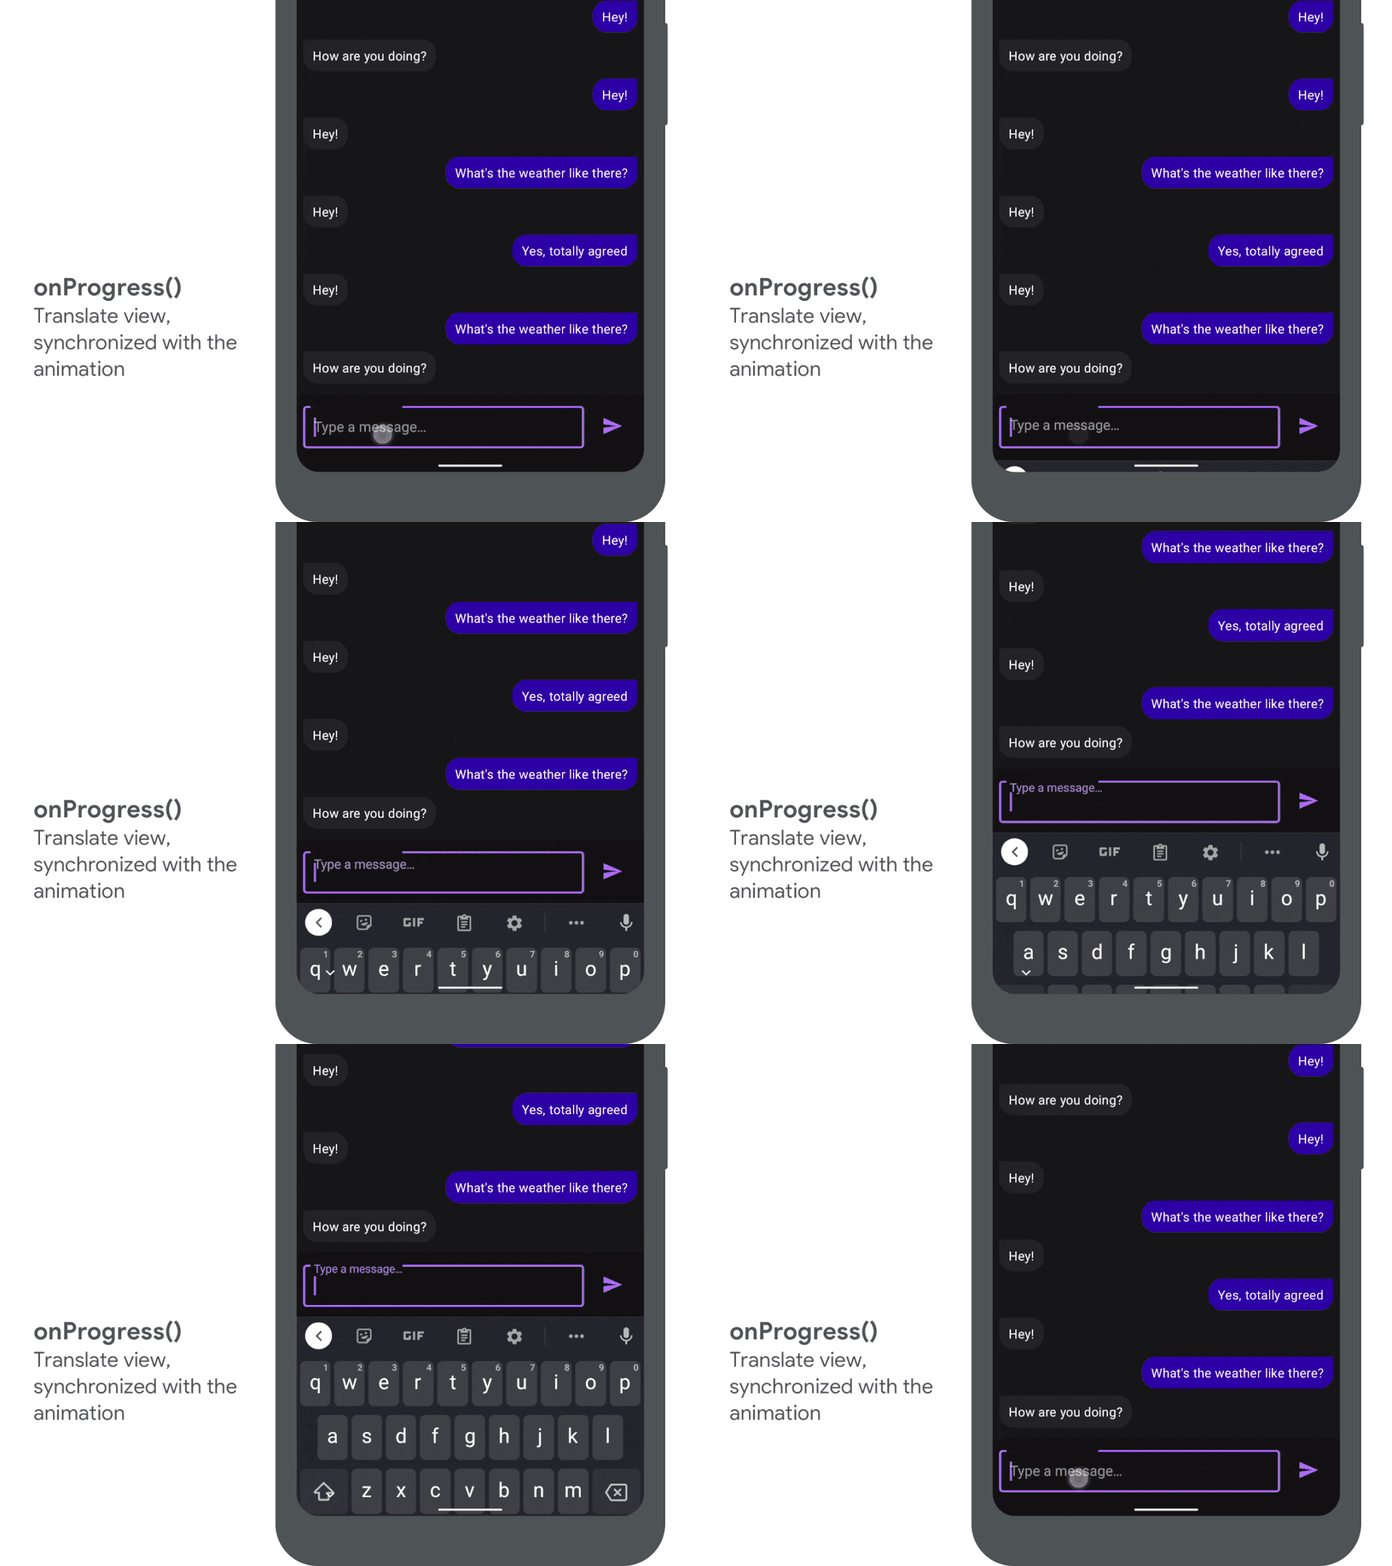
最后我们要复写 onProgress() 方法,这会让我们可以在软键盘滑入的时候更新我们的视图。- onProgress()
https://developer.android.google.cn/reference/android/view/WindowInsetsAnimation.Callback#onProgress(android.view.WindowInsets,%20java.util.List%3Candroid.view.WindowInsetsAnimation%3E)
我们会在起始和结束状态之间插值,并再次使用 translationY 使得视图可以和软键盘一起移动。
val view = binding.conversationList

val cb = object : WindowInsetsAnimation.Callback(DISPATCH_MODE_STOP) {
    var startBottom = 0
    var endBottom = 0

    override fun onProgress(
      insets: WindowInsets,
      runningAnimations: List<WindowInsetsAnimation>
    ): WindowInsets {

        // #4: 接下来是最重要的调用:onProgress
        // 它会在动画中每次视窗属性改变的时候被调用。

        // 从起始位置到结束位置,我们利用线性插值的方式和动画本身的分数
        // 来计算视图的偏移量。
        val offset = lerp(
            startBottom - endBottom,
            0,
            animation.interpolatedFraction
        )
        // … 然后我们再用 translationY 来设置
        view.translationY = offset

        return insets
    }
}
软键盘的协同效果
使用这个方法,我们已经实现了软键盘和应用视图的同步。如果您想查看完整的实现,请查阅 WindowInsetsAnimation 的示例: android/user-interface-samples
如果您在您的应用中添加了上述实现,请在下方评论区留言告诉我们您的使用感受。在下一篇文章中,我们会继续探索如何能让您的应用控制软键盘,比如在滚动列表的时候自动打开软键盘。
-
WindowInsetsAnimation
https://github.com/android/user-interface-samples/tree/master/WindowInsetsAnimation
-
android/user-interface-samples
https://github.com/android/user-interface-samples/tree/master/WindowInsetsAnimation
视图裁剪
如果您在您的视图上尝试我们在这篇文章中介绍的方法,您可能会发现视图在移动的过程中被裁剪了。这是因为我们在移动视图的过程中,视图本身可能会因为 OnApplyWindowInsetsListener 导致的布局改变而被调整大小。
我们会在以后的文章中介绍如何解决这个问题,而目前我会推荐查看 WindowInsetsAnimation 示例,其中也包含了一个可以避免这个问题的技巧。
- OnApplyWindowInsetsListener
https://developer.android.google.cn/reference/androidx/core/view/OnApplyWindowInsetsListener
- WindowInsetsAnimation
https://github.com/android/user-interface-samples/tree/master/WindowInsetsAnimation
