【实战】Node 服务中如何写日志?
用 Node 写服务端的时候,比较头疼的是排查定位问题,因为不像 Chrome 浏览器中,我们有直接的报错提示在 dev tool 中,或者我们可以直接打断点调试。
经常我们会遇到在明明我在 test 环境可以啊,为什么 live 环境不行的问题。假如没有日志,对于这种问题,根据毫无头绪。
所以这篇文章,我们来聊聊如何在 Node 服务中写日志。
本文 demo 可以查看 Github[1]
快速新建一个 koa 项目
先保证你全局安装了 koa2:
npm i koa2 -g
然后执行:
koa2 -e node-log # 新建一个项目
cd node-log
npm i # 安装依赖
npm run start # 启动
基础的服务就搭建起来了。访问 http://localhost:3000/,就可以看到以下的页面:

koa 服务的方法。这个项目中内置了一个写日志的库——koa-logger。我们先来看看它做了什么东西吧。
koa-logger
这个库比较简单,记录请求的基本信息,比如请求的方法、URl、用时等。作为中间件中使用,注意:推荐放在所有的中间件之前,这个跟 koa 的洋葱模型有关。假如不是第一个,计算时间会不准确。
var logger = require('koa-logger');
app.use(logger());
在我们访问响应的资源的时候,会在控制台输出相应的日志如下:
  <-- GET /
GET / - 14
  --> GET / 200 19ms 234b
  <-- GET /stylesheets/style.css
GET /stylesheets/style.css - 1
  --> GET /stylesheets/style.css 200 3ms 111b
  <-- GET /favicon.ico
GET /favicon.ico - 1
  --> GET /favicon.ico 404 1ms -
默认情况下,日志是通过 console 的方式直接输出到控制台中,假如我们需要对日志做自定义的操作,比如写入到日志文件中等。可以通过类似完成,比如我记录时间:
app.use(logger((str) => {
  console.log(new Date() + str)
  // redirect koa logger to other output pipe
  // default is process.stdout(by console.log function)
}))
结果:
Mon Oct 11 2021 19:28:41 GMT+0800 (China Standard Time)  <-- GET /
GET / - 10ms
Mon Oct 11 2021 19:28:41 GMT+0800 (China Standard Time)  --> GET / 200 20ms 226b
Mon Oct 11 2021 19:28:41 GMT+0800 (China Standard Time)  <-- GET /stylesheets/style.css
Mon Oct 11 2021 19:28:41 GMT+0800 (China Standard Time)  --> GET /stylesheets/style.css 200 4ms 111b
koa-log4js
koa-logger 比较轻量,也暴露了相对灵活的接口。但在实际业务中使用,我个人推荐使用 koa-log4js。主要理由如下:
koa-logger看起来只支持中间件的使用方式,而不支持上报特定日志的功能。- 内置的功能比较少。比如日志的分类和落盘等。
koa-log4js[2] 对 log4js-node[3] 做了一层包装,从而支持 Koa 日志的中间件。它的配置和 log4js-node 是保持一致的。所以假如你用 log4js-node 的话,使用上应该是一致的。
使用
安装:
npm i --save koa-log4
先来看使用,根目录新建一个文件夹 log。并且新建一个文件夹 utils,在其中新建文件 logger.js。代码如下:
const path = require('path');
const log4js = require('koa-log4');
const RUNTIME_PATH = path.resolve(__dirname, '../');
const LOG_PATH = path.join(RUNTIME_PATH, 'log');

log4js.configure({
  // 日志的输出
  appenders: {
    access: {
      type: 'dateFile',
      pattern: '-yyyy-MM-dd.log', //生成文件的规则
      alwaysIncludePattern: true, // 文件名始终以日期区分
      encoding: 'utf-8',
      filename: path.join(LOG_PATH, 'access.log') //生成文件名
    },
    application: {
      type: 'dateFile',
      pattern: '-yyyy-MM-dd.log',
      alwaysIncludePattern: true,
      encoding: 'utf-8',
      filename: path.join(LOG_PATH, 'application.log')
    },
    out: {
      type: 'console'
    }
  },
  categories: {
    default: { appenders: [ 'out' ], level: 'info' },
    access: { appenders: [ 'access' ], level: 'info' },
    application: { appenders: [ 'application' ], level: 'all'}
  }
});

// getLogger 传参指定的是类型
exports.accessLogger = () => log4js.koaLogger(log4js.getLogger('access')); // 记录所有访问级别的日志
exports.logger = log4js.getLogger('application');简单解释一下,configure 是 log4js-node 的配置(后文会详解),通过 getLogger 函数传参为日志类型,比如 access 是访问级别日志。
然后在 app.js 中加入:
const { accessLogger, logger } = require('./utils/logger');
app.use(accessLogger())
以及 routes/index.js 中加入:
+ const { logger } = require('../utils/logger')

router.get('/', async (ctx, next) => {
+  logger.info('我是首页');
  await ctx.render('index', {
    title: 'Hello Koa 2!'
  })
})
刷新,可以看到在 log 文件夹中输出两个文件:

[2021-10-12T10:43:33.914] [INFO] access - ::1 - - "GET / HTTP/1.1" 200 226 "" "Mozilla/5.0 (Macintosh; Intel Mac OS X 10_15_7) AppleWebKit/537.36 (KHTML, like Gecko) Chrome/94.0.4606.71 Safari/537.36"
[2021-10-12T10:43:34.065] [INFO] access - ::1 - - "GET /stylesheets/style.css HTTP/1.1" 200 111 "http://localhost:3000/" "Mozilla/5.0 (Macintosh; Intel Mac OS X 10_15_7) AppleWebKit/537.36 (KHTML, like Gecko) Chrome/94.0.4606.71 Safari/537.36"
[2021-10-12T10:43:33.902] [INFO] application - 我是首页
接下来我们来看看 log4js-node 的配置。
level
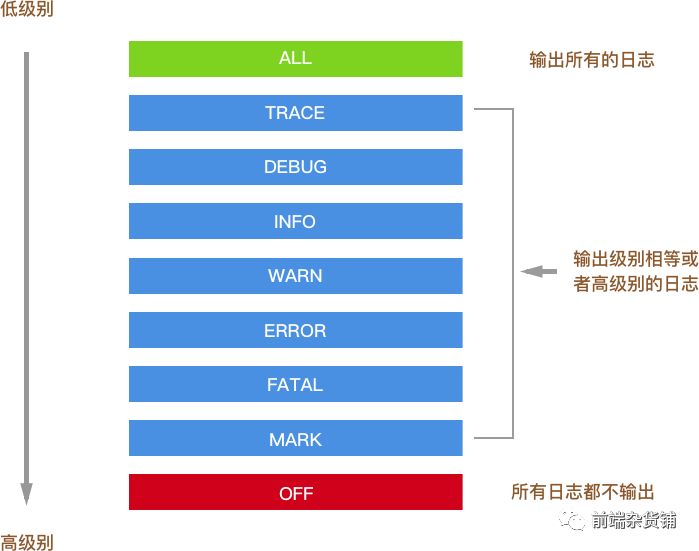
日志的分级,主要作用是更好的展示日志(不同颜色)、有选择的落盘日志,比如在生产中避免一些 debug 的敏感日志被泄露。log4js-node 默认有九个分级(你可以通过 levels 进行修改),如下:
<pre data-tool="mdnice编辑器" style="margin-top: 10px;margin-bottom: 10px;border-radius: 5px;box-shadow: rgba(0, 0, 0, 0.55) 0px 2px 10px;"><span style="display: block;background: url("https://mmbiz.qpic.cn/mmbiz_svg/fWJhv9xMFTsBbgTpL2X7Ue3PGoo1aKwwGUwBDs6uIs2YnZCUB4SDqKEGoUUYEz1IXefD7icztaAI6jNdCkPSovhZfMH8eYfZU/640?wx_fmt=svg") 10px 10px / 40px no-repeat rgb(40, 44, 52);height: 30px;width: 100%;margin-bottom: -7px;border-radius: 5px;">```
{<br></br>  <span style="color: #d19a66;line-height: 26px;">ALL: <span style="color: #c678dd;line-height: 26px;">new Level(<span style="color: #e6c07b;line-height: 26px;">Number.MIN_VALUE, <span style="color: #98c379;line-height: 26px;">"ALL"),<br></br>  <span style="color: #d19a66;line-height: 26px;">TRACE: <span style="color: #c678dd;line-height: 26px;">new Level(<span style="color: #d19a66;line-height: 26px;">5000, <span style="color: #98c379;line-height: 26px;">"TRACE"),<br></br>  <span style="color: #d19a66;line-height: 26px;">DEBUG: <span style="color: #c678dd;line-height: 26px;">new Level(<span style="color: #d19a66;line-height: 26px;">10000, <span style="color: #98c379;line-height: 26px;">"DEBUG"),<br></br>  <span style="color: #d19a66;line-height: 26px;">INFO: <span style="color: #c678dd;line-height: 26px;">new Level(<span style="color: #d19a66;line-height: 26px;">20000, <span style="color: #98c379;line-height: 26px;">"INFO"),<br></br>  <span style="color: #d19a66;line-height: 26px;">WARN: <span style="color: #c678dd;line-height: 26px;">new Level(<span style="color: #d19a66;line-height: 26px;">30000, <span style="color: #98c379;line-height: 26px;">"WARN"),<br></br>  <span style="color: #d19a66;line-height: 26px;">ERROR: <span style="color: #c678dd;line-height: 26px;">new Level(<span style="color: #d19a66;line-height: 26px;">40000, <span style="color: #98c379;line-height: 26px;">"ERROR"),<br></br>  <span style="color: #d19a66;line-height: 26px;">FATAL: <span style="color: #c678dd;line-height: 26px;">new Level(<span style="color: #d19a66;line-height: 26px;">50000, <span style="color: #98c379;line-height: 26px;">"FATAL"),<br></br>  <span style="color: #d19a66;line-height: 26px;">MARK: <span style="color: #c678dd;line-height: 26px;">new Level(<span style="color: #d19a66;line-height: 26px;">9007199254740992, <span style="color: #98c379;line-height: 26px;">"MARK"), <span style="color: #5c6370;font-style: italic;line-height: 26px;">// 2^53<br></br>  <span style="color: #d19a66;line-height: 26px;">OFF: <span style="color: #c678dd;line-height: 26px;">new Level(<span style="color: #e6c07b;line-height: 26px;">Number.MAX_VALUE, <span style="color: #98c379;line-height: 26px;">"OFF")<br></br>}<br></br>
如下图所示:

只会输出级别相等或者级别高的日志。比如你配置了 `WARN`,就不会输出 `INFO` 的日志。可以在下面配置的 `categories` 中配置不同的类型日志的日志级别。
### categories
日志类别。必须配置默认日志类别,用于没有命中的情况下的兜底行为。该配置为一个对象,`key` 值为分类名称。比如上述 `demo` 中:
```
{
default: { appenders: [ 'out' ], level: 'info' },
access: { appenders: [ 'access' ], level: 'info' },
application: { appenders: [ 'application' ], level: 'all'}
}
```
```
其中每个类别都有两个配置 appenders 是一个字符串数组,是输出配置(后文中会详解),可以指定多个,至少要有一个。level 是上文日志级别。
appenders
解决了日志分级和分类,接下来是日志落盘,也就是输出日志的问题。对应的配置是 appenders,该配置的 key 值为自定义的名称(可以给 categories 中的 appenders 使用),属性值为一个对象,配置输出类型。如下所示:
<pre data-tool="mdnice编辑器" style="margin-top: 10px;margin-bottom: 10px;border-radius: 5px;box-shadow: rgba(0, 0, 0, 0.55) 0px 2px 10px;"><span style="display: block;background: url("https://mmbiz.qpic.cn/mmbiz_svg/fWJhv9xMFTsBbgTpL2X7Ue3PGoo1aKwwGUwBDs6uIs2YnZCUB4SDqKEGoUUYEz1IXefD7icztaAI6jNdCkPSovhZfMH8eYfZU/640?wx_fmt=svg") 10px 10px / 40px no-repeat rgb(40, 44, 52);height: 30px;width: 100%;margin-bottom: -7px;border-radius: 5px;">```
<span style="color: #5c6370;font-style: italic;line-height: 26px;">// 日志的输出<br></br><span style="color: #d19a66;line-height: 26px;">appenders: {<br></br> <span style="color: #d19a66;line-height: 26px;">access: {<br></br> <span style="color: #d19a66;line-height: 26px;">type: <span style="color: #98c379;line-height: 26px;">'dateFile',<br></br> <span style="color: #d19a66;line-height: 26px;">pattern: <span style="color: #98c379;line-height: 26px;">'-yyyy-MM-dd.log', <span style="color: #5c6370;font-style: italic;line-height: 26px;">//生成文件的规则<br></br> <span style="color: #d19a66;line-height: 26px;">alwaysIncludePattern: <span style="color: #56b6c2;line-height: 26px;">true, <span style="color: #5c6370;font-style: italic;line-height: 26px;">// 文件名始终以日期区分<br></br> <span style="color: #d19a66;line-height: 26px;">encoding: <span style="color: #98c379;line-height: 26px;">'utf-8',<br></br> <span style="color: #d19a66;line-height: 26px;">filename: path.join(LOG_PATH, <span style="color: #98c379;line-height: 26px;">'access.log') <span style="color: #5c6370;font-style: italic;line-height: 26px;">//生成文件名<br></br> },<br></br> <span style="color: #d19a66;line-height: 26px;">out: {<br></br> <span style="color: #d19a66;line-height: 26px;">type: <span style="color: #98c379;line-height: 26px;">'console'<br></br> }<br></br>}<br></br>
其中,`out` 指的是通过 `console` 输出,这个可以作为我们的一个兜底。`access` 中 `type` 为 `dataFile`,指的是输出文件,然后配置文件的命名和输出路径。除了这个类型,详情可以看官网\[4\],比如 `SMTP` 通过邮件发送(这个需要 `nodemailer`)
### 总结配置
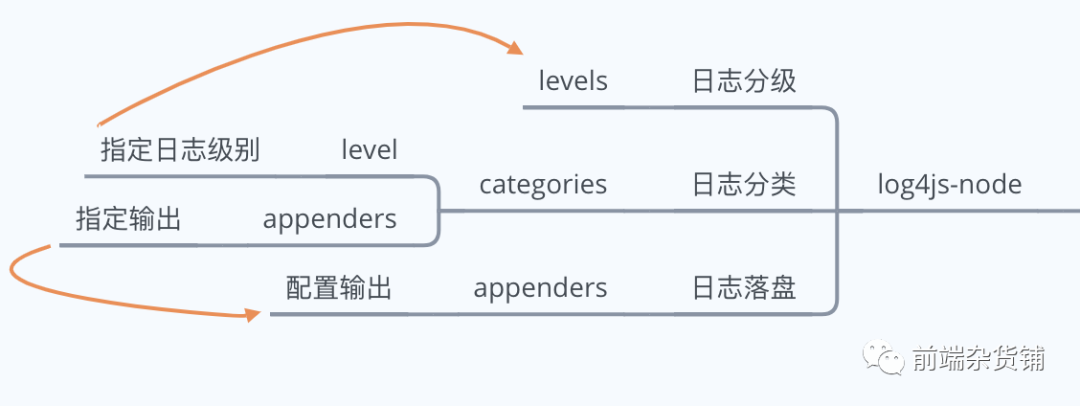
日志分级、日志分类以及日志落盘,配置上的关系如下:
总结
--
日志对于我们服务端排查定位问题非常重要,本文通过 `koa-logger` 和 `koa-log4js` 讲解了如何上报日志。
`koa-logger` 比较轻量,记录请求的基本信息,也提供了一定的自定义能力。
`koa-log4js` 在日志分级、日志分类以及日志落盘上提供了一定的能力,个人认为基本这个更加适用于生产环境。
### 参考资料
\[1\]Github: *https://github.com/GpingFeng/node-log*
\[2\]koa-log4js: *https://www.npmjs.com/package/koa-log4*
\[3\]log4js-node: *https://github.com/log4js-node/log4js-node*
\[4\]官网: *https://log4js-node.github.io/log4js-node/appenders.html*