「懒加载」的瀑布流组件你可知晓?
前言
瀑布流布局算是一种比较流行的布局,参差不齐的多列结构,不仅能节省空间,还能在视觉展示上错落有致不拘一格。在一次业务需求中,找了几个开源的瀑布流组件,在使用的过程中总会有点小问题,便开发了此组件。
在开始之前你可能需要先了解一下IntersectionObserver[1],核心是这个API监听指定的卡片是否在可视区域展示,当一个被监听卡片出现在可视区域,就会触发回调,执行列于列之间对比逻辑,并在高度较小的列添加数据。
基本使用
这款组件已经上传npm[2]了,有兴趣的小伙伴可以下载使用一下。
1、安装
npm i waterfall-vue2
2、使用方式
import { Waterfall } from "waterfall-vue2";
Vue.use(Waterfall);

<Waterfall
  :pageData="pageData"
  :columnCount="2"
  :colStyle="{display:'flex',flexDirection:'column',alignItems:'center'}"
  query-sign="#cardItem"
  @wfLoad="onLoad"
  @ObserveDataTotal="ObserveDataTotal"
>
  <template #default="{ item, columnIndex, index}">
    <!--  slot 内容  good-card:事例组件 -->
    <good-card :item="item" id="cardItem" />
  </template>
</Waterfall>
3、基本参数和事件
API
| 参数 | 说明 | 类型 | 默认值 | 版本 |
|---|---|---|---|---|
| columnCount | 列数 | Number | 2 | - |
| pageData | 当前 pageIndex 请求的数据(非多页累加数据) | Array | [] | - |
| resetSign | 重置数据(清空每列数据) | Boolean | false | - |
| immediateCheck | 立即检查 | Boolean | true | - |
| offset | 触发加载的距离阈值,单位为px | String Number | 300 | - |
| colStyle | 每列的样式 | Object | {} | - |
| querySign | 内容标识(querySelectorAll选择器) | String | 必须项 | - |
Event
| 事件名 | 说明 | 参数 |
|---|---|---|
| wfLoad | 滚动条与底部距离小于 offset 时触发 | - |
| ObserveDataTotal | 未渲染的数据总数 | length |
Slot
| 名称 | 说明 |
|---|---|
| default | 插槽内容 |
| columnIndex | 当前内容所在的列 |
| item | 单条数据 |
| index | 当前数据所在列的下标 |
技术实现
难点
图片大多数会使用懒加载实现,一般情况下节点内容已加载完成,图片未出现在可视区域内未加载。在图片高度不确定的情况下,怎么确保列表中列于列的落差小于一个卡片内容高度呢?
原理
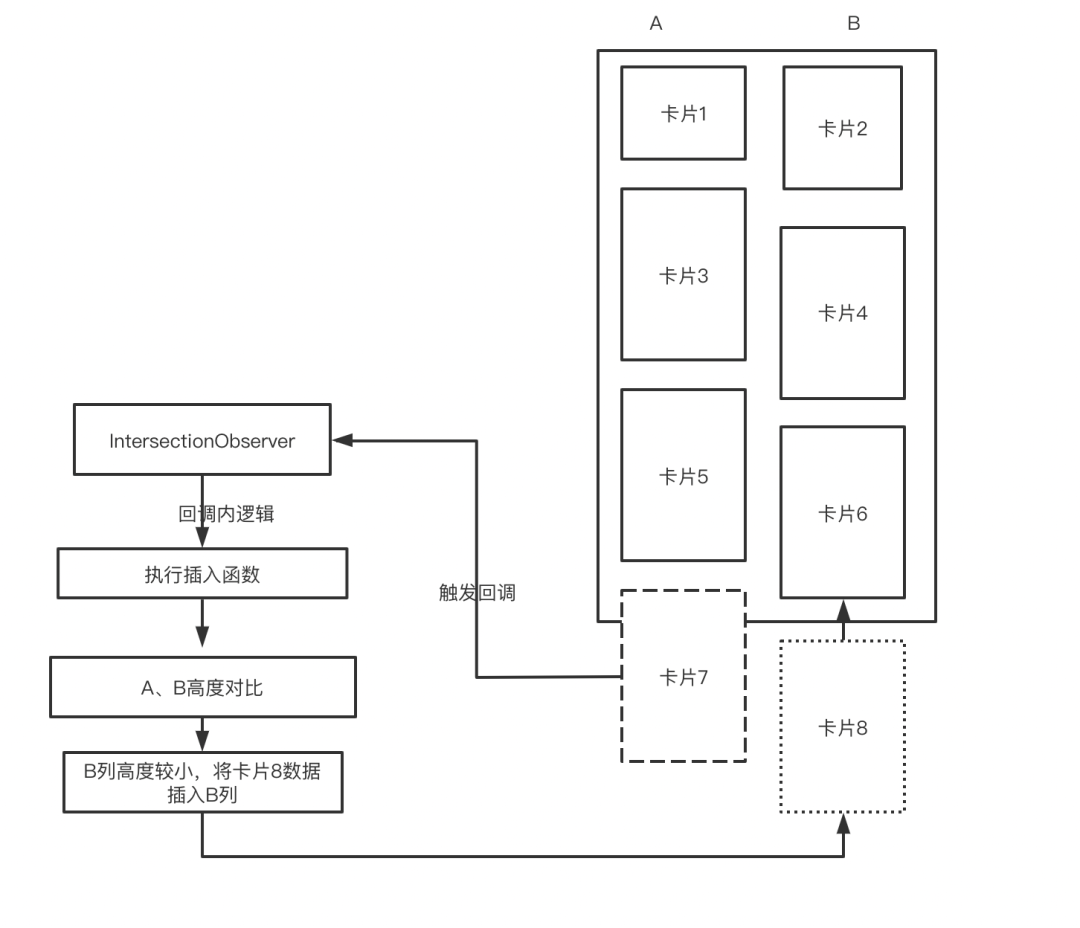
利用IntersectionObserver监听固定的节点信息,每当监听节点出现在可视区域中,就会触发IntersectionObserver回调,在回调中执行数据插入,对比每列的内容的高度,在监听数据池中取出一个数据放在最小列高度的数据列表中。每一个数据卡片的展示,就会触发新数据卡片的加载,这就是「懒加载」瀑布流组件的核心思想。
如下图,当卡片7刚刚展示在可视区域的时候,就会触发IntersectionObserver回调,再回调逻辑中执行插入函数,插入函数中进行列于列之间的对比,此时对比发现B列高度较小,然后在监听数据池中取出一个数据,放入B列的数据列表中,渲染出卡片8。
设计规划
1、一般瀑布流排列方式主要可以分为两种,一是分栏布局,一是绝对定位布局。不管那种思想难点都在于解决图片动态高度的问题。本次采用分栏布局方式,这样能够减少因图片加载而进行大面积卡片位置的计算。
2、创建一个数据监听池,作用一是将所有未渲染的数据保存在其中。作用二是当数据池的数据取完之后可以减少很多不必要的执行操作。
3、参数规划
// 列数
    columnCount: {
      type: Number,
      default: 2,
    },
    // 每页数据
    pageData: {
      type: Array,
      default: () => [],
    },
    // 重置
    resetSign: {
      type: Boolean,
      default: false,
    },
    // 立即检查
    immediateCheck: {
      type: Boolean,
      default: true,
    },
    // 偏移
    offset: {
      type: [Number, String],
      default: 300,
    },
    // 样式
    colStyle: {
      type: Object,
      default: () => ({}),
    },
    // 查询标识
    querySign: {
      type: String,
      require: true,
    },
3、函数规划
- getMinColSign 返回最小列的标识
- checkObserveDom 检查当前dom是否有未监听,将未监听的节点放入监听范围内
- insetData 执行取数据并插入列数据中
- getScrollParentNode 获取祖先滚动元素,并绑定滚动事件
- check 滚动检查是否触发加载阀值
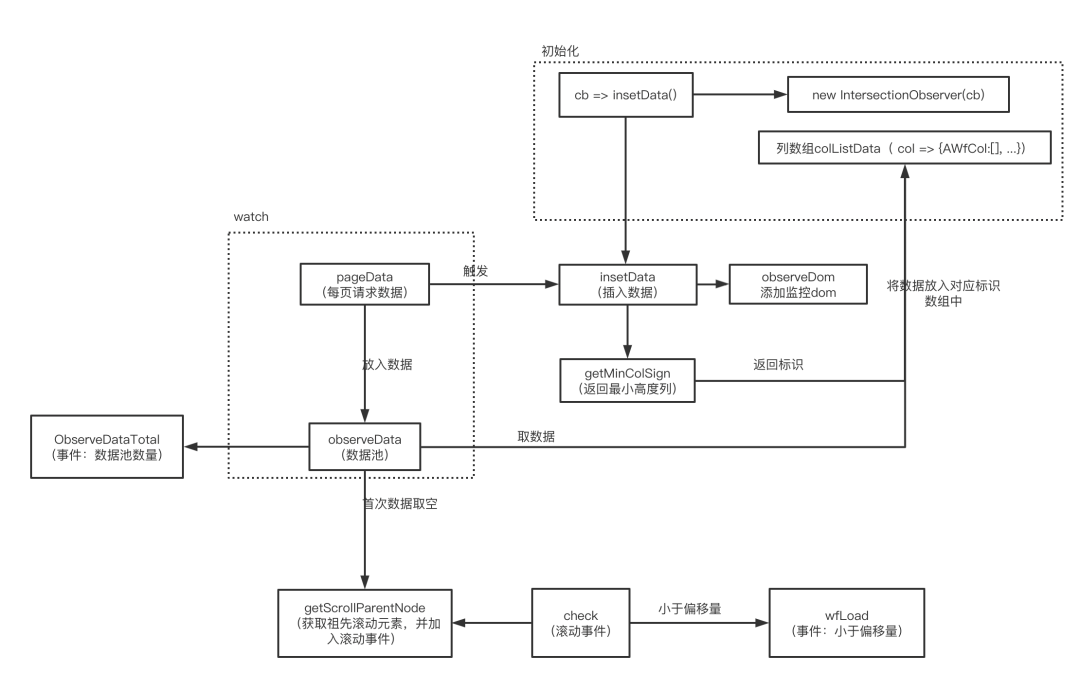
4、流程图设计
实践
pageData实现
- 传入数据,放入监视数据池
- 如重置标识为true,清空监视数据、列数据,
- 每次新数据都会触发数据插入
- 如果不兼容IntersectionObserver,每列均分当前的数据
   pageData(value = []) {
      if (!value.length) return
      if (IntersectionObserver) {
        // 判断当前是否需要重置
        if (this.resetSign) {
          // 重置断开当前全部监控数据
          this.intersectionObserve.disconnect()
          Object.keys(this.colListData).forEach((key) => {
            this.colListData[key] = []
          })
          this.observeData = [...value]
          this.$nextTick(() => {
            this.insetData()
          })
        } else {
          this.observeData = [...this.observeData, ...value]
          // 插入数据
          this.insetData()
        }
      } else {
        // 当 IntersectionObserver 不支持,每列数据均匀分配
        const val = (this.observeData = value)
        while (Array.isArray(val) && val.length) {
          let keys = null
          // 尽量减小数据分配不均匀
          if (this.averageSign) {
            keys = Object.keys(this.colListData)
          } else {
            keys = Object.keys(this.colListData).reverse()
          }
          keys.forEach((key) => {
            const item = val.shift()
            item && this.colListData[key].push(item)
          })
          this.averageSign = !this.averageSign
        }
      }
}insetData实现数据插入函数,确保控制数据的入口只有一个,避免同一批处理周期内执行多次。
// 插入数据
    insetData() {
      const sign = this.getMinColSign()
      const divData = this.observeData && this.observeData.shift()
      if (!divData || !sign) {
        return null
      }
      this.colListData[sign].push(divData)
      this.checkObserveDom()
},getMinColSign实现获取当前所有列中高度最小的列,并返回其标识
// 获取最小高度最小的标识
    getMinColSign() {
      let minHeight = -1
      let sign = null
      Object.keys(this.colListData).forEach((key) => {
        const div = this.$refs[key][0]
        if (div) {
          const height = div.offsetHeight
          if (minHeight === -1 || minHeight > height) {
            minHeight = height
            sign = key
          }
        }
      })
      return sign
},checkObserveDom实现将未加入监视的节点,加入监视
// 检查dom是否全部被监控
    checkObserveDom() {
      const divs = document.querySelectorAll(this.querySign)
      if (!divs || divs.length === 0) {
        // 防止数据插入dom未渲染,监听函数无数据
        setTimeout(() => {
          // 每次新数据的首个数据无法监控,需要延迟触发
          this.insetData()
        }, 100)
      }
      divs.forEach((div) => {
        if (!div.getAttribute('data-intersectionobserve')) {
          // 避免重复监听
          this.intersectionObserve.observe(div)
          div.setAttribute('data-intersectionobserve', true)
        }
      })
    }
observeData实现
- 每次数据池数据去空修改触底标识,只要是防止滚动持续触底,当前数据未渲染完
- 首次数据取空查找祖先滚动元素
- 每次数据变化,发布事件,告知当前数据池剩余数据
  observeData(val) {
      if(!val) return
      if (val.length === 0) {
        if (this.onceSign) {
          // 监视数组数据分发完了,在进行首次的祖先滚动元素的查找
          this.onceSign = false
          this.scrollTarget = this.getScrollParentNode(this.$el)
          this.scrollTarget.addEventListener('scroll', this.check)
        }
        // 数据更新,修改触发触底标识
        this.emitSign = true
      }
      this.$emit('ObserveDataTotal', val.length)
}getScrollParentNode实现在内容未加载的时候,无法准确的通过overflow属性查找到滚动祖先元素,为了能够更准确的获取祖先滚动元素,在首次内容全部加载之后才进行祖先滚动元素的查找
// 获取滚动的父级元素
    getScrollParentNode(el) {
      let node = el
      while (node.nodeName !== 'HTML' && node.nodeName !== 'BODY' && node.nodeType === 1) {
        const parentNode = node.parentNode
        const { overflowY } = window.getComputedStyle(parentNode)
        if (
          (overflowY === 'scroll' || overflowY === 'auto') &&
          parentNode.clientHeight != parentNode.scrollHeight
        ) {
          return parentNode
        }
        node = parentNode
      }
      return window
},check实现检查是否触发load
// 滚动检查
    check() {
      this.intersectionObserve && this.checkObserveDom()
      // 触底标识为false直接跳过
      if (!this.emitSign) {
        return
      }
      const { scrollTarget } = this
      let bounding = {
        top: 0,
        bottom: scrollTarget.innerHeight || 0,
      }
      if (this.$refs.bottom.getBoundingClientRect) {
        bounding = this.$refs.bottom.getBoundingClientRect()
      }
      // 元素所在视口容器的高度
      let height = bounding.bottom - bounding.top
      if (!height) {
        return
      }
      const container = scrollTarget.innerHeight || scrollTarget.clientHeight
      const distance = bounding.bottom - container - this._offset
      if (distance < 0) {
        // 发布事件
        this.$emit('wfLoad')
        // 发布事件触发修改触底标识
        this.emitSign = false
      }
    },
最后
上面便是整个「懒加载」瀑布流组件的产生过程,感兴趣的小伙伴可以下载使用,体验一下。或者您有更好的想法,相互探讨,共同进步。
参考资料
[1]IntersectionObserver: https://developer.mozilla.org/zh-CN/docs/Web/API/IntersectionObserver
[2]npm: https://www.npmjs.com/package/waterfall-vue2

