【源码】1142- 一文读懂Vuex4源码
Vuex4
Vuex是在Vue中常用的状态管理库,在Vue3发布后,这个状态管理库也随之发出了适配Vue3的Vuex4
快速过Vuex3.x原理
-
为什么每个组件都可以通过
this.$store访问到store数据? -
在beforeCreate时,通过mixin的方式注入了store
-
为什么Vuex中的数据都是响应式的
-
创建store的时候调用的是
new Vue,创建了一个Vue实例,相当于借用了Vue的响应式。 -
mapXxxx是怎么获取到store中的数据和方法的
-
mapXxxx只是一个语法糖,底层实现也是从$store中获取然后返回到computed / methods中。
Vuex4使用
Vue.useStore
- 在Vue3 Composition API中使用Vuex
import { useStore } from 'vuex'

export default{
    setup(){
        const store = useStore();
    }
}
Vuex4原理探究
去除冗余代码看本质
Vuex4是怎么注入Vue的
install
-
Vuex是以插件的形式在Vue中使用的,在createApp时调用install安装
-
插件列表中加入plugin
-
执行plugin的安装函数
-
也就是我们常用的Vue.use函数
// Vue3源码 app.use

export function createAppAPI<HostElement>(
  render: RootRenderFunction,
  hydrate?: RootHydrateFunction
): CreateAppFunction<HostElement> {
  return function createApp(rootComponent, rootProps = null) {

    // 省略部分代码....
    const app: App = (context.app = {
      _uid: uid++,
      _component: rootComponent as ConcreteComponent,
      _props: rootProps,
      _container: null,
      _context: context,

      version,

      // 省略部分代码....

      use(plugin: Plugin, ...options: any[]) {
        if (installedPlugins.has(plugin)) {
          __DEV__ && warn(`Plugin has already been applied to target app.`)
        } else if (plugin && isFunction(plugin.install)) {
          installedPlugins.add(plugin)
          plugin.install(app, ...options)
        } else if (isFunction(plugin)) {
          installedPlugins.add(plugin)
          plugin(app, ...options)
        } else if (__DEV__) {
          warn(
            `A plugin must either be a function or an object with an "install" ` +
              `function.`
          )
        }
        return app
      },
      // 省略部分代码 ....
   }
}-
Store 类的install,两种实现分别为挂载到全局和组件内访问
-
将store挂载到全局properties
-
详情见下文app.provide讲解
-
实现通过inject获取
-
实现this.$store获取
// Vuex4实现插件install
install (app, injectKey) {
  // 实现通过inject获取
  app.provide(injectKey || storeKey, this)
  // 实现this.$store获取
  app.config.globalProperties.$store = this
Provide / Inject架构示意图

下面接着看provide实现
app.provide实现
-
每个Vue组件都有一个context上下文对象
-
对context上下文中的provides对象进行赋值
-
createAppContext是一个创建App上下文函数
-
将插件通过key / value的形式挂载到app上下文的provides对象上
-
inject时,通过存入的key进行取出
-
返回体中是一个具有一些常见的Option(mixins、components等)
-
Vue的插件实现最主要的为其中一项provides,具体实现方式为:
// Vue3 app.provide实现
provide(key, value) {
  // 已存在则警告
  if (__DEV__ && (key as string | symbol) in context.provides) {
    warn(
      `App already provides property with key "${String(key)}". ` +
        `It will be overwritten with the new value.`
    )
  }
  // 将store放入context的provide中
  context.provides[key as string] = value
  return app
}

// context相关   context为上下文对象
const context = createAppContext()
export function createAppContext(): AppContext {
  return {
    app: null as any,
    config: {
      isNativeTag: NO,
      performance: false,
      globalProperties: {},
      optionMergeStrategies: {},
      errorHandler: undefined,
      warnHandler: undefined,
      compilerOptions: {}
    },
    mixins: [],
    components: {},
    directives: {},
    provides: Object.create(null)
  }
}
useStore的实现
function useStore (key = null) {
  return inject(key !== null ? key : storeKey)
}
Vue.provide
- Vue的provide API也比较简单,相当于直接通过key/value赋值
- 当前实例provides和父级实例provides相同时,通过原型链建立连接
// Vue3 provide实现
function provide<T>(key: InjectionKey<T> | string | number, value: T) {
  if (!currentInstance) {
    if (__DEV__) {
      warn(`provide() can only be used inside setup().`)
    }
  } else {
    let provides = currentInstance.provides
    const parentProvides =
      currentInstance.parent && currentInstance.parent.provides
    if (parentProvides === provides) {
      provides = currentInstance.provides = Object.create(parentProvides)
    }
    // TS doesn't allow symbol as index type
    provides[key as string] = value
  }
}
Vue.inject
- 通过provide时存入的key取出store
- 有父级实例则取父级实例的provides,没有则取根实例的provides
// Vue3 inject实现
function inject(
  key: InjectionKey<any> | string,
  defaultValue?: unknown,
  treatDefaultAsFactory = false
) {
  const instance = currentInstance || currentRenderingInstance
  if (instance) {
    // 有父级实例则取父级实例的provides,没有则取根实例的provides
    const provides =
      instance.parent == null
        ? instance.vnode.appContext && instance.vnode.appContext.provides
        : instance.parent.provides

    // 通过provide时存入的key取出store
    if (provides && (key as string | symbol) in provides) {
      return provides[key as string]
    }
    // 省略一部分代码......
  }
}
注入
-
为什么每个组件实例都有Store对象了?
-
优先注入父级provides
-
兜底为注入app上下文的provides
-
在创建组件实例的时候注入了provides
function createComponentInstance(vnode, parent, suspense) {
    const type = vnode.type;
    const appContext = (parent ? parent.appContext : vnode.appContext) || emptyAppContext;
    const instance = {
        parent,
        appContext,
        // ...
        provides: parent ? parent.provides : Object.create(appContext.provides),
        // ...
    }
    // ...
    return instance;
}
可从vue中引入provide、inject、getCurrentInstance等API进行库开发 / 高阶用法,这里不过多赘述。
Vuex4执行机制
createStore
- 从createStore开始看起
- 可以发现Vuex4中的state是通过reactive API去创建的响应式数据,Vuex3中是通过new Vue实例
- dispatch、commit的实现基本是封装了一层执行,底层也是通过store去执行,不用过于关心
- 而Vuex4的响应式实现,同样是借用了Vue3的响应式API reactive
// Vuex4源码

export function createStore (options) {
    return new Store(options)
}
class Store{
    constructor (options = {}){
        // 省略若干代码...
        this._committing = false
        this._actions = Object.create(null)
        this._actionSubscribers = []
        this._mutations = Object.create(null)
        this._wrappedGetters = Object.create(null)
        this._modules = new ModuleCollection(options)
        this._modulesNamespaceMap = Object.create(null)
        this._subscribers = []
        this._makeLocalGettersCache = Object.create(null)

        // bind commit and dispatch to self
        const store = this
        const { dispatch, commit } = this
        this.dispatch = function boundDispatch (type, payload) {
          return dispatch.call(store, type, payload)
        }
        this.commit = function boundCommit (type, payload, options) {
          return commit.call(store, type, payload, options)
        }


        const state = this._modules.root.state
        installModule(this, state, [], this._modules.root);
        resetStoreState(this, state)

        // 省略若干代码...
    }
}
function resetStoreState (store, state, hot) {
    // 省略若干代码...
    store._state = reactive({
        data: state
    })
    // 省略若干代码...
}
installModule
installModule主要为按序初始化各模块,主要功能代码已高亮
- Mutation
- Action
- Getter
- Child(install)
// Vuex4
function installModule (store, rootState, path, module, hot) {
  const isRoot = !path.length
  const namespace = store._modules.getNamespace(path)

  // register in namespace map
  if (module.namespaced) {
    if (store._modulesNamespaceMap[namespace] && __DEV__) {
      console.error(`[vuex] duplicate namespace ${namespace} for the namespaced module ${path.join('/')}`)
    }
    store._modulesNamespaceMap[namespace] = module
  }

  // set state
  if (!isRoot && !hot) {
    const parentState = getNestedState(rootState, path.slice(0, -1))
    const moduleName = path[path.length - 1]
    store._withCommit(() => {
      if (__DEV__) {
        if (moduleName in parentState) {
          console.warn(
            `[vuex] state field "${moduleName}" was overridden by a module with the same name at "${path.join('.')}"`
          )
        }
      }
      parentState[moduleName] = module.state
    })
  }

  const local = module.context = makeLocalContext(store, namespace, path)

  module.forEachMutation((mutation, key) => {
    const namespacedType = namespace + key
    registerMutation(store, namespacedType, mutation, local)
  })

  module.forEachAction((action, key) => {
    const type = action.root ? key : namespace + key
    const handler = action.handler || action
    registerAction(store, type, handler, local)
  })

  module.forEachGetter((getter, key) => {
    const namespacedType = namespace + key
    registerGetter(store, namespacedType, getter, local)
  })

  module.forEachChild((child, key) => {
    installModule(store, rootState, path.concat(key), child, hot)
  })
}
订阅机制
看完了Vuex4是如何安装和注入的,最后来看看Vuex的订阅机制是如何实现的
-
和订阅机制有关的方法主要有
-
订阅:subscribe、subscribeAction,分别用于订阅Mutation和Action
-
执行:commit、dispatch,分别用于执行
-
数据项有:_actionSubscribers、_subscribers
subscribe
订阅 store 的 mutation。
handler会在每个 mutation 完成后调用,接收 mutation 和经过 mutation 后的状态作为参数
所有的订阅callback都会被放入
this._subscribers,可通过prepend选项选择放入队头 / 队尾。
- 将callback推入订阅数组
- 返回一个取消订阅的函数
// 用法   该方法会返回一个取消订阅的函数
store.subscribe((action, state) => {
  console.log(action.type)
  console.log(action.payload)
}, { prepend: true })

// subscribe  Vuex4源码实现
subscribe (fn, options) {
  return genericSubscribe(fn, this._subscribers, options)
}

function genericSubscribe (fn, subs, options) {
  if (subs.indexOf(fn) < 0) {
    options && options.prepend
      ? subs.unshift(fn)
      : subs.push(fn)
  }
  return () => {
    const i = subs.indexOf(fn)
    if (i > -1) {
      subs.splice(i, 1)
    }
  }
}
接着看看commit执行时如何触发这些订阅的callback

- 执行需commit的函数
- 依次执行
this._subscribers中的订阅callback
// commit实现
commit (_type, _payload, _options) {
  // check object-style commit
  const {
    type,
    payload,
    options
  } = unifyObjectStyle(_type, _payload, _options)

  const mutation = { type, payload }
  const entry = this._mutations[type]

  // 执行需commit的函数
  this._withCommit(() => {
    entry.forEach(function commitIterator (handler) {
      handler(payload)
    })
  })x

    // 执行订阅函数
  this._subscribers
    .slice() // shallow copy to prevent iterator invalidation if subscriber synchronously calls unsubscribe
    .forEach(sub => sub(mutation, this.state))

    // 省略若干代码....
}
subscribeAction
订阅 store 的 action。
handler会在每个 action 分发的时候调用并接收 action 描述和当前的 store 的 state 这两个参数
可订阅:执行前、执行后和错误
- 将订阅对象推入
this._actionSubscribers - 返回一个取消订阅函数
// 用法
store.subscribeAction({
  before: (action, state) => {
    console.log(`before action ${action.type}`)
  },
  after: (action, state) => {
    console.log(`after action ${action.type}`)
  },
  error: (action, state, error) => {
    console.log(`error action ${action.type}`)
    console.error(error)
  }
}, { prepend: true })

// Vuex4源码实现
subscribeAction (fn, options) {
  const subs = typeof fn === 'function' ? { before: fn } : fn
  return genericSubscribe(subs, this._actionSubscribers, options)
}

function genericSubscribe (fn, subs, options) {
  if (subs.indexOf(fn) < 0) {
    options && options.prepend
      ? subs.unshift(fn)
      : subs.push(fn)
  }
  return () => {
    const i = subs.indexOf(fn)
    if (i > -1) {
      subs.splice(i, 1)
    }
  }
}
dispatch执行时如何触发这些订阅函数?
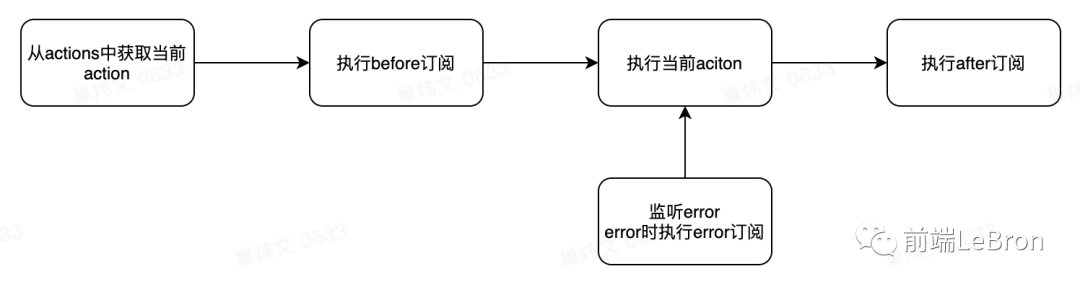
// Vuex4源码实现
dispatch (_type, _payload) {
  // check object-style dispatch
  const {
    type,
    payload
  } = unifyObjectStyle(_type, _payload)

  const action = { type, payload }
  const entry = this._actions[type]
  if (!entry) {
    if (__DEV__) {
      console.error(`[vuex] unknown action type: ${type}`)
    }
    return
  }

  // before订阅执行
  try {
    this._actionSubscribers
      .slice() // shallow copy to prevent iterator invalidation if subscriber synchronously calls unsubscribe
      .filter(sub => sub.before)
      .forEach(sub => sub.before(action, this.state))
  } catch (e) {
    if (__DEV__) {
      console.warn(`[vuex] error in before action subscribers: `)
      console.error(e)
    }
  }

  // action执行
  const result = entry.length > 1
    ? Promise.all(entry.map(handler => handler(payload)))
    : entry[0](payload)

  return new Promise((resolve, reject) => {
    result.then(res => {
        // after订阅执行
      try {
        this._actionSubscribers
          .filter(sub => sub.after)
          .forEach(sub => sub.after(action, this.state))
      } catch (e) {
        if (__DEV__) {
          console.warn(`[vuex] error in after action subscribers: `)
          console.error(e)
        }
      }
      resolve(res)
    }, error => {
        // error订阅执行
      try {
        this._actionSubscribers
          .filter(sub => sub.error)
          .forEach(sub => sub.error(action, this.state, error))
      } catch (e) {
        if (__DEV__) {
          console.warn(`[vuex] error in error action subscribers: `)
          console.error(e)
        }
      }
      reject(error)
    })
  })
}
一句话总结
Vuex3 -> Vuex4,主要实现方式将mixin注入改为了provides / inject的方式注入。
Provide / Inject 不仅用于Vuex实现,同样可以用于深层组件的数据传递
提示:
provide和inject绑定并不是可响应的。这是刻意为之的。然而,如果你传入了一个可监听的对象,那么其对象的 property 还是可响应的。