简单 4 步定义公共 springboot starter 包
最近在整理公司公共 starter 内容,也是想写一篇关于 starter 文章,让更多不了解的小伙伴掌握这项核心技能
文章从零到一的封装设计 starter,并提供可插拔 starter 以及元数据配置等说明,并在可插拔上与开源 zuul 进行比对,希望小伙伴看后有所收获
文章大纲如下:
starter
starter 定义
starter 好处
自定义 starter
starter 命名
创建 springboot 项目
pom 依赖配置
自动配置类
spring.factories
打包仓库
测试 starter
可插拔 starter
自定义可插拔 starter
zuul 实现可插拔原理
配置元数据
mybatis starter 如何实现
结言
starter
starter 定义
springboot starter 类似于一种插件机制,抛弃了之前繁琐的配置,将复杂依赖统一集成进 starter
所有依赖模块都遵循着约定成俗的默认配置,并允许我们调整这些配置,即遵循“约定大于配置”的理念
starter 好处
starter 的出现极大的帮助开发者们从繁琐的框架配置中解放出来,从而更专注于业务代码
并且 springboot 官方提供除了企业级项目不同场景的 starter 依赖模块,可以很便捷的集成进项目
比如 springboot 项目需要依赖 redis,我们只需要加入 spring-boot-starter-data-redis 依赖,并配置一些必须的连接信息
使用者只需要引用 starter 依赖,springboot 就可以自动加载项目所需要的配置依赖,彻底摆脱了不同的依赖库引用以及版本问题
自定义 starter
starter 命名
官方对 starter 包定义的 artifactId 是有要求的,当然也可以不遵守(毕竟你的项目你做主)
spring 官方提供 starter 通常命名为 spring-boot-starter-{name} 如:
spring-boot-starter-web,spring-boot-starter-activemq 等,这里放一部分官方提供列表,详情查看 springboot starter 列表

比如 mybatis 出品的:mybatis-spring-boot-starter
创建 springboot 项目
starter 也是基于 springboot 项目创建的,所以第一步应该先创建 springboot 项目
创建工程完成后,删除不必要文件,目录如下:
├── pom.xml
└── src
    ├── main
    │   ├── java
    │   │   └── cn
    │   │       └── machen
    │   │           └── starter
    │   │               └── demospringbootstarter
    │   └── resources
pom 依赖配置
pom.xml 中依赖非常简洁,除了项目的基本信息和父类引用,只需引用 spring-boot-starter 即可
<?xml version="1.0" encoding="UTF-8"?>
<project xmlns="http://maven.apache.org/POM/4.0.0" xmlns:xsi="http://www.w3.org/2001/XMLSchema-instance"
         xsi:schemaLocation="http://maven.apache.org/POM/4.0.0 https://maven.apache.org/xsd/maven-4.0.0.xsd">
    <modelVersion>4.0.0</modelVersion>
    <parent>
        <groupId>org.springframework.boot</groupId>
        <artifactId>spring-boot-starter-parent</artifactId>
        <version>2.2.11.RELEASE</version>
        <relativePath/> <!-- lookup parent from repository -->
    </parent>
    <groupId>cn.machen.starter</groupId>
    <artifactId>demo-spring-boot-starter</artifactId>
    <version>0.0.1-SNAPSHOT</version>

    <properties>
        <java.version>1.8</java.version>
    </properties>

    <dependencies>
        <dependency>
            <groupId>org.springframework.boot</groupId>
            <artifactId>spring-boot-starter</artifactId>
        </dependency>
    </dependencies>

</project>
自动配置类
创建一个注册为 spring bean 的 service 类,提供一个 sayHello 方法以供后续测试
public class ServiceBean {
    public String sayHello(String name) {
        return String.format("Hello World, %s", name);
    }
}
创建自动配置类,将 ServiceBean 进行声明 Bean,等待扫描后交付给 spring ioc 容器
@Configuration
public class AutoConfigurationTest {

    @Bean
    public ServiceBean getServiceBean() {
        return new ServiceBean();
    }
}
spring.factories
项目 resources 目录下新建 META-INF 文件夹,然后创建 spring.factories 文件

org.springframework.boot.autoconfigure.EnableAutoConfiguration=\
  cn.machen.starter.demospringbootstarter.AutoConfigurationTest
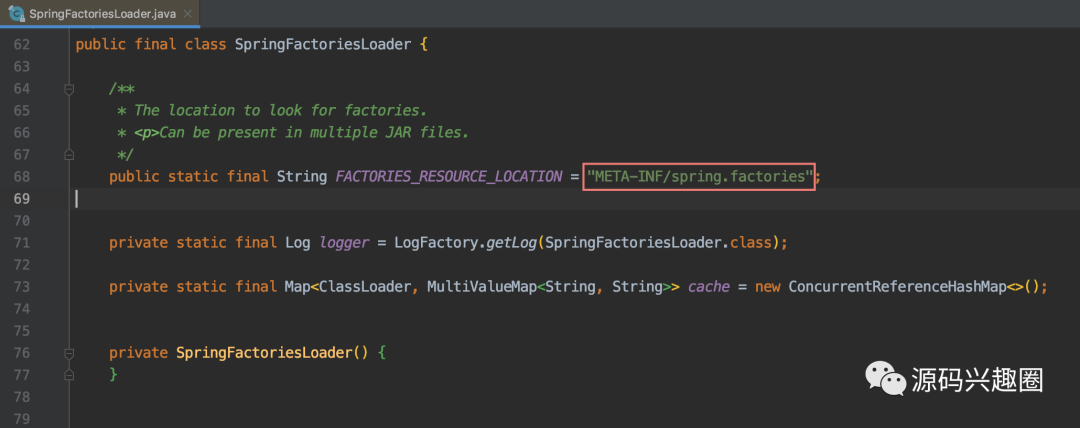
为什么要指定 resources/META-INF 下写 spring.factories?不这么写不行啊
SpringFactoriesLoader#loadFactories 负责完成自动装配类的加载,扫描的就是这个变量文件
你不按照规定写可以,扫不到你的自动配置类可咋整,消停的吧
打包仓库
我们提供 starter 肯定是要被第三方或者我们其它项目所引用的,所以要把项目打包后发布到仓库中
这里科普一下 maven 命令知识点,一般我们打包使用比较多的命令就是 package、install、deploy
声明一点就是这三个命令都能打包,有什么区别呢?
package:
该命令完成了项目编译、单元测试、打包功能三个过程
install:
在 package 命令的前提下新增一个步骤,将新打好的包部署到本地 maven 仓库
deploy:
在 install 命令的前提下新增一个步骤,将新打的包部署到远端仓库(相当于本地和远端仓库同时部署一份)
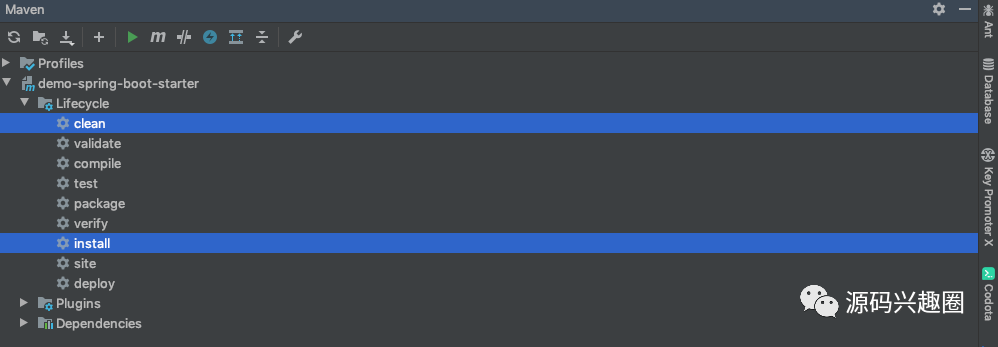
而我们只是本地仓库引用,只需要 install 命令执行即可,两种方式分别是 maven 插件或者终端执行命令 mvn clean install
测试 starter
我们如何测试刚才新建的 starter 是否成功了呢?新建一个项目引用 starter 项目坐标就可以啦
<?xml version="1.0" encoding="UTF-8"?>
<project xmlns="http://maven.apache.org/POM/4.0.0" xmlns:xsi="http://www.w3.org/2001/XMLSchema-instance"
         xsi:schemaLocation="http://maven.apache.org/POM/4.0.0 https://maven.apache.org/xsd/maven-4.0.0.xsd">
    <modelVersion>4.0.0</modelVersion>
    <parent>
        <groupId>org.springframework.boot</groupId>
        <artifactId>spring-boot-starter-parent</artifactId>
        <version>2.2.11.RELEASE</version>
        <relativePath/> <!-- lookup parent from repository -->
    </parent>
    <groupId>cn.machen.starter</groupId>
    <artifactId>demo-test-spring-boot-starter</artifactId>
    <version>0.0.1-SNAPSHOT</version>

    <dependencies>
        <dependency>
            <groupId>org.springframework.boot</groupId>
            <artifactId>spring-boot-starter</artifactId>
        </dependency>
        <!-- 引入 starter 包 -->
        <dependency>
            <groupId>cn.machen.starter</groupId>
            <artifactId>demo-spring-boot-starter</artifactId>
            <version>${project.version}</version>
        </dependency>

        <dependency>
            <groupId>org.springframework.boot</groupId>
            <artifactId>spring-boot-starter-test</artifactId>
            <scope>test</scope>
            <exclusions>
                <exclusion>
                    <groupId>org.junit.vintage</groupId>
                    <artifactId>junit-vintage-engine</artifactId>
                </exclusion>
            </exclusions>
        </dependency>
    </dependencies>
</project>既然是测试,达到什么样的标准才算通过呢?
根据我们 starter 中定义代码,只要 demo-test 项目 引用 ServiceBean 打印输出对应信息 即算成功
src-main-test 目录下使用项目创建自带的测试类
@SpringBootTest
class DemoTestSpringBootStarterApplicationTests {

    @Autowired
    private ServiceBean serviceBean;

    @Test
    void contextLoads() {
        System.out.println(serviceBean.sayHello("machen"));
    }
}
运行 contextLoads 测试方法,最终输出 Hello World, machen
你以为这就结束了么?不不不,硬核且干的知识才刚刚开始
可插拔 starter
自定义可插拔 starter
starter 就是 starter,咋起了个名字叫 可插拔
所谓可插拔,字面意思理解就是虽然我引入了你的 starter jar 包,但是可以通过条件判断是否加载你的功能
满足条件的话加载此 jar 相关配置,不满足就哪凉快哪歇着吧(比较白话哈,具体点就是模块插件化,降低耦合)
实现可插拔的方式有很多,通过配置文件 key 前缀或者自定义注解等,但是这些都绕不过 springboot 的条件注解
文章使用自定义注解 + 条件注解的形式完成,其余这里就不一一举例了,大家可以网上自行搜索
demo-spring-boot-starter
1)首先在项目中创建自定义注解
@Target(ElementType.TYPE)
@Retention(RetentionPolicy.RUNTIME)
public @interface EnableAutoConfigTest { }
2)AutoConfigurationTest 类中添加条件注解,然后重新打包至本地仓库
@Configuration
@ConditionalOnBean(annotation = EnableAutoConfigTest.class)
public class AutoConfigurationTest {

    @Bean
    public ServiceBean getServiceBean() {
        return new ServiceBean();
    }
}
demo-test-spring-boot-starter
1)在主程序引用 @EnableAutoConfigTest 注解
@EnableAutoConfigTest
@SpringBootApplication
public class DemoTestSpringBootStarterApplication {
    public static void main(String[] args) {
        SpringApplication.run(DemoTestSpringBootStarterApplication.class, args);
    }
}
测试可插拔 starter
跑一下上文测试类中运行程序,这样的常规操作自然可以正常打印我们的 Hello World
跑程序谁家只跑正常的呀是不是,把 @EnableAutoConfigTest 删了试一哈,看迎接咱的是不是这玩意
Unsatisfied dependency expressed through field 'serviceBean'; nested exception is org.springframework.beans.factory.NoSuchBeanDefinitionException: No qualifying bean of type 'cn.machen.starter.demospringbootstarter.ServiceBean' available: expected at least 1 bean which qualifies as autowire candidate. Dependency annotations: {@org.springframework.beans.factory.annotation.Autowired(required=true)}
当然,正式环境上可不能实现的这么糙哈,不过,思路都是一致的
之前参与公司搜索业务封装 starter,就是采用上述自定义注解结合条件注解完成的
其实除了文中可插拔的实现之外,像 springcloud zuul 也是类似的思路,因为就这点玩意,也玩不出个花
zuul 实现可插拔原理
我们通常是通过配置类上配置 zuul 注解 @EnableZuulProxy 开启 Zuul 注入功能

看一下图片中标红的类起到了什么作用
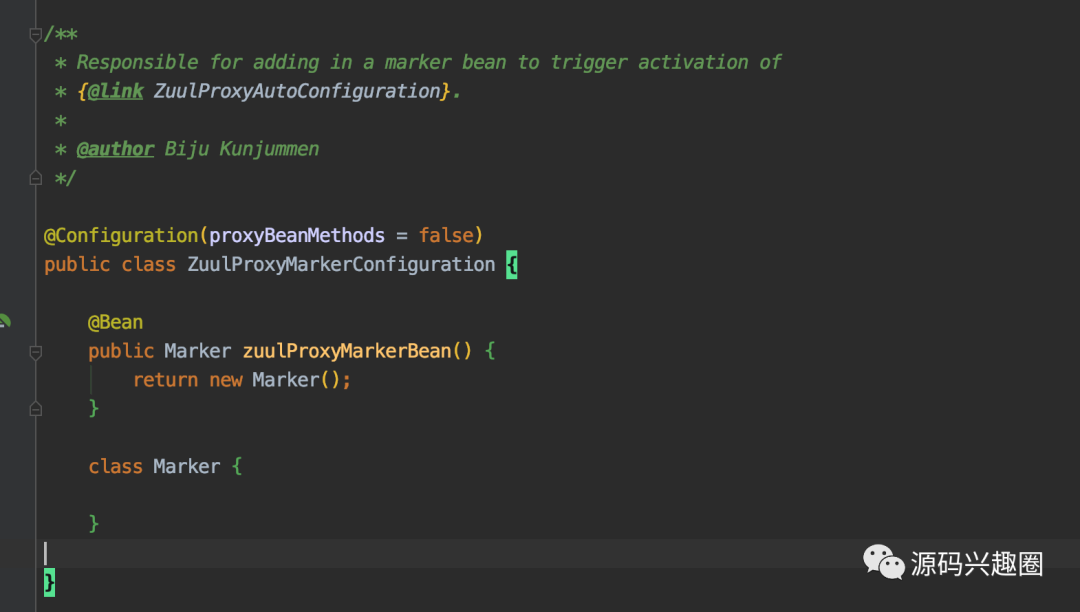
负责添加标记 bean 以触发 {@link ZuulProxyAutoConfiguration} 的激活
其实到这里就已经很明白了,但是本着负责到底的良好品质,继续跟进
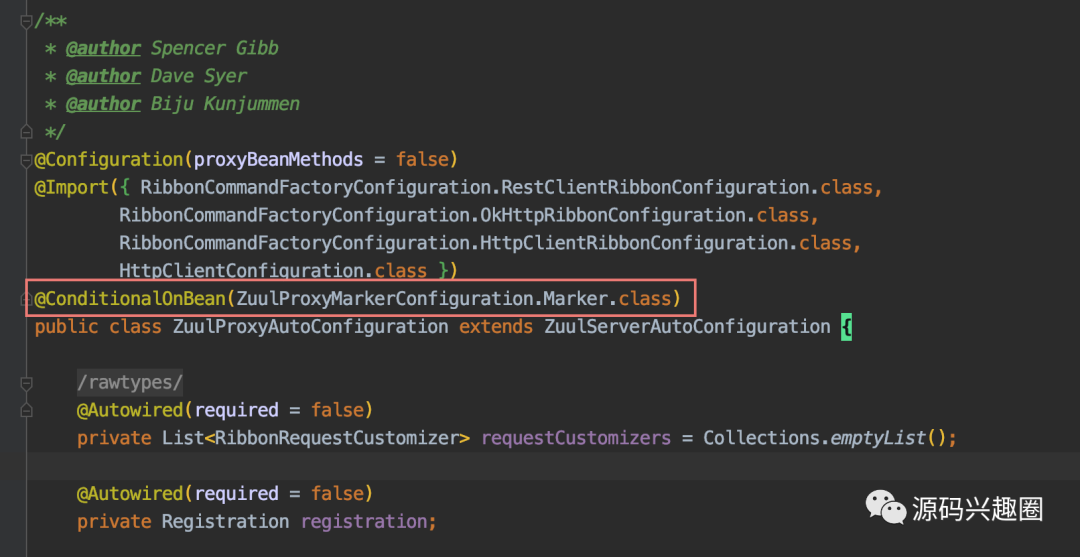
不同的是 zuul 中使用过一个无实际意义的 bean 来标记,而我们使用的注解
配置元数据
不知道小伙伴在项目配置文件中输入时,看到智能提示时,有没有疑惑怎么实现的?
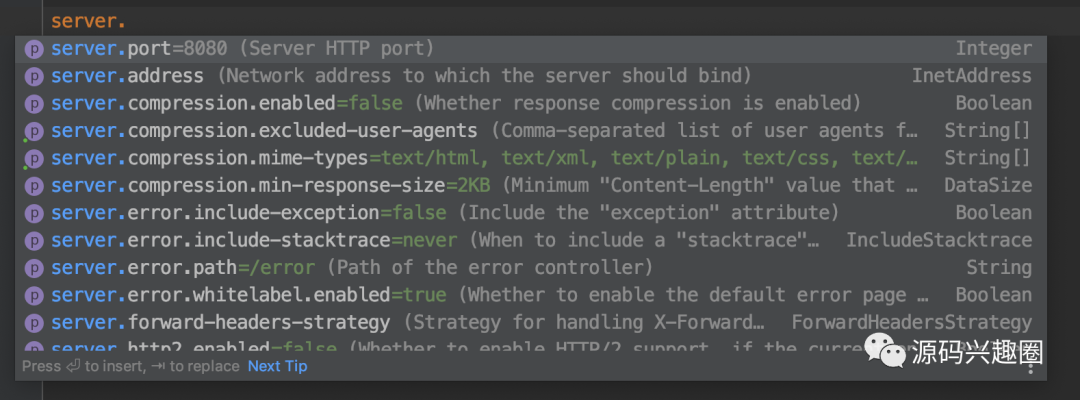
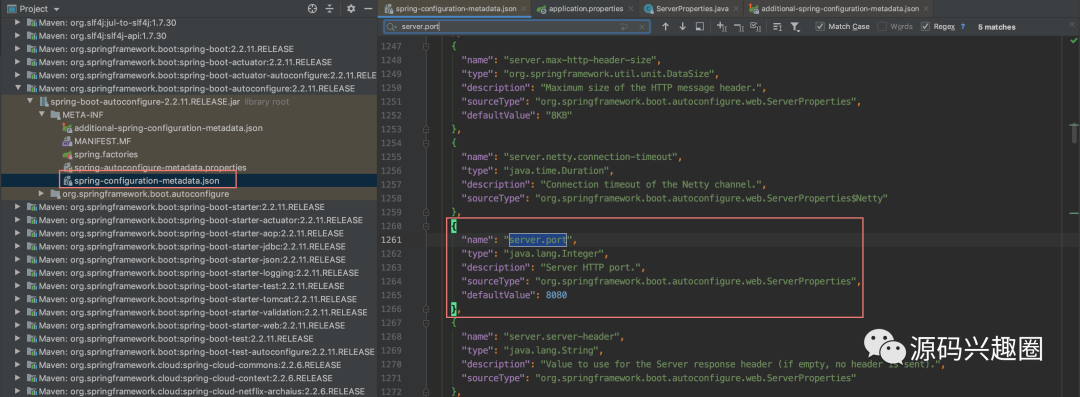
这种文件如何产生的呢?有两种方式
- 通过建立 META-INF/spring-configuration-metadata.json 文件,开发者手动配置
- 还有一种是通过注解 @ConfigurationProperties 方式自动生成
有自动生成的肯定优先使用呀,毕竟我这么懒的人。实现元数据配置只需要在 starter 包下简单三步操作
1)提供引用 pom.xml 中加入 spring-boot-configuration-processor 包
<dependency>
    <groupId>org.springframework.boot</groupId>
    <artifactId>spring-boot-configuration-processor</artifactId>
</dependency>
2)编写 Properties 配置类,以 swagger 示例
@Data
@Configuration
@ConfigurationProperties(prefix = "swagger")
public class SwaggerProperties {

    /**
     * 文档扫描包路径
     */
    private String basePackage = "";

    /**
     * title 示例: 订单创建接口
     */
    private String title = "平台系统接口详情";

    /**
     * 服务条款网址
     */
    private String termsOfServiceUrl = "https://www.xxxx.com/";

    /**
     * 版本号
     */
    private String version = "V_1.0.0";

}
3)最后执行打包命令,更新本地仓库 jar 包
mvn clean install
接下来在 demo-test-spring-boot-starter 项目更新引用,然后在 application.properties 测试一下

mybatis starter 如何实现
我们引一下相关 pom 包依赖,如果大家平常找不到相关依赖包,可以在公共仓库上搜索
公共仓库地址:https://mvnrepository.com/
<dependency>
    <groupId>org.mybatis.spring.boot</groupId>
    <artifactId>mybatis-spring-boot-starter</artifactId>
    <version>1.3.2</version>
</dependency>
看一下 mybatis starter 包里都包含什么内容,是否和我们自定义一致
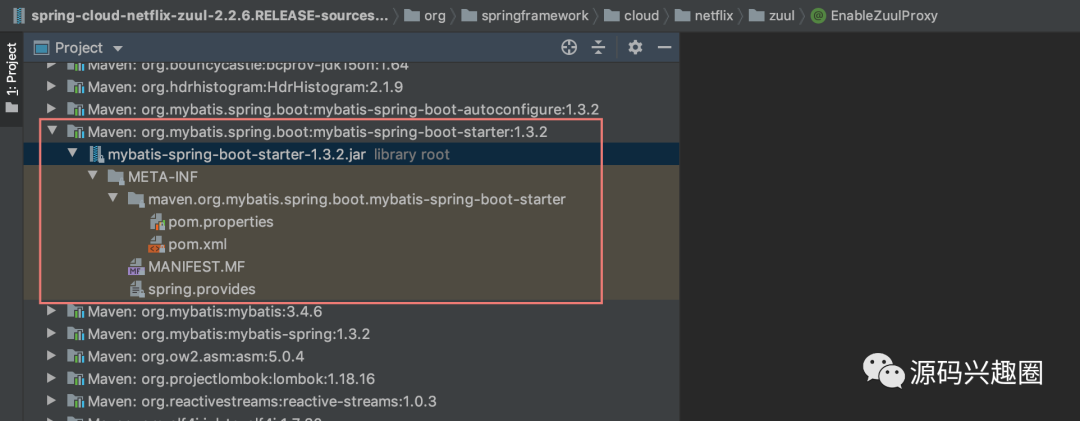

而真正让 mybatis 进行全局初始化的秘密就在 mybatis-spring-boot-autoconfigure 中
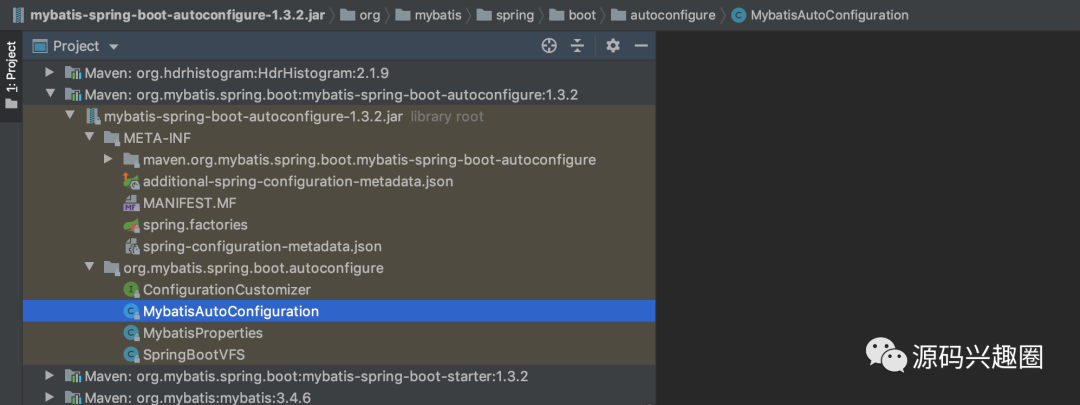
mybatis starter 设计与我们上文讲的自定义 starter 有何不同?
mybatis starter 并没有做什么操作,只是做了一个组合依赖作用,起到初始化作用的是其中 autoconfigure 包
springboot 也是这种思想,只不过它是将所有包的 autoconfigure 实现统一发现的,大家看一下 spring-boot-autoconfigure-xxx.jar 就会明白
而我们自定义 starter 中就少了依赖 autoconfigure 包这个环节,两者无关对错,只是不同设计的体现,这里不作任何建议,看个人喜好
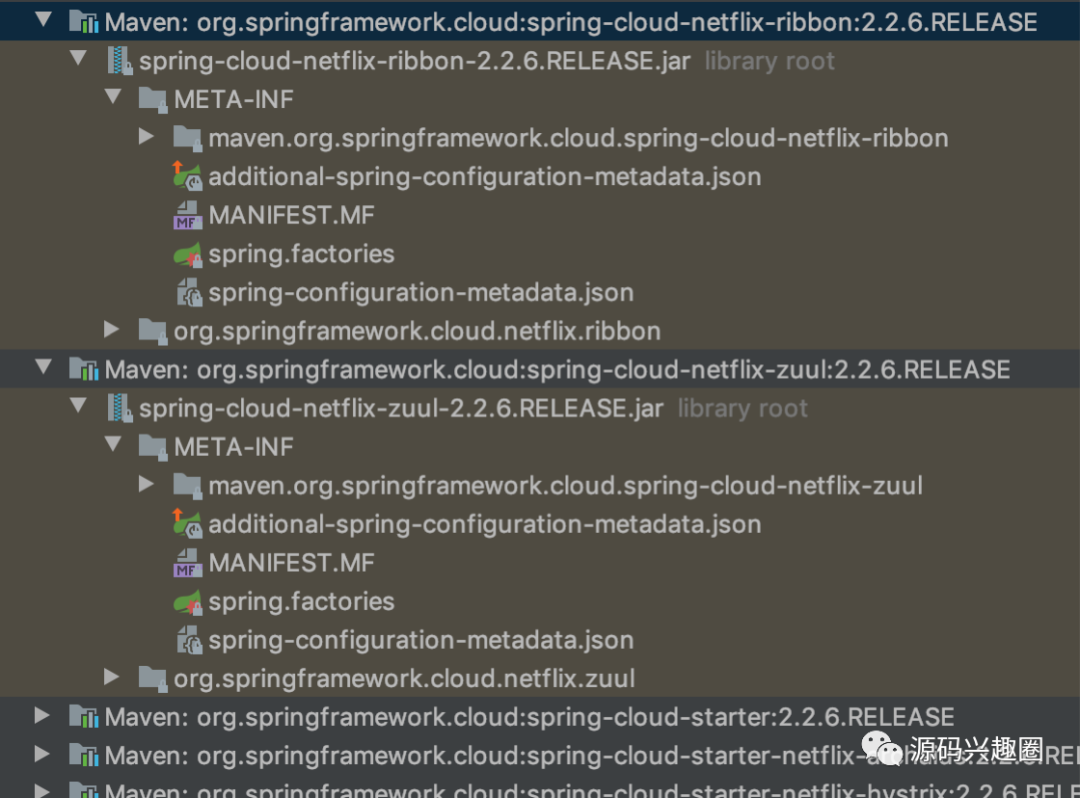
啥?你说要跟着主流走,严格贯彻 springboot 思想?

结言
距离上次发文章已经过去了一周,这期间做了三件事情,分别是:
- DevOps 概念了解以及公司部分 DevOps 组件优化
- 完成了个人技术博客网站的搭建
- 通过迁移公众号开启了留言功能
DevOps
DevOps 这件事情在之前作者接触不多,所以花了一些时间从概念入手去了解
- 瀑布开发是什么?有什么优缺点?
- 敏捷开发是什么?有什么优缺点?
- 什么是 DevOps?CI/CD 又是什么?
经过这几天的了解以及基本组件的搭建使用,掌握程度比之前好了不少,收获还是挺多的

