MotionLayout 的高级玩法我学会了
前言
最近写业务的时候遇到一个带有轮播的界面ConstraintLayout
在交互效果还定稿的时候,大佬同事建议轮播样式可以考虑 MotionLayout 中的 Carousel, 这个组件就是为轮播而生。
学习完发现 MotionLayout 确实好用,用同事的话来说,就是让世界没有难做的动画。
MotionLayout 的思路非常简单,使用 ConstraintLayout 的写法,定义动画开始的一帧和动画结束的一帧(当然我们也可以加入更多帧,在动画的过程中),在事件触发以后,会自动帮我们处理好动画。
不过,本文的重点可不是学习 MotionLayout,而是教大家如何使用 Carousel,可以看一下我写的效果:图一图二图三
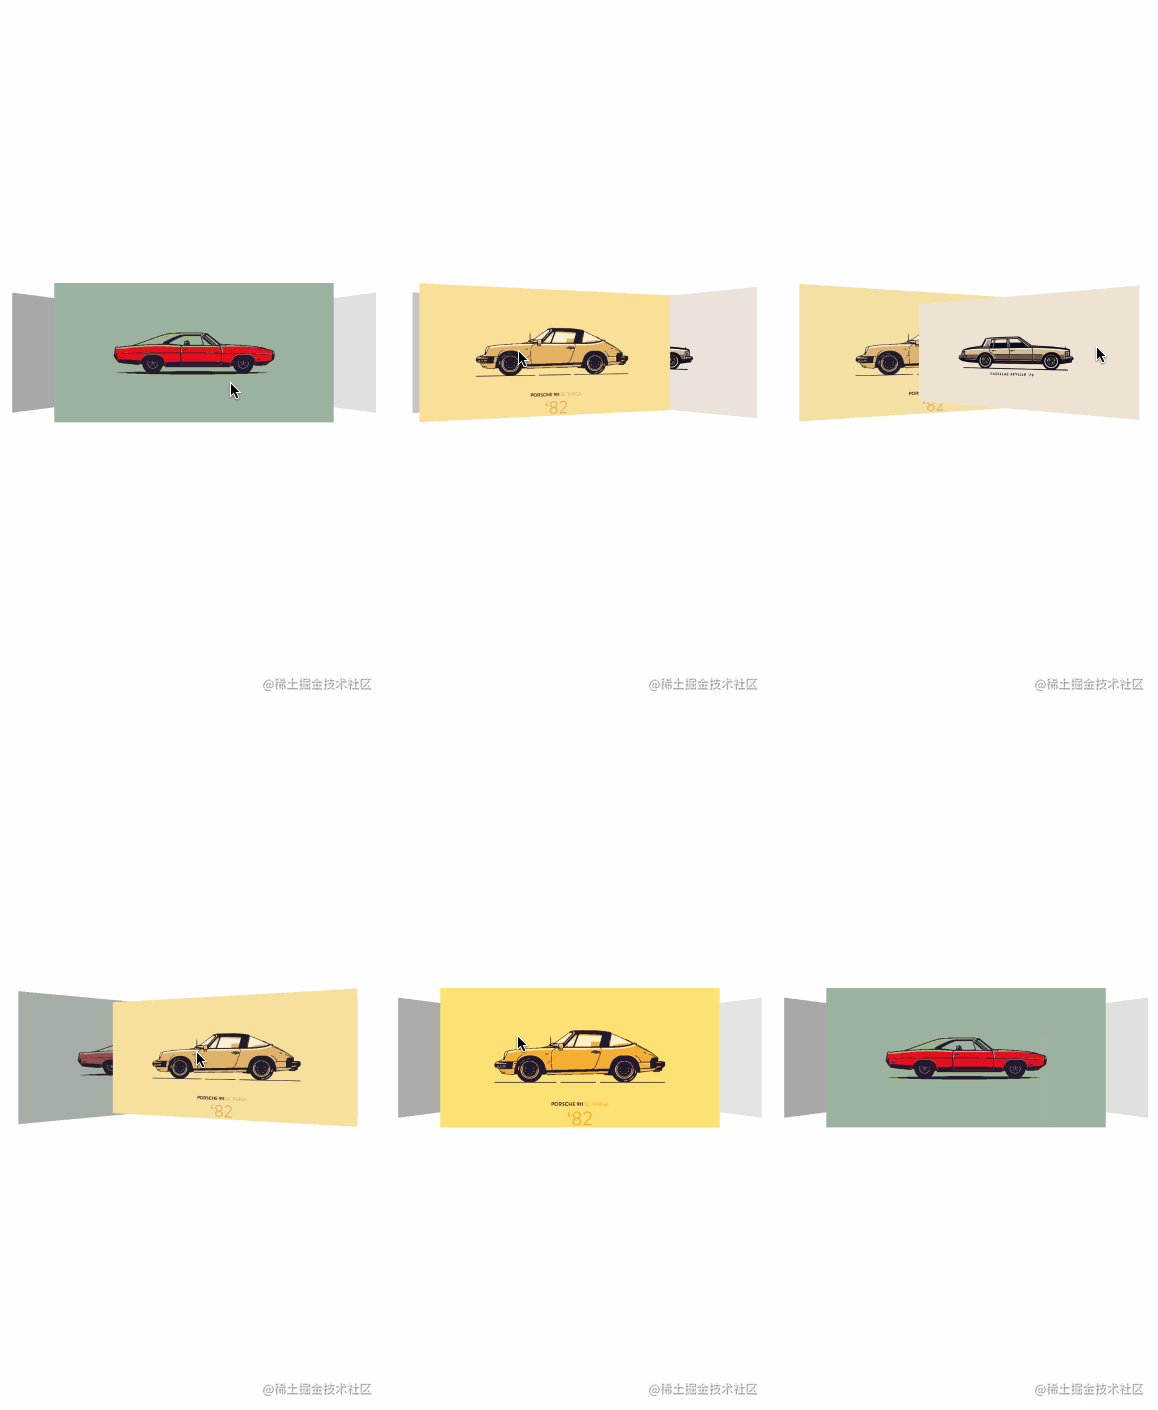
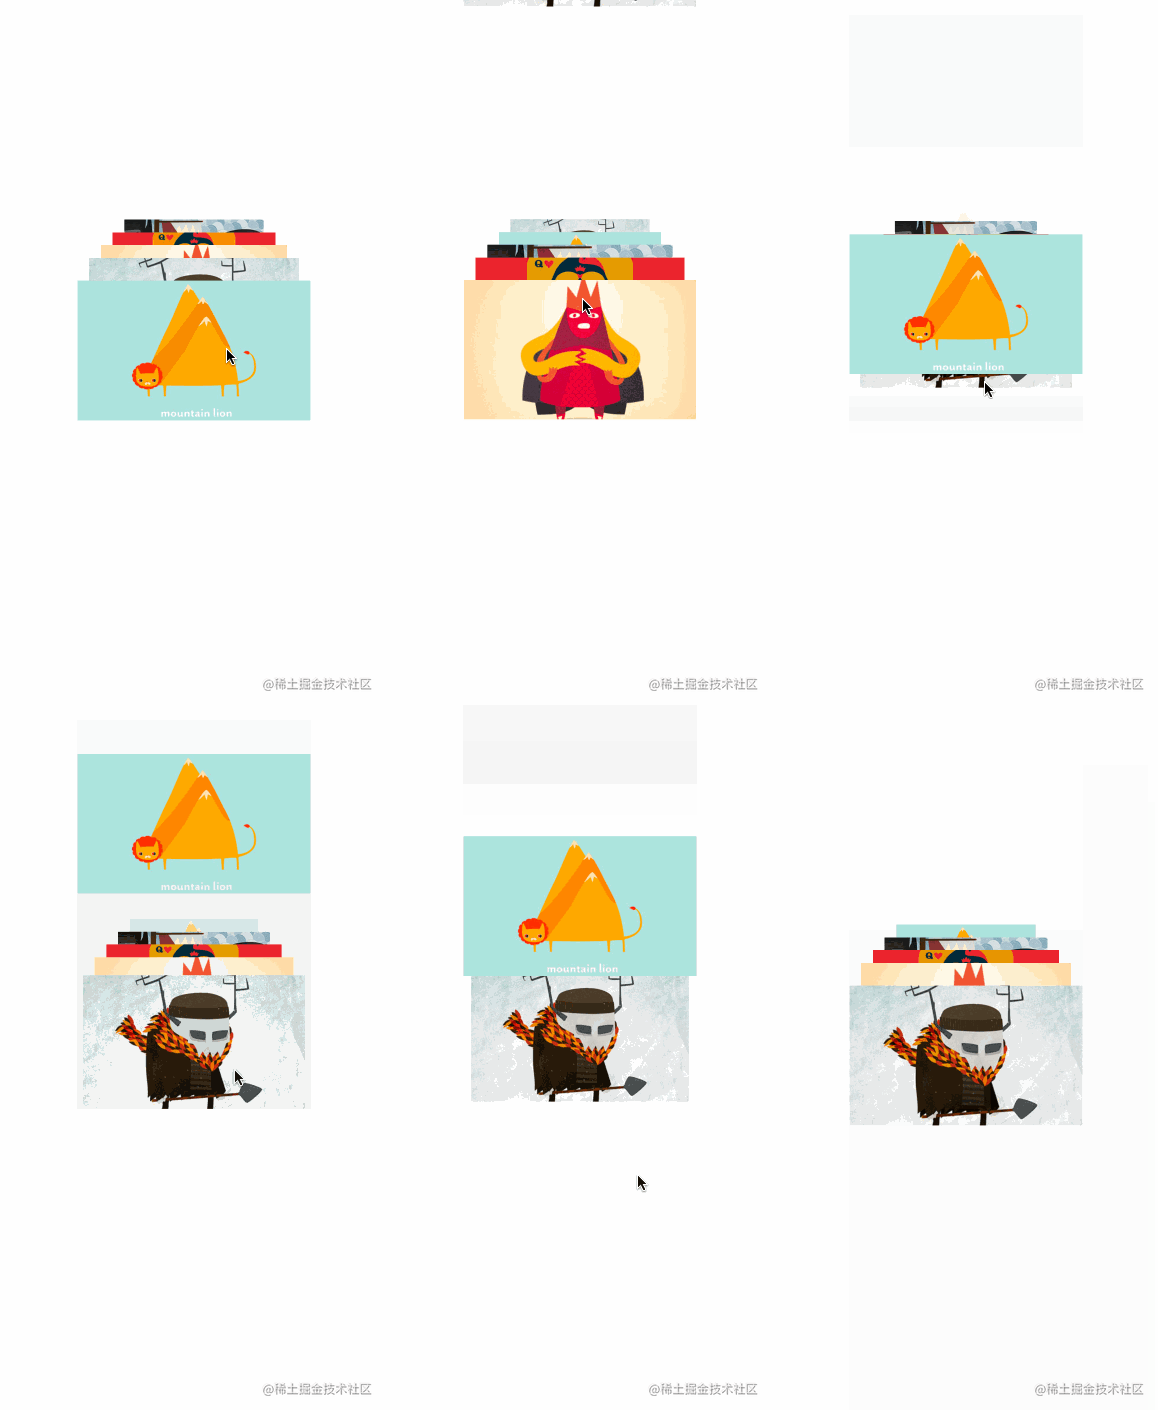

并且,滑动的动画非常丝滑,建议自己编写体验。Demo地址:https://github.com/mCyp/MotionDemo
一、简介
学习 Carousel 之前,我认定你已经有 MotionLayout 的基础了。
如果你连 MotionLayout 是什么都不知道,建议你看一下官方的教程:
“《MotionLayout官方教程》 《MotionLayout-代码实验室》
好了,回到重点,Carousel 的中文意思-轮播,它就是轮播的解决方案,可以帮助我们处理比较复杂的轮播动画。
1. 核心概念
我们从官方的例子入手,构建一个如图的轮播: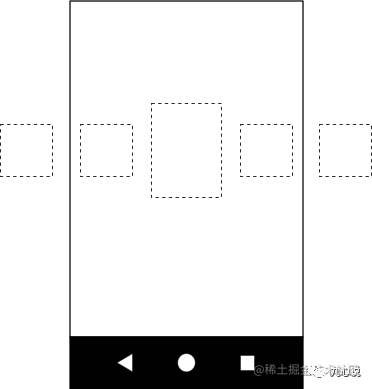
在 MotionLayout,这些 View 可都是要写出来:
通常一个轮播,都会支持向前滑动和向后滑动这两种动作。如果我们要完整的展示一个 Carousel 动画,至少需要三个状态:
previousstartnext
start 是组件最初的状态,start - previous 代表向前滑动的过程,start - next 则代表向后滑动的过程,对应额状态如图:
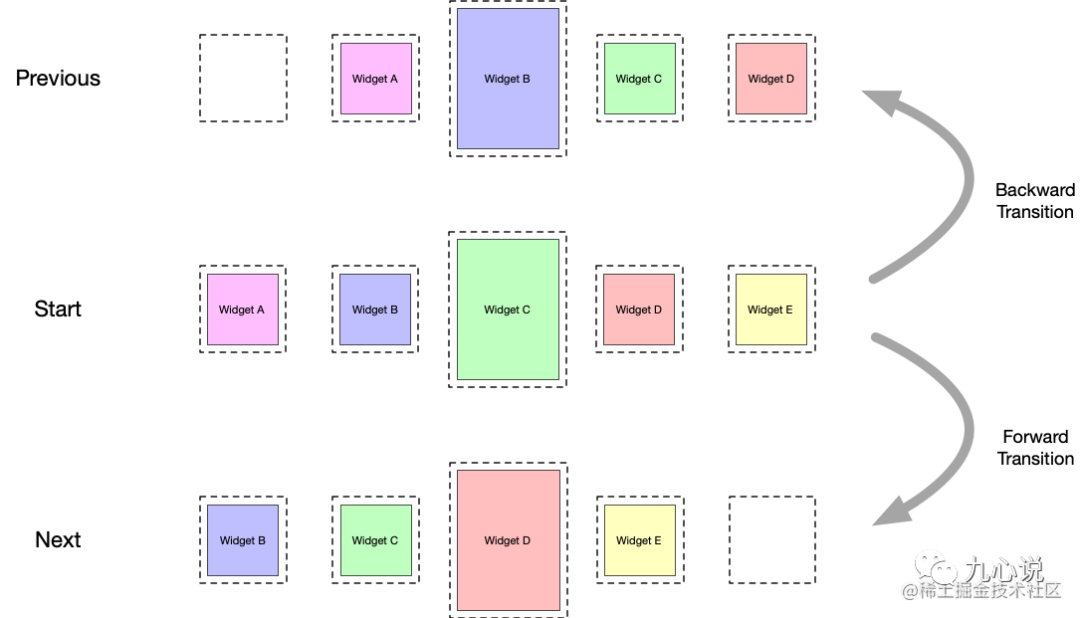
从上文中知道,屏幕只能显示中间的三个 View。start 就是开始的状态,这个时候一共有 A、B、C、D 和 E 五个 View,屏幕中显示的是 B、C 和 D。当发生向后滑动的时候,B、C、D 和 E 移动到了 A、B、C 和 D 的位置(A 组件可以不处理),屏幕中看见的是C 、D 和 E。向前滑动同理。
三个状态真的够吗?这是很多同学的疑问。
Carousel 中有一个偷天换日的技能,每一次动画完成后,整个界面又会重置成 start 状态,但控件映射的数据却发生了变化:
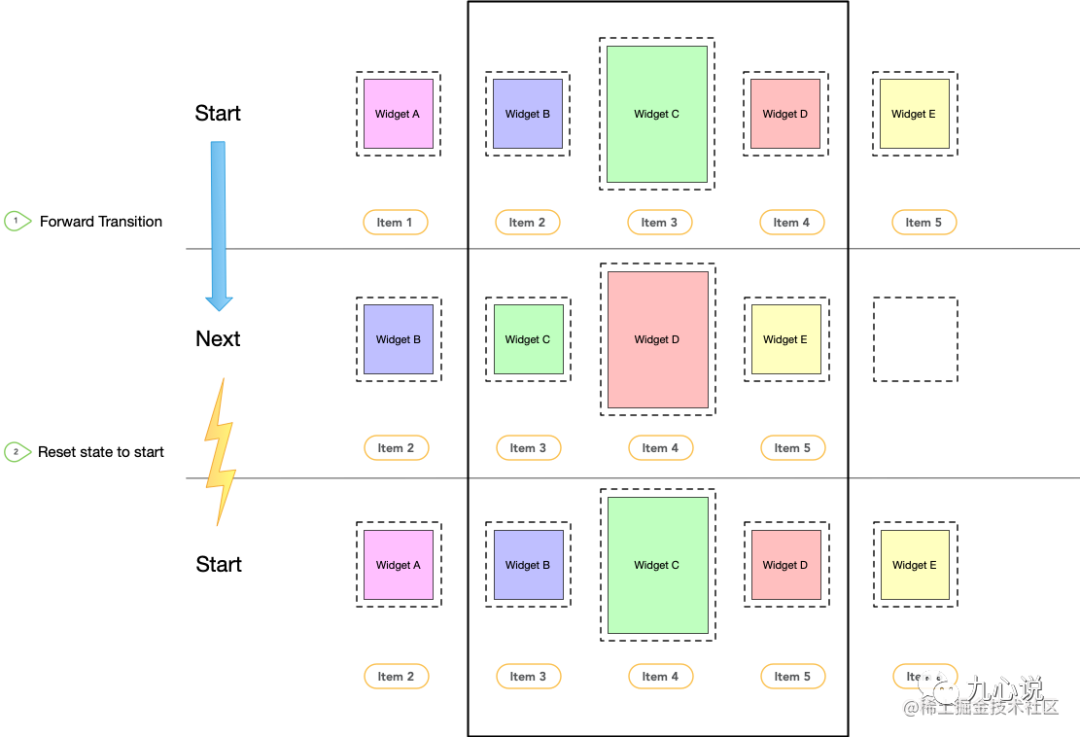
就像这张图片发生的那样,界面进行过一轮 start - next 动画以后,界面又重置为 start 状态。注意一下,虽然状态重置了,但是数据和控件的对应的关系发生了变化!
原来屏幕中组件:
Widget B对应Item2Widget C对应Item3Widget D对应Item4
重置以后:
Widget B对应Item3Widget C对应Item4Widget D对应Item5
跟 next 状态中屏幕展示的数据是一样的,所以这三个状态真的够用了。
2. 代码
讲解一下上面过程对应的伪代码
步骤一
在布局文件 MotionLayout 中,我们要把界面中所有元素都写出来:
<androidx.constraintlayout.motion.widget.MotionLayout ... >

        <ImageView  android:id="@+id/imageView0" .. />
        <ImageView  android:id="@+id/imageView1" .. />
        <ImageView  android:id="@+id/imageView2" .. />
        <ImageView  android:id="@+id/imageView3" .. />
        <ImageView  android:id="@+id/imageView4" .. />

</androidx.constraintlayout.motion.widget.MotionLayout>
布局层级是很重要的! 布局层级是很重要的! 布局层级是很重要的!
重要的事情需要说三遍,一定要正确的顺序放置控件,系统是根据视图的层级确认View的先后顺序的。
不然等代码写完以后,你会发出这样的疑问:代码明明没问题,动画执行后的数据排列怎么都对不上?
步骤二
在 MotionScene 文件中描绘出 start、previous 和 next 三个状态中组件对应的位置,相当于用constraintlayout 写了三个界面:
<MotionScene xmlns:android="http://schemas.android.com/apk/res/android"
    xmlns:motion="http://schemas.android.com/apk/res-auto">

    <Transition
        android:id="@+id/forward"
        motion:constraintSetEnd="@+id/next"
        motion:constraintSetStart="@id/start"
        motion:duration="1000">
        <OnSwipe
            motion:dragDirection="dragUp"
            motion:touchAnchorSide="left" />

    </Transition>

    <Transition
        android:id="@+id/backward"
        motion:constraintSetEnd="@+id/previous"
        motion:constraintSetStart="@+id/start">
        <OnSwipe
            motion:dragDirection="dragDown"
            motion:touchAnchorSide="right" />
    </Transition>

    <!-- previous状态对应的组件位置 -->
    <ConstraintSet android:id="@+id/previous">
        <Constraint
            android:id="@+id/iv1"
            ... />

        <Constraint
            android:id="@+id/iv2"
            ... />

        <Constraint
            android:id="@+id/iv3"
            ... />

        <Constraint
            android:id="@+id/iv4"
            ... />
    </ConstraintSet>


    <!-- start状态对应的组件位置 -->
    <ConstraintSet android:id="@+id/start">
        <Constraint
            android:id="@+id/iv1"
            ... />

        <Constraint
            android:id="@+id/iv2"
            ... />

        <Constraint
            android:id="@+id/iv3"
            ... />

        <Constraint
            android:id="@+id/iv4"
            ... />

        <Constraint
            android:id="@+id/iv5"
            ... />
    </ConstraintSet>

    <!-- next状态对应的组件位置 -->
    <ConstraintSet android:id="@+id/next">
        <Constraint
            android:id="@+id/iv2"
            ... />

        <Constraint
            android:id="@+id/iv3"
            ... />

        <Constraint
            android:id="@+id/iv4"
            ... />

        <Constraint
            android:id="@+id/iv5"
            ... />
    </ConstraintSet>

</MotionScene>
我们先用 ConstraintSet 表示一个状态,接着在这个状态中用约束布局的写法告诉系统每个 id 对应的控件应该出现在什么位置。
再用 forward 对应的 Transition 表示 start - previous 的过度动画,用 backward 对应的 Transition 表示 start - next 的动画过度,这是为了告诉系统什么样的动作会触发什么样的动画。
虽然我们做了很少,但是 MotionLayout 却替我们做了很多!
步骤三 加入Carousel
在布局中引入 Carousel:
<androidx.constraintlayout.motion.widget.MotionLayout ... >

        <ImageView  android:id="@+id/iv1" .. />
        <ImageView  android:id="@+id/iv2" .. />
        <ImageView  android:id="@+id/iv3" .. />
        <ImageView  android:id="@+id/iv4" .. />
        <ImageView  android:id="@+id/iv5" .. />

        <androidx.constraintlayout.helper.widget.Carousel
            android:id="@+id/carousel"
            android:layout_width="wrap_content"
            android:layout_height="wrap_content"
            app:carousel_forwardTransition="@+id/forward"
            app:carousel_backwardTransition="@+id/backward"
            app:carousel_previousState="@+id/previous"
            app:carousel_nextState="@+id/next"
            app:carousel_infinite="true"
            app:carousel_firstView="@+id/iv2"
            app:constraint_referenced_ids="iv0,iv1,iv2,iv3,iv4" />

    </androidx.constraintlayout.motion.widget.MotionLayout>
解释一下几个属性:- app:carousel_forwardTransition:向前跳转的动画,引用 forward 对应的 Transition
app:carousel_backwardTransition向后跳转的动画,引用backward对应的Transitionapp:carousel_previousState:向前跳转动画完成后对应的状态,引用previous状态的ConstraintSetapp:carousel_nextState:向后跳转动画后对应的状态,引用next状态的ConstraintSetapp:carousel_infinite:开启无限循环app:carousel_firstView:哪个控件展示第一条数据,iv2代表中间的控件iv2将展示第一条数据
步骤四 在Activity中声明
需要设置一下适配器:
carousel.setAdapter(object : Carousel.Adapter {
            override fun count(): Int {
              // need to return the number of items we have in the carousel
            }

            override fun populate(view: View, index: Int) {
                // need to implement this to populate the view at the given index
            }

            override fun onNewItem(index: Int) {
                // called when an item is set
            }
        })
在这个适配器中,我们需要告诉适配器,有多少条数据要展示,当新的一页到来的时候,控件应该如何更新展示的数据等。
二、实战
我们实战的例子是:

自信分析一下这个动画,也就两点需要处理:
- 图片由黑白转变为彩色
- 图片翻转
翻转动画比较简单,可以通过 rotationY 来处理,不过也有一个坑,后面再分析。
那黑白图片变彩色呢?答案就是 ImageFilterView,他可以通过 app:saturation 一键设置黑白转彩色效果。
点赞
1. 描绘界面
我们需要在 xml 文件中把所有的控件都写出来,这个界面中一共有四个 ImageView,截图中可能不太明显,我又截了一张 3D 视图: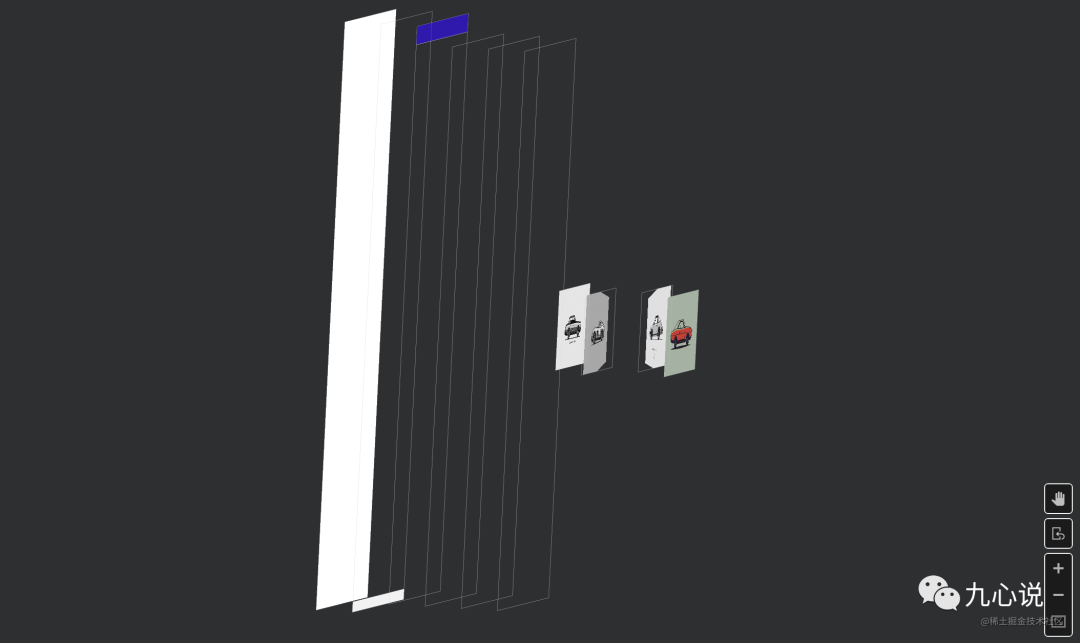
上下居中比较简单,左右定位则是借助了0.2宽、0.4宽、0.6宽和0.8宽的 GuideLine,如图:
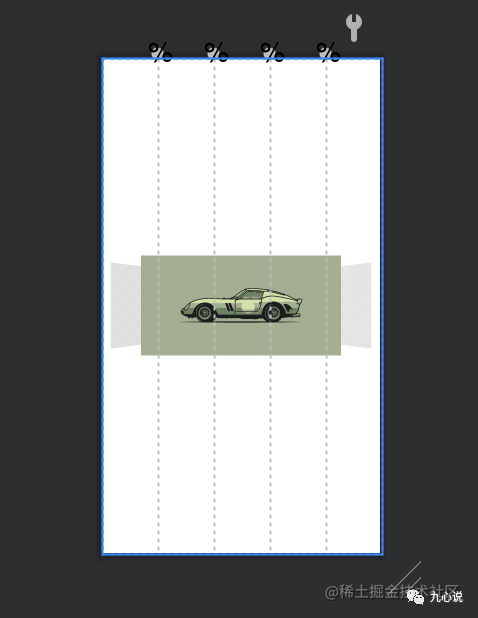
简化后的布局文件代码:
<androidx.constraintlayout.motion.widget.MotionLayout ..>

    <androidx.constraintlayout.utils.widget.ImageFilterView
        android:id="@+id/iv1" ../>

    <androidx.constraintlayout.utils.widget.ImageFilterView
        android:id="@+id/iv2" ../>

    <androidx.constraintlayout.utils.widget.ImageFilterView
        android:id="@+id/iv4" ../>

    <androidx.constraintlayout.utils.widget.ImageFilterView
        android:id="@+id/iv3" ../>

    <androidx.constraintlayout.widget.Guideline
        android:id="@+id/glLeft"
        ...
        app:layout_constraintGuide_percent="0.2" />

    <androidx.constraintlayout.widget.Guideline
        android:id="@+id/glm1"
        ...
        app:layout_constraintGuide_percent="0.4" />

    <androidx.constraintlayout.widget.Guideline
        android:id="@+id/glm2"
        ...
        app:layout_constraintGuide_percent="0.6" />

    <androidx.constraintlayout.widget.Guideline
        android:id="@+id/glRight"
        ...
        app:layout_constraintGuide_percent="0.8" />


    <androidx.constraintlayout.helper.widget.Carousel
        android:id="@+id/carousel"
        android:layout_width="wrap_content"
        android:layout_height="wrap_content"
        app:carousel_backwardTransition="@+id/backward"
        app:carousel_firstView="@+id/iv1"
        app:carousel_forwardTransition="@+id/forward"
        app:carousel_infinite="true"
        app:carousel_nextState="@+id/next"
        app:carousel_previousState="@+id/previous"
        app:constraint_referenced_ids="iv1,iv2,iv4,iv3" />

</androidx.constraintlayout.motion.widget.MotionLayout>
2. 描绘动画
在之前的伪代码中,我们知道要定义 previou、start 和 next 三种状态,先看看最基本的 start 状态,我们只要把界面中的约束都表达出来即可,就像我们在约束布局中使用的那样。拿出 MotionScene 文件,暂时只放了 start 状态:
MotionScene xmlns:android="http://schemas.android.com/apk/res/android"
    xmlns:motion="http://schemas.android.com/apk/res-auto">

    <ConstraintSet android:id="@+id/start">
        <Constraint
            android:id="@+id/iv1"
            android:layout_width="0dp"
            android:layout_height="0dp"
            android:translationZ="0dp"
            motion:layout_constraintLeft_toLeftOf="@+id/glLeft"
            motion:layout_constraintRight_toRightOf="@id/glRight"
            motion:layout_constraintTop_toTopOf="parent"
            motion:layout_constraintBottom_toBottomOf="parent"
            motion:layout_constraintDimensionRatio="2:1">
            <CustomAttribute
                motion:attributeName="Saturation"
                motion:customFloatValue="0.0"
                />
        </Constraint>

        <Constraint
            android:id="@+id/iv2"
            android:layout_width="0dp"
            android:layout_height="0dp"
            android:rotationY="30"
            android:scaleX="0.8"
            android:scaleY="0.8"
            android:translationZ="4dp"
            motion:layout_constraintBottom_toBottomOf="parent"
            motion:layout_constraintDimensionRatio="2:1"
            motion:layout_constraintLeft_toLeftOf="parent"
            motion:layout_constraintRight_toRightOf="@id/glm2"
            motion:layout_constraintTop_toTopOf="parent">
            <CustomAttribute
                motion:attributeName="Saturation"
                motion:customFloatValue="0.0"
                />
        </Constraint>

        <Constraint
            android:id="@+id/iv3"
            android:layout_width="0dp"
            android:layout_height="0dp"
            android:rotationY="-30"
            android:scaleX="0.8"
            android:scaleY="0.8"
            android:translationZ="6dp"
            motion:layout_constraintBottom_toBottomOf="parent"
            motion:layout_constraintDimensionRatio="2:1"
            motion:layout_constraintLeft_toLeftOf="@id/glm1"
            motion:layout_constraintRight_toRightOf="parent"
            motion:layout_constraintTop_toTopOf="parent">
            <CustomAttribute
                motion:attributeName="Saturation"
                motion:customFloatValue="0.0"
                />
        </Constraint>

        <Constraint
            android:id="@+id/iv4"
            android:layout_width="0dp"
            android:layout_height="0dp"
            android:scaleX="1.2"
            android:scaleY="1.2"
            motion:layout_constraintBottom_toBottomOf="parent"
            motion:layout_constraintDimensionRatio="2:1"
            android:translationZ="10dp"
            motion:layout_constraintLeft_toLeftOf="@+id/glLeft"
            motion:layout_constraintRight_toRightOf="@id/glRight"
            motion:layout_constraintTop_toTopOf="parent"
            >
            <CustomAttribute
                motion:attributeName="Saturation"
                motion:customFloatValue="1.0"
                />
        </Constraint>
    </ConstraintSet>
</MotionScene>
简单的描述一下:
iv1在最里面,位置上下居中,左边在0.2的分割线,右边在0.8的分割线,Saturation为0,即图片黑白,translationZ为 0dp。iv2在最左边,位置上下居中,左边在父布局左侧,右边在0.4的分割线,Saturation为0,translationZ为 4dp,rotationY偏移30度。iv3在最右边,位置上下居中,左边在0.6的分割线,右边与父布局右边对齐,Saturation为0,translationZ为 6dp,rotationY偏移-30度。iv3在最上边,位置上下居中,左边在0.2的分割线,右边在0.8的分割线,长和宽各放大1.2倍,Saturation为1,即彩色图片,translationZ为 10dp。
细心的小伙伴可能发现了,我这里多用了一个 translationZ,这个属性是干嘛的呢?
这个属性在有背景的情况下,可以帮我们设置阴影。除此以外,还可以帮助我们设置层级,布局文件中的默认层级是先声明的 View 层级低,后声明的 View 层级高,即后面写的 View 会把前面写的 View 给遮挡住。
如果以这个层级进行动画,坑就来了:

不改变层级的情况下,动画会显得很乱,所以我们需要根据动画的进行,动态的调整层级。
next 状态很简单,将对应的的位置变动一下即可,iv3 到 iv1,iv1 到 iv2,iv2 到 iv4,iv4 到 iv3,进行位置的简单互换,previous 状态同理,篇幅起见,代码就不放了。
除了三个状态,还需要在 MotionScene 声明动画:
<MotionScene xmlns:android="http://schemas.android.com/apk/res/android"
    xmlns:motion="http://schemas.android.com/apk/res-auto">
    <Transition
        motion:constraintSetStart="@id/start"
        motion:constraintSetEnd="@+id/next"
        motion:duration="1000"
        android:id="@+id/forward">
        <OnSwipe
            motion:dragDirection="dragLeft"
            motion:touchAnchorSide="left" />

    </Transition>

    <Transition
        motion:constraintSetStart="@+id/start"
        motion:constraintSetEnd="@+id/previous"
        android:id="@+id/backward">
        <OnSwipe
            motion:dragDirection="dragRight"
            motion:touchAnchorSide="right" />

    </Transition>

    <ConstraintSet android:id="@+id/previous">
        ...
    </ConstraintSet>

    <ConstraintSet android:id="@+id/start">
        ...
    </ConstraintSet>


    <ConstraintSet android:id="@+id/next">
        ...
    </ConstraintSet>
</MotionScene>
就是告诉系统往左滑动会执行 start 到 next 状态的动画,往右滑动执行 start 到 previous 状态的动画,最后在布局文件中的 Carousel 引用系统就知道如何处理了。
3.设置轮播数量
最后你需要在调用处设置轮播的数量,以及滑动以后,index 变化后,如何通知 View 发生变化:
class CarMotionActivity : AppCompatActivity() {
    var images = intArrayOf(
        R.drawable.car1,
        R.drawable.car3,
        R.drawable.car4,
        R.drawable.car2
    )

    override fun onCreate(savedInstanceState: Bundle?) {
       //...

        val carsoul = findViewById<Carousel>(R.id.carousel)
        carsoul.setAdapter(object : Carousel.Adapter {
            override fun count(): Int {
                return 4
            }

            override fun populate(view: View?, index: Int) {
                if(view is ImageView){
                    view.setImageResource(images[index])
                }
            }

            override fun onNewItem(index: Int) {
                // called when an item is set
            }
        })
    }
}
ok,入门版本的 Carousel 玩法就成功掌握了。
写在最后话
Carousel 思路简单,又是基于 ConstraintLayout,确实是一个很好的工具。
当接到页面元素不多,动画有点复杂的轮播需求时,Carousel 是一个很好的选择。反之,当页面变化的元素比较多,动画比较简单的时候,可不一定了。因为你需要写三张界面,虽然思路简单,但也抵不住代码量多啊!
一波学习以后,发现设计大佬最后的动效是图片覆盖,一张图需要两个 ImageView 来实现!

完了,又白学了!!!
不过,我却借此机会掌握了 MotionLayout,以后,写动画的时候多了一种技术储备。
