Node.js 诊断指南 第二弹
TL;DR
接上文,本次我们介绍的诊断小技巧有:Core dump、Heap dump、CPU dump、trace event 和 Diagnostics Reports。
Core Dump
服务端应用的 crash 有的时候可能与我们正常开发时候预设的使用路径不同,可能是在运行了一段时间之后处于某种特殊状态之下才出现的 crash。有的时候,只是简单的重启一下还可以继续使用,但是这实在是一件难以接受的事情。
我们会发现程序的 crash 可能会伴随着流量增加或者用户请求被劫持或者无网络出现一些特殊状态等等,这些问题可能很难在开发的时候发现,只能随着应用运行时间的增加而慢慢被发现。
在大多数情况下,这种特别的状态下的问题都很难通过日志分析。幸运的是。我们的操作系统内核有提供了一种机制来让我在应用 crash 的时候生成 core 文件,通过 core 文件开发者就可以分析和恢复场景。
目前来说有 3 种方式可以帮助我们产生 core 文件。首先我们需要调整 ulimit -c unlimited 来帮助我们修改 OS 的默认限制(如果不这样设置的话,默认情况下 core file 的 size 限制是 0,即不能产生)。
- kill -11
。使用信号来触发进程的段错误并且输出 core dump。 - node.js 启动 flag。在启动 Node.js 应用的时候指定 --abort-on-uncaught-exception 来开启程序触发未捕获的异常时自动 core dump 操作。
- gcore
。依赖 gdb 工具集的一个工具
Core dump 实际上意味着应用程序意外 crash 和 terminate 的时候,OS 自动记录的内存信息、程序计数器、堆栈指针和其他 crash 时候的关键信息。因此,获得 core 文件之后,我们可以通过 LLDB、GDB、MDB 或者其他调试工具来分析和诊断的实际 crash 原因。
Heap Dump
如果觉得 core 文件上手比较困难,也可以考虑 V8 封装好的特定场景的工具,比如 Heap dump。
我们可以通过 Node.js 内置的 dump 方式,即 --heap* 的启动 flag 来执行 dump。比如:
  --heap-prof                    Start the V8 heap profiler on start up, and
                                 write the heap profile to disk before exit.
                                 If --heap-prof-dir is not specified, write
                                 the profile to the current working
                                 directory.
  --heap-prof-dir=...            Directory where the V8 heap profiles
                                 generated by --heap-prof will be placed.
  --heap-prof-interval=...       specified sampling interval in bytes for the
                                 V8 heap profile generated with --heap-prof.
                                 (default: 512 * 1024)
  --heap-prof-name=...           specified file name of the V8 CPU profile
                                 generated with --heap-prof
  --heapsnapshot-signal=...      Generate heap snapshot on specified signal
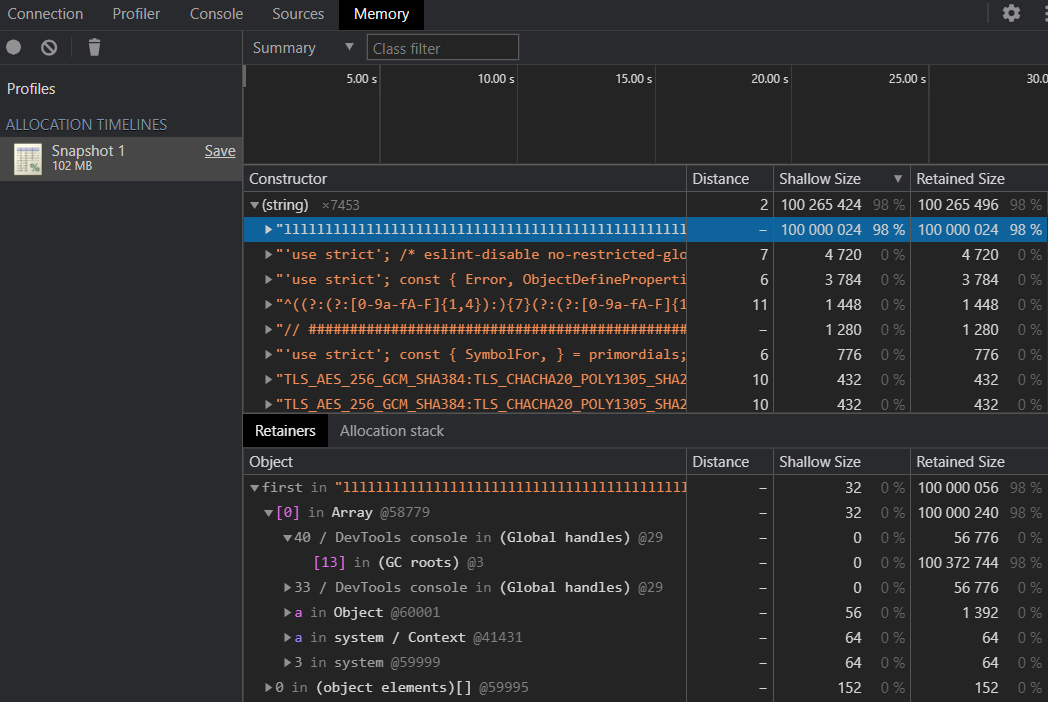
这种 V8 提供的工具,基本都是通过某种方式触发 dump 文件的生成,然后回到 Chrome DevTools 上去分析。基本步骤:
- 通过 heap-prof flag 来开启功能。如 node --heap-prof app.js。
- 在程序运行过后,检查当前的工作目录 (通常是你启动程序的目录)。基于你的设置(如 interval、或者设置了信号然后出发了信号)就可以 dump 出一个 heap 文件,默认来说文件名类似 Heap*.heapprofile。
- 打开 Chrome DevTools → 找到 Memory tab
- 在最下面,点击 Load → 选择 Heap*.heapprofile
- Over。现在我们就可以看到内存里面的情况。
例如,如下 case,我们可以通过检视内存中特别大的对象来排查分析,是哪些可能存在的原因/逻辑导致了内存 crash。
如果觉得 Node.js 内置的 dump 方式不太友好,可以找一找市面上专门做这些功能的 npm。比如 heapdump 这个 npm。
const {EventEmitter} = require('events');
const heapdump = require('heapdump');

global.test = new EventEmitter();


// 第一次 dump

heapdump.writeSnapshot('./' + Date.now() + '.heapsnapshot');


// 需要排查的 code

function run3() {
  const innerData = new Buffer(100);
  const outClosure3 = function () {
    void innerData;
  };
  test.on('error', () => {
    console.log('error');
  });
  outClosure3();
}

for(let i = 0; i < 10; i++) {
  run3();
}
gc(); // 手动触发一下 gc 来排除干扰


// 第二次 dump

heapdump.writeSnapshot('./' + Date.now() + '.heapsnapshot');
PS: Chrome DevTools 支持比较两次 heap 快文件的 diff。
CPU dump
V8 也提供了关于 CPU 的 dump 特性。我们可以在 Node.js 中通过 --prof 来开启。
NODE_ENV=production node --prof app.js
在通过 ab 之类的测试工具,多次调用我们的 http 服务:
ab -k -c 20 -n 250 "http://localhost:8080/auth"
之后,我们可以查找一下工作目录下面一个类似 isolate-0xnnnnnnnnnnnn-v8.log (n 是数字)的文件。
这个文件是 V8 帮我们生成的 tick 文件。通常来说这个文件不是拿来给人看的,要转换成可读的格式需要我们使用 node --prof-process 命令,例如:
node --prof-process isolate-0xnnnnnnnnnn-v8.log > tick.txt
通过 tick 文件,我们可以看到程序运行的 tick 时间都花在了哪些代码上,比如某个函数运行的时间占用 80% 以上的时间,通常意味着这个函数里面的计算逻辑是一个性能瓶颈。具体的关于如何解读 tick 文件,你可以转到官方文档 (https://nodejs.org/en/docs/guides/simple-profiling/) 上阅读更多。
Trace Event
你可以通过命令行 flag: --trace-event-categories 或者是使用内置的 trace_events 模块来使用 trace event。使用 --trace-event-categories 的时候可以在命令行上指定 event 的类型(category)。
这些 event 的类型有:
-
node: 一个空的 placeholder.
-
node.async_hooks: 捕获详细的 async_hooks trace 数据。
-
node.bootstrap: 捕获 Node.js 启动里程碑数据。
-
node.console: 捕获 console.time() 和 console.count() 的输出。
-
node.dns.native: 捕获 DNS 查询的 trace 数据。
-
node.environment: 捕获 Node.js 环境里程碑。
-
node.fs.sync: 捕获 文件系统同步方法的 trace 数据。
-
node.perf: 启用 Performance API。
-
node.perf.usertiming: 捕获 User Timing measures 和 marks.
-
node.perf.timerify: 捕获 Performance API timerify measurements.
-
node.promises.rejections: 追踪 unhandled Promise rejections 和 handled-after-rejections 的数目.
-
node.vm.script: 追踪 vm 模块的 runInNewContext()、runInContext() 和 runInThisContext() 方法。
-
v8: 追踪 V8 时间如 GC、编译和执行等。、
默认情况下 node, node.async_hooks 以及 v8 三个类别是启用的。你可以通过命令行的方式如
node --trace-event-categories v8,node,node.async_hooks 或者使用 trace_event 这个模块上的 createTracing 的方法来开启或者关闭某些 event 的 trace 功能。1
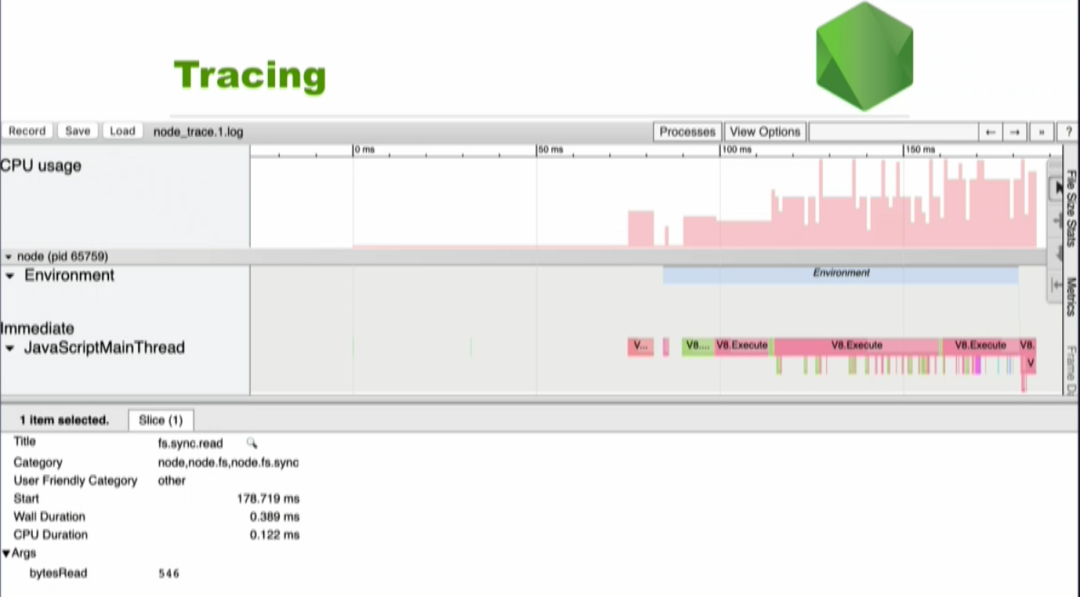
输出的trace 数据文件,默认情况下文件名是 node_trace.${rotation}.log 格式的,其中 ${rotation} 增长的日志轮转 id。当然我们也可以通过 --trace-event-file-pattern 来手动指定这个文件的格式,在指定的时候,支持 ${rotation} 和 ${pid} 变量,例如:
node --trace-event-categories v8 --trace-event-file-pattern '${pid}-${rotation}.log' server.js
拿到文件之后,我们可以在 Chrome 浏览器的 chrome://tracing 这个页面下找到分析工具,然后就可以可视化我们的 trace 数据了:
Diagnostics Reports
诊断报告(Diagnostic Reports)被设计成为一个立即收集一些导致 crash 的信息报告,并且让用户不需要再重新构造一次 crash 场景的一个功能。
例如我们使用诊断报告的功能去运行我们的代码的话,在启动的时候指定 --report-uncaught-exception,就可以在触发 unccaught-exception 的时候输出一个诊断报告。
node --experimental-report --report-uncaught-exception test.js

Writing Node.js report to file: report.20190309.102401.47640.001.json
Node.js report completed
报告包含错误栈、堆统计、平台信息、资源使用等。开启了诊断报告这个 feature 后,除了通过 API 调用 (process.report.writeReport) 以编程方式触发之外,还可以针对未处理的异常、致命错误和用户信号触发诊断报告。常见的配置参数:
- --experimental-report:由于该功能还在试验阶段,所以需要使用这个 flag 来开启 Diagnostic Reports 功能。
- --report-on-fatalerror:如果你需要收集 C++ 层面的 crash 信息。
- --report-uncaught-exception:如果你在 JavaScript 代码中出现 uncaught exceptions 的时候需要一份诊断报告。
- --report-on-signal:如果你希望通过发特定信号来触发诊断报告
- --report-signal=signal: 你希望使用你指定的信号来触发诊断报告,如果不指定的话默认使用 sigUser2
- --report-directory=directory: 指定你的诊断报告目录
- --report-filename=filename: 指定诊断报告文件名 (如果不指定的话默认是日期格式)
更多可以参见官方文档:https://nodejs.org/api/report.html。

