手写系列-实现一个铂金段位的 React
为什么是铂金呢,因为和王者还有很远的距离。本文仅实现简单版本的 React,参考 React 16.8 的基本功能,包括虚拟 DOM、Fiber、Diff 算法、函数式组件、hooks 等。
一、前言
本文基于 pomb.us/build-your-…[2] 实现简单版 React。
本文学习思路来自 卡颂-b站-React源码,你在第几层[3]。
模拟的版本为 React 16.8。
将实现以下功能:
- createElement(虚拟 DOM);
- render;
- 并发模式;
- Fibers;
- Render and Commit Phases ;
- 协调(Diff 算法);
- 函数组件;
- hooks;
下面上正餐,请继续阅读。
二、准备
1 . React Demo
先来看看一个简单的 React Demo,代码如下:
const element = <div title="foo">hello</div>
const container = document.getElementById('container')
ReactDOM.render(element, container);
复制代码
本例完整源码见:reactDemo[4]
在浏览器中打开 reactDemo.html,展示如下:

我们需要实现自己的 React,那么就需要知道上面的代码到底做了什么。
1.1 element
const element = <div>123</div> 实际上是 JSX 语法。
React 官网[5] 对 JSX 的解释如下:
JSX 是一个 JavaScript 语法扩展。它类似于模板语言,但它具有 JavaScript 的全部能力。JSX 最终会被 babel 编译为 React.createElement() 函数调用。
通过 babel 在线编译[6]const element = <div>123</div> 。

可知 const element = <div>123</div> 经过编译后的实际代码如下:
const element = React.createElement("div", {
  title: "foo"
}, "hello");
复制代码
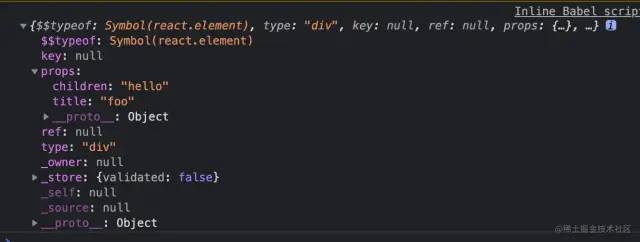
再来看看上文的 React.createElement 实际生成了一个怎么样的对象。
在 demo 中打印试试:
const element = <div title="foo">hello</div>
console.log(element)
const container = document.getElementById('container')
ReactDOM.render(element, container);
复制代码
可以看到输出的 element 如下:

简化一下 element:
const element = {
    type: 'div',
    props: {
        title: 'foo',
        children: 'hello'
    }
}
复制代码简单总结一下,React.createElement 实际上是生成了一个 element 对象,该对象拥有以下属性:
- type: 标签名
- props
- title: 标签属性
- children: 子节点
1.2 render
ReactDOM.render() 将 element 添加到 id 为 container 的 DOM 节点中,下面我们将简单手写一个方法代替 ReactDOM.render()。
1 . 创建标签名为 element.type 的节点;
const node = document.createElement(element.type)
复制代码
2 . 设置 node 节点的 title 为 element.props.title;
node["title"] = element.props.title
复制代码
3 . 创建一个空的文本节点 text;
const text = document.createTextNode("")
复制代码
4 . 设置文本节点的 nodeValue 为 element.props.children;
text["nodeValue"] = element.props.children
复制代码
5 . 将文本节点 text 添加进 node 节点;
node.appendChild(text)
复制代码
6 . 将 node 节点添加进 container 节点
container.appendChild(node)
复制代码
本例完整源码见:reactDemo2[7]
运行源码,结果如下,和引入 React 的结果一致:

三、开始
上文通过模拟 React,简单代替了 React.createElement、ReactDOM.render 方法,接下来将真正开始实现 React 的各个功能。
1 . createElement(虚拟 DOM)
上面有了解到 createElement 的作用是创建一个 element 对象,结构如下:
// 虚拟 DOM 结构
const element = {
    type: 'div', // 标签名
    props: { // 节点属性,包含 children
        title: 'foo', // title 属性
        children: 'hello' // 子节点,注:实际上这里应该是数组结构,帮助我们存储更多子节点
    }
}
复制代码
根据 element 的结构,设计了 createElement 函数,代码如下:
/**
 * 创建虚拟 DOM 结构
 * @param {type} 标签名
 * @param {props} 属性对象
 * @param {children} 子节点
 * @return {element} 虚拟 DOM
 */
function createElement (type, props, ...children) {
    return {
        type,
        props: {
            ...props,
            children: children.map(child =>
                typeof child === 'object'
                ? child
                : createTextElement(child)
            )
        }
    }
}
复制代码
这里有考虑到,当 children 是非对象时,应该创建一个 textElement 元素, 代码如下:
/**
 * 创建文本节点
 * @param {text} 文本值
 * @return {element} 虚拟 DOM
 */
function createTextElement (text) {
    return {
        type: "TEXT_ELEMENT",
        props: {
            nodeValue: text,
            children: []
        }
    }
}
复制代码
接下来试一下,代码如下:
const myReact = {
    createElement
}
const element = myReact.createElement(
  "div",
  { id: "foo" },
  myReact.createElement("a", null, "bar"),
  myReact.createElement("b")
)
console.log(element)
复制代码
本例完整源码见:reactDemo3[8]
得到的 element 对象如下:
const element = {
    "type": "div",
    "props": {
        "id": "foo",
        "children": [
            {
                "type": "a",
                "props": {
                    "children": [
                        {
                            "type": "TEXT_ELEMENT",
                            "props": {
                                "nodeValue": "bar",
                                "children": [ ]
                            }
                        }
                    ]
                }
            },
            {
                "type": "b",
                "props": {
                    "children": [ ]
                }
            }
        ]
    }
}
复制代码
JSX
实际上我们在使用 react 开发的过程中,并不会这样创建组件:
const element = myReact.createElement(
  "div",
  { id: "foo" },
  myReact.createElement("a", null, "bar"),
  myReact.createElement("b")
)
复制代码
而是通过 JSX 语法,代码如下:
const element = (
    <div id='foo'>
        <a>bar</a>
        <b></b>
    </div>
)
复制代码
在 myReact 中,可以通过添加注释的形式,告诉 babel 转译我们指定的函数,来使用 JSX 语法,代码如下:
/** @jsx myReact.createElement */
const element = (
    <div id='foo'>
        <a>bar</a>
        <b></b>
    </div>
)
复制代码
本例完整源码见:reactDemo4[9]
2 . render
render 函数帮助我们将 element 添加至真实节点中。
将分为以下步骤实现:
1 . 创建 element.type 类型的 dom 节点,并添加至容器中;
/**
 * 将虚拟 DOM 添加至真实 DOM
 * @param {element} 虚拟 DOM
 * @param {container} 真实 DOM
 */
function render (element, container) {
    const dom = document.createElement(element.type)
    container.appendChild(dom)
}
复制代码
2 . 将 element.children 都添加至 dom 节点中;
element.props.children.forEach(child =>
    render(child, dom)
)
复制代码
3 . 对文本节点进行特殊处理;
const dom = element.type === 'TEXT_ELEMENT'
    ? document.createTextNode("")
    : document.createElement(element.type)
复制代码
4 . 将 element 的 props 属性添加至 dom;
const isProperty = key => key !== "children"
Object.keys(element.props)
    .filter(isProperty)
    .forEach(name => {
      dom[name] = element.props[name]
})
复制代码
以上我们实现了将 JSX 渲染到真实 DOM 的功能,接下来试一下,代码如下:
const myReact = {
    createElement,
    render
}
/** @jsx myReact.createElement */
const element = (
    <div id='foo'>
        <a>bar</a>
        <b></b>
    </div>
)

myReact.render(element, document.getElementById('container'))
复制代码
本例完整源码见:reactDemo5[10]
结果如图,成功输出:

3 . 并发模式(requestIdleCallback)
再来看看上面写的 render 方法中关于子节点的处理,代码如下:
/**
 * 将虚拟 DOM 添加至真实 DOM
 * @param {element} 虚拟 DOM
 * @param {container} 真实 DOM
 */
function render (element, container) {
    // 省略
    // 遍历所有子节点,并进行渲染
    element.props.children.forEach(child =>
        render(child, dom)
    )
    // 省略
}
复制代码
这个递归调用是有问题的,一旦开始渲染,就会将所有节点及其子节点全部渲染完成这个进程才会结束。
当 dom tree 很大的情况下,在渲染过程中,页面上是卡住的状态,无法进行用户输入等交互操作。
可分为以下步骤解决上述问题:
- 允许中断渲染工作,如果有优先级更高的工作插入,则暂时中断浏览器渲染,待完成该工作后,恢复浏览器渲染;
- 将渲染工作进行分解,分解成一个个小单元;
使用 requestIdleCallback 来解决允许中断渲染工作的问题。
window.requestIdleCallback[11] 将在浏览器的空闲时段内调用的函数排队。这使开发者能够在主事件循环上执行后台和低优先级工作,而不会影响延迟关键事件,如动画和输入响应。
window.requestIdleCallback 详细介绍可查看文档:文档[12]
代码如下:
// 下一个工作单元
let nextUnitOfWork = null
/**
 * workLoop 工作循环函数
 * @param {deadline} 截止时间
 */
function workLoop(deadline) {
  // 是否应该停止工作循环函数
  let shouldYield = false

  // 如果存在下一个工作单元,且没有优先级更高的其他工作时,循环执行
  while (nextUnitOfWork && !shouldYield) {
    nextUnitOfWork = performUnitOfWork(
      nextUnitOfWork
    )

    // 如果截止时间快到了,停止工作循环函数
    shouldYield = deadline.timeRemaining() < 1
  }

  // 通知浏览器,空闲时间应该执行 workLoop
  requestIdleCallback(workLoop)
}
// 通知浏览器,空闲时间应该执行 workLoop
requestIdleCallback(workLoop)

// 执行单元事件,并返回下一个单元事件
function performUnitOfWork(nextUnitOfWork) {
  // TODO
}
复制代码
performUnitOfWork 是用来执行单元事件,并返回下一个单元事件的,具体实现将在下文介绍。
4 . fiber
上文介绍了通过 requestIdleCallback 让浏览器在空闲时间渲染工作单元,避免渲染过久导致页面卡顿的问题。
注:实际上 requestIdleCallback 功能并不稳定,不建议用于生产环境,本例仅用于模拟 React 的思路,React 本身并不是通过 requestIdleCallback 来实现让浏览器在空闲时间渲染工作单元的。
另一方面,为了让渲染工作可以分离成一个个小单元,React 设计了 fiber。
每一个 element 都是一个 fiber 结构,每一个 fiber 都是一个渲染工作单元。
所以 fiber 既是一种数据结构,也是一个工作单元。
下文将通过简单的示例对 fiber 进行介绍。
假设需要渲染这样一个 element 树:
myReact.render(
  <div>
    <h1>
      <p />
      <a />
    </h1>
    <h2 />
  </div>,
  container
)
复制代码
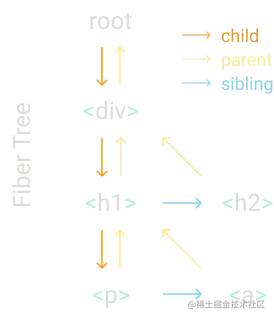
生成的 fiber tree 如图:
橙色代表子节点,黄色代表父节点,蓝色代表兄弟节点。

每个 fiber 都有一个链接指向它的第一个子节点、下一个兄弟节点和它的父节点。这种数据结构可以让我们更方便的查找下一个工作单元。
上图的箭头也表明了 fiber 的渲染过程,渲染过程详细描述如下:
- 从 root 开始,找到第一个子节点 div;
- 找到 div 的第一个子节点 h1;
- 找到 h1 的第一个子节点 p;
- 找 p 的第一个子节点,如无子节点,则找下一个兄弟节点,找到 p 的兄弟节点 a;
- 找 a 的第一个子节点,如无子节点,也无兄弟节点,则找它的父节点的下一个兄弟节点,找到 a 的 父节点的兄弟节点 h2;
- 找 h2 的第一个子节点,找不到,找兄弟节点,找不到,找父节点 div 的兄弟节点,也找不到,继续找 div 的父节点的兄弟节点,找到 root;
- 第 6 步已经找到了 root 节点,渲染已全部完成。
下面将渲染过程用代码实现。
1 . 将 render 中创建 DOM 节点的部分抽离为 creactDOM 函数;
/**
 * createDom 创建 DOM 节点
 * @param {fiber} fiber 节点
 * @return {dom} dom 节点
 */
function createDom (fiber) {
    // 如果是文本类型,创建空的文本节点,如果不是文本类型,按 type 类型创建节点
    const dom = fiber.type === 'TEXT_ELEMENT'
        ? document.createTextNode("")
        : document.createElement(fiber.type)

    // isProperty 表示不是 children 的属性
    const isProperty = key => key !== "children"

    // 遍历 props,为 dom 添加属性
    Object.keys(fiber.props)
        .filter(isProperty)
        .forEach(name => {
            dom[name] = fiber.props[name]
        })

    // 返回 dom
    return dom
}
复制代码
2 . 在 render 中设置第一个工作单元为 fiber 根节点;
fiber 根节点仅包含 children 属性,值为参数 fiber。
// 下一个工作单元
let nextUnitOfWork = null
/**
 * 将 fiber 添加至真实 DOM
 * @param {element} fiber
 * @param {container} 真实 DOM
 */
function render (element, container) {
    nextUnitOfWork = {
        dom: container,
        props: {
            children: [element]
        }
    }
}
复制代码
3 . 通过 requestIdleCallback 在浏览器空闲时,渲染 fiber;
/**
 * workLoop 工作循环函数
 * @param {deadline} 截止时间
 */
function workLoop(deadline) {
  // 是否应该停止工作循环函数
  let shouldYield = false

  // 如果存在下一个工作单元,且没有优先级更高的其他工作时,循环执行
  while (nextUnitOfWork && !shouldYield) {
    nextUnitOfWork = performUnitOfWork(
      nextUnitOfWork
    )

    // 如果截止时间快到了,停止工作循环函数
    shouldYield = deadline.timeRemaining() < 1
  }

  // 通知浏览器,空闲时间应该执行 workLoop
  requestIdleCallback(workLoop)
}
// 通知浏览器,空闲时间应该执行 workLoop
requestIdleCallback(workLoop)
复制代码
4 . 渲染 fiber 的函数 performUnitOfWork;
/**
 * performUnitOfWork 处理工作单元
 * @param {fiber} fiber
 * @return {nextUnitOfWork} 下一个工作单元
 */
function performUnitOfWork(fiber) {
  // TODO 添加 dom 节点
  // TODO 新建 filber
  // TODO 返回下一个工作单元(fiber)
}
复制代码
4.1 添加 dom 节点
function performUnitOfWork(fiber) {
    // 如果 fiber 没有 dom 节点,为它创建一个 dom 节点
    if (!fiber.dom) {
        fiber.dom = createDom(fiber)
    }

    // 如果 fiber 有父节点,将 fiber.dom 添加至父节点
    if (fiber.parent) {
        fiber.parent.dom.appendChild(fiber.dom)
    }
}
复制代码
4.2 新建 filber
function performUnitOfWork(fiber) {
    // ~~省略~~
    // 子节点
    const elements = fiber.props.children
    // 索引
    let index = 0
    // 上一个兄弟节点
    let prevSibling = null
    // 遍历子节点
    while (index < elements.length) {
        const element = elements[index]

        // 创建 fiber
        const newFiber = {
            type: element.type,
            props: element.props,
            parent: fiber,
            dom: null,
        }

        // 将第一个子节点设置为 fiber 的子节点
        if (index === 0) {
            fiber.child = newFiber
        } else if (element) {
        // 第一个之外的子节点设置为该节点的兄弟节点
            prevSibling.sibling = newFiber
        }

        prevSibling = newFiber
        index++
    }
}
复制代码
4.3 返回下一个工作单元(fiber)
 function performUnitOfWork(fiber) {
    // ~~省略~~
    // 如果有子节点,返回子节点
    if (fiber.child) {
        return fiber.child
    }
    let nextFiber = fiber
    while (nextFiber) {
        // 如果有兄弟节点,返回兄弟节点
        if (nextFiber.sibling) {
            return nextFiber.sibling
        }

        // 否则继续走 while 循环,直到找到 root。
        nextFiber = nextFiber.parent
    }
}
复制代码
以上我们实现了将 fiber 渲染到页面的功能,且渲染过程是可中断的。
现在试一下,代码如下:
const element = (
    <div>
        <h1>
        <p />
        <a />
        </h1>
        <h2 />
    </div>
)

myReact.render(element, document.getElementById('container'))
复制代码
本例完整源码见:reactDemo7[13]
如预期输出 dom,如图:

5 . 渲染提交阶段
由于渲染过程被我们做了可中断的,那么中断的时候,我们肯定不希望浏览器给用户展示的是渲染了一半的 UI。
对渲染提交阶段优化的处理如下:
1 . 把 performUnitOfWork 中关于把子节点添加至父节点的逻辑删除;
function performUnitOfWork(fiber) {
    // 把这段删了
    if (fiber.parent) {
       fiber.parent.dom.appendChild(fiber.dom)
    }
}
复制代码
2 . 新增一个根节点变量,存储 fiber 根节点;
// 根节点
let wipRoot = null
function render (element, container) {
    wipRoot = {
        dom: container,
        props: {
            children: [element]
        }
    }
    // 下一个工作单元是根节点
    nextUnitOfWork = wipRoot
}
复制代码
3 . 当所有 fiber 都工作完成时,nextUnitOfWork 为 undefined,这时再渲染真实 DOM;
function workLoop (deadline) {
    // 省略
    if (!nextUnitOfWork && wipRoot) {
        commitRoot()
    }
    // 省略
}
复制代码
4 . 新增 commitRoot 函数,执行渲染真实 DOM 操作,递归将 fiber tree 渲染为真实 DOM;
// 全部工作单元完成后,将 fiber tree 渲染为真实 DOM;
function commitRoot () {
    commitWork(wipRoot.child)
    // 需要设置为 null,否则 workLoop 在浏览器空闲时不断的执行。
    wipRoot = null
}
/**
 * performUnitOfWork 处理工作单元
 * @param {fiber} fiber
 */
function commitWork (fiber) {
    if (!fiber) return
    const domParent = fiber.parent.dom
    domParent.appendChild(fiber.dom)
    // 渲染子节点
    commitWork(fiber.child)
    // 渲染兄弟节点
    commitWork(fiber.sibling)
}
复制代码
本例完整源码见:reactDemo8[14]
源码运行结果如图:

6 . 协调(diff 算法)
当 element 有更新时,需要将更新前的 fiber tree 和更新后的 fiber tree 进行比较,得到比较结果后,仅对有变化的 fiber 对应的 dom 节点进行更新。
通过协调,减少对真实 DOM 的操作次数。
1. currentRoot
新增 currentRoot 变量,保存根节点更新前的 fiber tree,为 fiber 新增 alternate 属性,保存 fiber 更新前的 fiber tree;
let currentRoot = null
function render (element, container) {
    wipRoot = {
        // 省略
        alternate: currentRoot
    }
}
function commitRoot () {
    commitWork(wipRoot.child)
    currentRoot = wipRoot
    wipRoot = null
}
复制代码
2. performUnitOfWork
将 performUnitOfWork 中关于新建 fiber 的逻辑,抽离到 reconcileChildren 函数;
/**
 * 协调子节点
 * @param {fiber} fiber
 * @param {elements} fiber 的 子节点
 */
function reconcileChildren (fiber, elements) {
    // 用于统计子节点的索引值
    let index = 0
    // 上一个兄弟节点
    let prevSibling = null

    // 遍历子节点
    while (index < elements.length) {
        const element = elements[index]

        // 新建 fiber
        const newFiber = {
            type: element.type,
            props: element.props,
            parent: fiber,
            dom: null,
        }

        // fiber的第一个子节点是它的子节点
        if (index === 0) {
            fiber.child = newFiber
        } else if (element) {
        // fiber 的其他子节点,是它第一个子节点的兄弟节点
            prevSibling.sibling = newFiber
        }

        // 把新建的 newFiber 赋值给 prevSibling,这样就方便为 newFiber 添加兄弟节点了
        prevSibling = newFiber

        // 索引值 + 1
        index++
    }
}
复制代码
3. reconcileChildren
在 reconcileChildren 中对比新旧 fiber;
3.1 当新旧 fiber 类型相同时
保留 dom,仅更新 props,设置 effectTag 为 UPDATE;
function reconcileChildren (wipFiber, elements) {
    // ~~省略~~
    // oldFiber 可以在 wipFiber.alternate 中找到
    let oldFiber = wipFiber.alternate && wipFiber.alternate.child

    while (index < elements.length || oldFiber != null) {
        const element = elements[index]
        let newFiber = null

        // fiber 类型是否相同
        const sameType =
            oldFiber &&
            element &&
            element.type == oldFiber.type

        // 如果类型相同,仅更新 props
        if (sameType) {
            newFiber = {
                type: oldFiber.type,
                props: element.props,
                dom: oldFiber.dom,
                parent: wipFiber,
                alternate: oldFiber,
                effectTag: "UPDATE",
            }
        }
        // ~~省略~~
    }
    // ~~省略~~
}
复制代码
3.2 当新旧 fiber 类型不同,且有新元素时
创建一个新的 dom 节点,设置 effectTag 为 PLACEMENT;
function reconcileChildren (wipFiber, elements) {
    // ~~省略~~
    if (element && !sameType) {
        newFiber = {
            type: element.type,
            props: element.props,
            dom: null,
            parent: wipFiber,
            alternate: null,
            effectTag: "PLACEMENT",
        }
    }
    // ~~省略~~
}
复制代码
3.3 当新旧 fiber 类型不同,且有旧 fiber 时
删除旧 fiber,设置 effectTag 为 DELETION;
function reconcileChildren (wipFiber, elements) {
    // ~~省略~~
    if (oldFiber && !sameType) {
        oldFiber.effectTag = "DELETION"
        deletions.push(oldFiber)
    }
    // ~~省略~~
}
复制代码
4. deletions
新建 deletions 数组存储需删除的 fiber 节点,渲染 DOM 时,遍历 deletions 删除旧 fiber;
let deletions = null
function render (element, container) {
    // 省略
    // render 时,初始化 deletions 数组
    deletions = []
}

// 渲染 DOM 时,遍历 deletions 删除旧 fiber
function commitRoot () {
    deletions.forEach(commitWork)
}
复制代码
5. commitWork
在 commitWork 中对 fiber 的 effectTag 进行判断,并分别处理。
5.1 PLACEMENT
当 fiber 的 effectTag 为 PLACEMENT 时,表示是新增 fiber,将该节点新增至父节点中。
if (
    fiber.effectTag === "PLACEMENT" &&
    fiber.dom != null
) {
    domParent.appendChild(fiber.dom)
}
复制代码
5.2 DELETION
当 fiber 的 effectTag 为 PLACEMENT 时,表示是删除 fiber,将父节点的该节点删除。
else if (fiber.effectTag === "DELETION") {
    domParent.removeChild(fiber.dom)
}
复制代码
5.3 DELETION
当 fiber 的 effectTag 为 UPDATE 时,表示是更新 fiber,更新 props 属性。
else if (fiber.effectTag === 'UPDATE' && fiber.dom != null) {
    updateDom(fiber.dom, fiber.alternate.props, fiber.props)
}
复制代码
updateDom 函数根据不同的更新类型,对 props 属性进行更新。
const isProperty = key => key !== "children"

// 是否是新属性
const isNew = (prev, next) => key => prev[key] !== next[key]

// 是否是旧属性
const isGone = (prev, next) => key => !(key in next)

function updateDom(dom, prevProps, nextProps) {
    // 删除旧属性
    Object.keys(prevProps)
        .filter(isProperty)
        .filter(isGone(prevProps, nextProps))
        .forEach(name => {
            dom[name] = ""
        })

    // 更新新属性
    Object.keys(nextProps)
        .filter(isProperty)
        .filter(isNew(prevProps, nextProps))
        .forEach(name => {
            dom[name] = nextProps[name]
        })
}
复制代码
另外,为 updateDom 添加事件属性的更新、删除,便于追踪 fiber 事件的更新。
function updateDom(dom, prevProps, nextProps) {
    // ~~省略~~
    const isEvent = key => key.startsWith("on")
    //删除旧的或者有变化的事件
    Object.keys(prevProps)
        .filter(isEvent)
        .filter(
          key =>
            !(key in nextProps) ||
            isNew(prevProps, nextProps)(key)
        )
        .forEach(name => {
          const eventType = name
            .toLowerCase()
            .substring(2)
          dom.removeEventListener(
            eventType,
            prevProps[name]
          )
        })

    // 注册新事件
    Object.keys(nextProps)
        .filter(isEvent)
        .filter(isNew(prevProps, nextProps))
        .forEach(name => {
        const eventType = name
            .toLowerCase()
            .substring(2)
        dom.addEventListener(
            eventType,
            nextProps[name]
        )
    })
    // ~~省略~~
}
复制代码
替换 creactDOM 中设置 props 的逻辑。
function createDom (fiber) {
    const dom = fiber.type === 'TEXT_ELEMENT'
        ? document.createTextNode("")
        : document.createElement(fiber.type)
    // 看这里鸭
    updateDom(dom, {}, fiber.props)
    return dom
}
复制代码
新建一个包含输入表单项的例子,尝试更新 element,代码如下:
/** @jsx myReact.createElement */
const container = document.getElementById("container")

const updateValue = e => {
    rerender(e.target.value)
}

const rerender = value => {
    const element = (
        <div>
            <input onInput={updateValue} value={value} />
            <h2>Hello {value}</h2>
        </div>
    )
    myReact.render(element, container)
}

rerender("World")
复制代码
本例完整源码见:reactDemo9[15]
输出结果如图:

7 . 函数式组件
先来看一个简单的函数式组件示例:
myReact 还不支持函数式组件,下面代码运行会报错,这里仅用于比照函数式组件的常规使用方式。
/** @jsx myReact.createElement */
const container = document.getElementById("container")

function App (props) {
    return (
        <h1>hi~ {props.name}</h1>
    )
}

const element = (
    <App name='foo' />
)

myReact.render(element, container)
复制代码
函数式组件和 html 标签组件相比,有以下两点不同:
- 函数组件的 fiber 没有 dom 节点;
- 函数组件的 children 需要运行函数后得到;
通过下列步骤实现函数组件:
1 . 修改 performUnitOfWork,根据 fiber 类型,执行 fiber 工作单元;
function performUnitOfWork(fiber) {
    // 是否是函数类型组件
    const isFunctionComponent = fiber && fiber.type && fiber.type instanceof Function
    // 如果是函数组件,执行 updateFunctionComponent 函数
    if (isFunctionComponent) {
        updateFunctionComponent(fiber)
    } else {
    // 如果不是函数组件,执行 updateHostComponent 函数
        updateHostComponent(fiber)
    }
    // 省略
}
复制代码
2 . 定义 updateHostComponent 函数,执行非函数组件;
非函数式组件可直接将 fiber.props.children 作为参数传递。
function updateHostComponent(fiber) {
    if (!fiber.dom) {
        fiber.dom = createDom(fiber)
    }
    reconcileChildren(fiber, fiber.props.children)
}
复制代码
3 . 定义 updateFunctionComponent 函数,执行函数组件;
函数组件需要运行来获得 fiber.children。
function updateFunctionComponent(fiber) {
    // fiber.type 就是函数组件本身,fiber.props 就是函数组件的参数
    const children = [fiber.type(fiber.props)]
    reconcileChildren(fiber, children)
}
复制代码
4 . 修改 commitWork 函数,兼容没有 dom 节点的 fiber;
4.1 修改 domParent 的获取逻辑,通过 while 循环不断向上寻找,直到找到有 dom 节点的父 fiber;
function commitWork (fiber) {
    // 省略
    let domParentFiber = fiber.parent
    // 如果 fiber.parent 没有 dom 节点,则继续找 fiber.parent.parent.dom,直到有 dom 节点。
    while (!domParentFiber.dom) {
        domParentFiber = domParentFiber.parent
    }
    const domParent = domParentFiber.dom
    // 省略
}
复制代码
4.2 修改删除节点的逻辑,当删除节点时,需要不断向下寻找,直到找到有 dom 节点的子 fiber;
function commitWork (fiber) {
    // 省略
    // 如果 fiber 的更新类型是删除,执行 commitDeletion
     else if (fiber.effectTag === "DELETION") {
        commitDeletion(fiber.dom, domParent)
    }
    // 省略
}

// 删除节点
function commitDeletion (fiber, domParent) {
    // 如果该 fiber 有 dom 节点,直接删除
    if (fiber.dom) {
        domParent.removeChild(fiber.dom)
    } else {
    // 如果该 fiber 没有 dom 节点,则继续找它的子节点进行删除
        commitDeletion(fiber.child, domParent)
    }
}
复制代码
下面试一下上面的例子,代码如下:
/** @jsx myReact.createElement */
const container = document.getElementById("container")

function App (props) {
    return (
        <h1>hi~ {props.name}</h1>
    )
}

const element = (
    <App name='foo' />
)

myReact.render(element, container)
复制代码
本例完整源码见:reactDemo10[16]
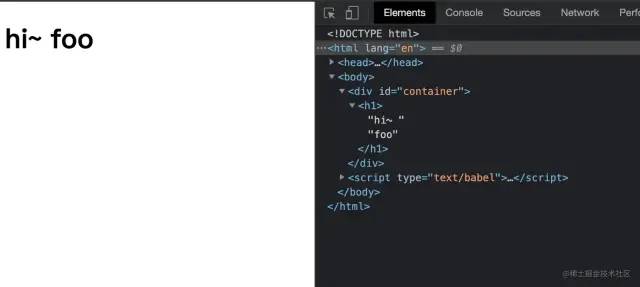
运行结果如图:

8 . hooks
下面继续为 myReact 添加管理状态的功能,期望是函数组件拥有自己的状态,且可以获取、更新状态。
一个拥有计数功能的函数组件如下:
function Counter() {
    const [state, setState] = myReact.useState(1)
    return (
        <h1 onClick={() => setState(c => c + 1)}>
        Count: {state}
        </h1>
    )
}
const element = <Counter />
复制代码
已知需要一个 useState 方法用来获取、更新状态。
这里再重申一下,渲染函数组件的前提是,执行该函数组件,因此,上述 Counter 想要更新计数,就会在每次更新都执行一次 Counter 函数。
通过以下步骤实现:
1 . 新增全局变量 wipFiber;
// 当前工作单元 fiber
let wipFiber = null
function updateFunctionComponent(fiber) {
    wipFiber = fiber
    // 当前工作单元 fiber 的 hook
    wipFiber.hook = []
    // 省略
}
复制代码
2 . 新增 useState 函数;
// initial 表示初始参数,在本例中,initail=1
function useState (initial) {
    // 是否有旧钩子,旧钩子存储了上一次更新的 hook
    const oldHook =
        wipFiber.alternate &&
        wipFiber.alternate.hook

    // 初始化钩子,钩子的状态是旧钩子的状态或者初始状态
    const hook = {
        state: oldHook ? oldHook.state : initial,
        queue: [],
    }

    // 从旧的钩子队列中获取所有动作,然后将它们一一应用到新的钩子状态
    const actions = oldHook ? oldHook.queue : []
    actions.forEach(action => {
        hook.state = action(hook.state)
    })

    // 设置钩子状态
    const setState = action => {
        // 将动作添加至钩子队列
        hook.queue.push(action)
        // 更新渲染
        wipRoot = {
            dom: currentRoot.dom,
            props: currentRoot.props,
            alternate: currentRoot,
        }
        nextUnitOfWork = wipRoot
        deletions = []
    }

    // 把钩子添加至工作单元
    wipFiber.hook = hook

    // 返回钩子的状态和设置钩子的函数
    return [hook.state, setState]
}
复制代码
下面运行一下计数组件,代码如下:
function Counter() {
    const [state, setState] = myReact.useState(1)
    return (
        <h1 onClick={() => setState(c => c + 1)}>
        Count: {state}
        </h1>
    )
}
const element = <Counter />
复制代码
本例完整源码见:reactDemo11[17]
运行结果如图:
本章节简单实现了 myReact 的 hooks 功能。
撒花完结,react 还有很多实现值得我们去学习和研究,希望有下期,和大家一起手写 react 的更多功能。
总结
本文参考 pomb.us[18] 进行学习,实现了包括虚拟 DOM、Fiber、Diff 算法、函数式组件、hooks 等功能的自定义 React。
在实现过程中小编对 React 的基本术语及实现思路有了大概的掌握,pomb.us[19] 是非常适合初学者的学习资料,可以直接通过 pomb.us[20] 进行学习,也推荐跟着本文一步步实现 React 的常见功能。
本文源码:github源码[21] 。
建议跟着一步步敲,进行实操练习。
希望能对你有所帮助,感谢阅读~
别忘了点个赞鼓励一下我哦,笔芯❤️
参考资料
[1]https://juejin.cn/post/6967194882926444557: https://juejin.cn/post/6967194882926444557
[2]https://pomb.us/build-your-own-react/: https://link.juejin.cn?target=https%3A%2F%2Fpomb.us%2Fbuild-your-own-react%2F
[3]https://www.bilibili.com/video/BV1Ki4y1u7Vr?t=78z: https://link.juejin.cn?target=https%3A%2F%2Fwww.bilibili.com%2Fvideo%2FBV1Ki4y1u7Vr%3Ft%3D78z
[4]https://github.com/jiaozitang/web-learn-note/blob/main/src/%E6%89%8B%E5%86%99%E7%B3%BB%E5%88%97/React/reactDemo.html: https://link.juejin.cn?target=https%3A%2F%2Fgithub.com%2Fjiaozitang%2Fweb-learn-note%2Fblob%2Fmain%2Fsrc%2F%25E6%2589%258B%25E5%2586%2599%25E7%25B3%25BB%25E5%2588%2597%2FReact%2FreactDemo.html
[5]https://zh-hans.reactjs.org/docs/glossary.html#jsx: https://link.juejin.cn?target=https%3A%2F%2Fzh-hans.reactjs.org%2Fdocs%2Fglossary.html%23jsx
[6]https://www.babeljs.cn/repl: https://link.juejin.cn?target=https%3A%2F%2Fwww.babeljs.cn%2Frepl
[7]https://github.com/jiaozitang/web-learn-note/blob/main/src/%E6%89%8B%E5%86%99%E7%B3%BB%E5%88%97/React/reactDemo2.html: https://link.juejin.cn?target=https%3A%2F%2Fgithub.com%2Fjiaozitang%2Fweb-learn-note%2Fblob%2Fmain%2Fsrc%2F%25E6%2589%258B%25E5%2586%2599%25E7%25B3%25BB%25E5%2588%2597%2FReact%2FreactDemo2.html
[8]https://github.com/jiaozitang/web-learn-note/blob/main/src/%E6%89%8B%E5%86%99%E7%B3%BB%E5%88%97/React/reactDemo3.html: https://link.juejin.cn?target=https%3A%2F%2Fgithub.com%2Fjiaozitang%2Fweb-learn-note%2Fblob%2Fmain%2Fsrc%2F%25E6%2589%258B%25E5%2586%2599%25E7%25B3%25BB%25E5%2588%2597%2FReact%2FreactDemo3.html
[9]https://github.com/jiaozitang/web-learn-note/blob/main/src/%E6%89%8B%E5%86%99%E7%B3%BB%E5%88%97/React/reactDemo4.html: https://link.juejin.cn?target=https%3A%2F%2Fgithub.com%2Fjiaozitang%2Fweb-learn-note%2Fblob%2Fmain%2Fsrc%2F%25E6%2589%258B%25E5%2586%2599%25E7%25B3%25BB%25E5%2588%2597%2FReact%2FreactDemo4.html
[10]https://github.com/jiaozitang/web-learn-note/blob/main/src/%E6%89%8B%E5%86%99%E7%B3%BB%E5%88%97/React/reactDemo5.html: https://link.juejin.cn?target=https%3A%2F%2Fgithub.com%2Fjiaozitang%2Fweb-learn-note%2Fblob%2Fmain%2Fsrc%2F%25E6%2589%258B%25E5%2586%2599%25E7%25B3%25BB%25E5%2588%2597%2FReact%2FreactDemo5.html
[11]https://developer.mozilla.org/zh-CN/docs/Web/API/Window/requestIdleCallback: https://link.juejin.cn?target=https%3A%2F%2Fdeveloper.mozilla.org%2Fzh-CN%2Fdocs%2FWeb%2FAPI%2FWindow%2FrequestIdleCallback
[12]https://developer.mozilla.org/zh-CN/docs/Web/API/Window/requestIdleCallback: https://link.juejin.cn?target=https%3A%2F%2Fdeveloper.mozilla.org%2Fzh-CN%2Fdocs%2FWeb%2FAPI%2FWindow%2FrequestIdleCallback
[13]https://github.com/jiaozitang/web-learn-note/blob/main/src/%E6%89%8B%E5%86%99%E7%B3%BB%E5%88%97/React/reactDemo7.html: https://link.juejin.cn?target=https%3A%2F%2Fgithub.com%2Fjiaozitang%2Fweb-learn-note%2Fblob%2Fmain%2Fsrc%2F%25E6%2589%258B%25E5%2586%2599%25E7%25B3%25BB%25E5%2588%2597%2FReact%2FreactDemo7.html
[14]https://github.com/jiaozitang/web-learn-note/blob/main/src/%E6%89%8B%E5%86%99%E7%B3%BB%E5%88%97/React/reactDemo8.html: https://link.juejin.cn?target=https%3A%2F%2Fgithub.com%2Fjiaozitang%2Fweb-learn-note%2Fblob%2Fmain%2Fsrc%2F%25E6%2589%258B%25E5%2586%2599%25E7%25B3%25BB%25E5%2588%2597%2FReact%2FreactDemo8.html
[15]https://github.com/jiaozitang/web-learn-note/blob/main/src/%E6%89%8B%E5%86%99%E7%B3%BB%E5%88%97/React/reactDemo9.html: https://link.juejin.cn?target=https%3A%2F%2Fgithub.com%2Fjiaozitang%2Fweb-learn-note%2Fblob%2Fmain%2Fsrc%2F%25E6%2589%258B%25E5%2586%2599%25E7%25B3%25BB%25E5%2588%2597%2FReact%2FreactDemo9.html
[16]https://github.com/jiaozitang/web-learn-note/blob/main/src/%E6%89%8B%E5%86%99%E7%B3%BB%E5%88%97/React/reactDemo10.html: https://link.juejin.cn?target=https%3A%2F%2Fgithub.com%2Fjiaozitang%2Fweb-learn-note%2Fblob%2Fmain%2Fsrc%2F%25E6%2589%258B%25E5%2586%2599%25E7%25B3%25BB%25E5%2588%2597%2FReact%2FreactDemo10.html
[17]https://github.com/jiaozitang/web-learn-note/blob/main/src/%E6%89%8B%E5%86%99%E7%B3%BB%E5%88%97/React/reactDemo11.html: https://link.juejin.cn?target=https%3A%2F%2Fgithub.com%2Fjiaozitang%2Fweb-learn-note%2Fblob%2Fmain%2Fsrc%2F%25E6%2589%258B%25E5%2586%2599%25E7%25B3%25BB%25E5%2588%2597%2FReact%2FreactDemo11.html
[18]https://pomb.us/build-your-own-react/: https://link.juejin.cn?target=https%3A%2F%2Fpomb.us%2Fbuild-your-own-react%2F
[19]https://pomb.us/build-your-own-react/: https://link.juejin.cn?target=https%3A%2F%2Fpomb.us%2Fbuild-your-own-react%2F
[20]https://pomb.us/build-your-own-react/: https://link.juejin.cn?target=https%3A%2F%2Fpomb.us%2Fbuild-your-own-react%2F
[21]https://github.com/jiaozitang/web-learn-note/tree/main/src/%E6%89%8B%E5%86%99%E7%B3%BB%E5%88%97/Promise: https://link.juejin.cn?target=https%3A%2F%2Fgithub.com%2Fjiaozitang%2Fweb-learn-note%2Ftree%2Fmain%2Fsrc%2F%25E6%2589%258B%25E5%2586%2599%25E7%25B3%25BB%25E5%2588%2597%2FPromise
[22]https://pomb.us/build-your-own-react/: https://link.juejin.cn?target=https%3A%2F%2Fpomb.us%2Fbuild-your-own-react%2F
[23]https://www.bilibili.com/video/BV1Ki4y1u7Vr?t=78z: https://link.juejin.cn?target=https%3A%2F%2Fwww.bilibili.com%2Fvideo%2FBV1Ki4y1u7Vr%3Ft%3D78z
[24]https://jelly.jd.com/article/60aceb6b27393b0169c85231: https://link.juejin.cn?target=https%3A%2F%2Fjelly.jd.com%2Farticle%2F60aceb6b27393b0169c85231
