【实战】 Webpack to Vite, 为开发提速!
 Webpack to Vite
背景
最近,就 前端开发过程中的痛点及可优化项 做了一次收集。 其中,构建耗时、项目编译速度慢 的字眼出现了好几次。
随着业务的快速发展,我们很多项目的体积也快速膨胀。随之而来的, 就是打包变慢等问题。
提升研发效率,是技术人永恒的追求。
我们项目也有启动慢的问题,同事也提到过几次。刚好我之前也做过类似的探索和优化, 于是就借这个机会,改造一下项目, 解决启动耗时的问题。
于昨天下午(2021.4.7 23:00), 成功嵌入 Vite, 项目启动时间由约 190s => 20s, 热更新时间缩短为 2s。
中间踩了一些坑, 好在最后爬出来了, 相关技术要点都会在下文中呈现。
FBI Warning:以下文字,只是我结合自己的实际项目, 总结出来的一些浅薄的经验, 如有错误,欢迎指正 :)
今天的主要内容:
为什么 Vite 启动这么快我的项目如何植入 Vite改造过程中遇到的问题以及解决方式关于 Vite 开发、打包上线的一些思考相关代码和结论
正文
为什么 Vite 启动这么快
底层实现上, Vite 是基于 esbuild 预构建依赖的。
esbuild 使用 go 编写,并且比以 js 编写的打包器预构建依赖, 快 10 - 100 倍。
因为 js 跟 go 相比实在是太慢了,js 的一般操作都是毫秒计,go 则是纳秒。
另外, 两者的启动方式也有所差异。
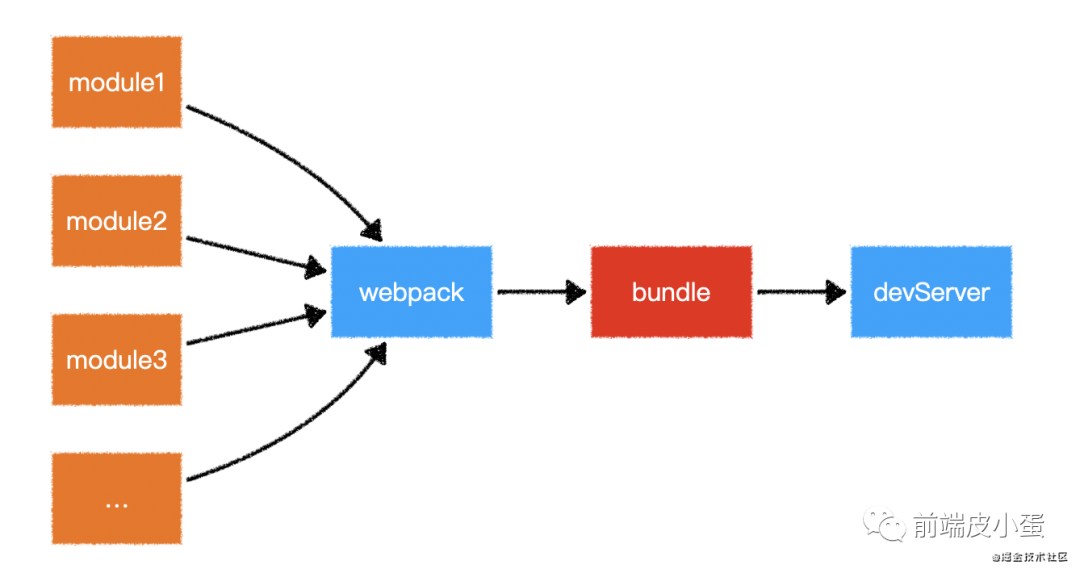
webpack 启动方式
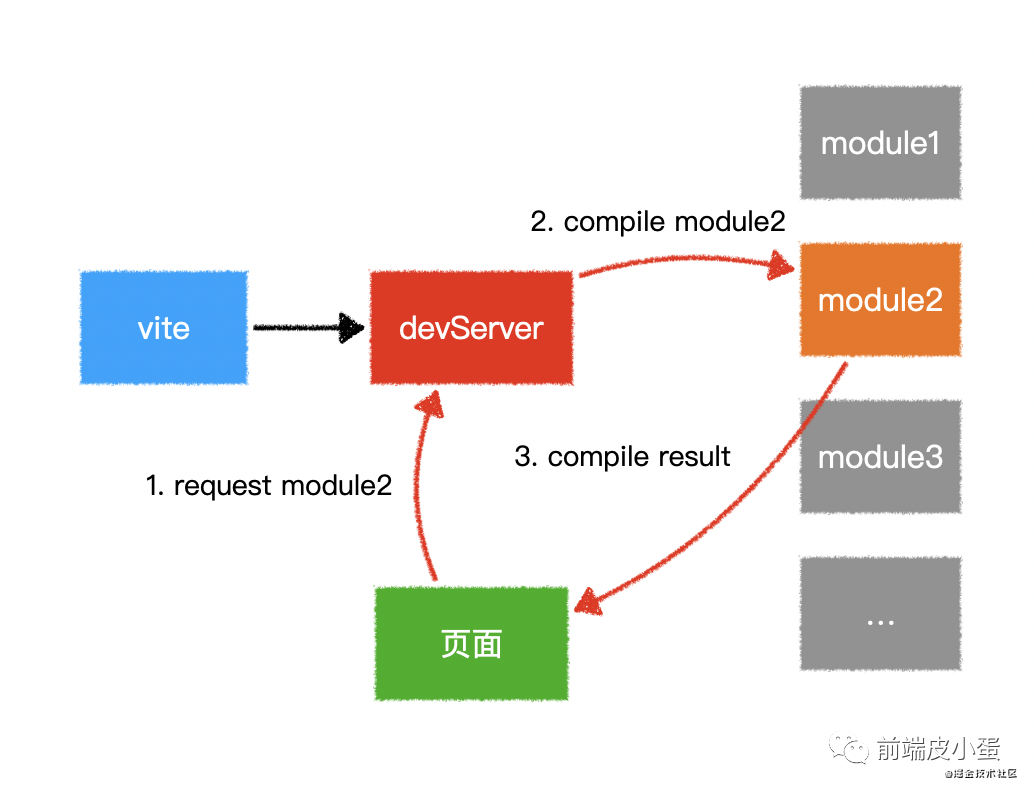
Vite 启动方式
Webpack 会先打包,然后启动开发服务器,请求服务器时直接给予打包结果。
而 Vite 是直接启动开发服务器,请求哪个模块再对该模块进行实时编译。
由于现代浏览器本身就支持 ES Module,会自动向依赖的 Module 发出请求。
Vite 充分利用了这一点,将开发环境下的模块文件,就作为浏览器要执行的文件,而不是像 W ebpack 那样进行打包合并。
由于 Vite 在启动的时候不需要打包,也就意味着不需要分析模块的依赖、不需要编译。因此启动速度非常快。当浏览器请求某个模块时,再根据需要对模块内容进行编译。
这种按需动态编译的方式,极大的缩减了编译时间,项目越复杂、模块越多,vite 的优势越明显。
在 HMR(热更新)方面,当改动了一个模块后,仅需让浏览器重新请求该模块即可,不像webpack那样需要把该模块的相关依赖模块全部编译一次,效率更高。
从实际的开发体验来看, 在 Vite 模式下, 开发环境可以瞬间启动, 但是等到页面出来, 要等一段时间。
我的项目如何植入 Vite
新项目
创建一个 Vite 新项目就比较简单:
yarn create @vitejs/app

生成好之后, 直接启动就可以了:
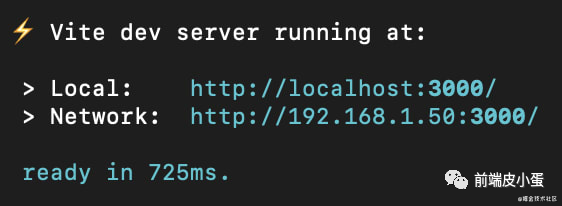
已有项目
已有项目的迁移, 稍微繁琐一些。
首先, 加入 Vite 的相关配置。这里我使用了一个 cli 工具:wp2vite.
安装好之后, 直接执行:
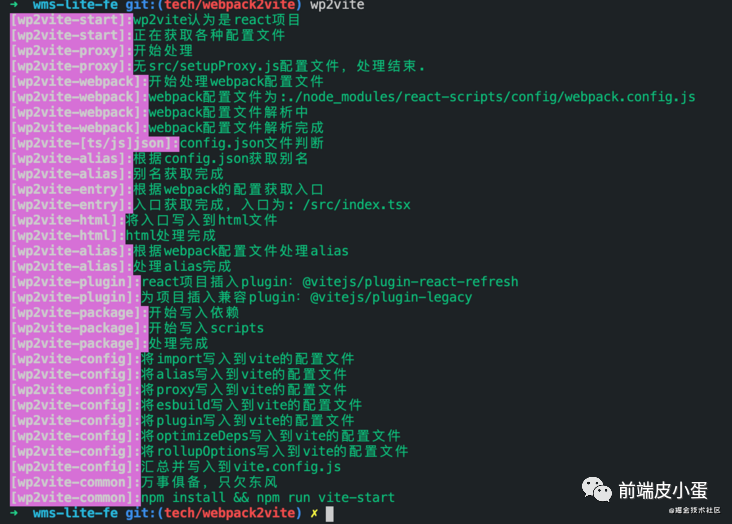
这一步, 会自动生成 Vite 的配置文件,并引入相关的依赖。
把依赖安装一下, 启动就可以了。
如果没有意外的话, 你会收获一堆报错。
恭喜你,进入开心愉快的踩坑环节。
我在改造过程中遇到的问题
1. alias 错误

项目代码里配置了一些别名,vite 无法识别,所以需要在vite 里面也配置 alias:
 resolve: {
    alias: {
      '@': resolve(__dirname, 'src'),
    },
  },
2. 无法识别 less 全局变量

解决办法:
把自定义的全局变量从外部注入即可, 直接在 vite.config.js 的 css 选项中加入:
  css: {
    preprocessorOptions: {
      less: {
        modifyVars: {
          hack: `true;@import '${resolve('./src/vars.less')}';`,
          ...themeVariables,
        },
        javascriptEnabled: true,
      },
    },
  },
3. Uncaught Error: Target container is not a DOM element.

根元素未找到。
原因是:默认生成的 index.html 中:
<div id="root"></div>id 是 root, 而逻辑中的是#app, 这里直接改成 id=app 即可。
4. typings 文件找不到

typings 文件未找到。
这个错误, 乍一看, 一头雾水。
进去看一下源代码和编译后的代码:
源代码:

编译后:


typings 文件这不是好好的在这吗, 怎么就找不到?
想了一下:Vite 不知道 typeings 文件是不需要被编译的,需要告诉编译器不编译这个文件。
最后在 TS 官方文档里找到了答案:
https://www.typescriptlang.org/docs/handbook/release-notes/typescript-3-8.html
Type-Only Imports and Export
This feature is something most users may never have to think about; however, if you’ve hit issues under --isolatedModules, TypeScript’s transpileModule API, or Babel, this feature might be relevant.
TypeScript 3.8 adds a new syntax for type-only imports and exports.
import type { SomeThing } from "./some-module.js";
export type { SomeThing };
需要单独引入types, 于是把代码改为:

同时要注意, 如果一个文件有有多个导出, 也要分开引入:

唯一痛苦的是: 全局都需要改一遍, 体力活。
至此,typeings 问题完美解决。
5. 无法识别 svg
我们在使用 svg 作为图标组件的时候, 一般是:
import Icon from '@ant-design/icons';
import ErrorSvg from '@/assets/ico_error.svg';

const ErrorIcon = (props: any) => <Icon component={ErrorSvg} />;

// ...
<ErrorIcon />
浏览器报错:

error occurred in the </src/assets/ico_error.svg> component很明显的看到, 这里是把文件路径作为组件了。
现在要做的是:把这个文件路径, 换成可以识别的组件。
搜索一番, 找到了个插件:vite-plugin-react-svg
加入配置:
const reactSvgPlugin = require('vite-plugin-react-svg');

plugins: [
  reactSvgPlugin(),
],
import MyIcon from './svgs/my-icon.svg?component';
function App() {
return (
<div>
<MyIcon />
</div>
);
}需要注意的是:引入的 svg 文件需要加 ?component 作为后缀。
看了一下源码, 这个后缀是用来作为标识符的,
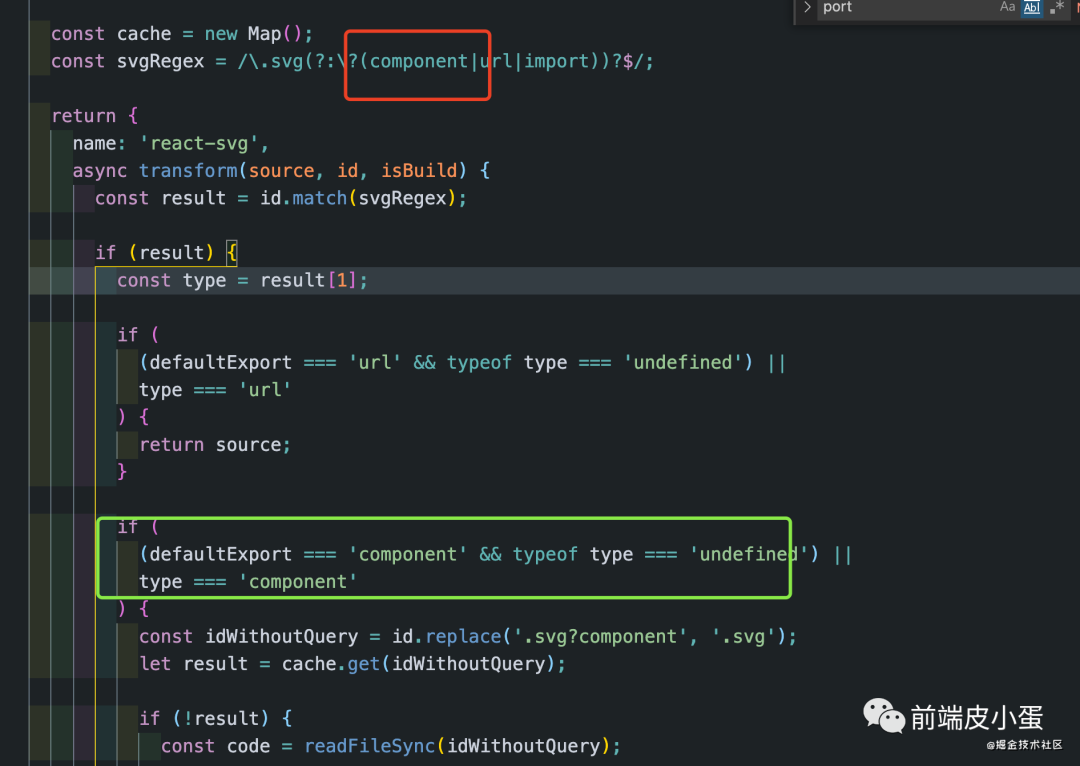
如果后缀匹配上是component, 就解析文件, 并缓存, 最后返回结果:
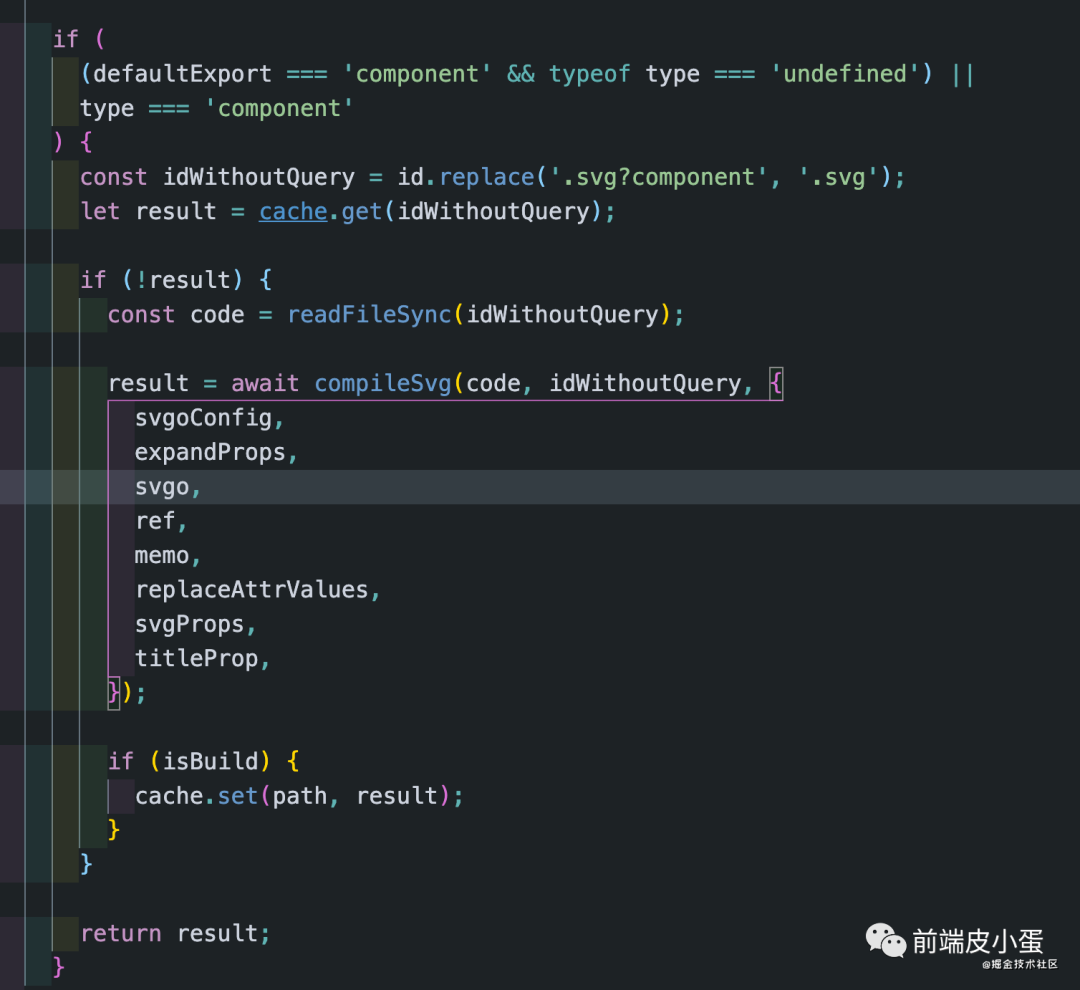
知道原理之后, 就需要把全部的 .svg => .svg?component。
vscode 一键替换就可以, 不过注意别把 node_module 里面的也替换了。
6. global 未定义

global 是 Node里面的变量, 会在客户端报错 ?
一层层看下去, 原来是引入的第三方包使用了global。
看 vite 文档里提到了 Client Types:
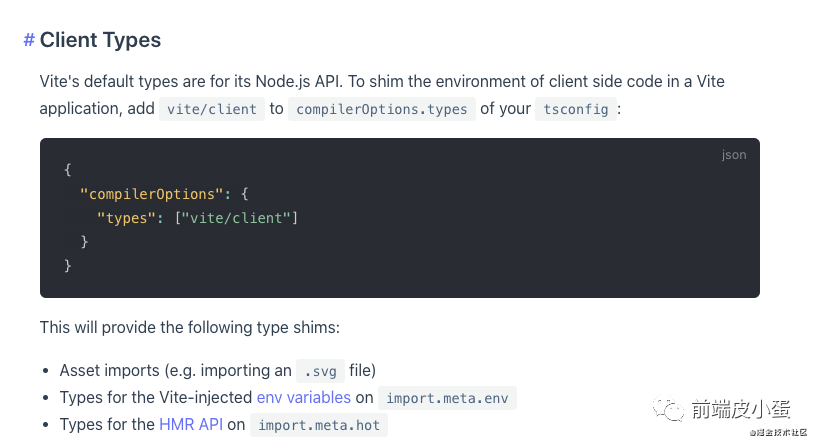
追加到 tsconfig 里面:
 "compilerOptions": {
    "types": ["node", "jest", "vite/client"],
 }
然后, 并没有什么乱用。。。

没办法, 只得祭出 window 大法。
在入口index.tsx 里面加上:
(window as any).global = window;刷新, 好了。

7. [未解决] 替代HtmlWebpackPlugin
还需要注入一些外部变量, 修改入口html, favicon, title 之类。
找到一个插件:vite-plugin-singlefile
不过并没有什么用。
有了解的同学请留言赐教。
至此, 整个 app 已经能在本地跑起来了, build 也没问题。
7. 线上打包构建时, 内存溢出
本地能跑起来, 打包也没问题, 后面当然是放到线上跑一跑啦。
立刻安排!

内存不足, 我就给你加点:


搞定!
关于 Vite 开发、打包上线的一些思考
从实际使用来看, vite 在一些功能上还是无法完全替代 webpack。
毕竟是后起之秀, 相关的生态还需要持续完善。
个人认为,目前一种比较稳妥的方式是:
- 保留 webpack dev & build 的能力,
vite 仅作为开发的辅助
等相关工具再完善一些, 再考虑完全迁移过来。
相关代码和结论
一个完整的 Vite demo
仓库地址:https://github.com/beMySun/react-hooks-i18n-template/tree/test-wp2vite
业务项目的 vite.config.js 完整配置
import { defineConfig } from 'vite';
import reactRefresh from '@vitejs/plugin-react-refresh';
import legacyPlugin from '@vitejs/plugin-legacy';
import { resolve } from 'path';

const fs = require('fs');
const lessToJS = require('less-vars-to-js');
const themeVariables = lessToJS(fs.readFileSync(resolve(__dirname, './src/antd-custom.less'), 'utf8'));
const reactSvgPlugin = require('vite-plugin-react-svg');

// https://cn.vitejs.dev/config/
export default defineConfig({
  base: './',
  root: './',
  resolve: {
    alias: {
      'react-native': 'react-native-web',
      '@': resolve(__dirname, 'src'),
    },
  },
  define: {
    'process.env.REACT_APP_IS_LOCAL': '\'true\'',
    'window.__CID__': JSON.stringify(process.env.cid || 'id'),
  },
  server: {
    port: 8080,
    proxy: {
      '/api': {
        target: 'https://stoku.test.shopee.co.id/',
        changeOrigin: true,
        cookieDomainRewrite: {
          'stoku.test.shopee.co.id': 'localhost',
        },
      },
    },
  },
  build: {
    target: 'es2015',
    minify: 'terser',
    manifest: false,
    sourcemap: false,
    outDir: 'build',
    rollupOptions: {},
  },
  esbuild: {},
  optimizeDeps: {},
  plugins: [
    // viteSingleFile({
    //   title: 'dynamic title', // doesn't work
    // }),
    reactSvgPlugin(),
    reactRefresh(),
    legacyPlugin({
      targets: [
        'Android > 39',
        'Chrome >= 60',
        'Safari >= 10.1',
        'iOS >= 10.3',
        'Firefox >= 54',
        'Edge >= 15',
      ],
    }),
    // vitePluginImp({
    //   libList: [
    //     {
    //       libName: 'antd',
    //       style: (name) => `antd/es/${name}/style`,
    //     },
    //   ],
    // }),
  ],
  css: {
    preprocessorOptions: {
      less: {
        modifyVars: {
          hack: `true;@import '${resolve('./src/vars.less')}';`,
          ...themeVariables,
        },
        javascriptEnabled: true,
      },
    },
  },
});
最后
使用 Vite 能大幅缩短项目构建时间,提升开发效率。
不过也要结合项目的实际情况,合理取舍。
对于我的这个项目而言,把 Vite 作为辅助开发的一种方式,还是挺有用的。
期待 Vite 能继续完善,为研发提效。
好了, 内容大概就这么多, 希望对大家有所帮助。
才疏学浅,如有错误, 欢迎指正。
谢谢。
