前端也要懂编译:AST 从入门到上手指南
阅读文章之前,不妨打开手头项目中的 package.json ,我们会发现众多工具已经占据了我们开发日常的各个角落,例如 JavaScript 转译、CSS 预处理、代码压缩、ESLint、Prettier等等。这些工具模块大都不会交付到生产环境中,但它们的存在于我们的开发而言是不可或缺的。
有没有想过这些工具的功能是如何实现的呢?没错,抽象语法树 (Abstract Syntax Tree) 就是上述工具的基石。
AST 是什么 & 如何生成
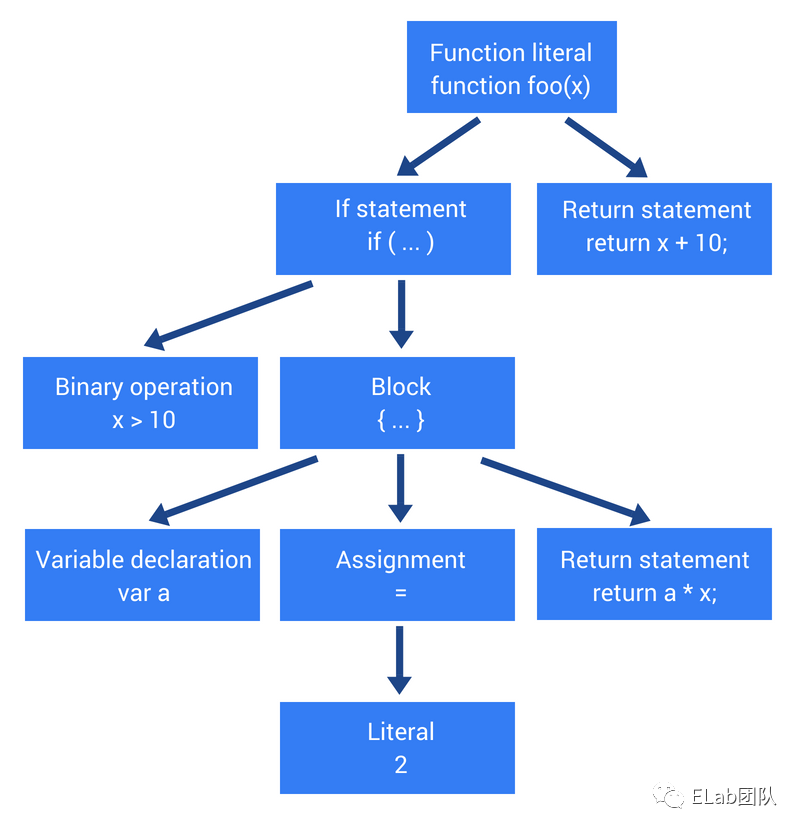
AST 是一种源代码的抽象语法结构的树形表示。树中的每个节点都表示源代码中出现的一个构造。
那么 AST 是如何生成的?为什么需要 AST ?
了解过编译原理的同学知道计算机想要理解一串源代码需要经过“漫长”的分析过程:
- 词法分析 (Lexical Analysis)
- 语法分析 (Syntax Analysis)
- ...
- 代码生成 (Code Generation)
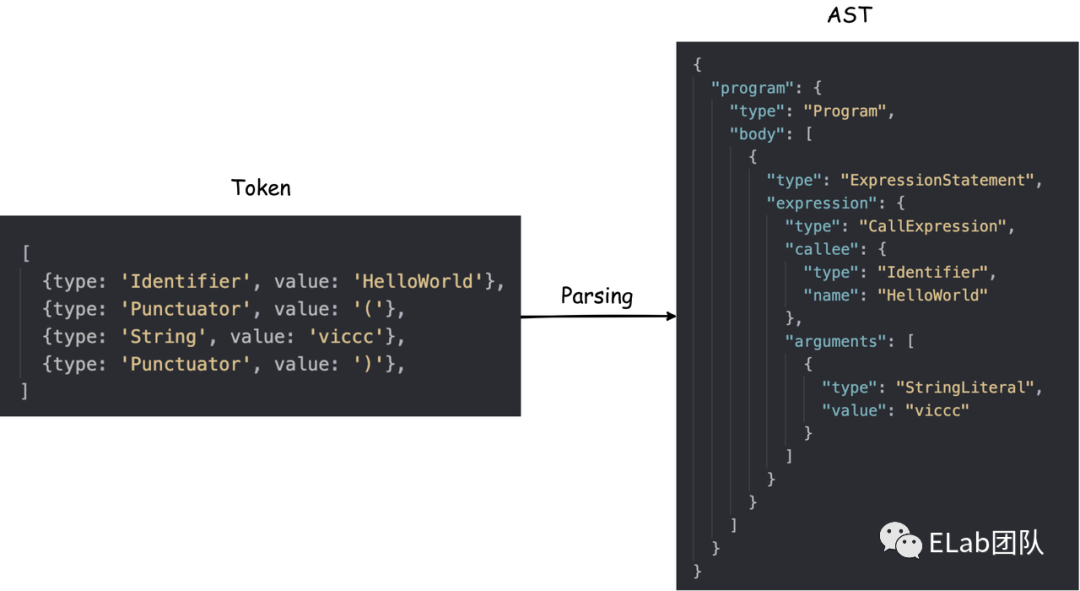
- 词法分析 其中词法分析阶段扫描输入的源代码字符串,生成一系列的词法单元 (tokens),这些词法单元包括数字,标点符号,运算符等。词法单元之间都是独立的,也即在该阶段我们并不关心每一行代码是通过什么方式组合在一起的。
词法分析阶段——仿佛最初学英语时,将一个句子拆分成很多独立的单词,我们首先记住每一个单词的类型和含义,但并不关心单词之间的具体联系。
- 语法分析 接着,语法分析阶段就会将上一阶段生成的 token 列表转换为如下图右侧所示的 AST,根据这个数据结构大致可以看出转换之前源代码的基本构造。
语法分析阶段——老师教会我们每个单词在整个句子上下文中的具体角色和含义。
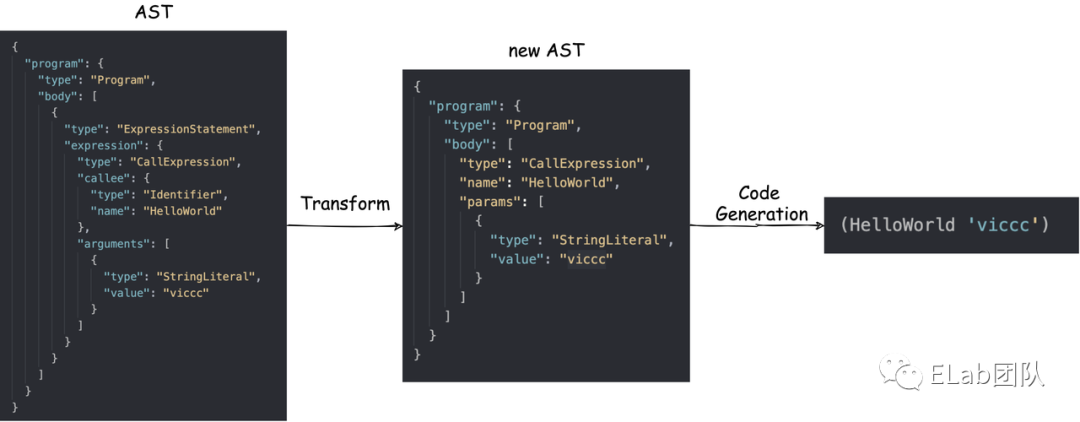
- 代码生成 最后是代码生成阶段,该阶段是一个非常自由的环节,可由多个步骤共同组成。在这个阶段我们可以遍历初始的
AST,对其结构进行改造,再将改造后的结构生成对应的代码字符串。
代码生成阶段——我们已经弄清楚每一条句子的语法结构并知道如何写出语法正确的英文句子,通过这个基本结构我们可以把英文句子完美地转换成一个中文句子或是文言文(如果你会的话)。
AST 的基本结构
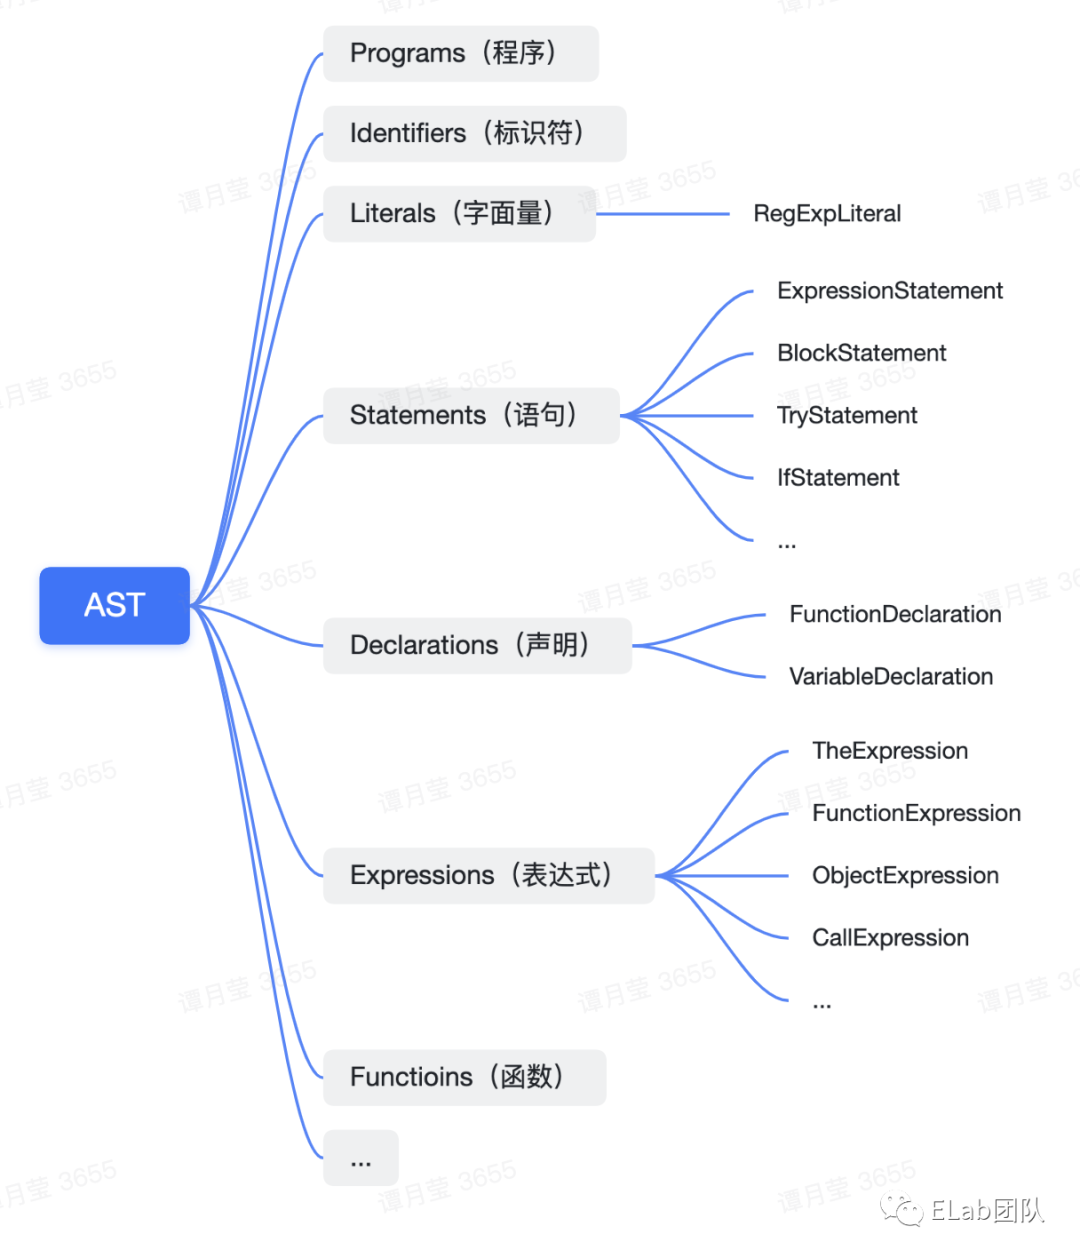
抛开具体的编译器和编程语言,在 “AST 的世界”里所有的一切都是 节点(Node),不同类型的节点之间相互嵌套形成一颗完整的树形结构。
{
  "program": {
    "type": "Program",
    "sourceType": "module",
    "body": [
      {
        "type": "FunctionDeclaration",
        "id": {
          "type": "Identifier",
          "name": "foo"
        },
        "params": [
          {
            "type": "Identifier",
            "name": "x"
          }
        ],
        "body": {
          "type": "BlockStatement",
          "body": [
            {
              "type": "IfStatement",
              "test": {
                "type": "BinaryExpression",
                "left": {
                  "type": "Identifier",
                  "name": "x"
                },
                "operator": ">",
                "right": {
                  "type": "NumericLiteral",
                  "value": 10
                }
              }
            }
          ]
        }
        ...
       }
       ...
    ]
}
AST 的结构在不同的语言编译器、不同的编译工具甚至语言的不同版本下是各异的,这里简单介绍一下目前 JavaScript 编译器遵循的通用规范 —— ESTree 中对于 AST 结构的一些基本定义,不同的编译工具都是基于此结构进行了相应的拓展。
AST 的用法 & 实战
应用场景和用法
了解 AST 的概念和具体结构后,你可能不禁会问:AST 有哪些使用场景,怎么用?
开篇有提到,其实我们项目中的依赖和 VSCode 插件已经揭晓了答案,AST 的应用场景非常广泛,以前端开发为例:
-
代码高亮、格式化、错误提示、自动补全等:ESlint、Prettier、Vetur等。
-
代码压缩混淆:uglifyJS等。
-
代码转译:webpack、babel、TypeScript等。
至于如何使用 AST ,归纳起来可以把它的使用操作分为以下几个步骤:
-
解析 (Parsing):这个过程由编译器实现,会经过词法分析过程和语法分析过程,从而生成
AST。 -
读取/遍历 (Traverse):深度优先遍历
AST,访问树上各个节点的信息(Node)。 -
修改/转换 (Transform):在遍历的过程中可对节点信息进行修改,生成新的
AST。 -
输出 (Printing):对初始
AST进行转换后,根据不同的场景,既可以直接输出新的AST,也可以转译成新的代码块。
通常情况下使用 AST,我们重点关注步骤2和3,诸如 Babel、ESLint 等工具暴露出来的通用能力都是对初始 AST 进行访问和修改。
这两步的实现基于一种名为访问者模式的设计模式,即定义一个 visitor 对象,在该对象上定义了对各种类型节点的访问方法,这样就可以针对不同的节点做出不同的处理。例如,编写 Babel 插件其实就是在构造一个 visitor 实例来处理各个节点信息,从而生成想要的结果。
const visitor = {

    CallExpression(path) {

        ...

    }

    FunctionDeclaration(path) {

        ...

    }

    ImportDeclaration(path) {

        ...

    }

    ...

}

traverse(AST, visitor)
实战
《说了一堆,一行代码没看见》,最后一部分我们来看如何使用 Bable 在 AST 上做一些“手脚”。
开发工具
-
AST Explorer:在线 AST 转换工具,集成了多种语言和解析器
-
@babel/parser :将 JS 代码解析成对应的 AST
-
@babel/traverse:对 AST 节点进行递归遍历
-
@babel/types:集成了一些快速生成、修改、删除 AST Node的方法
-
@babel/generator :根据修改过后的 AST 生成新的 js 代码
目标:将所有函数中的普通 log 打印转换成 error 打印,并在打印内容前方附加函数名的字符串
// Before

function add(a, b) {

    console.log(a + b)

    return a + b

}


// => After

function add(a, b) {

    console.error('add', a + b)

    return a + b

}思路:
-
遍历所有的函数调用表达式(CallExpression)节点
-
将函数调用方法的属性由 log 改为 error
-
找到函数声明(FunctionDeclaration)父节点,提取函数名信息
-
将函数名信息包装成字符串字面量(StringLiteral)节点,插入函数调用表达式的参数节点数组中
const compile = (code) => {

  // 1. tokenizer + parser

  const ast = parser.parse(code)

  // 2. traverse + transform

  const visitor = {

    // 访问函数调用表达式

    CallExpression(path) {

      const { callee } = path.node

      if (types.isCallExpression(path.node) && types.isMemberExpression(callee)) {

        const { object, property } = callee

        // 将成员表达式的属性由 log -> error

        if (object.name === 'console' && property.name === 'log') {

          property.name = 'error'

        } else {

          return

        }

        // 向上遍历,在该函数调用节点的父节点中找到函数声明节点

        const FunctionDeclarationNode = path.findParent(parent => {

          return parent.type === 'FunctionDeclaration'

        })

        // 提取函数名称信息,包装成一个字符串字面量节点,插入当前节点的参数数组中

        const funcNameNode = types.stringLiteral(FunctionDeclarationNode.node.id.name)

        path.node.arguments.unshift(funcNameNode)

      }

    }

  }

  traverse.default(ast, visitor)

  // 3. code generator

  const newCode = generator.default(ast, {}, code).code

}
目标:为所有的函数添加错误捕获,并在捕获阶段实现自定义的处理操作
// Before

function add(a, b) {

  console.log('23333')

  throw new Error('233 Error')

  return a + b;

}


// => After

function add(a, b) {

  // 这里只能捕获到同步代码的执行错误

  try {

    console.log('23333')

    throw new Error('233 Error')

    return a + b;

  } catch (myError) {

      mySlardar(myError) // 自定义处理(eg:函数错误自动上报)

  }

}
思路:
-
遍历函数声明(FunctionDeclaration)节点
-
提取该节点下整个代码块节点,作为 try 语句(tryStatement)处理块中的内容
-
构造一个自定义的 catch 子句(catchClause)节点,作为 try 异常处理块的内容
-
将整个 try 语句节点作为一个新的函数声明节点的子节点,用新生成的节点替换原有的函数声明节点
const compile = (code) => {

  // 1. tokenizer + parser

  const ast = parser.parse(code)

  // utils.writeAst2File(ast) // 查看 ast 结果

  // 2. traverse

  const visitor = {

    FunctionDeclaration(path) {

      const node = path.node

      const { params, id } = node // 函数的参数和函数体节点

      const blockStatementNode = node.body

      // 已经有 try-catch 块的停止遍历,防止 circle loop

      if (blockStatementNode.body && types.isTryStatement(blockStatementNode.body[0])) {

        return

      }

      // 构造 cath 块节点

      const catchBlockStatement = types.blockStatement(

        [types.expressionStatement(

          types.callExpression(types.identifier('mySlardar'), [types.identifier('myError')])

        )]

      )

      // catch 子句节点

      const catchClause = types.catchClause(types.identifier('myError'), catchBlockStatement)

      // try 语句节点

      const tryStatementNode = types.tryStatement(blockStatementNode, catchClause)

      // try-catch 节点作为新的函数声明节点

      const tryCatchFunctionDeclare = types.functionDeclaration(id, params, types.blockStatement([tryStatementNode]))

      path.replaceWith(tryCatchFunctionDeclare)

    }

  }

  traverse.default(ast, visitor)

  // 3. code generator

  const newCode = generator.default(ast, {}, code).code

}
目标:在 webpack 中实现 import 的按需导入(乞丐版 babel-import-plugin)
// Before

import { Button as Btn, Dialog } from '233_UI'

import { HHH as hhh } from '233_UI'


设置自定义参数:

(moduleName) => `233_UI/lib/src/${moduleName}/${moduleName} `


// => After

import { Button as Btn } from "233_UI/lib/src/Button/Button"

import { Dialog } from "233_UI/lib/src/Dialog/Dialog"

import { HHH as hhh } from "233_UI/lib/src/HHH/HHH"
思路:
-
在插件运行的上下文状态中指定自定义的查找文件路径规则
-
遍历 import 声明节点(ImportDeclaration)
-
提取 import 节点中所有被导入的变量节点(ImportSpecifier)
-
将该节点的值通过查找文件路径规则生成新的导入源路径,有几个导入节点就有几个新的源路径
-
组合被导入的节点和源头路径节点,生成新的 import 声明节点并替换
// 乞丐版按需引入 Babel 插件

const visitor = ({types}) => {

  return {

    visitor: {

      ImportDeclaration(path, {opts}) {

        const _getModulePath = opts.moduleName // 获取模块指定路径,通过插件的参数传递进来


        const importSpecifierNodes = path.node.specifiers // 导入的对象节点

        const importSourceNode = path.node.source // 导入的来源节点

        const sourceNodePath = importSourceNode.value

        // 已经成功替换的节点不再遍历

        if (!opts.libaryName || sourceNodePath !== opts.libaryName) {

          return

        }


        const modulePaths = importSpecifierNodes.map(node => {

          return _getModulePath(node.imported.name)

        })

        const newImportDeclarationNodes = importSpecifierNodes.map((node, index) => {

          return types.importDeclaration([node], types.stringLiteral(modulePaths[index]))

        })

        path.replaceWithMultiple(newImportDeclarationNodes)

      }

    }

  }

}


const result = babel.transform(code, {

  plugins: [

    [

      visitor,

      {

        libaryName: '233_UI',

        moduleName: moduleName => `233_UI/lib/src/${moduleName}/${moduleName}`

      }

    ]

  ]

})
上述三个的详细代码和运行示例的仓库地址见 https://github.com/xunhui/ast_js_demo[1]
总结
或许我们的日常工作和 AST 打交道的机会并不多,更不会刻意地去关注语言底层编译器的原理,但了解 AST 可以帮助我们更好地理解日常开发工具的原理,更轻松地上手这些工具暴露的 API。
工作的每一天,我们的喜怒哀乐通过一行又一行的代码向眼前的机器倾诉。它到底是怎么读懂你的情愫,又怎么给予你相应的回应,这是一件非常值得探索的事情:)
参考
ASTs - What are they and how to use them[2]
AST 实现函数错误自动上报[3]
Babel Handbook[4]
参考资料
[1]https://github.com/xunhui/ast_js_demo: https://github.com/xunhui/ast_js_demo
[2]ASTs - What are they and how to use them: https%3A%2F%2Fwww.twilio.com%2Fblog%2Fabstract-syntax-trees
[3]AST 实现函数错误自动上报: https%3A%2F%2Fsegmentfault.com%2Fa%2F1190000037630766
[4]Babel Handbook: https%3A%2F%2Fgithub.com%2Fjamiebuilds%2Fbabel-handbook


