【源码】Vue-i18n: 你知道国际化是怎么实现的么?
Vue-i18n 简单介绍以及使用
Vue I18n 是 Vue.js 的国际化插件,它可以轻松地将一些本地化功能集成到你的 Vue.js 应用程序中。
本文的源码阅读是基于版本 8.24.4 进行
我们来看一个官方的 demo
<!DOCTYPE html>
<html>
  <head>
    <meta charset="utf-8">
    <title>ES modules browser example</title>
    <script src="../../dist/vue-i18n.js"></script>
  </head>
  <body>
    <div id="app">
      <p>{{ $t('message.hello') }}</p>
    </div>
    <script type="module">
      // 如果使用模块系统 (例如通过 vue-cli),则需要导入 Vue 和 VueI18n ,然后调用 Vue.use(VueI18n)。
      import Vue from 'https://unpkg.com/vue@2.6.10/dist/vue.esm.browser.js'
      Vue.use(VueI18n)

      new Vue({
        // 通过 `i18n` 选项创建 Vue 实例
        // 通过选项创建 VueI18n 实例
        i18n: new VueI18n({
          locale: 'zh', // 设置地区
          // 准备翻译的语言环境信息
          // 设置地区信息
          messages: {
            en: {
              message: {
                hello: 'hello, I am Gopal'
              }
            },
            zh: {
              message: {
                hello: '你好,我是 Gopal 一号'
              }
            }
          }
        })
      }).$mount('#app')
    </script>
  </body>
</html>
使用上是比较简单的,本文我们深入了解 Vue-i18n 的工作原理,探索国际化实现的奥秘。包括:
- 整体的 Vue-i18n 的架构是怎样的?
- 上述 demo 是如何生效的?
- 我们为什么可以直接在模板中使用 $t?它做了什么?
- 上述 demo 是如何做到不刷新更新页面的?
- 全局组件
和全局自定义指令的实现?
代码结构以及入口
我们看一下 Vue-18n 的代码结构如下
├── components/
│   ├── interpolation.js // <i18n> 组件的实现
│   └── number.js
├── directive.js // 全局自定义组件的实现
├── extend.js // 拓展方法
├── format.js // parse 和 compile 的核心实现
├── index.js // 入口文件
├── install.js // 注册方法
├── mixin.js // 处理各个生命周期
├── path.js
└── util.js
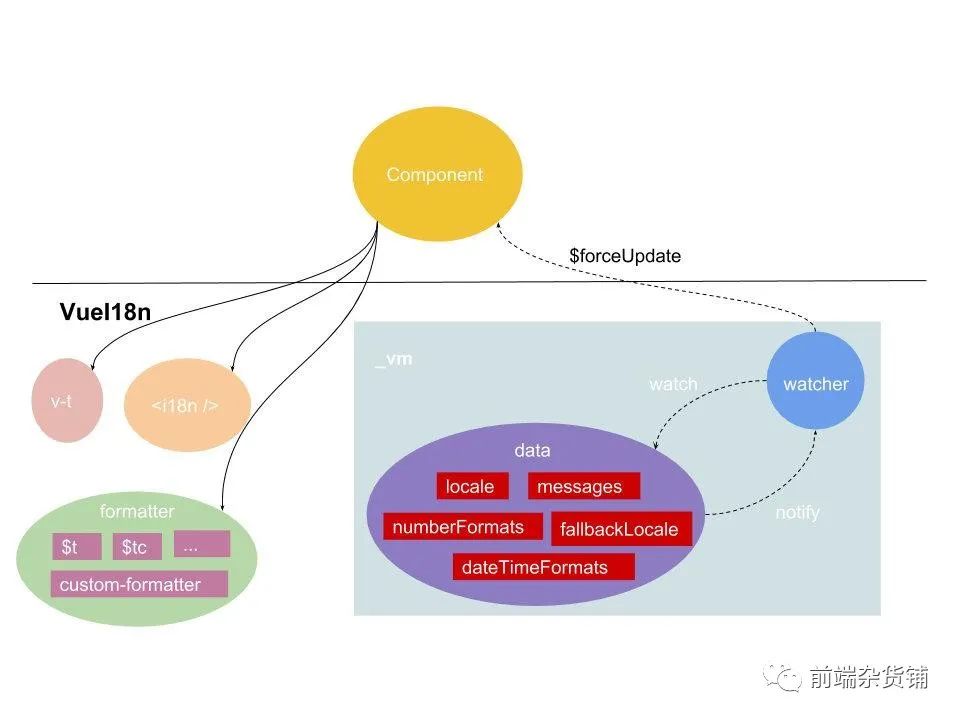
关于 Vue-18n 的整体架构,网上找到了一个比较贴切的图,如下。其中左侧是 Vue-i18n 提供的一些方法、组件、自定义指令等能力,右侧是 Vue-i18n 对数据的管理

// Auto install if it is not done yet and `window` has `Vue`.
// To allow users to avoid auto-installation in some cases,
// this code should be placed here. See #290
/* istanbul ignore if */
if (!Vue && typeof window !== 'undefined' && window.Vue) {
  install(window.Vue)
}
在 install 方法中,主要做了几件事,如下代码注释,后面还会提到,这里有一个大致的印象
// 在 Vue 的原型中拓展方法,代码在 extend.js 里
extend(Vue)
// 在 Vue 中通过 mixin 的方式混入
Vue.mixin(mixin)
// 全局指令
Vue.directive('t', { bind, update, unbind })
// 全局组件
Vue.component(interpolationComponent.name, interpolationComponent)
Vue.component(numberComponent.name, numberComponent)
注册完成后,会调用 _initVM,这个主要是创建了一个 Vue 实例对象,后面很多功能会跟这个 this._ vm 相关联
// VueI18n 其实不是一个 Vue 对象,但是它在内部建立了 Vue 对象 vm,然后很多的功能都是跟这个 vm 关联的
this._initVM({
  locale,
  fallbackLocale,
  messages,
  dateTimeFormats,
  numberFormats
})

_initVM (data: {
         locale: Locale,
         fallbackLocale: FallbackLocale,
         messages: LocaleMessages,
         dateTimeFormats: DateTimeFormats,
         numberFormats: NumberFormats
         }): void {
  // 用来关闭 Vue 打印消息的
  const silent = Vue.config.silent
  Vue.config.silent = true
  this._vm = new Vue({ data }) // 创建了一个 Vue 实例对象
  Vue.config.silent = silent
}
全局方法 $t 的实现
我们来看看 Vue-i18n 的 $t 方法的实现,揭开国际化翻译的神秘面纱
在 extent.js 中,我们看到在 Vue 的原型中挂载 $t 方法,这是我们为什么能够直接在模板中使用的原因。
// 在 Vue 的原型中挂载 $t 方法,这是我们为什么能够直接在模板中使用的原因
// 把 VueI18n 对象实例的方法都注入到 Vue 实例上
Vue.prototype.$t = function (key: Path, ...values: any): TranslateResult {
  const i18n = this.$i18n
  // 代理模式的使用
  return i18n._t(key, i18n.locale, i18n._getMessages(), this, ...values)
}
看到的是调用 index.js 中的 $t 的方法
// $t 最后调用的方法
_t (key: Path, _locale: Locale, messages: LocaleMessages, host: any, ...values: any): any {
  if (!key) { return '' }
  const parsedArgs = parseArgs(...values)
  // 如果 escapeParameterHtml 被配置为 true,那么插值参数将在转换消息之前被转义。
  if(this._escapeParameterHtml) {
    parsedArgs.params = escapeParams(parsedArgs.params)
  }
  const locale: Locale = parsedArgs.locale || _locale
  // 翻译
  let ret: any = this._translate(
    messages, locale, this.fallbackLocale, key,
    host, 'string', parsedArgs.params
  )
}
_interpolate
回到主线,当调用 _translate 的时候,接着调用
this._interpolate(step, messages[step], key, host, interpolateMode, args, [key])
并返回
this._render(ret, interpolateMode, values, key)
在 _render 方法中,可以调用自定义方法去处理插值对象,或者是默认的方法处理插值对象。
_render (message: string | MessageFunction, interpolateMode: string, values: any, path: string): any {
  // 自定义插值对象
  let ret = this._formatter.interpolate(message, values, path)

  // If the custom formatter refuses to work - apply the default one
  if (!ret) {
    // 默认的插值对象
    ret = defaultFormatter.interpolate(message, values, path)
  }

  // if interpolateMode is **not** 'string' ('row'),
  // return the compiled data (e.g. ['foo', VNode, 'bar']) with formatter
  return interpolateMode === 'string' && !isString(ret) ? ret.join('') : ret
}
我们主要来看看默认的方法处理,主要是在 format.js 中完成
format.js 中的 parse 和 compile
format.js 实现了 BaseFormatter 类,这里使用 _caches 实现了一层缓存优化,也是常见的优化手段。下面的 没有插值对象的话,就直接返回 [message],就完成使命了。
export default class BaseFormatter {
  // 实现缓存效果
  _caches: { [key: string]: Array<Token> }

  constructor () {
    this._caches = Object.create(null)
  }

  interpolate (message: string, values: any): Array<any> {
    // 没有插值对象的话,就直接返回
    if (!values) {
      return [message]
    }
    // 如果存在 tokens,则组装值返回
    let tokens: Array<Token> = this._caches[message]
    if (!tokens) {
      // 没有存在 tokens,则拆分 tokens
      tokens = parse(message)
      this._caches[message] = tokens
    }
    return compile(tokens, values)
  }
}
当遇到如下的使用方式的时候
<p>{{ $t('message.sayHi', { name: 'Gopal' })}}</p>
主要涉及两个方法,我们先来看 parse,代码比较直观,可以看到本质上是遍历字符串,然后遇到有 {} 包裹的,把其中的内容附上类型拿出来放入到 tokens 里返回。
// 代码比较直观,可以看到本质上是遍历字符串,然后遇到有 {} 包裹的,把其中的内容附上类型拿出来放入到 tokens 里返回。
export function parse (format: string): Array<Token> {
  const tokens: Array<Token> = []
  let position: number = 0

  let text: string = ''
  while (position < format.length) {
    let char: string = format[position++]
    if (char === '{') {
      if (text) {
        tokens.push({ type: 'text', value: text })
      }

      text = ''
      let sub: string = ''
      char = format[position++]
      while (char !== undefined && char !== '}') {
        sub += char
        char = format[position++]
      }
      const isClosed = char === '}'

      const type = RE_TOKEN_LIST_VALUE.test(sub)
        ? 'list'
        : isClosed && RE_TOKEN_NAMED_VALUE.test(sub)
          ? 'named'
          : 'unknown'
      tokens.push({ value: sub, type })
    } else if (char === '%') {
      // when found rails i18n syntax, skip text capture
      if (format[(position)] !== '{') {
        text += char
      }
    } else {
      text += char
    }
  }

  text && tokens.push({ type: 'text', value: text })

  return tokens
}
以上的 demo 的返回 tokens 如下:
[
    {
        "type": "text",
        "value": "hi, I am "
    },
    {
        "value": "name",
        "type": "named"
    }
]
还有 parse,就是将上述的组装起来
// 把一切都组装起来
export function compile (tokens: Array<Token>, values: Object | Array<any>): Array<any> {
  const compiled: Array<any> = []
  let index: number = 0

  const mode: string = Array.isArray(values)
    ? 'list'
    : isObject(values)
      ? 'named'
      : 'unknown'
  if (mode === 'unknown') { return compiled }

  while (index < tokens.length) {
    const token: Token = tokens[index]
    switch (token.type) {
      case 'text':
        compiled.push(token.value)
        break
      case 'list':
        compiled.push(values[parseInt(token.value, 10)])
        break
      case 'named':
        if (mode === 'named') {
          compiled.push((values: any)[token.value])
        } else {
          if (process.env.NODE_ENV !== 'production') {
            warn(`Type of token '${token.type}' and format of value '${mode}' don't match!`)
          }
        }
        break
      case 'unknown':
        if (process.env.NODE_ENV !== 'production') {
          warn(`Detect 'unknown' type of token!`)
        }
        break
    }
    index++
  }

  return compiled
}
以上 demo 最后返回 ["hi, I am ", "Gopal"],最后再做一个简单的拼接就可以了,至此,翻译就可以成功了
Vue-i18n 是如何避免 XSS ?
上面 _t 方法中有一个 _escapeParameterHtml 。这里谈谈 escapeParams,其实是 Vue-i18n 为了防止 xss 攻击做的一个处理。如果 escapeParameterHtml 被配置为 true,那么插值参数将在转换消息之前被转义。
// 如果escapeParameterHtml被配置为true,那么插值参数将在转换消息之前被转义。
if(this._escapeParameterHtml) {
  parsedArgs.params = escapeParams(parsedArgs.params)
}
/**
* Sanitizes html special characters from input strings. For mitigating risk of XSS attacks.
* @param rawText The raw input from the user that should be escaped.
*/
function escapeHtml(rawText: string): string {
return rawText
.replace(/</g, '<')
.replace(/>/g, '>')
.replace(/"/g, '"')
.replace(/'/g, ''')
}
/**
* Escapes html tags and special symbols from all provided params which were returned from parseArgs().params.
* This method performs an in-place operation on the params object.
*
* @param {any} params Parameters as provided from `parseArgs().params`.
* May be either an array of strings or a string->any map.
*
* @returns The manipulated `params` object.
*/
export function escapeParams(params: any): any {
if(params != null) {
Object.keys(params).forEach(key => {
if(typeof(params[key]) == 'string') {
// 处理参数,防止 XSS 攻击
params[key] = escapeHtml(params[key])
}
})
}
return params
}如何做到无刷新更新页面
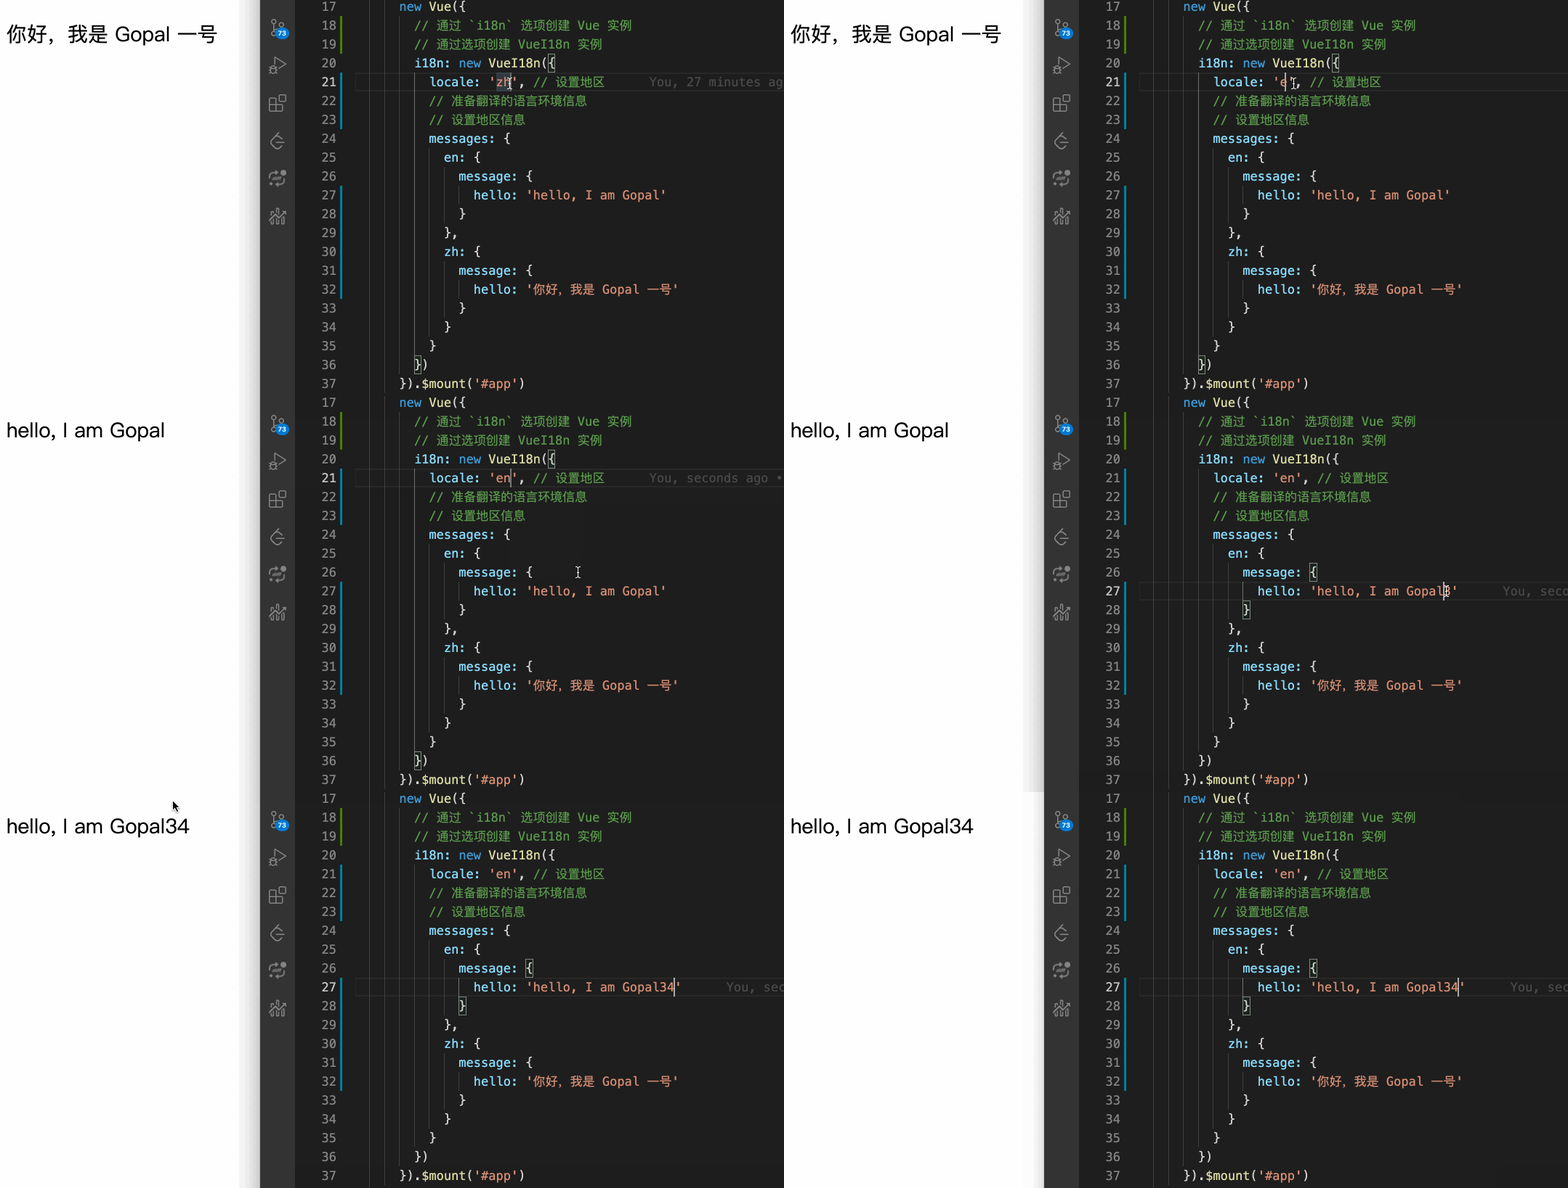
我们发现,在 demo 中,我无论是修改了 locale 还是 message 的值,页面都不会刷新,但页面也是会更新数据。这个功能类似 Vue 的双向数据绑定,它是如何实现的呢?

这里 Vue-i18n 采用了观察者模式,我们上面提到过的 _initVM 方法中,我们会将翻译相关的数据 data 通过 new Vue 传递给 this._vm 实例。现在要做的就是去监听这些 data 的变化
Vue-i18n 的这一块的逻辑主要是在 mixin.js 文件中,在 beforeCreate 中调用 watchI18nData 方法,这个方法的实现如下:
// 为了监听翻译变量的变化
watchI18nData (): Function {
  const self = this
  // 使用 vue 实例中的 $watch 方法,数据变化的时候,强制刷新
  // 组件的 data 选项是一个函数。Vue 在创建新组件实例的过程中调用此函数。它应该返回一个对象,然后 Vue 会通过响应性系统将其包裹起来,并以 $data 的形式存储在组件实例中
  return this._vm.$watch('$data', () => {
    self._dataListeners.forEach(e => {
      Vue.nextTick(() => {
        e && e.$forceUpdate()
      })
    })
  }, { deep: true })
}
其中 _dataListeners,我理解是一个个的实例(但我没想到具体的场景,在系统中使用 vue-18n new 多个实例?)。subscribeDataChanging 和 unsubscribeDataChanging 就是用来添加和移除订阅器的函数
// 添加订阅器,添加使用的实例
subscribeDataChanging (vm: any): void {
  this._dataListeners.add(vm)
}

// 移除订阅器
unsubscribeDataChanging (vm: any): void {
  remove(this._dataListeners, vm)
}
它们会在 mixin.js 中的 beforeMount 和 beforeDestroy 中调用
// 精简后的代码
// 在保证了_i18n 对象生成之后,beforeMount 和 beforeDestroy 里就能增加移除监听了
beforeMount (): void {
  const options: any = this.$options
  options.i18n = options.i18n || (options.__i18n ? {} : null)

  this._i18n.subscribeDataChanging(this)
},


  beforeDestroy (): void {
    if (!this._i18n) { return }
    const self = this
    this.$nextTick(() => {
      if (self._subscribing) {
        // 组件销毁的时候,去除这个实例
        self._i18n.unsubscribeDataChanging(self)
        delete self._subscribing
      }
    })
}
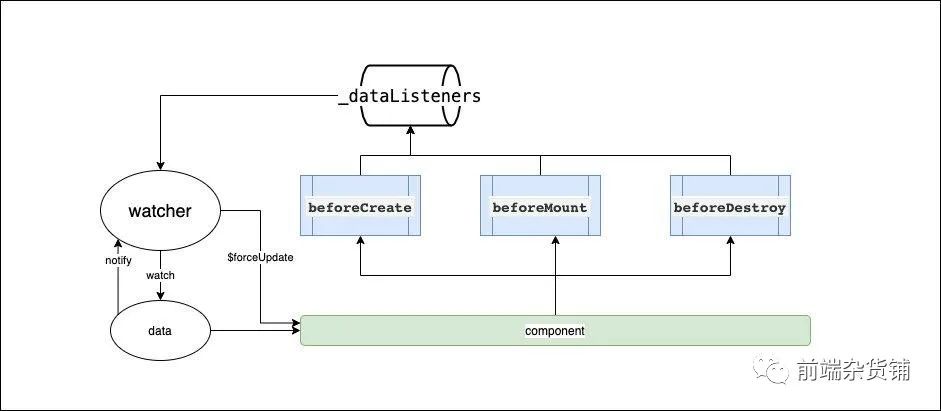
总结一下,在 beforeCreate 会去 watch data 的变化,并在 beforeMount 中添加订阅器。假如 data 变化,就会强制更新相应的实例更新组件。并在 beforeDestroy 中移除订阅器,防止内存溢出,整体流程如下图所示
全局自定义指令以及全局组件的实现
在 extent.js 中,我们提到了注册全局指令和全局组件,我们来看下如何实现的
// 全局指令
Vue.directive('t', { bind, update, unbind })
// 全局组件
Vue.component(interpolationComponent.name, interpolationComponent)
Vue.component(numberComponent.name, numberComponent)
全局指令 t
关于指令 t 的使用方法,详情参考官方文档
以下是示例:
<!-- 字符串语法:字面量 -->
<p v-t="'foo.bar'"></p>

<!-- 字符串语法:通过数据或计算属性绑定 -->
<p v-t="msg"></p>

<!-- 对象语法: 字面量 -->
<p v-t="{ path: 'hi', locale: 'ja', args: { name: 'kazupon' } }"></p>

<!-- 对象语法: 通过数据或计算属性绑定 -->
<p v-t="{ path: greeting, args: { name: fullName } }"></p>

<!-- `preserve` 修饰符 -->
<p v-t.preserve="'foo.bar'"></p>
在 directive.js 中,我们看到实际上是调用了 t 方法和 tc 方法,并给 textContent 方法赋值。(textContent 属性表示一个节点及其后代的文本内容。)
// 主要是调用了 t 方法和 tc 方法
if (choice != null) {
  el._vt = el.textContent = vm.$i18n.tc(path, choice, ...makeParams(locale, args))
} else {
  el._vt = el.textContent = vm.$i18n.t(path, ...makeParams(locale, args))
}
在 unbind 的时候会清空 textContent
全局组件 i18n
i18n 函数式组件 使用如下:
<div id="app">
  <!-- ... -->
  <i18n path="term" tag="label" for="tos">
    <a :href="url" target="_blank">{{ $t('tos') }}</a>
  </i18n>
  <!-- ... -->
</div>
其源码实现 src/components/interpolation.js,其中 tag 表示外层标签。传 false, 则表示不需要外层。
export default {
  name: 'i18n',
  functional: true,
  props: {
    // 外层标签。传 false,则表示不需要外层
    tag: {
      type: [String, Boolean, Object],
      default: 'span'
    },
    path: {
      type: String,
      required: true
    },
    locale: {
      type: String
    },
    places: {
      type: [Array, Object]
    }
  },
  render (h: Function, { data, parent, props, slots }: Object) {
    const { $i18n } = parent

    const { path, locale, places } = props
    // 通过插槽的方式实现
    const params = slots()
    // 获取到子元素 children 列表
    const children = $i18n.i(
      path,
      locale,
      onlyHasDefaultPlace(params) || places
        ? useLegacyPlaces(params.default, places)
        : params
    )

    const tag = (!!props.tag && props.tag !== true) || props.tag === false ? props.tag : 'span'
    // 是否需要外层标签进行渲染
    return tag ? h(tag, data, children) : children
  }
}
注意的是:places 语法会在下个版本进行废弃了
function useLegacyPlaces (children, places) {
  const params = places ? createParamsFromPlaces(places) : {}

  if (!children) { return params }

  // Filter empty text nodes
  children = children.filter(child => {
    return child.tag || child.text.trim() !== ''
  })

  const everyPlace = children.every(vnodeHasPlaceAttribute)
  if (process.env.NODE_ENV !== 'production' && everyPlace) {
    warn('`place` attribute is deprecated in next major version. Please switch to Vue slots.')
  }

  return children.reduce(
    everyPlace ? assignChildPlace : assignChildIndex,
    params
  )
}
总结
总体 Vue-i18n 代码不复杂,但也花了自己挺多时间,算是一个小挑战。从 Vue-i18n 中,我学习到了
- 国际化翻译 Vue-i18n 的架构组织和 $t 的原理,当遇到插值对象的时候,需要进行 parse 和 compile
- Vue-i18n 通过转义字符避免 XSS
- 通过观察者模式对数据进行监听和更新,做到无刷新更新页面
- 全局自定义指令和全局组件的实现
参考
- https://zhuanlan.zhihu.com/p/110112552
- https://hellogithub2014.github.io/2018/07/17/vue-i18n-source-code/
