一名 Vue 程序员总结的 React 基础
一、生命周期
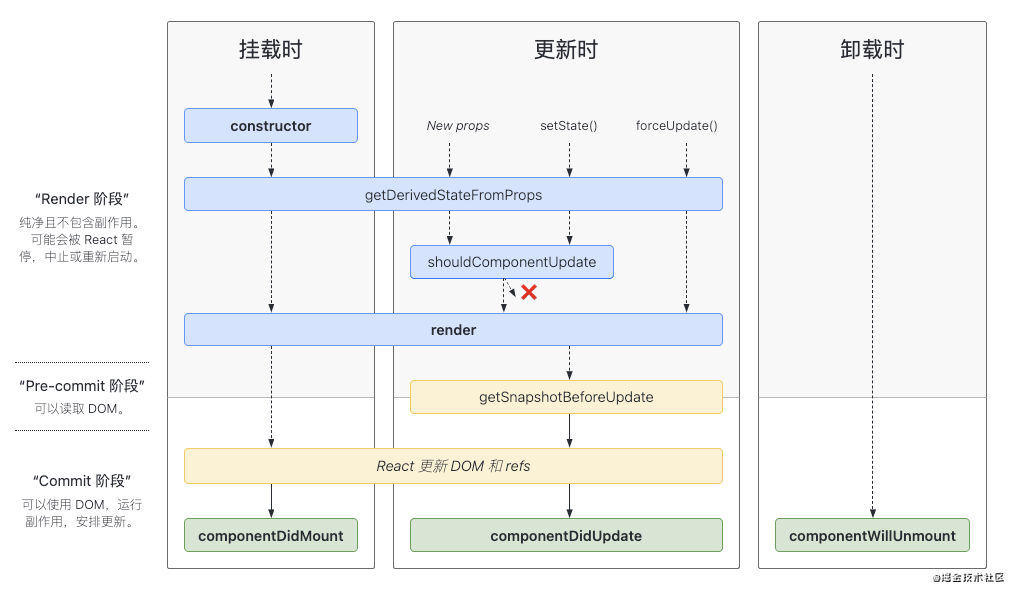
React 生命周期图解[1]
我已经把这张图印在脑子里面了,没事就自己画画,中间发散一些自己的思考。u1s1,不知道 react 的生命周期命名为什么要怎么长~~~, 小程序,vue 的都比较短。毕竟使用的频率还是很高的,Hooks 除外。

1、constructor
constructor 是类通用的构造函数,常用于初始化,算是生命周期的一环。React 后来的版本中类组件也可以不写。
注意:在构造函数中使用时,super 关键字将单独出现,并且必须在使用 this 关键字之前使用。super 关键字也可以用来调用父对象上的函数。MDN 说明[2]
class JJTest extends React.Component {
  // constructor 写法
  constructor(props) {
    super(props);
    this.state = {
      count: 0,
    };
    this.handleClick = this.handleClick.bind(this);
  }
  // 直接声明
  state = {
    count: 0,
  };
}
2、getDerivedStateFromProps
触发时机:state 变化、props 变化、forceUpdate,如上图。
这是一个静态方法, 是一个和组件自身"不相关"的角色. 在这个静态方法中, 除了两个默认的位置参数 nextProps 和 currentState 以外, 你无法访问任何组件上的数据。
// 初始化/更新时调用
static getDerivedStateFromProps(nextProps, currentState) {
  console.log(nextProps, currentState, "getDerivedStateFromProps方法执行");
  // 返回值是对currentState进行修改
  return {
    fatherText: nextProps.text,
  };
}
3、render
render 函数返回的 JSX 结构,用于描述具体的渲染内容, render 被调用时,它会检查 this.props 和 this.state 的变化并返回以下类型之一:
-
React 元素。通常通过 JSX 创建。例如,会被 React 渲染为 DOM 节点, 会被 React 渲染为自定义组件,无论是
还是 均为 React 元素。
-
数组或 fragments。使得 render 方法可以返回多个元素。欲了解更多详细信息,请参阅 fragments 文档。 -
Portals。可以渲染子节点到不同的 DOM 子树中。欲了解更多详细信息,请参阅有关 portals 的文档 -
字符串或数值类型。它们在 DOM 中会被渲染为文本节点 -
布尔类型或 null。什么都不渲染。(主要用于支持返回 test && 的模式,其中 test 为布尔类型。)
注意:如果 shouldComponentUpdate() 返回 false,则不会调用 render()。
Hooks 不需要写 render 函数。要注意的一点是,即使 Hooks 不需要写 render, 没有用到 React.xxx,组件内还是要import React from "react";的(至于原因,后续深入 Hooks 学一下,大哥们也可以解释下)。React 官方也说了,后续的版本会优化掉这一点。
4、componentDidMount
主要用于组件加载完成时做某些操作,比如发起网络请求或者绑定事件。当做 vue 的 mounted 用就行了,这里需要注意的是:
componentDidMount() 里直接调用 setState()。它将触发额外渲染,也就是两次 render,不过问题不大,主要还是理解。
5、shouldComponentUpdate
该方法通过返回 true 或者 false 来确定是否需要触发新的渲染。因为渲染触发最后一道关卡,所以也是性能优化的必争之地。通过添加判断条件来阻止不必要的渲染。注意:首次渲染或使用 forceUpdate() 时不会调用该方法。
React 官方提供了一个通用的优化方案,也就是 PureComponent。PureComponent 的核心原理就是默认实现了 shouldComponentUpdate 函数,在这个函数中对 props 和 state 进行浅比较,用来判断是否触发更新。
当然 PureComponent 也是有缺点的,使用的时候一定要注意:由于进行的是浅比较,可能由于深层的数据不一致导致而产生错误的否定判断,从而导致页 面得不到更新。不适合使用在含有多层嵌套对象的 state 和 prop 中。
shouldComponentUpdate(nextProps, nextState) {
  // 浅比较仅比较值与引用,并不会对 Object 中的每一项值进行比较
  if (shadowEqual(nextProps, this.props) || shadowEqual(nextState, this.state) ) {
    return true
  }
  return false
}
6、getSnapshotBeforeUpdate
在 DOM 更新前被调用,返回值将作为 componentDidUpdate 的第三个参数。
getSnapshotBeforeUpdate(prevProps, prevState) {
    console.log("getSnapshotBeforeUpdate方法执行");

    return "componentDidUpdated的第三个参数";
}
7、componentDidUpdate
首次渲染不会执行此方法。可以使用 setState,会触发重渲染,但一定要小心使用,避免死循环
 componentDidUpdate(preProps, preState, valueFromSnapshot) {
    console.log("componentDidUpdate方法执行");

    console.log("从 getSnapshotBeforeUpdate 获取到的值是", valueFromSnapshot);
  }
8、componentWillUnmount
主要用于一些事件的解绑,资源清理等,比如取消定时器,取消订阅事件
小结
生命周期一定要好好理解,一定要动手写,看一下每种情况下,生命周期的执行结果。上述代码中在React-TypeScript 仓库[3]中都有,可以 clone 下来跑跑看,或者直接访问俊劫学习系统 LifeCycle[4]。还有些其他的生命周期,componentDidCatch, UNSAFE_componentWillMount()等等,简单了解下就行。
二、JSX
1、循环列表
jsx 中一般用 map 来渲染列表循环类的,vue 中直接在 template 中写 v-for 即可
{
  list.map((item, index) => {
    return <AppCard key={index} title={item.title} onClick={item.onClick} />;
  });
}
2、样式
(1)className
单独写一个 class 是可以的,动态拼接需要借助 classnames[5] 库
import style from './style.css'

<div className={style.class1 style.class2}</div>
(2)style
需要注意的:两个括号(样式被当做一个对象来解析),类似-连接的样式属性需要转换成小驼峰写法。
<div style={{ marginTop: 8 }}>样式</div>
(3)css 隔离
u1s1,css 隔离这块还是 vue 的 scoped 好用
- css-module
create-react-app 中内置了使用 CSS Modules 的配置,和 vue 的 scoped 原理相似,都是在生成的 class 后面加了 hash 值
// style.module.css
.text {
    color: blue
}
// app.tsx
import s from "./style.module.css";
class App extends Component {
  render() {
    return <div className={s.text}>css-module text</div>;
  }
}
// 编译后
.text_3FI3s6uz {
    color: blue;
}- styled-components
目前社区里最受欢迎的一款 CSS in JS 方案,个人感觉有点别扭,不太喜欢
//引入styled-components
import styled from "styled-components";

//修改了div的样式
const Title = styled.div`
  font-size: 30px;
  color: red;
`;
class App extends Component {
  render() {
    return (
      <>
        <Title>CSS in JS 方案</Title>
      </>
    );
  }
}
3、一个 JSX
刚开始从 vue 转过来会有些不适应(话说有多少人直接在 vue 里面写 JSX 的),之前用的都是 Vue Sfc 写法,当然多写写就熟悉了。至于 React 采用 JSX 的优劣势,评论区各抒己见哈。
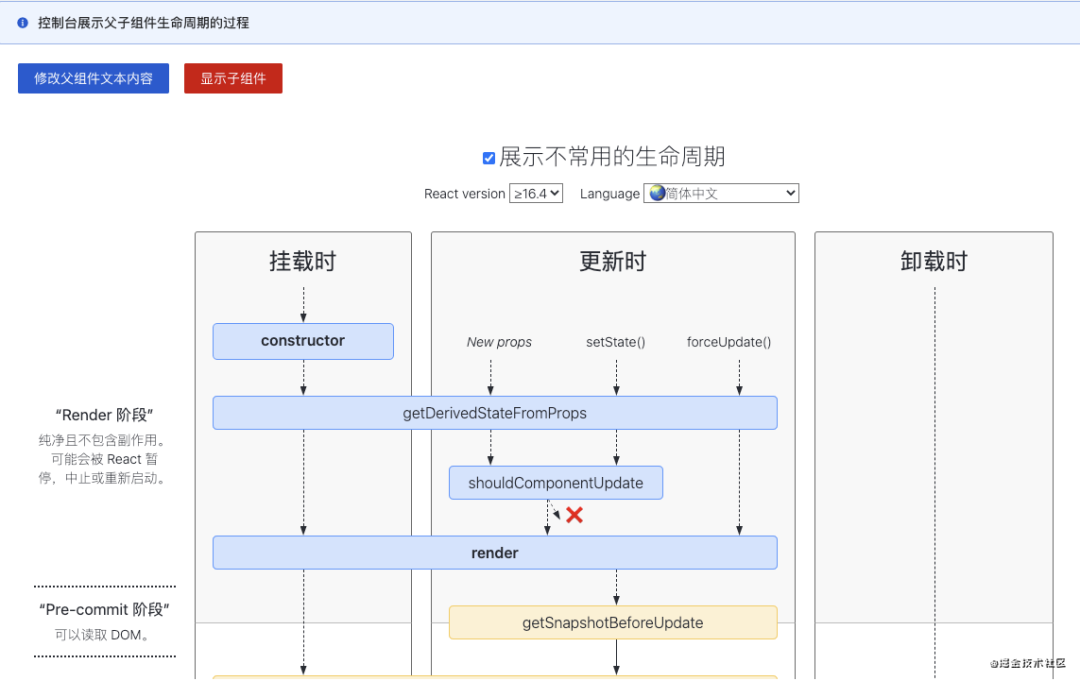
代码对应页面预览[6]

render() {
    return (
      <>
        <Alert title="控制台展示父子组件生命周期的过程" />
        <div className="fatherContainer">
          <Button onClick={this.changeText} type="primary">
            修改父组件文本内容
          </Button>
          <Button onClick={this.hideChild} type="danger">
            {this.state.hideChild ? "显示" : "隐藏"}子组件
          </Button>
          {this.state.hideChild ? null : (
            <LifeCycle text={this.state.text} count={1} />
          )}
        </div>
        <div>
          <BlockLoading loading={this.state.loading} iconSize={64} />
          <iframe
            src={this.state.lifeCycle}
            title="navigation"
            width="100%"
            height="600px"
            onLoad={this.onLoading}
            onError={this.onLoading}
          ></iframe>
        </div>
      </>
    );
  }
三、基础组件
组件这块,个人感觉和 vue 差别还是比较大的,颗粒度更细致,当然也增加了一定难度。这里就简单例举一个TS版本的,带 Icon 的标题组件
import cn from "classnames";
import React from "react";
import "./style/index.less";
import { Icon,IIconProps } from "zent";

interface IProps {
  title: string;
  iconType?: IIconProps['type'];
  isShowIcon?: boolean;
  iconClassName?: string;
  titleClassName?: string;
}

export const ContentTitle: React.FC<IProps> = (props) => {
  const { title, iconType = 'youzan', isShowIcon = false , iconClassName, titleClassName, ...popProps } = props;

  return (
    <div className={cn("content-title", titleClassName)}>
      {title}
      {isShowIcon && <Icon
        className={cn("content-title__icon", iconClassName)}
        {...popProps}
        type={iconType}
      />}
    </div>
  );
};

export default ContentTitle;
四、高阶组件 HOC
1、含义
和 vue mixins 相同,都是为了解决代码复用的问题,但 react 中已经废弃 mixins,vue 中也不推荐使用。主要是会带来命名冲突,相互依赖,不方便维护等一些缺点。
高阶组件其实就是处理 react 组件的函数,简单理解就是和 ES6 中提供的 export/import 作用相似,不同点在于:高阶组件会进行加工后再导出你需要的东西。类似于方程式:y = ax + b, x 是入口(组件),会根据 a 和 b 进行计算,得到最终的 y(处理后的组件) 给到你用。
2、Demo
官网的实现 Demo: 高阶组件[7]
一个简单的高阶组件(实现有两种方式:属性代理和反向继承):
// 属性代理: 组件属性的一些修改
const JJHOC = (WrappedComponent) => {
  return class NewComponent extends React.Component {
    render() {
      const newProps = { type: "HOC" };
      return <WrappedComponent {...this.props} {...newProps} />;
    }
  };
};
// 反向继承: 在render() 方法中返回 super.render() 方法
const JJHOC = (WrappedComponent) => {
  return class NewComponent extends WrappedComponent {
    render() {
      return super.render();
    }
  };
};
3、常用 HOC
- react-router withRouter: 可获取 history,一些路由信息
- redux connect 连接 React 组件与 Redux store,给组件挂载 dispatch 方法。
五、组件通信
1、props
和 vue 不同的是,react props 传值可以直接写,不需要声明。在 props 上挂载 function,就相当于是 vue 的$emit。同样需要注意的是子组件不可以修改 props 的值
import React from "react";

function Child(props) {
  const sendMsg = (msg) => {
    props.onClick("子组件的消息");
  };
  return (
    <div>
      <div>子组件标题:{props.title}</div>
      <button onClick={() => sendMsg("子组件消息")}> 子传父 </button>
    </div>
  );
}

function Father() {
  const onClick = (msg) => {
    console.log(`父组件接收:${msg}`);
  };
  return (
    <div>
      <Child title="组件props传值测试" onClick={onClick}></Child>
    </div>
  );
}

export default Father;
2、context
React Context 官网说明[8],跨组件传值。创建了一个上下文,同 context 内的组件都可以 通过 Provider 配合 value 使用数据
import * as React from "react";
import { Button } from "zent";
// Context 可以让我们无须明确地传遍每一个组件,就能将值深入传递进组件树。
// 为当前的 theme 创建一个 context(“primary”为默认值)。
const ThemeContext = React.createContext("primary");
export default class App extends React.Component {
  render() {
    // 使用一个 Provider 来将当前的 theme 传递给以下的组件树。
    // 无论多深,任何组件都能读取这个值。
    // 在这个例子中,我们将 danger 作为当前的值传递下去。
    return (
      <ThemeContext.Provider value="danger">
        <Toolbar />
      </ThemeContext.Provider>
    );
  }
}

// 中间的组件再也不必指明往下传递 theme 了。
function Toolbar() {
  return (
    <div>
      <ThemedButton />
    </div>
  );
}

class ThemedButton extends React.Component {
  // 指定 contextType 读取当前的 theme context。
  // React 会往上找到最近的 theme Provider,然后使用它的值。
  // 在这个例子中,当前的 theme 值为 “danger”。
  static contextType = ThemeContext;
  render() {
    return <Button type={this.context}>context测试</Button>;
  }
}
3、Redux
Redux 中文文档[9]
redux 的三大核心:
- action:action 可以说是一个动作,用来描述将要触发的事件。
- state:单一数据源,用来存储我们的数据。
- reducer:通过触发的 action 事件来改变 state 的值。
不一定非要用,很多项目 context 就已经够用了
(1)挂载
使用 createStore 创建一个 store 并通过 Provider 把它放到容器组件中
// index.js
const store = createStore(appReducer);

ReactDOM.render(
  <Provider store={store}>
    <App />
  </Provider>,
  document.getElementById("root");
);
(2)创建修改的方法
和 vuex 相似,都是通过 action 来修改数据
// action.js
export const addConst = (payload) => {
  type: "ADD_CONST",
}

export const minusConst = (payload) => {
 type: "MINUS_CONST",
}
(3)创建一个 store 集合
当 dispatch 触发相应的方法,执行对应的操作,修改 store 数据。
// appReducer.js
const initialState = { count: 0 };
const reducer = (state = initialState, action) => {
  switch (action.type) {
    case "ADD_CONST":
      return { count: count + 1 };
    case "MINUS_CONST":
      return { count: count - 1 };
    default:
      return state;
  }
};
export default reducer;
(4)组件中 redux 使用姿势
import React from "react";
import { connect } from "react-redux";

const ReduxDemo: React.FC = (props) => {
  const addCount = () => {
    const { dispatch } = props;
    dispatch({
      type: "ADD_CONST",
    });
  };

  const minusCount = () => {
    const { dispatch } = props;
    dispatch({
      type: "MINUS_CONST",
    });
  };
  return (
    <div>
      <button onClick={addCount}>加</button>
      <button onClick={minusCount}>减</button>
      <div>{props.state}</div>
    </div>
  );
};

const mapStateToProps = (state) => {
  return {
    count: state.count,
  };
};
export default connect(mapStateToProps)(ReduxDemo);
六、组件校验
React 官网 使用 PropTypes 进行类型检查[10] react props 不是必须声明的,但是如果项目规范起来,就需要在 propTypes 中声明 props 类型,注意需要引入prop-types库
不过现在更多的是通过 typescript 来校验类型了,开发阶段就能发现问题。
import * as React from "react";
import PropTypes from "prop-types";

interface IProps {
  name: string;
}

const PropsDemo: React.FC<IProps> = ({ name }) => {
  return <h1>Hello, {name}</h1>;
};

PropsDemo.propTypes = {
  name: PropTypes.string,
};
七、React Router
- React Router 官网[11] 英文版
- React Router 中文文档[12] 感觉写的不是很清楚
1、注意
- react-router: 实现了路由的核心功能, react-router 3.x 版本还包括操作 dom 的方法,4.x 以上就没有了。
- react-router-dom: 基于 react-router,加入了在浏览器运行环境下的一些功能,例如:Link 组件,会渲染一个 a 标签,Link 组件源码 a 标签行; BrowserRouter 和 HashRouter 组件,前者使用 pushState 和 popState 事件构建路由,后者使用 window.location.hash 和 hashchange 事件构建路由。
- react-router-native: 基于 react-router,类似 react-router-dom,加入了 react-native 运行环境下的一些功能
2、一个 Demo
import React, { Component } from "react";
import Admin from "./pages/admin/admin";
import Login from "./pages/login/Login";
import { HashRouter, Route, Switch } from "react-router-dom";
class App extends Component {
  render() {
    return (
      <HashRouter>
        <Switch>
          <Route path="/" component={Admin}></Route>
          <Route path="/login" component={Login}></Route>
        </Switch>
      </HashRouter>
    );
  }
}

export default App;
3、路由传参
(1)params
// router
<Route path='/path/:id' component={Path}/>
// 传参
<link to="/path/789">xxx</Link>
this.props.history.push({pathname:`/path/${id}`});
// 获取
this.props.match.params.id
(2)query
// router
<Route path='/query' component={Query}/>
// 传参
<Link to={{ path : '/query' , query : { id : '789' }}}>xxx</Link>

this.props.history.push({pathname:"/query",query: { id : '789' }});
// 获取
this.props.location.query.id
(3)Hooks
// 跳转
let history = useHistory();
history.push("/");

// 获取
useLocation();
useParams();
useRouteMatch();
4、exact 属性
exact 是 Route 下的一条属性,一般而言,react 路由会匹配所有匹配到的路由组价,exact 能够使得路由的匹配更严格一些。
exact 的值为 bool 型,为 true 是表示严格匹配,为 false 时为正常匹配。
如在 exact 为 true 时,’/link’与’/’是不匹配的,但是在 false 的情况下它们又是匹配的。<Route path="/home" component={Home} exact></Route>
八、总结
学完生命周期,多练习 JSX,配合 React Router 和 Redux 多写写组件,基本就能上手开发了。没有过多的 API 需要学习,写起来也比较自由。React 虽然生态强大,选着性比较多,但是这样产生了一个问题:什么是 React 的最佳实践?
参考资料
[1]React 生命周期图解: https://projects.wojtekmaj.pl/react-lifecycle-methods-diagram/
[2]MDN 说明: https://developer.mozilla.org/zh-CN/docs/Web/JavaScript/Reference/Operators/super#%E6%8F%8F%E8%BF%B0
[3]React-TypeScript 仓库: https://github.com/alexwjj/React-TypeScript
[4]俊劫学习系统 LifeCycle: https://alexwjj.github.io/study/#/demo
[5]classnames: https://github.com/JedWatson/classnames
[6]代码对应页面预览: https://alexwjj.github.io/study/#/demo
[7]高阶组件: https://zh-hans.reactjs.org/docs/higher-order-components.html
[8]React Context 官网说明: https://zh-hans.reactjs.org/docs/context.html
[9]Redux 中文文档: http://cn.redux.js.org/
[10]React 官网 使用 PropTypes 进行类型检查: https://zh-hans.reactjs.org/docs/typechecking-with-proptypes.html
[11]React Router 官网: https://reactrouter.com/web/guides/quick-start
[12]React Router 中文文档: http://react-guide.github.io/react-router-cn/