CSS实现一个让面试官眼前一亮的故障风格文字动画
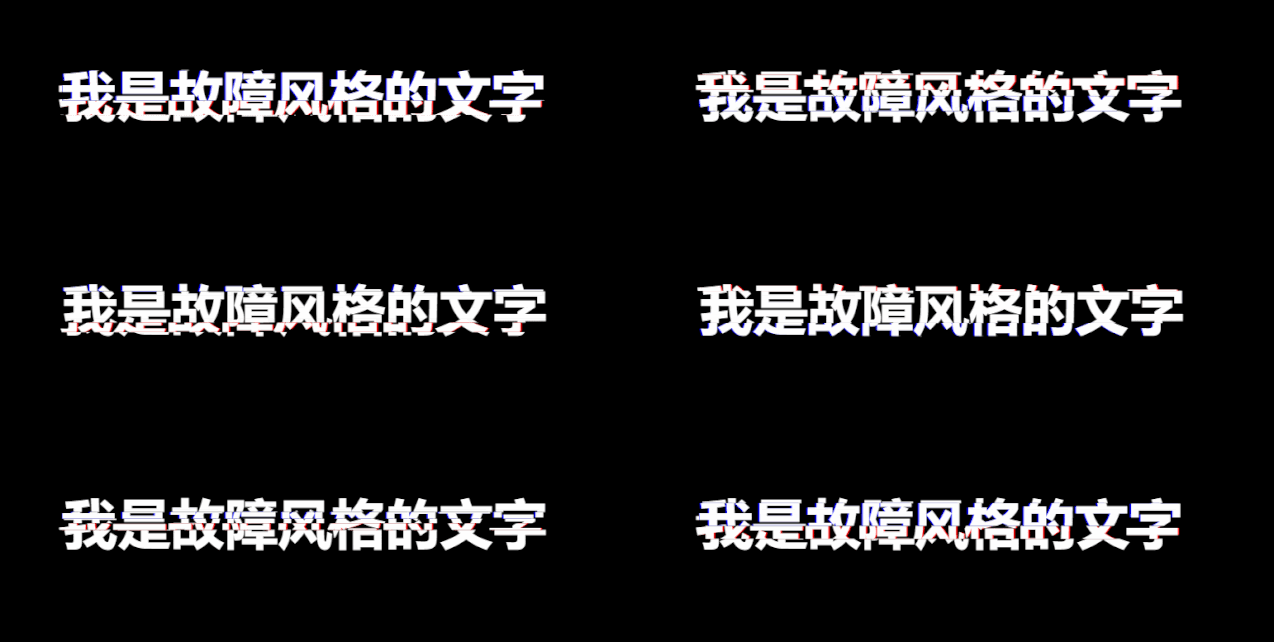
今天分享一个用 css3 来实现一个最近特别流行的故障风格的文字展示动画,我敢说,只要你在你的项目中用到这个动画,面试官看到了一定会眼前一亮。下面先来看一下成品图

该动画效果就比较复杂了,用到的知识比较多,例如 「css伪元素 、元素自定义属性 、蒙版属性 、animation动画等等」
标签元素部分
<body>
    <div class="txt" data-text="我是故障风格的文字">
        我是故障风格的文字
    </div>
</body>
这里我们使用了自定义属性,即 「data-」 加上我们自定义的属性名,我们将我们的文字内容作为该属性的值,方便之后伪元素获取到对应的文字
「@keyframes部分」
@keyframes animation-before{
    0% {
        clip-path: inset(0 0 0 0);
    }

    5% {
        clip-path: inset(.8em 0 .4em 0);
    }

    10% {
        clip-path: inset(.4em 0 .8em 0);
    }

    15% {
        clip-path: inset(.1em 0 1em 0);
    }

    20% {
        clip-path: inset(.3em 0 .6em 0);
    }

    25% {
        clip-path: inset(.6em 0 .3em 0);
    }

    30% {
        clip-path: inset(.8em 0 .5em 0);
    }

    35% {
        clip-path: inset(1em 0 .1em 0);
    }

    40% {
        clip-path: inset(.7em 0 .35em 0);
    }

    45% {
        clip-path: inset(.5em 0 .2em 0);
    }

    50% {
        clip-path: inset(.2em 0 .5em 0);
    }

    55% {
        clip-path: inset(.35em 0 .7em 0);
    }

    60% {
        clip-path: inset(.1em 0 .9em 0);
    }

    65% {
        clip-path: inset(.8em 0 .46em 0);
    }

    70% {
        clip-path: inset(.66em 0 .33em 0);
    }

    75% {
        clip-path: inset(.48em 0 .23em 0);
    }

    80% {
        clip-path: inset(.23em 0 .48em 0);
    }

    85% {
        clip-path: inset(.39em 0 .79em 0);
    }

    90% {
        clip-path: inset(.33em 0 .66em 0);
    }

    95% {
        clip-path: inset(1em 0 .3em 0);
    }

    100% {
        clip-path: inset(.62em 0 .29em 0);
    }
}
@keyframes animation-after{
    0% {
        clip-path: inset(0 0 0 0);
    }

    5% {
        clip-path: inset(.4em 0 .8em 0);
    }

    10% {
        clip-path: inset(.8em 0 .4em 0);
    }

    15% {
        clip-path: inset(1em 0 .1em 0);
    }

    20% {
        clip-path: inset(.6em 0 .3em 0);
    }

    25% {
        clip-path: inset(.3em 0 .6em 0);
    }

    30% {
        clip-path: inset(.5em 0 .8em 0);
    }

    35% {
        clip-path: inset(.1em 0 1em 0);
    }

    40% {
        clip-path: inset(.35em 0 .7em 0);
    }

    45% {
        clip-path: inset(.2em 0 .5em 0);
    }

    50% {
        clip-path: inset(.5em 0 .2em 0);
    }

    55% {
        clip-path: inset(.7em 0 .35em 0);
    }

    60% {
        clip-path: inset(.9em 0 .1em 0);
    }

    65% {
        clip-path: inset(.46em 0 .8em 0);
    }

    70% {
        clip-path: inset(.3em 0 .66em 0);
    }

    75% {
        clip-path: inset(.23em 0 .48em 0);
    }

    80% {
        clip-path: inset(.48em 0 .23em 0);
    }

    85% {
        clip-path: inset(.79em 0 .39em 0);
    }

    90% {
        clip-path: inset(.66em 0 .33em 0);
    }

    95% {
        clip-path: inset(.3em 0 1em 0);
    }

    100% {
        clip-path: inset(.29em 0 .62em 0);
    }
}
这里我们设置了两个keyframes,分别为 「animation-before」 、「animation-after」
想必已经很明显了,前者是准备给我们后面的伪元素 before 使用的 ;后者是给我们后面的伪元素 after 使用的
那么其中用到的 clip-path 是干什么用的呢?这个是css3的一个新属性,叫做「蒙版」,而其中的 inset() 值表示的是蒙版形状为矩形
我们来看一下它的用法
首先 inset() 接收四个长度参数,分别表示蒙版距离元素标签的「上侧」 、「右侧」 、「下侧」 、「左侧」的距离,从而决定了蒙版的大小
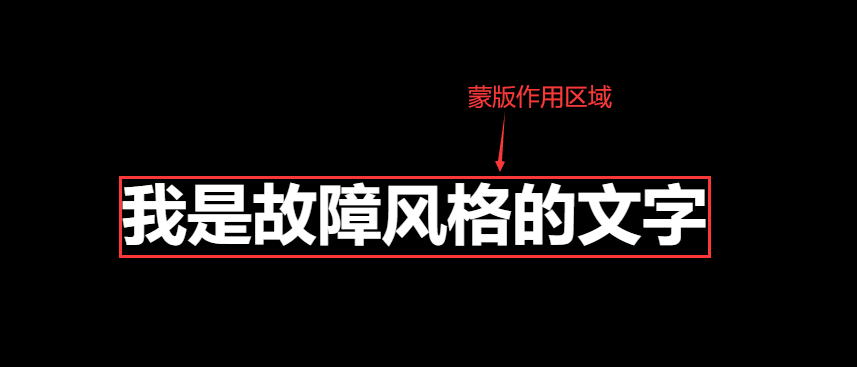
当我们设置为 inset(0 0 0 0)时,表示蒙版作用区域大小跟元素标签一样大,如下图所示(红色边框表示蒙版的作用区域)
图片
此时我们的文字是可以完全展示出来的,因为蒙版的作用区域就是我们标签元素的大小
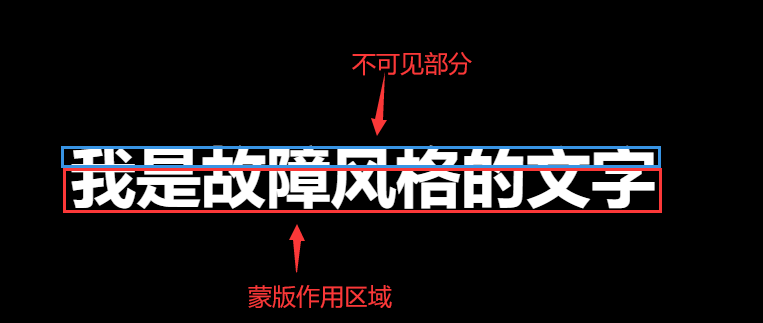
然后我们再来看一下,如果我们的设置为 inset(30px 0 0 0) ,则测试表示,蒙版的作用区域距离标签元素的上侧 30px,距离其它的边 0px,如图所示

图中蓝色边框的部分不是蒙版的作用区域,因此我们无法看到该区域的内容,真实情况如下图所示

在了解了蒙版的使用情况了以后,我们就通过 @keyframes 来设置逐帧动画,使蒙版的作用区域在垂直方向一直变化,实现上下抖动的效果,代码就如上所述
具体样式
body{
    height: 100vh;
    display: flex;
    justify-content: center;
    align-items: center;
    background: black;
}
.txt{
    display: inline-block;
    font-size: 65px;
    font-weight: 600;
    padding: 0 4px;
    color: white;
    position: relative;
}
.txt::before{
    /* 获取文本 */
    content: attr(data-text);
    position: absolute;
    /* 向左侧移2px */
    left: -2px;
    width: 100%;
    /* 将背景色设为与主背景同样的颜色,用于遮挡我们的标签元素 */
    background: black;
    /* 给before伪元素的文本添加左侧2px大小的红色文字阴影 */
    text-shadow:2px 0 red;
    /* 应用蒙版垂直变化动画,并一直循环 */
    animation: animation-before 3s infinite linear alternate-reverse;
}
.txt::after{
    /* 获取文本 */
    content: attr(data-text);
    position: absolute;
    /* 向左侧移2px */
    left: 2px;
    width: 100%;
    /* 将背景色设为与主背景同样的颜色,用于遮挡我们的标签元素 */
    background: black;
    /* 给before伪元素的文本添加右侧2px大小的蓝色文字阴影 */
    text-shadow: -2px 0 blue;
    /* 应用蒙版垂直变化动画,并一直循环 */
    animation: animation-after 3s infinite linear alternate-reverse;
}
这里,我们设置了两个伪元素 before 和 after,分别定位到跟父元素同样的位置,然后分别向左、右侧移一点点的距离,制作一个错位的效果,然后都将背景色设置为与父元素背景色一样的颜色,用于遮挡父元素。
然后设置了蒙版垂直变化动画以后,被蒙版遮挡的部分虽然看不到了,但是会露出下面一层的父元素内容,这样就可以实现了一个完美的故障风格的文字展示动画了。
