学习 redux 源码整体架构,深入理解 redux 及其中间件原理
1 . 前言
阅读本文你将学到:
git subtree管理子仓库- 如何学习
redux源码redux中间件原理redux各个API的实现vuex和redux的对比- 等等
1.1 本文阅读最佳方式
把我的redux源码仓库 git clone https://github.com/lxchuan12/redux-analysis.git克隆下来,顺便star一下我的redux源码学习仓库^_^。跟着文章节奏调试和示例代码调试,用chrome动手调试印象更加深刻。文章长段代码不用细看,可以调试时再细看。看这类源码文章百遍,可能不如自己多调试几遍。也欢迎加我微信交流ruochuan12。
2 . git subtree 管理子仓库
写了很多源码文章,vuex、axios、koa等都是使用新的仓库克隆一份源码在自己仓库中。虽然电脑可以拉取最新代码,看到原作者的git信息。但上传到github后。读者却看不到原仓库作者的git信息了。于是我找到了git submodules 方案,但并不是很适合。再后来发现了git subtree。
简单说下 npm package和git subtree的区别。npm package是单向的。git subtree则是双向的。
具体可以查看这篇文章@德来(原有赞大佬):用 Git Subtree 在多个 Git 项目间双向同步子项目,附简明使用手册
学会了git subtree后,我新建了redux-analysis项目后,把redux源码4.x(截止至2020年06月13日,4.x分支最新版本是4.0.5,master分支是ts,文章中暂不想让一些不熟悉ts的读者看不懂)分支克隆到了我的项目里的一个子项目,得以保留git信息。
对应命令则是:
git subtree add --prefix=redux https://github.com/reduxjs/redux.git 4.x
3 . 调试 redux 源码准备工作
之前,我在知乎回答了一个问题若川:一年内的前端看不懂前端框架源码怎么办?推荐了一些资料,阅读量还不错,大家有兴趣可以看看。主要有四点:
1.借助调试 2.搜索查阅相关高赞文章 3.把不懂的地方记录下来,查阅相关文档 4.总结
看源码调试很重要,所以我的每篇源码文章都详细描述(也许有人看来是比较啰嗦...)如何调试源码。
断点调试要领: 赋值语句可以一步按
F10跳过,看返回值即可,后续详细再看。 函数执行需要断点按F11跟着看,也可以结合注释和上下文倒推这个函数做了什么。 有些不需要细看的,直接按F8走向下一个断点 刷新重新调试按F5
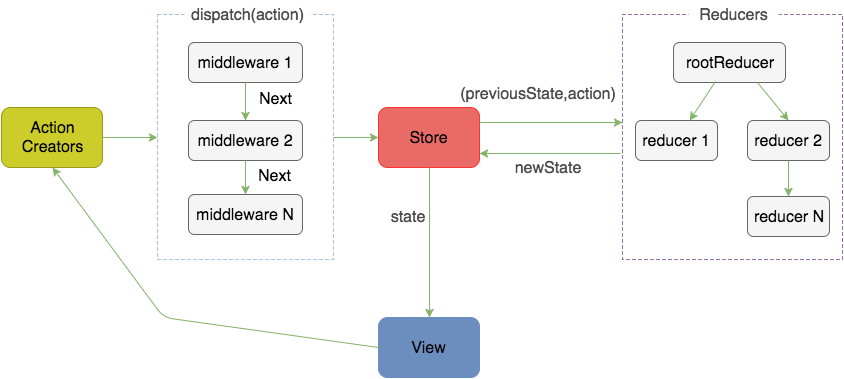
调试源码前,先简单看看 redux 的工作流程,有个大概印象。
3.1 rollup 生成 sourcemap 便于调试
修改rollup.config.js文件,output输出的配置生成sourcemap。
// redux/rollup.config.js 有些省略
const sourcemap = {
  sourcemap: true,
};

output: {
    // ...
    ...sourcemap,
}
安装依赖
git clone http://github.com/lxchuan12/redux-analysis.git
cd redux-analysi/redux
npm i
npm run build
# 编译结束后会生成 sourcemap .map格式的文件到 dist、es、lib 目录下。仔细看看redux/examples目录和redux/README。
这时我在根路径下,新建文件夹examples,把原生js写的计数器redux/examples/counter-vanilla/index.html,复制到examples/index.html。同时把打包后的包含sourcemap的redux/dist目录,复制到examples/dist目录。
修改index.html的script的redux.js文件为dist中的路径。
为了便于区分和调试后续
html文件,我把index.html重命名为index.1.redux.getState.dispatch.html。
# redux-analysis 根目录
# 安装启动服务的npm包
npm i -g http-server
cd examples
hs -p 5000就可以开心的调试啦。可以直接克隆我的项目git clone http://github.com/lxchuan12/redux-analysis.git。本地调试,动手实践,容易消化吸收。
4 . 通过调试计数器例子的学习 redux 源码
接着我们来看examples/index.1.redux.getState.dispatch.html文件。先看html部分。只是写了几个 button,比较简单。
<div>
    <p>
    Clicked: <span id="value">0</span> times
    <button id="increment">+</button>
    <button id="decrement">-</button>
    <button id="incrementIfOdd">Increment if odd</button>
    <button id="incrementAsync">Increment async</button>
    </p>
</div>js部分,也比较简单。声明了一个counter函数,传递给Redux.createStore(counter),得到结果store,而store是个对象。render方法渲染数字到页面。用store.subscribe(render)订阅的render方法。还有store.dispatch({type: 'INCREMENT' })方法,调用store.dispatch时会触发render方法。这样就实现了一个计数器。
function counter(state, action) {
    if (typeof state === 'undefined') {
        return 0
    }

    switch (action.type) {
        case 'INCREMENT':
        return state + 1
        case 'DECREMENT':
        return state - 1
        default:
        return state
    }
}

var store = Redux.createStore(counter)
var valueEl = document.getElementById('value')

function render() {
    valueEl.innerHTML = store.getState().toString()
}
render()
store.subscribe(render)

document.getElementById('increment')
.addEventListener('click', function () {
    store.dispatch({ type: 'INCREMENT' })
})

// 省略部分暂时无效代码...
思考:看了这段代码,你会在哪打断点来调试呢。
// 四处可以断点来看
// 1.
var store = Redux.createStore(counter)
// 2.
function render() {
valueEl.innerHTML = store.getState().toString()
}
render()
// 3.
store.subscribe(render)
// 4.
store.dispatch({ type: 'INCREMENT' })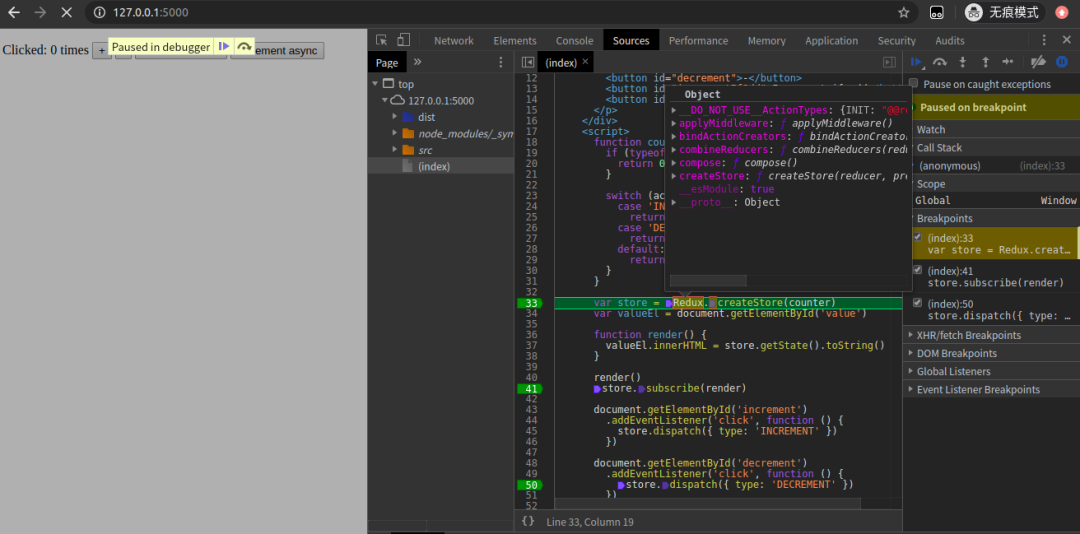
图中的右边Scope,有时需要关注下,会显示闭包、全局环境、当前环境等变量,还可以显示函数等具体代码位置,能帮助自己理解代码。
断点调试,按F5刷新页面后,按F8,把鼠标放在Redux和store上。
可以看到Redux上有好几个方法。分别是:
- __DO_NOT_USE__ActionTypes: {INIT: "@@redux/INITu.v.d.u.6.r", REPLACE: "@@redux/REPLACEg.u.u.7.c", PROBE_UNKNOWN_ACTION: ƒ}
- applyMiddleware: ƒ applyMiddleware() 函数是一个增强器,组合多个中间件,最终增强
store.dispatch函数,dispatch时,可以串联执行所有中间件。 - bindActionCreators: ƒ bindActionCreators(actionCreators, dispatch) 生成actions,主要用于其他库,比如
react-redux。 - combineReducers: ƒ combineReducers(reducers) 组合多个
reducers,返回一个总的reducer函数。 - compose: ƒ compose() 组合多个函数,从右到左,比如:compose(f, g, h) 最终得到这个结果 (...args) => f(g(h(...args))).
- createStore: ƒ createStore(reducer, preloadedState, enhancer) 生成
store对象
再看store也有几个方法。分别是:
- dispatch: ƒ dispatch(action) 派发动作,也就是把
subscribe收集的函数,依次遍历执行 - subscribe: ƒ subscribe(listener) 订阅收集函数存在数组中,等待触发
dispatch依次执行。返回一个取消订阅的函数,可以取消订阅监听。 - getState: ƒ getState() 获取存在
createStore函数内部闭包的对象。 - replaceReducer: ƒ replaceReducer(nextReducer) 主要用于
redux开发者工具,对比当前和上一次操作的异同。有点类似时间穿梭功能。 - Symbol(observable): ƒ observable()
也就是官方文档redux.org.js上的 API。
暂时不去深究每一个API的实现。重新按F5刷新页面,断点到var store = Redux.createStore(counter)。一直按F11,先走一遍主流程。
4.1 Redux.createSotre
createStore 函数结构是这样的,是不是看起来很简单,最终返回对象store,包含dispatch、subscribe、getState、replaceReducer等方法。
// 省略了若干代码
export default function createStore(reducer, preloadedState, enhancer) {
    // 省略参数校验和替换
    // 当前的 reducer 函数
    let currentReducer = reducer
    // 当前state
    let currentState = preloadedState
    // 当前的监听数组函数
    let currentListeners = []
    // 下一个监听数组函数
    let nextListeners = currentListeners
    // 是否正在dispatch中
    let isDispatching = false
    function ensureCanMutateNextListeners() {
        if (nextListeners === currentListeners) {
        nextListeners = currentListeners.slice()
        }
    }
    function getState() {
        return currentState
    }
    function subscribe(listener) {}
    function dispatch(action) {}
    function replaceReducer(nextReducer) {}
    function observable() {}
    // ActionTypes.INIT @@redux/INITu.v.d.u.6.r
    dispatch({ type: ActionTypes.INIT })
    return {
        dispatch,
        subscribe,
        getState,
        replaceReducer,
        [$$observable]: observable
    }
}
4.2 store.dispatch(action)
function dispatch(action) {
    // 判断action是否是对象,不是则报错
    if (!isPlainObject(action)) {
      throw new Error(
        'Actions must be plain objects. ' +
          'Use custom middleware for async actions.'
      )
    }
    // 判断action.type 是否存在,没有则报错
    if (typeof action.type === 'undefined') {
      throw new Error(
        'Actions may not have an undefined "type" property. ' +
          'Have you misspelled a constant?'
      )
    }
    // 不是则报错
    if (isDispatching) {
      throw new Error('Reducers may not dispatch actions.')
    }

    try {
      isDispatching = true
      currentState = currentReducer(currentState, action)
    } finally {
        // 调用完后置为 false
      isDispatching = false
    }
    //  把 收集的函数拿出来依次调用
    const listeners = (currentListeners = nextListeners)
    for (let i = 0; i < listeners.length; i++) {
      const listener = listeners[i]
      listener()
    }
    // 最终返回 action
    return action
  }
var store = Redux.createStore(counter)
上文调试完了这句。
继续按F11调试。
function render() {
    valueEl.innerHTML = store.getState().toString()
}
render()
4.3 store.getState()
getState函数实现比较简单。
function getState() {
    // 判断正在dispatch中,则报错
    if (isDispatching) {
        throw new Error(
        'You may not call store.getState() while the reducer is executing. ' +
            'The reducer has already received the state as an argument. ' +
            'Pass it down from the top reducer instead of reading it from the store.'
        )
    }
    // 返回当前的state
    return currentState
}
4.4 store.subscribe(listener)
订阅监听函数,存放在数组中,store.dispatch(action)时遍历执行。
function subscribe(listener) {
    // 订阅参数校验不是函数报错
    if (typeof listener !== 'function') {
      throw new Error('Expected the listener to be a function.')
    }
    // 正在dispatch中,报错
    if (isDispatching) {
      throw new Error(
        'You may not call store.subscribe() while the reducer is executing. ' +
          'If you would like to be notified after the store has been updated, subscribe from a ' +
          'component and invoke store.getState() in the callback to access the latest state. ' +
          'See https://redux.js.org/api-reference/store#subscribelistener for more details.'
      )
    }
    // 订阅为 true
    let isSubscribed = true

    ensureCanMutateNextListeners()
    nextListeners.push(listener)

    // 返回一个取消订阅的函数
    return function unsubscribe() {
      if (!isSubscribed) {
        return
      }
      // 正在dispatch中,则报错
      if (isDispatching) {
        throw new Error(
          'You may not unsubscribe from a store listener while the reducer is executing. ' +
            'See https://redux.js.org/api-reference/store#subscribelistener for more details.'
        )
      }
      // 订阅为 false
      isSubscribed = false

      ensureCanMutateNextListeners()
    //   找到当前监听函数
      const index = nextListeners.indexOf(listener)
    //   在数组中删除
      nextListeners.splice(index, 1)
      currentListeners = null
    }
}到这里,我们就调试学习完了Redux.createSotre、store.dispatch、store.getState、store.subscribe的源码。
接下来,我们写个中间件例子,来调试中间件相关源码。
5 . Redux 中间件相关源码
中间件是重点,面试官也经常问这类问题。
5.1 Redux.applyMiddleware(...middlewares)
5.1.1 准备 logger 例子调试
为了调试Redux.applyMiddleware(...middlewares),我在examples/js/middlewares.logger.example.js写一个简单的logger例子。分别有三个logger1,logger2,logger3函数。由于都是类似,所以我在这里只展示logger1函数。
// examples/js/middlewares.logger.example.js
function logger1({ getState }) {
  return next => action => {
      console.log('will dispatch--1--next, action:', next, action)

      // Call the next dispatch method in the middleware chain.
      const returnValue = next(action)

      console.log('state after dispatch--1', getState())

      // This will likely be the action itself, unless
      // a middleware further in chain changed it.
      return returnValue
  }
}
// 省略 logger2、logger3logger中间件函数做的事情也比较简单,返回两层函数,next就是下一个中间件函数,调用返回结果。为了让读者能看懂,我把logger1用箭头函数、logger2则用普通函数。
写好例子后,我们接着来看怎么调试Redux.applyMiddleware(...middlewares))源码。
cd redux-analysis && hs -p 5000
# 上文说过npm i -g http-server打开http://localhost:5000/examples/index.2.redux.applyMiddleware.compose.html,按F12打开控制台,
先点击加号操作+1,把结果展示出来。
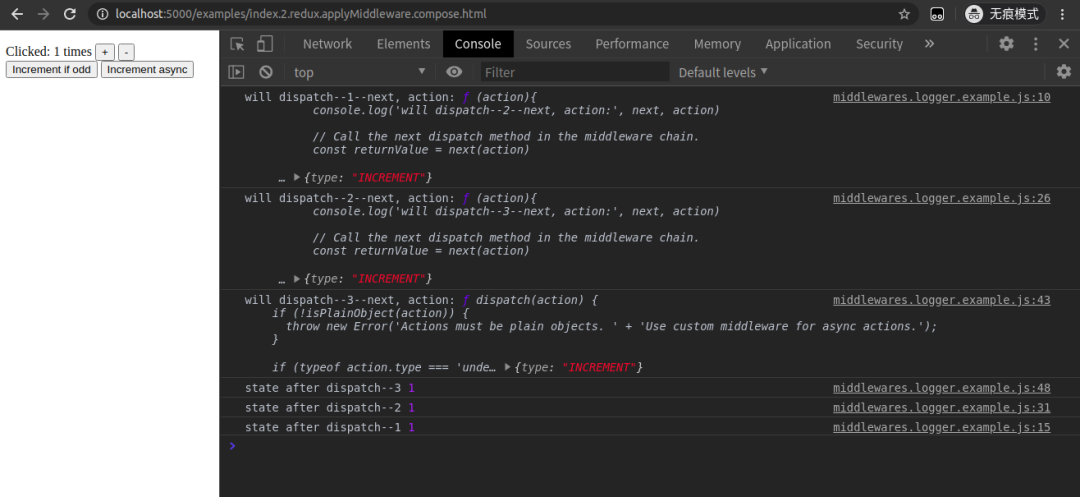
从图中可以看出,next则是下一个函数。先1-2-3,再3-2-1这样的顺序。
这种也就是我们常说的中间件,面向切面编程(AOP)。
接下来调试,在以下语句打上断点和一些你觉得重要的地方打上断点。
// examples/index.2.redux.applyMiddleware.compose.html
var store = Redux.createStore(counter, Redux.applyMiddleware(logger1, logger2,  logger3))
5.1.2 Redux.applyMiddleware(...middlewares) 源码
// redux/src/applyMiddleware.js
/**
 * ...
 * @param {...Function} middlewares The middleware chain to be applied.
 * @returns {Function} A store enhancer applying the middleware.
 */
export default function applyMiddleware(...middlewares) {
  return createStore => (...args) => {
    const store = createStore(...args)
    let dispatch = () => {
      throw new Error(
        'Dispatching while constructing your middleware is not allowed. ' +
          'Other middleware would not be applied to this dispatch.'
      )
    }

    const middlewareAPI = {
      getState: store.getState,
      dispatch: (...args) => dispatch(...args)
    }
    const chain = middlewares.map(middleware => middleware(middlewareAPI))
    dispatch = compose(...chain)(store.dispatch)

    return {
      ...store,
      dispatch
    }
  }
}
// redux/src/createStore.js
export default function createStore(reducer, preloadedState, enhancer) {
// 省略参数校验
// 如果第二个参数`preloadedState`是函数,并且第三个参数`enhancer`是undefined,把它们互换一下。
if (typeof preloadedState === 'function' && typeof enhancer === 'undefined') {
enhancer = preloadedState
preloadedState = undefined
}
if (typeof enhancer !== 'undefined') {
if (typeof enhancer !== 'function') {
throw new Error('Expected the enhancer to be a function.')
}
// enhancer 也就是`Redux.applyMiddleware`返回的函数
// createStore 的 args 则是 `reducer, preloadedState`
/**
* createStore => (...args) => {
const store = createStore(...args)
return {
...store,
dispatch,
}
}
** /
// 最终返回增强的store对象。
return enhancer(createStore)(reducer, preloadedState)
}
// 省略后续代码
}把接收的中间件函数logger1, logger2, logger3放入到 了middlewares数组中。Redux.applyMiddleware最后返回两层函数。把中间件函数都混入了参数getState和dispatch。
// examples/index.2.redux.applyMiddleware.compose.html
var store = Redux.createStore(counter, Redux.applyMiddleware(logger1, logger2, logger3))最后这句其实是返回一个增强了dispatch的store对象。
而增强的dispatch函数,则是用Redux.compose(...functions)进行串联起来执行的。
5.2 Redux.compose(...functions)
export default function compose(...funcs) {
  if (funcs.length === 0) {
    return arg => arg
  }

  if (funcs.length === 1) {
    return funcs[0]
  }

  return funcs.reduce((a, b) => (...args) => a(b(...args)))
}
// applyMiddleware.js
dispatch = compose(...chain)(store.dispatch)
// compose
funcs.reduce((a, b) => (...args) => a(b(...args)))这两句可能不是那么好理解,可以断点多调试几次。我把箭头函数转换成普通函数。
funcs.reduce(function(a, b){
  return function(...args){
    return a(b(...args));
  };
});其实redux源码中注释很清晰了,这个compose函数上方有一堆注释,其中有一句:组合多个函数,从右到左,比如:compose(f, g, h) 最终得到这个结果 (...args) => f(g(h(...args))).
5.2.1 compose 函数演化
看Redux.compose(...functions)函数源码后,还是不明白,不要急不要慌,吃完鸡蛋还有汤。仔细来看如何演化而来,先来简单看下如下需求。
传入一个数值,计算数值乘以10再加上10,再减去2。
实现起来很简单。
const calc = (num) => num * 10 + 10 - 2;
calc(10); // 108但这样写有个问题,不好扩展,比如我想乘以10时就打印出结果。为了便于扩展,我们分开写成三个函数。
const multiply = (x) => {
   const result = x * 10;
   console.log(result);
   return result;
};
const add = (y) => y + 10;
const minus = (z) => z - 2;

// 计算结果
console.log(minus(add(multiply(10))));
// 100
// 108
// 这样我们就把三个函数计算结果出来了。
再来实现一个相对通用的函数,计算这三个函数的结果。
const compose = (f, g, h) => {
  return function(x){
    return f(g(h(x)));
  }
}
const calc = compose(minus, add, multiply);
console.log(calc(10));
// 100
// 108这样还是有问题,只支持三个函数。我想支持多个函数。我们了解到数组的reduce方法就能实现这样的功能。前一个函数
// 我们常用reduce来计算数值数组的总和
[1,2,3,4,5].reduce((pre, item, index, arr) => {
  console.log('(pre, item, index, arr)', pre, item, index, arr);
  // (pre, item, index, arr) 1 2 1 (5) [1, 2, 3, 4, 5]
  // (pre, item, index, arr) 3 3 2 (5) [1, 2, 3, 4, 5]
  // (pre, item, index, arr) 6 4 3 (5) [1, 2, 3, 4, 5]
  // (pre, item, index, arr) 10 5 4 (5) [1, 2, 3, 4, 5]
  return pre + item;
});
// 15
pre 是上一次返回值,在这里是数值1,3,6,10。在下一个例子中则是匿名函数。
function(x){
  return a(b(x));
}item是2,3,4,5,在下一个例子中是minus、add、multiply。
const compose = (...funcs) => {
  return funcs.reduce((a, b) => {
    return function(x){
      return a(b(x));
    }
  })
}
const calc = compose(minus, add, multiply);
console.log(calc(10));
// 100
// 108而Redux.compose(...functions)其实就是这样,只不过中间件是返回双层函数罢了。
所以返回的是next函数,他们串起来执行了,形成了中间件的洋葱模型。人们都说一图胜千言。我画了一个相对简单的redux中间件原理图。
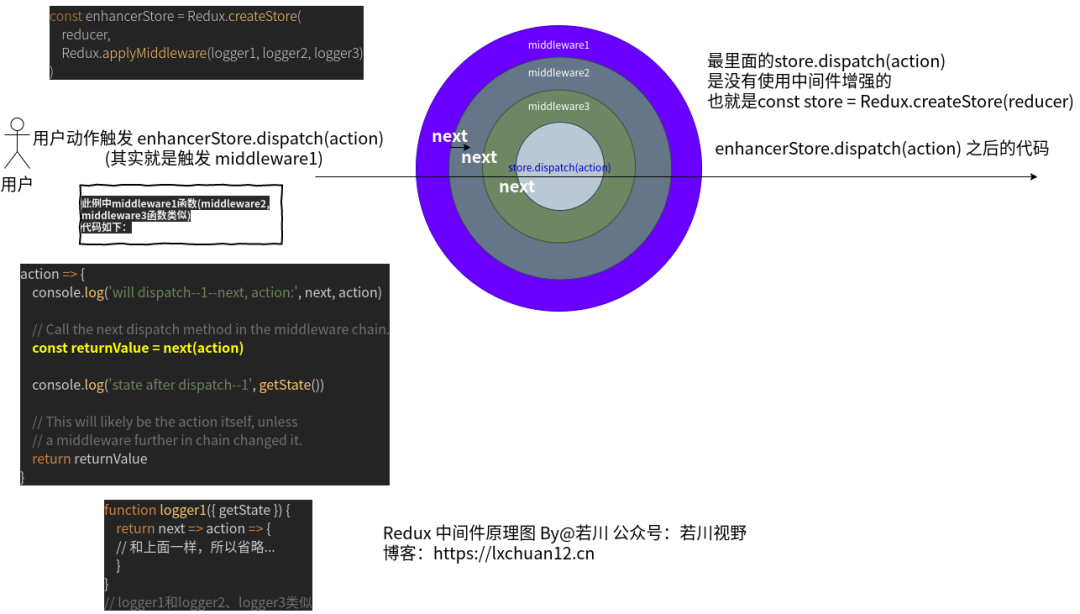
redux中间件原理图
如果还不是很明白,建议按照我给出的例子,多调试。
cd redux-analysis && hs -p 5000
# 上文说过npm i -g http-server打开http://localhost:5000/examples/index.3.html,按F12打开控制台调试。
5.2.2 前端框架的 compose 函数的实现
lodash源码中 compose函数的实现,也是类似于数组的reduce,只不过是内部实现的arrayReduce
引用自我的文章:学习lodash源码整体架构
// lodash源码
function baseWrapperValue(value, actions) {
 var result = value;
 // 如果是lazyWrapper的实例,则调用LazyWrapper.prototype.value 方法,也就是 lazyValue 方法
 if (result instanceof LazyWrapper) {
  result = result.value();
 }
 // 类似 [].reduce(),把上一个函数返回结果作为参数传递给下一个函数
 return arrayReduce(actions, function(result, action) {
  return action.func.apply(action.thisArg, arrayPush([result], action.args));
 }, result);
}koa-compose源码也有compose函数的实现。实现是循环加promise。由于代码比较长我就省略了,具体看链接若川:学习 koa 源码的整体架构,浅析koa洋葱模型原理和co原理小节 koa-compose 源码(洋葱模型实现)
6 . Redux.combineReducers(reducers)
打开http://localhost:5000/examples/index.4.html,按F12打开控制台,按照给出的例子,调试接下来的Redux.combineReducers(reducers)和Redux.bindActionCreators(actionCreators, dispatch)具体实现。由于文章已经很长了,这两个函数就不那么详细解释了。
combineReducers函数简单来说就是合并多个reducer为一个函数combination。
export default function combineReducers(reducers) {
  const reducerKeys = Object.keys(reducers)
  const finalReducers = {}
  for (let i = 0; i < reducerKeys.length; i++) {
    const key = reducerKeys[i]

    // 省略一些开发环境判断的代码...

    if (typeof reducers[key] === 'function') {
      finalReducers[key] = reducers[key]
    }
  }

  // 经过一些处理后得到最后的finalReducerKeys
  const finalReducerKeys = Object.keys(finalReducers)

  // 省略一些开发环境判断的代码...

  return function combination(state = {}, action) {
    // ... 省略开发环境的一些判断

   // 用 hasChanged变量 记录前后 state 是否已经修改
    let hasChanged = false
    // 声明对象来存储下一次的state
    const nextState = {}
    //遍历 finalReducerKeys
    for (let i = 0; i < finalReducerKeys.length; i++) {
      const key = finalReducerKeys[i]
      const reducer = finalReducers[key]
      const previousStateForKey = state[key]
      // 执行 reducer
      const nextStateForKey = reducer(previousStateForKey, action)

      // 省略容错代码 ...

      nextState[key] = nextStateForKey
      // 两次 key 对比 不相等则发生改变
      hasChanged = hasChanged || nextStateForKey !== previousStateForKey
    }
    // 最后的 keys 数组对比 不相等则发生改变
    hasChanged =
      hasChanged || finalReducerKeys.length !== Object.keys(state).length
    return hasChanged ? nextState : state
  }
}
7 . Redux.bindActionCreators(actionCreators, dispatch)
如果第一个参数是一个函数,那就直接返回一个函数。如果是一个对象,则遍历赋值,最终生成boundActionCreators对象。
function bindActionCreator(actionCreator, dispatch) {
  return function() {
    return dispatch(actionCreator.apply(this, arguments))
  }
}

export default function bindActionCreators(actionCreators, dispatch) {
  if (typeof actionCreators === 'function') {
    return bindActionCreator(actionCreators, dispatch)
  }

  // ... 省略一些容错判断

  const boundActionCreators = {}
  for (const key in actionCreators) {
    const actionCreator = actionCreators[key]
    if (typeof actionCreator === 'function') {
      boundActionCreators[key] = bindActionCreator(actionCreator, dispatch)
    }
  }
  return boundActionCreators
}redux所提供的的API 除了store.replaceReducer(nextReducer)没分析,其他都分析了。
8 . vuex 和 redux 简单对比
8.1 源码实现形式
从源码实现上来看,vuex源码主要使用了构造函数,而redux则是多用函数式编程、闭包。
8.2 耦合度
vuex 与 vue 强耦合,脱离了vue则无法使用。而redux跟react没有关系,所以它可以使用于小程序或者jQuery等。如果需要和react使用,还需要结合react-redux库。
8.3 扩展
// logger 插件,具体实现省略
function logger (store) {
  console.log('store', store);
}
// 作为数组传入
new Vuex.Store({
  state,
  getters,
  actions,
  mutations,
  plugins: process.env.NODE_ENV !== 'production'
    ? [logger]
    : []
})
// vuex 源码 插件执行部分
class Store{
  constructor(){
    // 把vuex的实例对象 store整个对象传递给插件使用
    plugins.forEach(plugin => plugin(this))
  }
}vuex实现扩展则是使用插件形式,而redux是中间件的形式。redux的中间件则是AOP(面向切面编程),redux中Redux.applyMiddleware()其实也是一个增强函数,所以也可以用户来实现增强器,所以redux生态比较繁荣。
8.4 上手难易度
相对来说,vuex上手相对简单,redux相对难一些,redux涉及到一些函数式编程、高阶函数、纯函数等概念。
9 . 总结
文章主要通过一步步调试的方式循序渐进地讲述redux源码的具体实现。旨在教会读者调试源码,不惧怕源码。
面试官经常喜欢考写一个redux中间件,说说redux中间件的原理。
function logger1({ getState }) {
  return next => action => {
      const returnValue = next(action)
      return returnValue
  }
}
const compose = (...funcs) => {
if (funcs.length === 0) {
return arg => arg
}
if (funcs.length === 1) {
return funcs[0]
}
// 箭头函数
// return funcs.reduce((a, b) => (...args) => a(b(...args)))
return funcs.reduce((a, b) => {
return function(x){
return a(b(x));
}
})
}const enhancerStore = Redux.create(reducer, Redux.applyMiddleware(logger1, ...))
enhancerStore.dispatch(action)用户触发enhancerStore.dispatch(action)是增强后的,其实就是第一个中间件函数,中间的next是下一个中间件函数,最后next是没有增强的store.dispatch(action)。
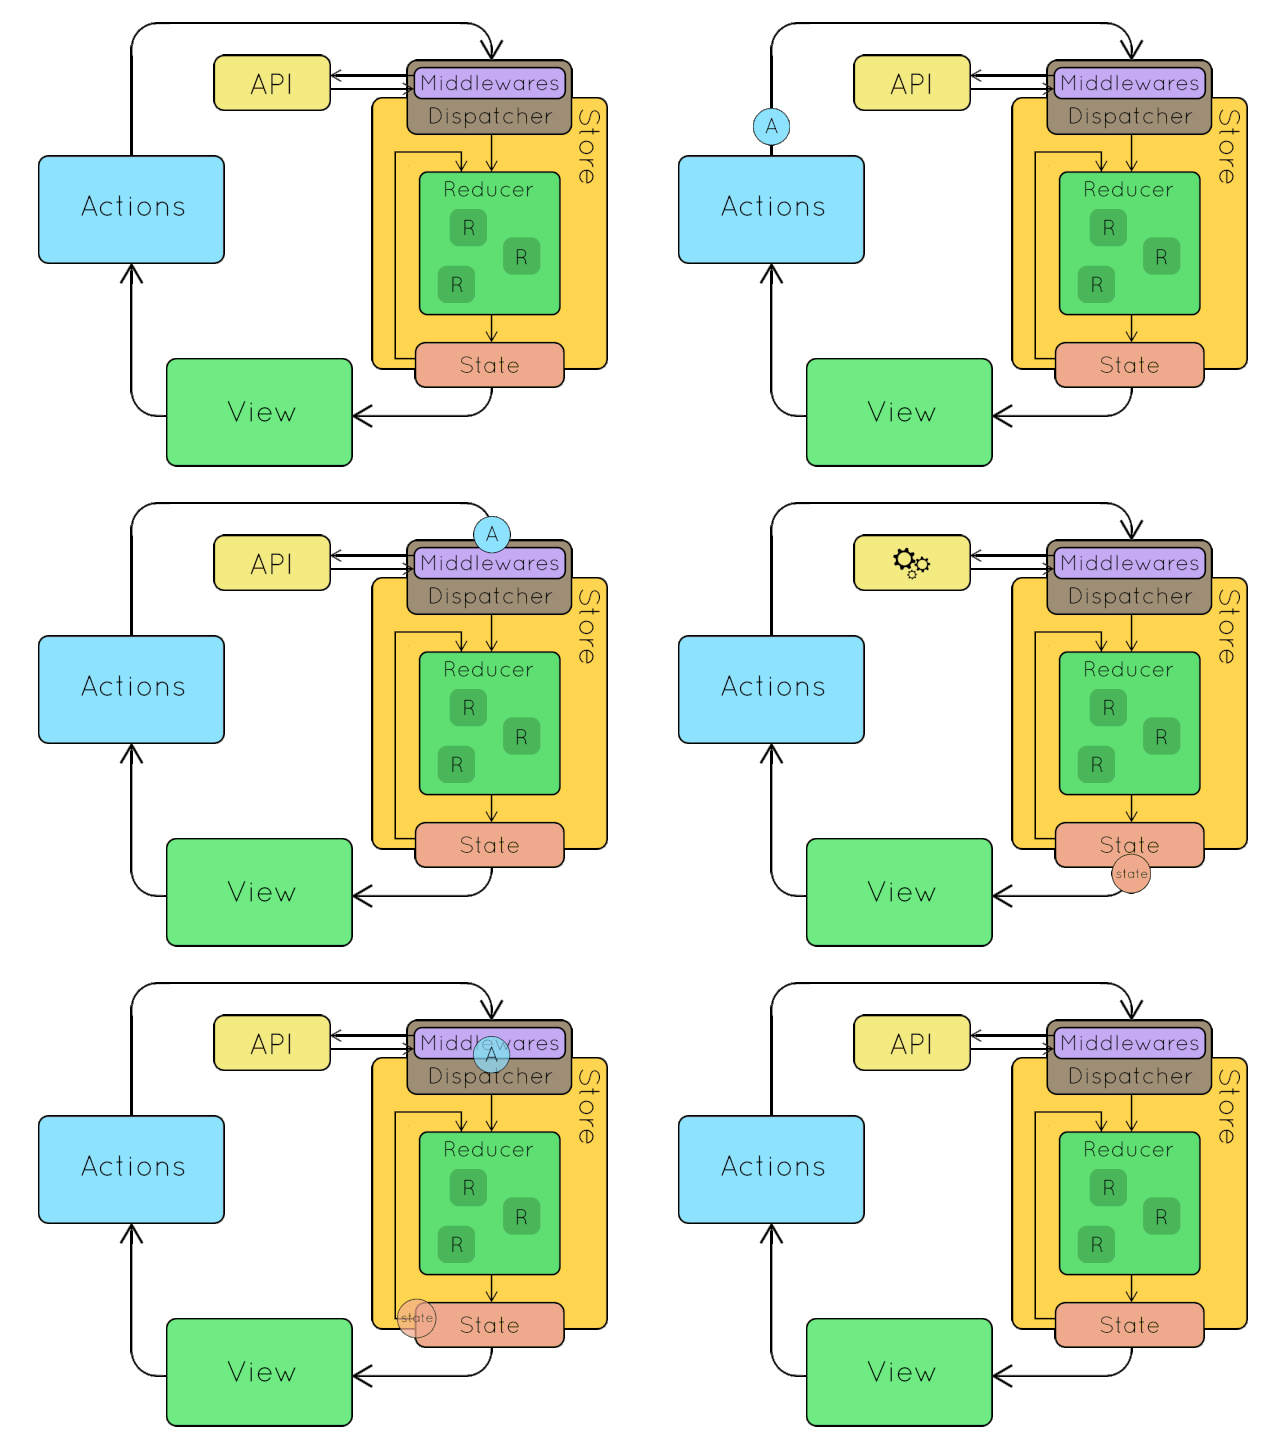
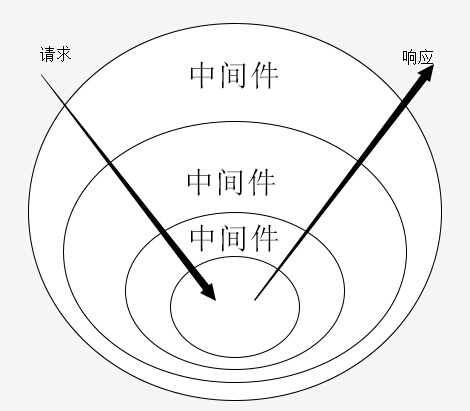
最后再来看张redux工作流程图
是不是就更理解些了呢。
