谈 UIKit 和 CoreAnimation 在 iOS 渲染中的角色(上)
前言
在这篇文章中,我们将从一个 Button 的绘制说起,一步步探究 UIKit,CoreAnimation,CoreFoundation 等框架在 iOS 渲染这个概念中各自充当什么样的角色,又是如何一步步配合,完成静态渲染以及动画展示等任务的。
目录
-
UIKit和CoreAnimation在iOS渲染中的角色
-
UIView在iOS渲染中的角色
-
CALayer等在 iOS 渲染中的角色
-
Core Foundation在iOS渲染中的角色
-
Runloop 在 iOS 渲染中的角色
UIKit 和 CoreAnimation 在 iOS 渲染中的角色
iOS是移动端图形体验最优秀的平台,开发人员依靠 UIKit 和 CoreAnimation 提供的丰富的、优秀的接口实现了了绚丽的效果和优异的用户体验。
下面我们对这两个框架在渲染这一任务中充当的角色进行梳理。
UIKit 框架在 iOS 渲染中的角色
回顾一下 UIKit 的官方定义:
Construct and manage a graphical, event-driven user interface for your iOS or tvOS app.
构建和管理一个图形化的,事件驱动的 User Interface。
UIKit 是构建和管理图形化界面的大型工具集合,操作的最小单位是 UIView。
UIView 在 iOS 渲染中的角色
UIView 是 UIKit 用来构建和管理界面的最小单位,主要行使以下三个职能:
- 负责某个区域内容的展示 (contents)
- 负责区域内用户交互的处理 (responder)
- 负责区域内子 UIView 的上述两项任务的管理 (subviews)
特别的,在渲染方面支持以下功能:
- 在XYZ轴上的布局
- 视觉属性支持积木式配置
- 视图层级管理和控制
- 多种 Animatable 属性以及简单动画的封装
封装度极高,性能优秀的UIKit为我们描述和控制UI元素(UIView)提供了非常便捷和齐全的API,实际需求开发中,90%的需求都可以用UIKit解决。
CoreAnimation 框架在 iOS 渲染中的角色
CoreAnimation 直译是动画相关的框架,实际上在 dyld_shared_cache 中,CoreAnimation 框架依附于 QuartzCore.framework 之下,QuartzCore 框架是 macOS 和 iOS 共用的 UI 图形化框架。
而当中,CALayer 是 CoreAnimation 管理的最小单位。
CALayer 是 UIView 完成第一个职能,即某个区域内容的展示 (Contents)的载体。CALayer 致力于把 CALayer.contents 定义的数据快速准确的展现在屏幕指定的区域。
绘制一个Button
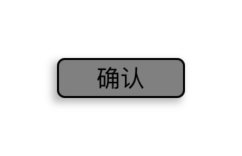
当需要绘制一个如图所示的 Button 样式时:
我们需要通过代码完成以下工作:
- 绘制外层的圆角矩形
- 绘制矩形的边框
- 绘制矩形外的阴影
- 绘制文字——确认
一般来说,我们只需要这么去实现:
UIButton *confirmBtn = [UIButton buttonWithType:UIButtonTypeCustom];
confirmBtn.frame = CGRectMake(100,200,64,20);
confirmBtn.layer.cornerRadius = 4.0;
confirmBtn.layer.borderWidth = 1.0;
[confirmBtn setTitle:@"确认" forState:UIControlStateNormal];
[confirmBtn setTitleColor:UIColor.blackColor forState:UIControlStateNormal];
[confirmBtn.titleLabel setFont:[UIFont systemFontOfSize:12.0]];
[confirmBtn setBackgroundColor:UIColor.grayColor];
confirmBtn.layer.shadowOffset = CGSizeMake(-2, 2);
confirmBtn.layer.shadowPath = CGPathCreateWithRect(confirmBtn.bounds, nil);
confirmBtn.layer.shadowRadius = 2.0;
confirmBtn.layer.shadowColor = [UIColor.blackColor colorWithAlphaComponent:0.3].CGColor;
confirmBtn.layer.shadowOpacity = 1;
就可以顺利的在屏幕上绘制这样一个 button,非常方便快捷,我们不需要直接操作 GPU。
如果没有 UIKit,我们就需要直接操作 GPU 完成图形的渲染工作。
在 PC 端,我们可以使用 OpenGL 完成圆角矩形,边框,阴影的绘制。不了解 OpenGL 的同学可以通过这个网站学习。https://learnopengl.com/
在移动端,我们可以使用 OpenGL ES 完成同样的任务。相信很多音视频开发的同学都有写过 Metal 或者 OpenGLES 的代码,使用 GLSL 或者 MSL 写过各种效果的 shader。
但完成这些绘制工作需要大量的代码,为了画一个不太复杂的按钮,就写成百上千的模版代码,是不值得的,因此才有了 UIKit,OpenGL 等代码也是在特定情形下才需要使用的工具。而如前面所说,UIKit 通过 CALayer 完成内容的渲染工作。
借助 CALayer,我们只需要完成 对绘制任务的描述 ,省去了大量直接操作GPU进行渲染的模版代码工作。接下来我们深入讨论CALayer的角色或者说职能。
CALayer的职能
CALayer 帮助我们避免使用 OpenGL ES/Metal 等低级 API 直接操作 GPU 完成绘制工作。
但这并不意味着 CoreAnimation 库本身含有大量的 OpenGL ES 绘制逻辑(比如按照指定大小和位置画一个矩形),来帮助 CALayer 完成这个功能。
相反,CoreAnimation 本身作为翻译机,一个中间者,把 iOS 工程师编写的 UIKit、CoreAnimation 级别的代码,转换为另外一种描述,类似 LLVM 的 IR,通过 IPC ( inter-process communication ),将翻译好的 UI 信息提供给系统常驻的UI绘制进程。通过系统服务完成真正的使用低级 API 操作 GPU 完成渲染的任务 。
这个用于绘制的系统服务或系统进程,就是出现在各个 Apple 视频中的 Render Server 。
个人猜测,Render Server 通过 Launchd 注册,CoreAnimation 通过 bootstrap 框架完成 服务名(字符串)到 mach_port (整数) 的转换工作,再使用此
mach_port进行 IPC ,进行 UI 信息的传递工作。
关于 Launchd 和 bootstrap 将在下篇 XNU IPC 中介绍。
在这个流程中,我们很容易得出一个在 非 App 进程主动操作 GPU 的场景下 的判断:
在App进程对 Render Server 的 Performance 进行 监控是困难的,必须依赖 Render Server 在 IPC 时主动向 App 进程提供该App提交的 Render 任务的 Performance 数据。
同时,CALayer的另一个重要职能是完成动画任务。这也正是Core Animation 的本意。
CoreAnimation 提供了 keyframe animation, property animation 等简单易用的动画封装。下面我们从动画的本质谈起,探析Core Animation是如何完成动画任务的。
CoreAnimation 动画的本质是什么?
首先思考一下,一个几何在屏幕上的位置移动动画,本质是什么?
本质是在时间的起点和终点的过程里,每一次屏幕刷新,某个物体的位置做一点点均匀的移动,人眼就会认为它在均匀的移动。
比如 0s ~ 1s ,在x轴位移120pt,那么每一帧都位移2pt,对于人眼来说就是一个连续的动画了。反映到 CoreAnimation 做的工作是什么呢?就是生成了这样一个长度为60的数组,第一行为现实世界的时间节点,第二行为x轴坐标:
#define PER_FRAME 1/60

---

1*PER_FRAME  | 2*PER_FRAME  | 3*PER_FRAME  ....

0            |  2           |  4           ....

---
那么我们所谓的 timingFunction 做的是什么呢?实际上就是改变了 时间节点 = 帧序号 * PER_FRAME 这个对应关系,结合一个曲线的 timingFunction,在 3 * PER_FRAME 这个时间节点,需要的可能就不是第3帧,而是原来的直线 timingfunction 的 3.2 帧或者 2.8 帧的几何位置 X。
回到 CALayer 的 Presentation Tree 和 Model Tree ,结合上述动画过程,presentation tree 中的对象在任何一个时间节点都能拿到最近一帧上该几何体 X 的位置,而 Model Tree,在整个动画过程中不会发生变化(一定程度上反映了直接使用 CoreAnimation 的一个特性,动画结束后元素属性回归原状,除非特别设置)。
如何获取 Presentation Tree 呢?前面我们有提到,CoreAnimation 框架是个翻译机,并且内部还有 Refer Tree,那么当我们试图去获取一个 Model Tree 当前动画中的状态时,CoreAnimation 就需要与 Render Server 进行一次 IPC,通过 Render Server 回复的信息构建一个新的 CALayer 对象,这个新的对象就表达了 CoreAnimation 框架目前认为某个 layer 的状态。
注意,可以看到这个新构建的对象不会被任何人使用,他就像一个 HTTP GET 的 Response,只能告诉你信息,做不了其他任何事情。
我们能不能不依赖 Render Server 自己实现动画效果呢?
当然可以。
Facebook 的 POP 就是一个替代 CoreAnimation 作为插值器的库,本质上就是自建上面的数组表格,依赖一个 CADisplayLink 来完成每一帧的提交渲染,CADisplayLink 的工作原理后面我们会详细说明,现在只需要知道,使用它是为了完成每隔 0.0167s 更新一次 UI 元素的任务。如果你想简陋一些,写一个递归的 dispatch_after 来完成这个任务也是 OK 的。
- (void)triggerDisplay
{
  //triggered! do your job
  //....

  dispatch_after(dispatch_time(DISPATCH_TIME_NOW, (int64_t)(0.16 * NSEC_PER_SEC)), dispatch_get_main_queue(), ^{
    [self triggerDisplay];
  });
}
POP 本质上需要做的,就是在 0.16s 后唤醒 Runloop ,执行一波 UI 更新。被唤醒,本质上是注册 VSync 信号,后面 Runloop 环节会具体解释为什么这么说。
那么 CoreAnimation 的动画是通过 CADisplayLink 来触发每一帧的提交的吗?网上没有搜到相关的说明,我们来研究一下。
通过符号断点 CADisplayLink 的初始化方法,我们发现创建一个 CAAnimation 的时候并没有创建一个 CADisplayLink。
通过监控 Runloop 唤醒情况,发现在添加 Animation 后只唤醒了26次,但是动画仍然在不停的运行(次数我们设置的 CGFLOAT_MAX)。
虽然 Runloop 没有运行,但是屏幕仍然在不断刷新,同时,使用 LLDB 断住 App 所有的线程后,屏幕上的 CALayer 动画仍然在更新
如前所说,CoreAnimation 本身作为翻译机,不仅翻译 UI 元素的描述,还翻译动画的描述,提交给其他进程执行,自然在本线程打断点不会阻塞动画的执行。
最后我们简单介绍一下 CALayer 内部管理的三种树型结构。
CALayer Tree
CoreAnimation 框架本身构建了关于 CALayer 的三种 Tree:
-
Model Layer 返回与该 CALayer 对象关联的模型model层对象(如果有的话)。
-
注意,你应该对 presentation Layer 对象使用这个属性,它会返回 presentation layer 表达的那个 Model 对象。
-
PresentationLayer 返回该 CALayer 对象关联的表示 presentation 层对象当前显示在屏幕上的状态的副本。
-
需要注意这并不是一个属性,是一个方法。如果你去 KVO 方法的返回值,会发现这个 instance 是不会发生变化,它只是在你请求那一瞬间,通过 IPC 去其他线程尝试读取 Refer Tree 中执行动画的对象的基本信息,然后根据 IPC 返回的信息本地构造一个 CALayer 作为返回值。
-
Refer Tree 执行动画的真正对象,为 CoreAnimation 内部对象,后面逆向 CoreAnimation 的代码中会看到大量的
CA::Layer::ref和CA::Layer::unref的操作。
Core Foundation 在 iOS 渲染中的角色
Runloop 在 iOS 渲染中的角色
前面我们在 POP 的讲解中有提到
POP 本质上需要做的,就是在 0.16s 后唤醒 Runloop ,执行一波 UI 更新。
看来, Runloop 和 UI 渲染,密切相关。
当用户没有操控手机的时候,手机屏幕处于静止画面的时候 ,系统不需要做什么渲染工作。
只有当我们点击按钮或者进行其他操作进而产生一个事件(UIKit 官方介绍的特性 Event-driven 的 event )的时候,或者收到某种消息,当前进程接收到了其他进程传递过来的事件的时候,才会需要进行一些渲染工作以把最新的内容呈现在屏幕上。
要站在宏观视角上完整的理解 iOS 渲染流程,必须解决
- 什么时候触发UI绘制代码?
- 什么时候绘制UI,或者说什么时候提交到 render server?
Runloop 是整个触发和提交机制的核心。
我们都知道, Runloop 是有休眠机制的,那么先考虑关于 Runloop 两个基本的问题:
- Runloop 如何进入waiting?
- Runloop 如何wakeup?
我们知道 Runloop 提供了几个时机供我们使用:
typedef CF_OPTIONS(CFOptionFlags, CFRunLoopActivity) {
 kCFRunLoopEntry = (1UL << 0),//即将进入
 kCFRunLoopBeforeTimers = (1UL << 1),//处理timer前
  kCFRunLoopBeforeSources = (1UL << 2),//处理source0前
 kCFRunLoopBeforeWaiting = (1UL << 5),//休眠前
 kCFRunLoopAfterWaiting = (1UL << 6),//休眠后,刚唤醒
 kCFRunLoopExit = (1UL << 7),//退出
 kCFRunLoopAllActivities = 0x0FFFFFFFU//全部事件
};
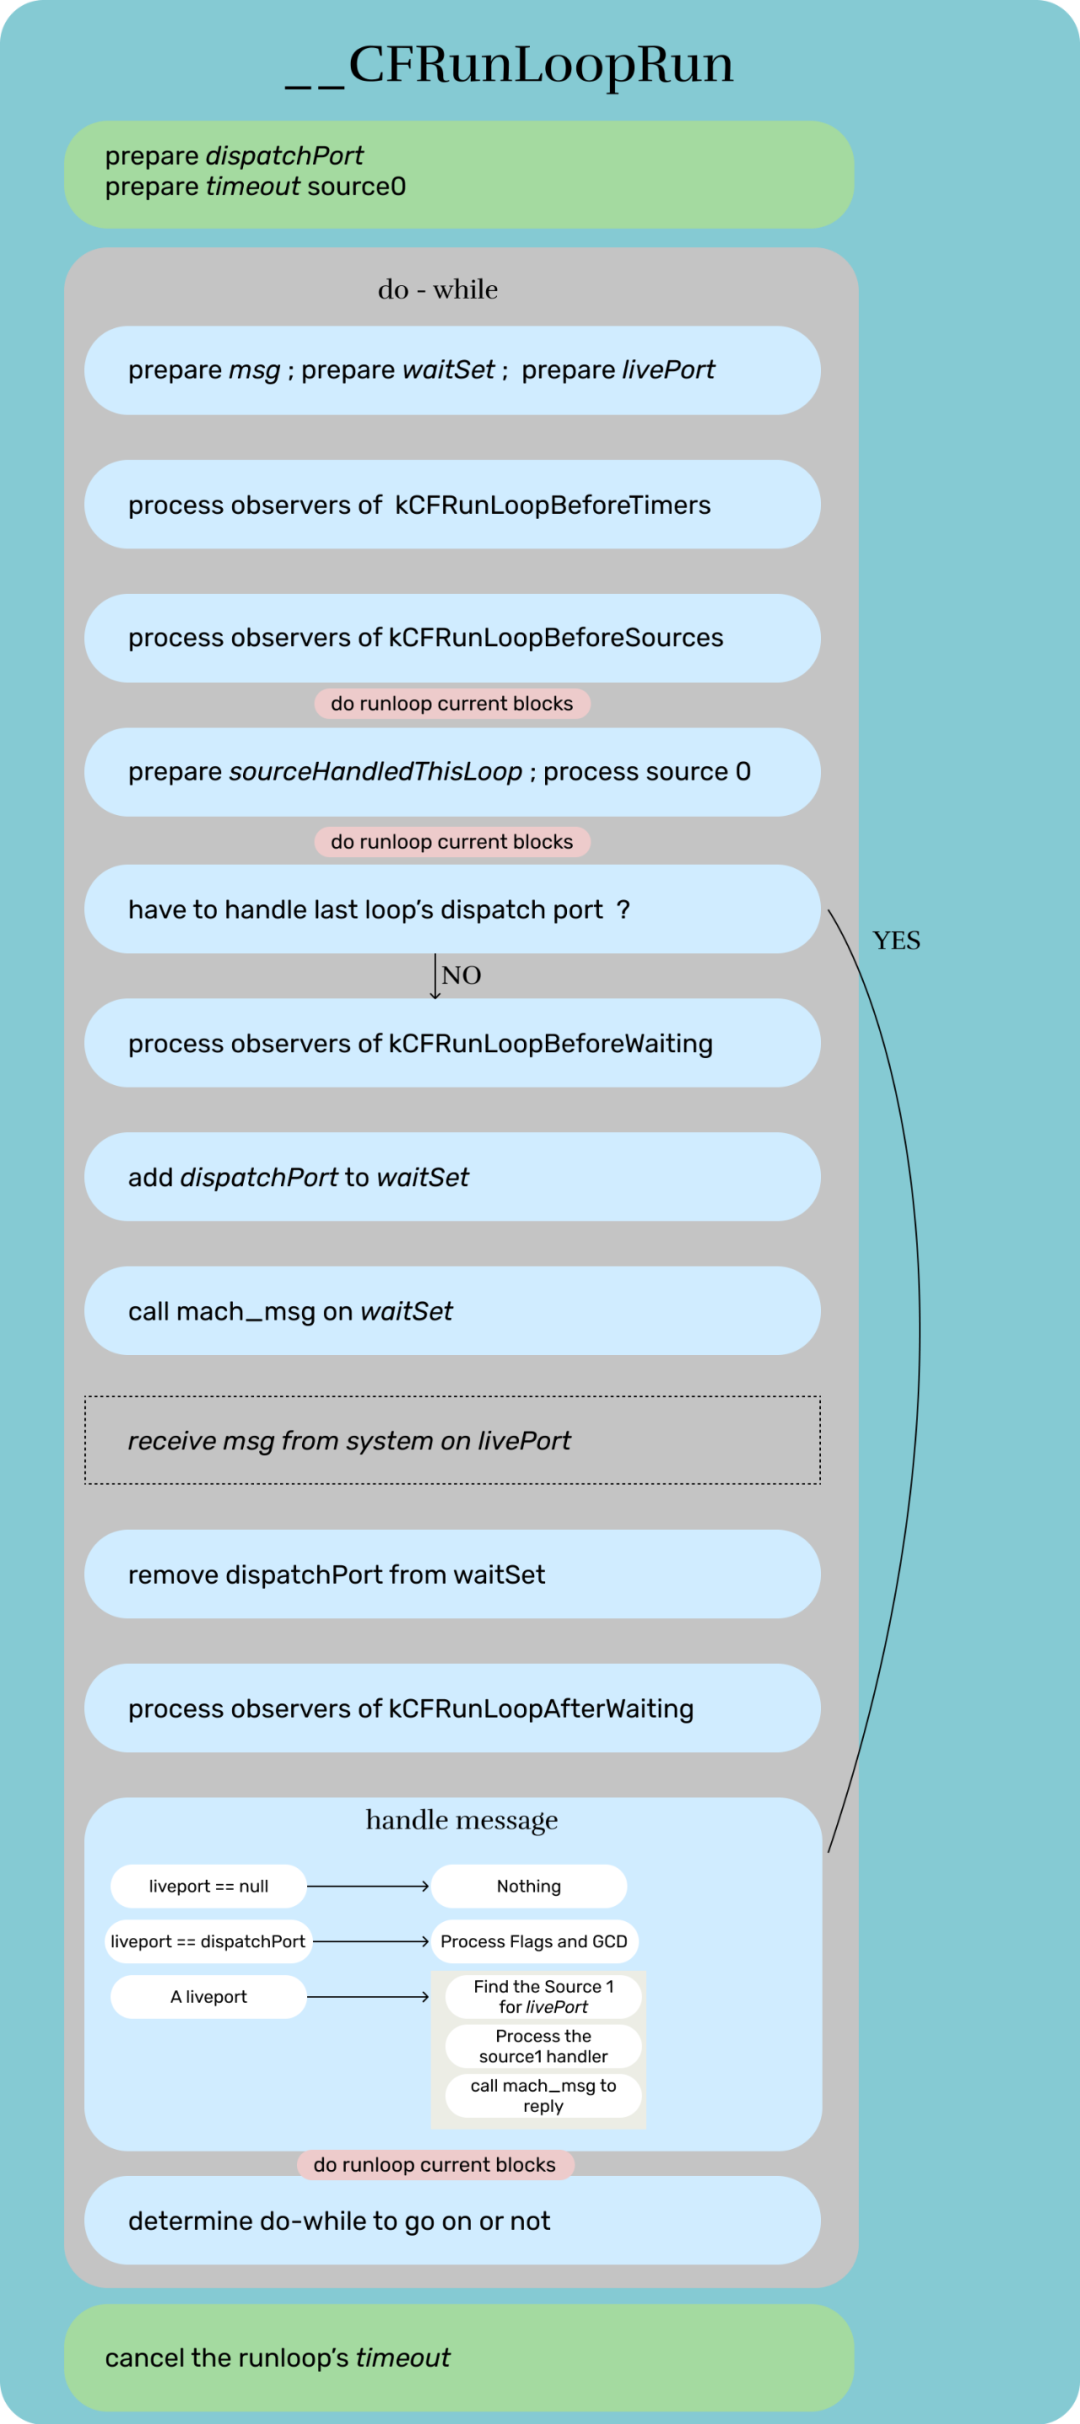
上述为几个允许用户自定义任务的 Runloop 时间节点,实际上也反映了整个 Runloop 的运转流程:
我们先来看 Runloop 循环的主函数,__CFRunLoopRun 的伪代码解析:
所谓的休眠,就是进入内核态等待唤醒,我们知道常用的进入内核态的方式就是进行系统调用,这里调用的就是 mach_msg。
当一个 RunLoop 处理完事件后,即将进入休眠时,会经历下面几步:
- 指定一组将来可以唤醒自己的
mach_portset,比如含有端口号11111; - 调用mach_msg来监听这些端口,在接受消息前保持
mach_msg_trap状态
唤醒的过程为:
另一个线程(比如有可能有一个专门处理键盘输入事件的系统服务进程在后台一直运行)向 11111 这个端口发送 msg 后,本线程被唤醒,liveport 设置为 11111,RunLoop wakeup,开始处理该 port 绑定的 source1 任务。
下面直接通过代码注释更加详细的讲解上述流程图
do {
    uint8_t msg_buffer[3 * 1024];
    mach_msg_header_t *msg = NULL;

    if (rlm->_observerMask & kCFRunLoopBeforeTimers)
        //如果有kCFRunLoopBeforeTimers的观察者
        __CFRunLoopDoObservers(rl, rlm, kCFRunLoopBeforeTimers);
    if (rlm->_observerMask & kCFRunLoopBeforeSources)
        //如果有kCFRunLoopBeforeSources的观察者
        __CFRunLoopDoObservers(rl, rlm, kCFRunLoopBeforeSources);

    //使用CFRunLoopPerformBlock添加的block
    //可以看到,这个block的作用主要是在当轮 Runloop 中执行
    __CFRunLoopDoBlocks(rl, rlm);

    // do source0
    Boolean sourceHandledThisLoop = __CFRunLoopDoSources0(rl, rlm, stopAfterHandle);
    //这个sourceHandledThisLoop是source0和1的合集,后面看处理source1会看到,两种都会让这个flag变为true
    if (sourceHandledThisLoop)
    {
        //do source0 后再执行一下可能添加了的block
        __CFRunLoopDoBlocks(rl, rlm);
    }

    Boolean poll = sourceHandledThisLoop || (0LL == timeout_context->termTSR);
    //dispatchPort如果不为null的话,开始处理dispatchPort上的mach msg
    //dispatchPort是用来接收dispatch_async到main queue的block的
    if (MACH_PORT_NULL != dispatchPort && !didDispatchPortLastTime)
    {
        msg = (mach_msg_header_t *)msg_buffer;
        //处理dispatchPort上的msg
        if (__CFRunLoopServiceMachPort(dispatchPort, &msg, sizeof(msg_buffer), 0))
        {
            goto handle_msg;
        }
    }
    //到这里表示没有处理dispatch_port
    didDispatchPortLastTime = false;

    if (!poll && (rlm->_observerMask & kCFRunLoopBeforeWaiting))
    //到达waiting前的节点,处理observer
        __CFRunLoopDoObservers(rl, rlm, kCFRunLoopBeforeWaiting);
    __CFRunLoopSetSleeping(rl);
    // do not do any user callouts after this point (after notifying of sleeping)

    // Must push the local-to-this-activation ports in on every loop
    // iteration, as this mode could be run re-entrantly and we don't
    // want these ports to get serviced.

    //waitSet是从rlm->_ports来的,应该是当前进程的ports集合
    //下面这个函数调用mach_port_insert_member,把dispatchPort加入到当前进程的port集合中去
    __CFPortSetInsert(dispatchPort, waitSet);

    __CFRunLoopModeUnlock(rlm);
    __CFRunLoopUnlock(rl);

    if (kCFUseCollectableAllocator)
    {
        objc_clear_stack(0);
        memset(msg_buffer, 0, sizeof(msg_buffer));
    }
    msg = (mach_msg_header_t *)msg_buffer;
    //下面基于当前线程的wait set调用mach_msg,等待任意一个port接收到消息
    __CFRunLoopServiceMachPort(waitSet, &msg, sizeof(msg_buffer), poll ? 0 : TIMEOUT_INFINITY);

    __CFRunLoopLock(rl);
    __CFRunLoopModeLock(rlm);

    // Must remove the local-to-this-activation ports in on every loop
    // iteration, as this mode could be run re-entrantly and we don't
    // want these ports to get serviced. Also, we don't want them left
    // in there if this function returns.
    //
    //dispatchPort在任意一个port接收后被remove?TO Confirm
    __CFPortSetRemove(dispatchPort, waitSet);

    rl->_ignoreWakeUps = true;

    // user callouts now OK again
    __CFRunLoopUnsetSleeping(rl);
    if (!poll && (rlm->_observerMask & kCFRunLoopAfterWaiting))
    //after waiting的observer处理
        __CFRunLoopDoObservers(rl, rlm, kCFRunLoopAfterWaiting);

handle_msg:;
    rl->_ignoreWakeUps = true;

    mach_port_t livePort = msg ? msg->msgh_local_port : MACH_PORT_NULL;

    if (MACH_PORT_NULL == livePort)
    {
        // handle nothing
    }
    else if (livePort == rl->_wakeUpPort)
    {
        // do nothing on Mac OS
    }
    else if (livePort == rlm->_timerPort)
    {
        __CFRunLoopDoTimers(rl, rlm, mach_absolute_time());
    }
    else if (livePort == dispatchPort)
    {
        __CFRunLoopModeUnlock(rlm);
        __CFRunLoopUnlock(rl);
        _CFSetTSD(__CFTSDKeyIsInGCDMainQ, (void *)6, NULL);
        //dispatch_async 到 main queue的处理就在这里了
        _dispatch_main_queue_callback_4CF(msg);
        _CFSetTSD(__CFTSDKeyIsInGCDMainQ, (void *)0, NULL);
        __CFRunLoopLock(rl);
        __CFRunLoopModeLock(rlm);
        sourceHandledThisLoop = true;
        didDispatchPortLastTime = true;
    }
    else
    {
        // Despite the name, this works for windows handles as well

        //要找到一个port对应的source去处理,这个source就是source1了
        CFRunLoopSourceRef rls = __CFRunLoopModeFindSourceForMachPort(rl, rlm, livePort);
        if (rls)
        {
            mach_msg_header_t *reply = NULL;
            //处理这个source1
            //果然这里sourceHandledThisLoop是不区分的
            sourceHandledThisLoop = __CFRunLoopDoSource1(rl, rlm, rls, msg, msg->msgh_size, &reply) || sourceHandledThisLoop;
            if (NULL != reply)
            {
                //进行回复,使用的是Send,会立刻返回
                (void)mach_msg(reply, MACH_SEND_MSG, reply->msgh_size, 0, MACH_PORT_NULL, 0, MACH_PORT_NULL);
                CFAllocatorDeallocate(kCFAllocatorSystemDefault, reply);
            }
        }
    }
    if (msg && msg != (mach_msg_header_t *)msg_buffer)
        free(msg);

    __CFRunLoopDoBlocks(rl, rlm);

    if (sourceHandledThisLoop && stopAfterHandle)
    {
        retVal = kCFRunLoopRunHandledSource;
    }
    else if (timeout_context->termTSR < (int64_t)mach_absolute_time())
    {
        retVal = kCFRunLoopRunTimedOut;
    }
    else if (__CFRunLoopIsStopped(rl))
    {
        __CFRunLoopUnsetStopped(rl);
        retVal = kCFRunLoopRunStopped;
    }
    else if (rlm->_stopped)
    {
        rlm->_stopped = false;
        retVal = kCFRunLoopRunStopped;
    }
    else if (__CFRunLoopModeIsEmpty(rl, rlm, previousMode))
    {
        retVal = kCFRunLoopRunFinished;
    }
} while (0 == retVal);
下面看下 __CFRunLoopServiceMachPort 是如何调用 mach_msg 的
static Boolean __CFRunLoopServiceMachPort(mach_port_name_t port, mach_msg_header_t **buffer, size_t buffer_size, mach_msg_timeout_t timeout) {
    Boolean originalBuffer = true;
    for (;;) {
/* In that sleep of death what nightmares may come ... */mach_msg_header_t *msg = (mach_msg_header_t *)*buffer;
        msg->msgh_bits = 0;
        msg->msgh_local_port = port;
        msg->msgh_remote_port = MACH_PORT_NULL;
        msg->msgh_size = buffer_size;
        msg->msgh_id = 0;
        kern_return_t ret = mach_msg(msg,
MACH_RCV_MSG|MACH_RCV_LARGE|((TIMEOUT_INFINITY != timeout) ? MACH_RCV_TIMEOUT : 0)
|MACH_RCV_TRAILER_TYPE(MACH_MSG_TRAILER_FORMAT_0)|MACH_RCV_TRAILER_ELEMENTS(MACH_RCV_TRAILER_AV), 0, msg->msgh_size, port, timeout, MACH_PORT_NULL);

//这里是仅接收
//这里可以看到使用的mach message OOL的format是 MACH_MSG_TRAILER_FORMAT_0
//mach_msg基于timeout事件决定停留在内核态的时间,调用后如果能获得信息,则设置在msg中,然后返回,否则停留在msg_trapif (MACH_MSG_SUCCESS == ret) return true;

        if (MACH_RCV_TIMED_OUT == ret) {
            if (!originalBuffer) free(msg);
            *buffer = NULL;
            return false;
        }
        if (MACH_RCV_TOO_LARGE != ret) break;
        buffer_size = round_msg(msg->msgh_size + MAX_TRAILER_SIZE);
        if (originalBuffer) *buffer = NULL;
        originalBuffer = false;
        *buffer = realloc(*buffer, buffer_size);
    }
    HALT;
    return false;
}
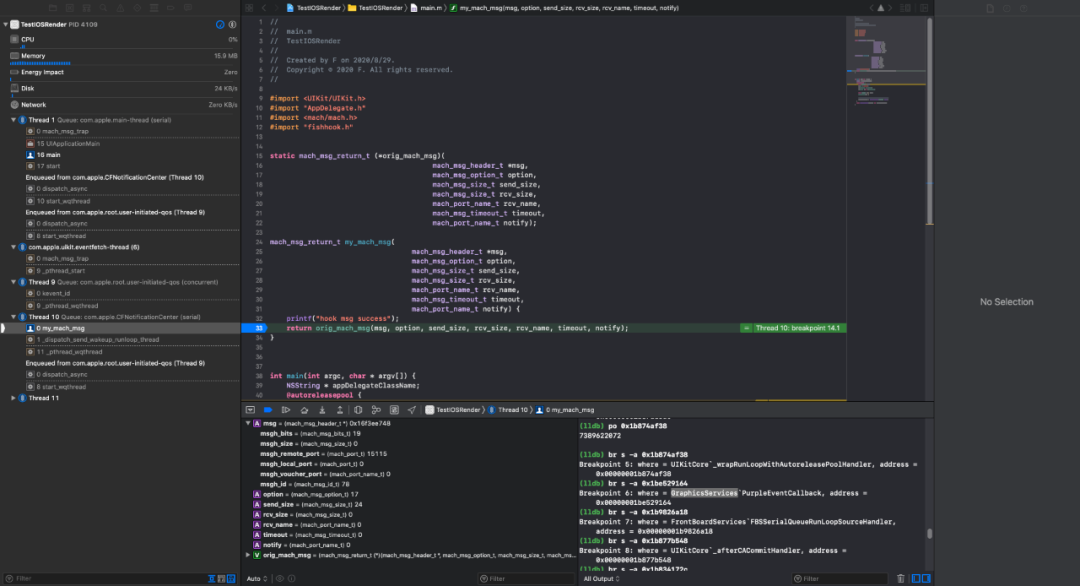
我们可以通过 hook mach_msg,监控所有发送过来的 mach_msg。
这样, Runloop 在做什么,怎么做的,就都讲明白了。
下面我们看一下 Runloop 和 Mach Port 的实际应用,也一起解答之前 POP 库为了获取每 16.7ms 的回调,注册 Vsync 信号的问题。


