盘点 Vue3 那些有趣的API
data选项哪去了?
回想我们在Vue2中创建响应式数据是这样的:
...
data() {
  return {
    num:1
  }
}
...
而Vue3会 setup 组合式API这个选项了,为此引入了ref、reactive等响应式API,来看看怎么写的吧:
<template>
  <div>num:{{num}}</div>
  <div>refNum:{{refNum}}</div>
  <div>state对象:名字:{{state.name}},年龄:{{state.age}}</div>
</template>

<script>
import { defineComponent, reactive, ref } from "vue"
export default defineComponent({
  setup() {
    const num = 1  //不具备响应式
    const refNum = ref(2)
    const state = reactive({
      name: '小黄',
      age: 18
    })
    return {
      num,
      refNum,
      state
    }
  }
})
</script>
你可以看到Vue2的data选项已经被ref、reactive这样的API给替换了。
那么在setup如何对ref、reactive声明的数据修改操作呢?
...
setup() {
  const count = ref(1)
  console.log(count.value) // => 1
  count.value++
  console.log(count.value) // => 2

  const str = ref('小黄')
  console.log(str.value) // => 小黄
}
...
可以看到使用 ref 声明的数据可以直接使用 .value 这种形式更新数据。但是你也许会疑问为什么在.value ,其实是vue内部做了操作。另外,打印一下可以看到ref声明数据:
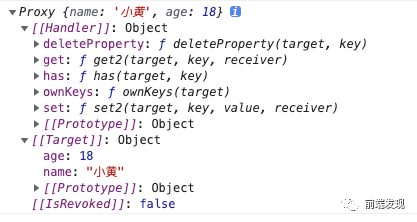
reactive 也是响应式的声明,它是返回对象的响应式副本
...
setup() {
  const state = reactive({
    name: '小黄',
    age: 18
  })
  console.log(state) // =>
}
...
我们直接打印下state对象,它其实是一个Proxy对象:
...
setup() {
  console.log(state.name) // => 小黄
  console.log(state.age) // => 18
  //对数据更改
  setTimeout(() => {
    state.age = 20
    console.log(state.age) // => 20
  }, 1000)
}
...
也许你已经注意到了开头举的例子——所有声明的变量都被 return 出去了,这看起来有什么好处呢?
- 可以更加清晰得知道,数据与视图之前的关系。setup里对数据操作,视图渲染return出来的数据
- 更好的保护组件独有的数据,不需要暴露给视图的数据我就不写在return里中
再者,你可能会讨厌为什么通过 reactive 声明的数据在视图中使用的时候又要 xx.属性名 的方式才行,有办法不写吗?有!尤大大满足开发者的一切便捷编码习惯。toRefs 就出来了,在结合ES9的扩展运算符 ... 就可以满足要求了
<template>
  //这里不再需要state包裹了,属性已经被展开return出来了
  <div>state对象:名字:{{name}},年龄:{{age}}</div>
</template>

<script>
import {defineComponent, reactive, toRefs } from "vue"
export default defineComponent({
  setup() {
    const state = reactive({
      name: '小黄',
      age: 18
    })
    return {
      ...toRefs(state)
    }
  }
})
</script>
computed计算属性更好看了?
计算属性在使用上好像变得更加令人愉快了,先来看Vue2的写法吧
...
data(){
  return {
    str:'小黄'
  }
},
computed: {
  newStr() { // 对data的数据重新处理
    return this.str + 'hha'
  },
  list() { // 获取Vuex中的数据(经常用到)
    return this.$store.state.btnMenu.btnPowerList
  }
},
mounted(){}
...
中规中矩没得说,这里computed是当作分段式的组件内部方法
重点看看Vue3中computed如何实现。
...
setup() {
  const count = ref(3)
  console.log(count.value) // => 3
  const newCount = computed(() => count.value + 1)
  console.log(newCount.value) // => 4
}
...
倘若需要在计算属性中获取Vuex的数据的话,那么可以使用Vuex提供的 useStore 模块获取到store的实例
import { computed, defineComponent } from "vue"
import { useStore } from 'vuex'
export default defineComponent({
  setup() {
    const store = useStore()
    const list = computed(() => store.state.list)
    return {
      list
    }
  }
})
watch与watchEffect监听?
watch监听在Vue使用的场景也是比较多的。老规矩,先来看看Vue2是怎么写的,有对比才有伤害
...
watch: {
  bankName(newValue,oldValue) {
    consoel.log(newValue,oldValue)
  }
},
methods:{}
...
来看看Vue3怎么写吧
<template>
  <div>count:{{count}}</div>
</template>

<script>
import { defineComponent, ref, watch } from "vue"
export default defineComponent({
  setup() {
    const count = ref(10)
    setTimeout(() => {
      count.value = 20
    }, 2000)
    watch(count, (newValue, oldValue) => {
      console.log(oldValue)
      console.log(newValue)
    })
    return {
      count
    }
  }
})
</script>
然后watch监听到count变化,预期地打印

reactive ,当然ref也可以定义一个对象。
<template>
  <div>person对象:名字:{{person.name}},年龄:{{person.age}}</div>
</template>

<script>
import { defineComponent, reactive, watch } from "vue"
export default defineComponent({
  setup() {
    const person = reactive({
      name: '前端发现',
      age: 18
    })
    setTimeout(() => {
      person.name = '我是reactive定义的name属性更改后的数据'
    }, 2000)

    watch(() => person.name, (newValue, oldValue) => {
      console.log(oldValue)
      console.log(newValue)
    })
    return {
      person
    }
  }
})
</script>
...可以看到,这里问采用了函数的形式返回了需要监听的数据.() => person.name。来看看案例的效果:
以上都是监听单一的数据,多个属性怎么监听呢?直接上
<template>
  <div>count:{{count}}</div>
  <div>person对象:名字:{{person.name}},年龄:{{person.age}}</div>
</template>

<script>
import { defineComponent, reactive, ref, watch } from "vue"
export default defineComponent({
  setup() {
    const count = ref(10)
    const person = reactive({
      name: '前端发现',
      age: 18
    })
    setTimeout(() => {
      count.value = 20
      person.name = '我是reactive定义的name属性更改后的数据'
      person.age = 22
    }, 2000)

    watch([count, () => person.name, () => person.age], ([newCount, newName, newAge], [oldCount, oldName, oldAge
    ]) => {
      console.log(oldCount, oldName, oldAge)
      console.log(newCount, newName, newAge)
    })
    return {
      count,
      person
    }
  }
})
</script>
直接数组的形式监听多个数据

watchEffect ,看起来像是watch Plus(我暂且这样理解吧),官方是怎么定义这个API的呢?
在响应式地跟踪其依赖项时立即运行一个函数,并在更改依赖项时重新运行它。
//当然这里是需要从vue导入模块滴
import { watchEffect } from "vue"
...
const count = ref(10)
watchEffect(() => console.log(count.value)) // => 10

setTimeout(() => {
  count.value = 20 立即执行watchEffect方法,调出打印 // => 20
}, 1000)
先看效果:
可以看到使用 watchEffect 并没有之前 watch 的更改前数据,也不需要传入监听的数据源 ,而是直接执行一个函数,可以获取到更新后的数据。
同样的,监听多个的话也是可以的
...
watchEffect(() => {
  console.log(count.value)
  console.log(person.name)
})
...
总结:watch watchEffect
- watchEffect 不需要指定监听的属性,他会自动的收集依赖,只要在回调函数中引用到了响应式的属性,那么当这些属性变动的时候,这个回调都会执行,而 watch 只能监听指定的属性而作出变动(v3开始能够同时指定多个)
- watch 能够获取到新值与旧值(更新前的值),而 watchEffect 是拿不到的
- watchEffect 在组件初始化的时候就会执行一次用以收集依赖,收集到的依赖发生变化时再执行。而 watch 则是直接指定依赖项
片段是啥?
在 Vue 3 中,组件现在正式支持多根节点组件,即片段!
<template>
  <div>我是其中一个div</div>
  <header>...</header>
  <footer>...</footer>
</template>
组件状态驱动的 CSS 变量真香?
听起来就感觉非常逼格
<template>
  <div class="myClass">我是SFC style CSS variable injection</div>
</template>

<script>
import { reactive, ref, toRefs } from "vue"
export default {
  setup() {
    const minColor = ref('red')
    const styleJs = reactive({
      color: 'blue',
      fontSize: '20px',
      fontWeight: '700',
      textDecoration: 'underline'
    })
    return { // 这里不能忘记return出去
      minColor,
      ...toRefs(styleJs),
    }
  }
}
</script>

<style lang="scss" scoped>
.myClass {
  text-decoration: v-bind(textDecoration);
  font-weight: v-bind(fontWeight);
  color: v-bind(minColor);
  font-size: v-bind(fontSize);
}
</style>
来看看效果:

值得说明的是,在return中,我使用了 ...toRefs() API,不使用的话那么在写绑定styleJs对象的属性值时就需要注意一下
.myClass {
  text-decoration: v-bind('styleJs.textDecoration');
  font-weight: v-bind('styleJs.fontWeight');
  color: v-bind(minColor);
  font-size: v-bind('styleJs.fontSize');
}
现在看到的样式绑定上的属性名上会有一点点的变化:


