深入浅出解析React Router 源码
最近组里有同学做了 React Router 源码相关的分享,我感觉这是个不错的选题, React Router 源码简练好读,是个切入前端路由原理的好角度。在分享学习的过程中,自己对前端路由也产生了一些思考和见解,所以写就本文,和大家分享我对前端路由的理解。
本文会先用原生 JavaScript 实现一个基本的前端路由,再介绍 React Router 的源码实现,通过比较二者的实现方式,分析 React Router 实现的动机和优点。阅读完本文,读者们应该能了解:
- 前端路由的基本原理
- React Router 的实现原理
- React Router 的启发和借鉴
一. 我们应该如何实现一个前端路由
一开始,我们先跳出 React Router,思考如何用原生 JavaScript 实现一个的前端路由,所谓前端路由,我们无非要实现两个功能:监听记录路由变化,匹配路由变化并渲染内容。以这两点需求作为基本脉络,我们就能大致勾勒出前端路由的形状。
路由示例:
1.Hash 实现
我们都知道,前端路由一般提供两种匹配模式, hash 模式和 history 模式,二者的主要差别在于对 URL 监听部分的不同,hash 模式监听 URL 的 hash 部分,也就是 # 号后面部分的变化,对于 hash 的监听,浏览器提供了 onHashChange 事件帮助我们直接监听 hash 的变化:
<body>
    <a href="#/home">Home</a>
    <a href="#/user">User</a>
    <a href="#/about">About</a>
    <div id="view"></div>
</body>

<script>
    // onHashChange事件回调, 匹配路由的改变并渲染对应内容
    function onHashChange() {
        const view = document.getElementById('view')
        switch (location.hash) {
          case '#/home':
              view.innerHTML = 'Home';
              break;
          case '#/user':
              view.innerHTML = 'User';
              break;
          case '#/about':
              view.innerHTML = 'About';
              break;
        }
    }

    // 绑定hash变化事件,监听路由变化
    window.addEventListener('hashchange', onHashChange);
</script>
hash 模式的实现比较简单,我们通过 hashChange 事件就能直接监听到路由 hash 的变化,并根据匹配到的 hash 的不同来渲染不同的内容。
2.History 实现
相较于 hash 实现的简单直接,history 模式的实现需要我们稍微多写几行代码,我们先修改一下 a 标签的跳转链接,毕竟 history 模式相较于 hash 最直接的区别就是跳转的路由不带 # 号,所以我们尝试直接拿掉#号:
<body>
    <a href="/home">Home</a>
    <a href="/user">User</a>
    <a href="/about">About</a>
    <div id="view"></div>
</body>
点击 a 标签,会看到页面发生跳转,并提示找不到跳转页面,这也是意料之中的行为,因为 a 标签的默认行为就是跳转页面,我们在跳转的路径下没有对应的网页文件,就会提示错误。那么对于这种非 hash 的路由变化,我们应该怎么处理呢?大体上,我们可以通过以下三步来实现 history 模式下的路由:
1.拦截a标签 的点击事件,阻止它的默认跳转行为
2.使用 H5 的 history API 更新 URL
3.监听和匹配路由改变以更新页面
在开始写代码之前,我们有必要先了解一下 H5 的几个 history API 的基本用法。其实 window.history 这个全局对象在 HTML4 的时代就已经存在,只不过那时我们只能调用 back()、go()等几个方法来操作浏览器的前进后退等基础行为,而 H5 新引入的 pushState()和 replaceState()及 popstate事件 ,能够让我们在不刷新页面的前提下,修改 URL,并监听到 URL 的变化,为 history 路由的实现提供了基础能力。
// 几个 H5 history API 的用法

History.pushState(state, title [, url])
// 往历史堆栈的顶部添加一个状态,方法接收三个参数:一个状态对象, 一个标题, 和一个(可选的)URL
// 简单来说,pushState能更新当前 url,并且不引起页面刷新

History.replaceState(stateObj, title[, url]);
// 修改当前历史记录实体,方法入参同上
// 用法和 pushState类似,区别在于 pushState 是往页面栈顶新增一个记录,而 replaceState 则是修改当前记录

window.onpopstate
// 当活动历史记录条目更改时,将触发popstate事件
// 需要注意的是,pushState 和 replaceState 对 url 的修改都不会触发onpopstate,它只会在浏览器某些行为下触发, 比如点击后退、前进按钮、a标签点击等
详细的参数介绍和用法读者们可以进一步查阅 MDN,这里只介绍和路由实现相关的要点以及基本用法。了解了这几个 API 以后,我们就能按照我们上面的三步来实现我们的 history 路由:
<body>
    <a href="/home">Home</a>
    <a href="/user">User</a>
    <a href="/about">About</a>
    <div id="view"></div>
</body>

<script>
    // 重写所有 a 标签事件
    const elements = document.querySelectorAll('a[href]')
    elements.forEach(el => el.addEventListener('click', (e) => {
      e.preventDefault()    // 阻止默认点击事件
      const test = el.getAttribute('href')
      history.pushState(null, null, el.getAttribute('href'))
      // 修改当前url(前两个参数分别是 state 和 title,这里暂时不需要用到
      onPopState()
      // 由于pushState不会触发onpopstate事件, 所以我们需要手动触发事件
    }))

    // onpopstate事件回调, 匹配路由的改变并渲染对应内容, 和 hash 模式基本相同
    function onPopState() {
        const view = document.querySelector('#view')
        switch (location.pathname) {
          case '/home':
              view.innerHTML = 'Home';
              break;
          case '/user':
              view.innerHTML = 'User';
              break;
          case '/about':
              view.innerHTML = 'About';
              break;
        }
    }

    // 绑定onpopstate事件, 当页面路由发生更改时(如前进后退),将触发popstate事件
    window.addEventListener('popstate', onPopState);
</script>
Tips:history 模式的代码无法通过直接打开 html 文件的形式在本地运行,在切换路由的时候,将会提示:
Uncaught SecurityError: A history state object with URL 'file://xxx.html' cannot be created in a document with origin 'null'.
这是由于 pushState 的 url 必须与当前的 url 同源,而
file://形式打开的页面没有 origin ,导致报错。如果想正常运行体验,可以使用http-server为文件启动一个本地服务。
History 模式的实现代码也比较简单,我们通过重写 a 标签的点击事件,阻止了默认的页面跳转行为,并通过 history API 无刷新地改变 url,最后渲染对应路由的内容。到这里,我们基本上了解了hash 和history 两种前端路由模式的区别和实现原理,总的来说,两者实现的原理虽然不同,但目标基本一致,都是在不刷新页面的前提下,监听和匹配路由的变化,并根据路由匹配渲染页面内容。既然我们能够如此简单地实现前端路由,那么 React Router 的优势又体现在哪,它的实现能给我们带来哪些启发和借鉴呢。
二. React Router 用法回顾
在分析源码之前,我们先来回顾一下 React Router 的基本用法,从用法中分析一个前端路由库的基本设计和需求。只有先把握作为上游的需求和设计,才能清晰和全面地解析作为下游的源码。
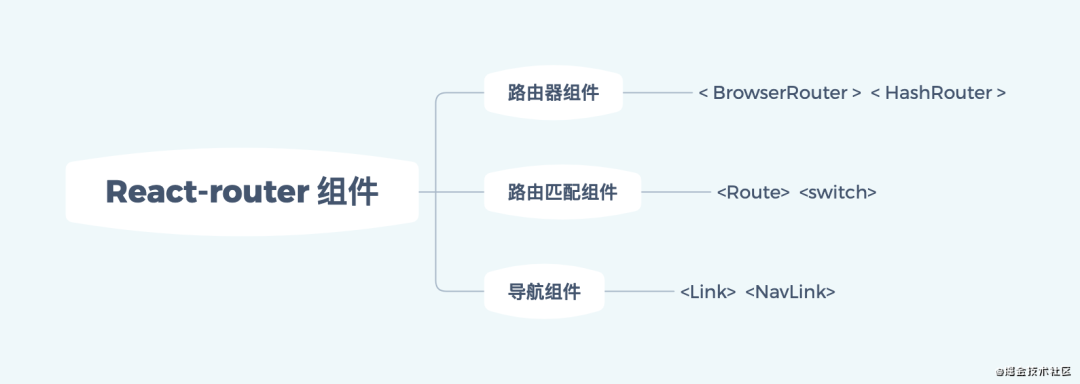
React Router 的组件通常分为三种:
- 路由器组件:
<BrowserRouter>和<HashRouter>,路由器组件的作为根容器组件,等路由组件必须被包裹在内才能够使用。 - 路由匹配组件:
<Route>和<Switch>,路由匹配组件通过匹配 path,渲染对应组件。 - 导航组件:
<Link>和<NavLink>,导航组件起到类似a标签跳转页面的作用。在后续对源码的讲解中,也将分别以这六个组件代码的解析为线索,来一窥 React Router 的整体实现。看回我们的代码,对于我们开头实现的原生路由,如果用 React Router 改写,应该是怎样的写法呢:
import { BrowserRouter, Switch, Route, Link } from "react-router-dom";
// HashRouter 和 BrowserRouter 二者的使用方法几乎没有差别,这里只演示其一

const App = () => {
  return (
    <BrowserRouter>
        <Link to="/">Home</Link>
        <Link to="/about">About</Link>
        <Link to="/user">User</Link>

        <Switch>
            <Route path="/about"><About /></Route>
            <Route path="/user"> <User /></Route>
            <Route path="/"><Home /></Route>
        </Switch>
    </BrowserRouter>
  );
}

const Home = () => (<h2>Home</h2>);
const About = () => (<h2>About</h2>);
const User = () => (<h2>User</h2>);

export default App;
我们使用 React Router 重新实现了一遍开头原生路由的功能,二者既有对应,也有差别。<Link> 对应 a标签,实现跳转路由的功能; <Route>对应 onPopState() 中的渲染逻辑,匹配路由并渲染对应组件;而<BrowserRouter> 对应 addEventListener 对路由变化的监听。
下面我们就进入 React Router 的源码,去一探这些组件的实现。
三. React Router 源码实现
1.目录概览
React Router 的代码主要存在于 packages 文件夹下,在 v4 版本后,React Router 就分为了四个包来发布,本文解析的部分主要位于 react-router 和 react-router-dom 文件夹。
├── packages
    ├── react-router    // 核心、公用代码
    ├── react-router-config   // 路由配置
    ├── react-router-dom   // 浏览器环境路由
    └── react-router-native   // React Native 路由
2.BrowserRouter 和 HashRouter
<BrowserRouter> 和 <HashRouter> 都是路由容器组件,所有的路由组件都必须被包裹在这两个组件中才能使用:
const App = () => {
  return (
    <BrowserRouter>
        <Route path="/" component={Home}></Route>
    </BrowserRouter>
  );
}
为什么会有这样的用法,其实我们在看过这两者的实现后就会理解:
// <BrowserRouter> 源码

import React from "react";
import { Router } from "react-router";
import { createBrowserHistory as createHistory } from "history";

class BrowserRouter extends React.Component {
  history = createHistory(this.props);

  render() {
    return <Router history={this.history} children={this.props.children} />;
  }
}

export default BrowserRouter;
// <HashRouter> 源码
import React from "react";
import { Router } from "react-router";
import { createHashHistory as createHistory } from "history";
class HashRouter extends React.Component {
history = createHistory(this.props);
render() {
return <Router history={this.history} children={this.props.children} />;
}
}
export default HashRouter;我们会发现这二者就是一个壳,两者的代码量很少,代码也几乎一致,都是创建了一个 history对象,然后将其和子组件一起透传给了<Router>,二者区别只在于引入的 createHistory() 不同。因此对于这二者的解析,其实是对 <Router> 和 history 库的解析。
history 库
history 源码仓库: https://github.com/ReactTraining/history
先来看 history 库,这里的 history 并非 H5 的 history 对象,而是一个有着 7k+ star 的会话历史管理库,是 React Router 的核心依赖。本小节我们来看 history 库的用法,以及了解为什么 React Router 要选择 history 来管理会话历史。
在看具体用法之前,我们先思考一下我们的"会话历史管理"的需求。所谓会话历史管理,我们很容易想到维护一个页面访问历史栈,跳转页面的时候 push 一个历史,后退 pop 一个历史即可。不过我们通过第一节对 hash 和 history 路由的原生实现就能明白,不同路由模式之间,操作会话历史的 API 不同、监听会话历史的方式也不同,而且前端路由并不只有这两种模式,React Router 还提供了 memory 模式 static 模式,分别用于 RN 开发和 SSR。
所以我们希望在中间加一层抽象,来屏蔽几种模式之间操作会话历史的差别,而不是将这些差别和判断带进 React Router 的代码中。
history 使您可以在任何运行 JavaScript 的地方轻松管理会话历史记录。一个 history 对象可以抽象出各种环境中的差异,并提供一个最小的API,使您可以管理历史记录堆栈,导航和在会话之间保持状态。
这是 history 文档的第一句,很好地概括了 history 的作用、优势和使用范围,直接来看 API:
import { createBrowserHistory } from 'history';
// 创建history实例
const history = createBrowserHistory();
// 获取当前 location 对象,类似 window.location
const location = history.location;
// 设置监听事件回调,回调接收两个参数 location 和 action
const unlisten = history.listen((location, action) => {
  console.log(location.pathname, location.state);
});

// 可以使用 push 、replace、go 等方法来修改会话历史
history.push('/home', { some: 'state' });
// 如果要停止监听,调用listen()返回的函数.
unlisten();
API 简洁好懂,就不再赘述了。出于篇幅的考虑,本小节只介绍 history库部分用法,其实现原理放到末尾番外篇,好让读者先专注了解 React Router 的实现。
Router 的实现
我们已经知道,<BrowserRouter> 和 <HashRouter> 本质上都是 <Router>,只是二者引入的 createHistory() 方法不同。<Router> 的代码在 react-router 这个包里,是一个相对公共的组件,其他包的 <Router> 都引自这里:
// 这个 RouterContext 并不是原生的 React Context, 由于React16和15的Context互不兼容, 所以React Router使用了一个第三方的 context 以同时兼容 React 16 和 15
// 这个 context 基于 mini-create-react-context 实现, 这个库也是React context的Polyfil, 所以可以直接认为二者用法相同
import RouterContext from "./RouterContext";
import React from 'react';

class Router extends React.Component {
  // 该方法用于生成根路径的 match 对象
  // 第一次看这个 match 对象可能有点懵逼, 其实后面看到 <Route> 实现的时候就能理解 match 对象的用处, 这个对象是提供给<Route>判断当前匹配页面的
  static computeRootMatch(pathname) {
    return { path: "/", url: "/", params: {}, isExact: pathname === "/" };
  }

  constructor(props) {
    super(props);

    // 从传入的 history 实例中取了 location 对象存到了state里, 后面会通过setState更改location来触发重新渲染
    // location 对象包含 hash/pathname/search/state 等属性, 其实就是当前的路由信息
    this.state = {
      location: props.history.location
    };
    // isMounted 和 pendingLocation 这两个私有变量可能让读者有点迷惑, 源码其实也在这进行了一整段注释说明, 解释为什么在 constructor 而不是 componentDidMount 中去监听路由变化
    // 简单来说, 由于子组件会比父组件更早完成挂载, 如果在 componentDidMount 进行监听, 则有可能在监听事件注册之前 history.location 已经发生改变, 因此我们需要在 constructor 中就注册监听事件, 并把改变的 location 记录下来, 等到组件挂载完了以后, 再更新到 state 上去
    // 其实如果去掉这部分的hack, 这里只是简单地设置了路由监听, 并在路由改变的时候更新 state 中的路由信息
    // 判断组件是否已经挂载, componentDidMount阶段会赋值为true
    this._isMounted = false;
    // 储存在构造函数执行阶段发生改变的location
    this._pendingLocation = null;

    // 判断是否处于服务端渲染 (staticContext 是 staticRouter 传入<Router>的属性, 用于服务端渲染)
    if (!props.staticContext) {
      // 使用 history.listen() 添加路由监听事件
      this.unlisten = props.history.listen(location => {
        if (this._isMounted) {
          // 如果组件已经挂载, 直接更新 state 的 location
          this.setState({ location });
        } else {
          // 如果组件未挂载, 就先把 location 存起来, 等到 didmount 阶段再 setState
          this._pendingLocation = location;
        }
      });
    }
  }

  // 对应构造函数里的处理, 将 _isMounted 置为 true, 并使用 setState 更新 location
  componentDidMount() {
    this._isMounted = true;

    if (this._pendingLocation) {
      this.setState({ location: this._pendingLocation });
    }
  }

  // 组件被卸载时, 同步解绑路由的监听
  componentWillUnmount() {
    if (this.unlisten) this.unlisten();
  }

  render() {
    return (
      // Provider将value向下传递给组件树上的组件
      <RouterContext.Provider
        // 透传子组件
        children={this.props.children || null}
        value={{
          // context 传递的值, <Router>下的组件树就能通过 this.context.xxx 这样的方式取得这里的值
          // 透传 history 对象
          history: this.props.history,
          // 当前路由信息
          location: this.state.location,
          // 是否为根路径
          match: Router.computeRootMatch(this.state.location.pathname),
          // 服务端渲染用到的 staticContext
          staticContext: this.props.staticContext
        }}
      />
    );
  }
}

export default Router
代码看起来不少,但如果刨除当中各种判断场景的代码,其实 <Router> 只做了两件事,一是给子组件包了一层context,让路由信息( history 和 location 对象)能传递给其下所有子孙组件;二是绑定了路由监听事件,使每次路由的改变都触发setState。
其实看到这我们就能明白,为什么 <Route> 等路由组件要求被包裹在 <BrowerRouter> 等路由器容器组件内才能使用,因为路由信息都由外层的容器组件通过 context 的方式,传递给所有子孙组件,子孙组件在拿到当前路由信息后,才能匹配并渲染出对应内容。此外在路由发生改变的时候,容器组件<Router> 会通过 setState() 的方式,触发子组件重新渲染。
本章小结
在看完了 <Router> 的实现后,我们来和原生实现做一个比较,我们之前提到,前端路由主要的两个点是监听和匹配路由的变化,而<Router> 就是帮我们完成了监听这一步。在原生实现中,我们分别实现了 hash 模式和 history 模式的监听,又是绑定事件,又是劫持 a 标签的点击,而在 React Router 中,这一步由 history 库来完成,代码内调用了history.listen 就完成了对几种模式路由的监听。
此外在原生实现中,我们还忽略了路由嵌套的情况,我们其实只在根节点绑定了监听事件,没有考虑子组件的路由,而在 React Router 中,<Router>通过context的方式,将路由信息传递给其子孙组件,使其下的 <Route> <Switch> 等路由组件都能感知路由变化,并拿到相应路由信息。
Route 的实现
我们前面提到,前端路由的核心在于监听和匹配,上面我们使用 <Router> 实现了监听,那么本小节就来分析 <Route> 是如何做匹配的,同样地我们先回顾 <Route> 的用法:
匹配模式:
// 精确匹配
// 严格匹配
// 大小写敏感
<Route path="/user" exact component={User} />
<Route path="/user" strict component={User} />
<Route path="/user" sensitive component={User} />
路径 path 写法:
// 字符串形式
// 命名参数
// 数组形式
<Route path="/user" component={User} />
<Route path="/user/:userId" component={User} />
<Route path={["/users", "/profile"]} component={User} />
渲染方式:
// 通过子组件渲染
// 通过 props.component 渲染
// 通过 props.render 渲染
<Route path='/home'><Home /></Route>
<Route path='/home' component={Home}></Route>
<Route path='/home' render={() => <p>home</p>}></Route>

// 例子: 这里最终的渲染结果是User, 优先级是子组件 > component > render
<Route path='/home' component={Home} render={() => <p>About</p>}>
  <User />
</Route>
<Route> 所做的事情也很简单,匹配到传入的 path,渲染对应的组件。此外 <Route> 还提供了几种不同的匹配模式、path写法以及渲染方式,<Route> 的源码实现,和这些配置项有着紧密的联系:
import React from "react";
import RouterContext from "./RouterContext";
import matchPath from "../utils/matchPath.js";

function isEmptyChildren(children) {
  return React.Children.count(children) === 0;
}

class Route extends React.Component {
  render() {
    return (
      {/* Consumer 接收了 <Router> 传下来的 context, 包含了history对象, location(当前路由信息), match(匹配对象)等信息 */}
      <RouterContext.Consumer>
      {/* 拿到路由信息
        拿到 match 对象(来源优先级:Switch → props.path → context)
        props.computedMatch 是 <Switch> 传下来的, 是已经计算好的match, 优先级最高
        <Route> 组件上的 path 属性, 优先级第二
        计算 match 对象, 下一小节会详解这个 matchPath
        context 上的 match 对象
        把当前的 location 和 match 拼成新的 props,这个 props 会通过 Provider 继续向下传
        <Route>组件提供的三种渲染方式, 优先级 children > component > render
        这里对children为空的情况做了一个兼容, 统一赋为null, 这是因为 Preact 默认使用空数组来表示没有children的情况 (Preact是一个3kb的React替代库, 挺有趣的, 读者们可以看看)
      */}
        {context => {
          const location = this.props.location || context.location;

          const match = this.props.computedMatch
            ? this.props.computedMatch
            : this.props.path
            ? matchPath(location.pathname, this.props)
            : context.match;


          const props = { ...context, location, match };
          let { children, component, render } = this.props;
          if (Array.isArray(children) && isEmptyChildren(children)) {
            children = null;
          }

          // 把拼好的新的props通过context继续往下传
          // 第一层判断: 如果有 match 对象, 就渲染子组件 children 或 Component
          // 第二层判断: 如果有子组件 children, 就渲染 children, 没有就渲染 component
          // 第三层判断: 如果子组件 children 是函数, 那就先执行函数, 并将路由信息 props 作为回调参数
          return (
            <RouterContext.Provider value={props}>
              {props.match
                ? children
                  ? typeof children === "function"
                    ? children(props)
                    : children
                  : component
                  ? React.createElement(component, props)
                  : render
                  ? render(props)
                  : null
                : typeof children === "function"
                ? children(props)
                : null}
            </RouterContext.Provider>
          );
        }}
      </RouterContext.Consumer>
    );
  }
}

export default Route;
Route的实现相对简单,代码分为两部分:获取 match 对象和渲染组件。我们在代码中会看到多次 match 对象,这个 match 对象其实是由根组件的 computedMatch() 或 matchPath() 生成,包含了当前匹配信息。对于这个 match 对象的生成过程,我们放到下一小节,这里我们只需要知道,如果当前 Route 匹配了路由,那么会生成对应 match 对象,如果没有匹配,match 对象为 null。
// match 对象实例
{
  isExact: true,
  params: {},
  path: "/",
  url: "/"
}
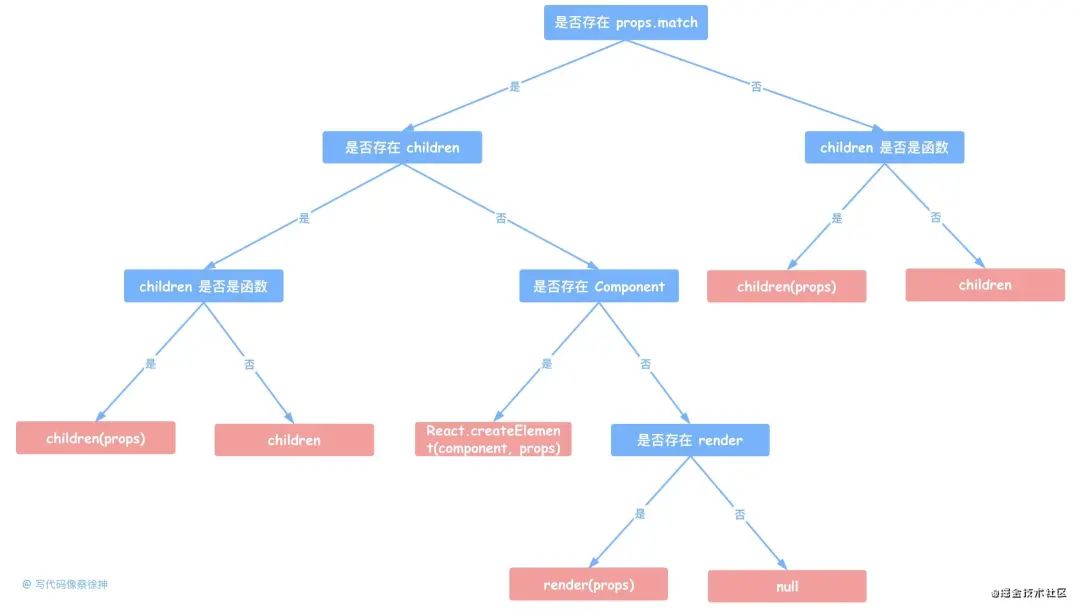
第二部分是 <Route> 组件的渲染逻辑,这部分代码还是得从 <Route> 的行为去理解,Route 提供了三种渲染方式:子组件、props.component、props.render,三者之间又存在优先级,因此就形成了我们看到了多层三元表达式渲染的结构。
这部分渲染逻辑不用细看,参照下边的树状图理解即可,代码用了四层三元表达式的嵌套,来实现 子组件> component属性传入的组件 > children是函数 这样的优先级渲染。
红色节点是最终渲染结果:
matchPath
如果让我们去实现路由匹配,我们会怎么去做呢?全等比较?正则判断?反正看起来应该是很简单的一个实现,但如果我们打开matchPath()的代码,却会发现它用了60行代码、引了一个第三方库来做这件事情:
import pathToRegexp from "path-to-regexp";

// 这里建议先直接看 matchPath() 的代码, 调用到的时候再看 compilePath
const cache = {};
const cacheLimit = 10000;
let cacheCount = 0;

// compilePath 的作用是根据路由路径path 和匹配参数options等参数拼出正则regexp,和路径参数keys 是路径参数
function compilePath(path, options) {
  const cacheKey = `${options.end}${options.strict}${options.sensitive}`;
  const pathCache = cache[cacheKey] || (cache[cacheKey] = {});

  if (pathCache[path]) return pathCache[path];

  const keys = [];
  // keys是个空数组, pathToRegexp会将在path中解析到的参数追加到keys里
  const regexp = pathToRegexp(path, keys, options);
  // 由pathToRegexp拼出正则, pathToRegexp是个将字符串路径转换为正则表达式的工具, 用法比较简单, 读者可以自己查查用法
  const result = { regexp, keys };
  // 返回结果: 正则regexp, 路径里解析到的参数keys

  console.log('cacheCount', cacheCount);
  console.log('cacheLimit', cacheLimit);
  console.log('pathCache', pathCache);;
  if (cacheCount < cacheLimit) {
    pathCache[path] = result;
    cacheCount++;
  }

  return result;
}

function matchPath(pathname, options = {}) {
  if (typeof options === "string" || Array.isArray(options)) {
  // 正常情况下, options 是 <Route> 的 props, 是个对象; 这里判断, 是为了兼容 `react-router-redux`库中某个调用传入的 options 只有 path
    options = { path: options };
  }

  const { path, exact = false, strict = false, sensitive = false } = options;
  // 取出路由路径 path 和匹配参数 exact 等, 并赋初值

  const paths = [].concat(path);
  // 统一 path 类型 (path可能是数组形式['/', '/user']或字符串形式"/user")

  return paths.reduce((matched, path) => {
  // 这里用 reduce, 其实是为了在遍历路径集合 paths 的同时, 只输出一个结果, 如果用 map之类的 api 做循环, 会得到一个数组
    if (!path && path !== "") return null;
    // 没有 path, 返回 null
    if (matched) return matched;
    // 已经匹配到了, 就返回上次匹配结果

    const { regexp, keys } = compilePath(path, {
    // 根据路由路径 path 和匹配参数 exact 等参数拼出正则 regexp, keys 是路径参数(比如/user:id的id)
      end: exact,
      strict,
      sensitive
    });
    const match = regexp.exec(pathname);
    // 调用正则原型方法exec, 返回一个结果数组或null

    if (!match) return null;
    // 没匹配到, 返回 null

    const [url, ...values] = match;
    // 从结果数组里
    const isExact = pathname === url;
    // 是否准确匹配

    if (exact && !isExact) return null;
    // 要求准确匹配却没有全等匹配到, 返回 null

    //  这里给几个例子, 帮助大家直观理解这个调用过程
    //  传入的path:    /user
    //  regexp:       /^\/user\/?(?=\/|$)/i
    //  url:          /user
    //  返回结果:       {"path":"/user","url":"/user","isExact":true,"params":{}}

    //  例子2
    //  传入的path:    /user/:id
    //  regexp:       /^\/user\/(?:([^\/]+?))\/?(?=\/|$)/i
    //  url:          /user/1
    //  返回结果:       {"path":"/user/:id","url":"/user/1","isExact":true,"params":{"id":"1"}}

    return {
      path,
      // 用于匹配的 path
      url: path === "/" && url === "" ? "/" : url,
      // url 匹配的部分
      isExact,
      // 是否准确匹配
      params: keys.reduce((memo, key, index) => {
      // 把 path-to-regexp 直接返回的路由参数 keys 做一次格式转换
        memo[key.name] = values[index];
        return memo;
      }, {})
    };
  }, null);
}

export default matchPath;
小结
本小节我们通过对 <Route> 和 mathPath 源码的解析,讲解 React Router 实现匹配和渲染的过程,匹配路由这部分的工作由 mathPath 通过 path-to-regexp进行,<Route> 其实相当于一个高阶组件,以不同的优先级和匹配模式渲染匹配到的子组件。
尾声
到这里,我们基本完成了对 React Router 的主要组件源码解析,最后回顾一下整体的实现:
-
对于监听功能的实现,React Router 引入了
history库,以屏蔽了不同模式路由在监听实现上的差异, 并将路由信息以context的形式,传递给被包裹的组件, 使所有被包裹在其中的路由组件都能感知到路由的变化, 并接收到路由信息 -
在匹配的部分, React Router 引入了
path-to-regexp来拼接路径正则以实现不同模式的匹配,路由组件作为一个高阶组件包裹业务组件, 通过比较当前路由信息和传入的 path,以不同的优先级来渲染对应组件
整体而言,React Router 的源码相对简单清晰,源码中所体现的前端路由的设计实现,也相信会对读者们有所启发借鉴。虽然本文对 React Router 源码的解析就到此为止, 但有关前端路由以及 React Router 的探索不会停止,怎样从源码到落地,怎样为项目做路由选型,怎样设计一个合理的前端路由系统... 对于前端路由, 我们需要挖掘的东西还有很多, 源码解析只是在这条道路路上迈出了一小步。在当下这波前端技术的滔滔浪潮中,前端路由,也还会在前端er的不断迭代中, 继续摸索和前进, 在更广阔的场景上, 去发挥它的价值。
由于时间紧张, 本文成文比较匆忙,潦草之处,敬请谅解,以下有些坑还没来得及填, 算是留给读者们的思考题了~
- 集中式静态配置路由和分布式动态组件路由之争
<Switch>和<Link>组件源码解析- React Router hooks 源码解析
- history 库源码解析


