「React 进阶」 学好这些 React 设计模式,能让你的 React 项目飞起来
一 前言
今天我们来悉数一下 React 中一些不错的设计模式,这些设计模式能够解决一些功能复杂,逻辑复用 的问题,还能锻炼开发者的设计和编程能力,以为多年开发经验来看,学好这些设计模式,那就是一个字 香!
基本上每一个设计模式,笔者都会绞尽脑汁的想出两个 demo,希望屏幕前的你能给笔者赏个赞,以此鼓励我继续创作前端硬文。
老规矩,我们带着疑问开始今天的阅读:
- 1 React 的常见设计模式有哪些?
- 2 组合模式功能强大,都用于哪些场景。
- 3 render props 使用,开发者应该注意些什么?
- 4 hoc 模式的应用场景。
- 5 提供者模式实现状态管理和状态下发。
- 6 如何使用继承模式,继承模式的优缺点是什么?
我相信读完这篇文章,这些问题全都会迎刃而解。
首先我们想一个问题,那就是 为什么要学习设计模式? 原因我总结有以下几个方面。
- 1 功能复杂,逻辑复用问题。首先 React 灵活多变性,就决定了 React 项目可以应用多种设计模式。但是这些设计模式的产生也确实办了实事:
场景一:
在一个项目中,全局有一个状态,可以称之为 theme (主题),那么有很多 UI 功能组件需要这个主题,而且这个主题是可以切换的,就像 github 切换暗黑模式一样,那么如何优雅的实现这个功能呢?
这个场景如果我们用 React 的提供者模式,就能轻松搞定了,通过 context 保存全局的主题,然后将 theme 通过 Provider 形式传递下去,需要 theme ,那么消费 context ,就可以了,这样的好处是,只要 theme 改变,消费 context 的组件就会重新更新,达到了切换主题的目的。
场景二:
表单设计场景也需要一定程度上的 React 的设计模式,首先对于表单状态的整体验证需要外层的 Form 绑定事件控制,调度表单的状态下发,验证功能。内层对于每一个表单控件还需要 FormItem 收集数据,让控件变成受控的。这样的 Form 和 FormItem 方式,就是通过组合模式实现的。
- 2 培养设计能力,编程能力
熟练运用 React 的设计模式,可以培养开发者的设计能力,比如 HOC 的设计 ,公共组件的设计 ,自定义 hooks 的设计,一些开源的优秀的库就是通过 React 的灵活性和优秀的设计模式实现的。
例子一:
比如在 React 状态管理工具中,无论是 react-redux ,还是 mobx-react,一方面想要把 state 和 dispatch 函数传递给组件,另一方面订阅 state 变化,来促使业务组件更新,那么整个流程中,需要一个或多个 HOC 来搞定。于是 react-redux 提供了 connect,mobx-react 提供了 inject ,observer 等优秀的 hoc。由此可见,学会 React 的设计模式,有助于开发者小到编写公共组件,大到开发开源项目。
今天我重点介绍 React 的五种设计模式,分别是:
- 组合模式
- render props模式
- hoc 模式
- 提供者模式
- 类组件继承
二 组合模式
1 介绍
组合模式适合一些容器组件场景,通过外层组件包裹内层组件,这种方式在 Vue 中称为 slot 插槽,外层组件可以轻松的获取内层组件的 props 状态,还可以控制内层组件的渲染,组合模式能够直观反映出 父 -> 子组件的包含关系,首先我来举个最简单的组合模式例子。
<Tabs onChange={ (type)=> console.log(type)  } >
    <TabItem name="react"  label="react" >React</TabItem>
    <TabItem name="vue" label="vue" >Vue</TabItem>
    <TabItem name="angular" label="angular"  >Angular</TabItem>
</Tabs>
如上 Tabs 和 TabItem 组合,构成切换 tab 功能,那么 Tabs 和 TabItem 的分工如下:
- Tabs 负责展示和控制对应的 TabItem 。绑定切换 tab 回调方法 onChange。当 tab 切换的时候,执行回调。
- TabItem 负责展示对应的 tab 项,向 Tabs 传递 props 相关信息。
我们直观上看到 Tabs 和 TabItem 并没有做某种关联,但是却无形的联系起来。这种就是组合模式的精髓所在,这种组合模式的组件,给使用者感觉很舒服,因为大部分工作,都在开发组合组件的时候处理了。所以编写组合模式的嵌套组件,对锻炼开发者的 React 组件封装能力是很有帮助的。
接下来我们一起看一下,组合模式内部是如何实现的。
2 原理揭秘
实际组合模式的实现并没有想象中那么复杂,主要分为外层和内层两部分,当然可能也存在多层组合嵌套的情况,但是万变不离其宗,原理都是一样的。首先我们看一个简单的组合结构:
<Groups>
    <Item  name="《React进阶实践指南》" />
</Groups>
那么 Groups 能对 Item 做一些什么操作呢 ?
Item 在 Groups的形态
首先如果如上组合模式的写法,会被 jsx 编译成 React element 形态,Item 可以通过 Groups 的 props.children 访问到。
function Groups (props){
    console.log( props.children  ) // Groups element
    console.log( props.children.props ) // { name : 'React进阶实践指南》' }
    return  props.children
}
但是这是针对单一节点的情况,事实情况下,外层容器可能有多个子组件的情况。
<Groups>
    <Item  name="《React进阶实践指南》" />
    <Item name="《Nodejs深度学习手册》" />
</Groups>
这种情况下,props.children 就是一个数组结构,如果想要访问每一个的 props ,那么需要通过 React.Children.forEach 遍历 props.children。
function Groups (props){
    console.log( props.children  ) // Groups element
    React.Children.forEach(props.children,item=>{
        console.log( item.props )  //依次打印 props
    })
    return  props.children
}
隐式混入 props
这个是组合模式的精髓所在,就是可以通过 React.cloneElement 向 children 中混入其他的 props,那么子组件就可以使用容器父组件提供的特有的 props 。我们来看一下具体实现:
function Item (props){
    console.log(props) // {name: "《React进阶实践指南》", author: "alien"}
    return <div> 名称: {props.name} </div>
}

function Groups (props){
    const newChilren = React.cloneElement(props.children,{ author:'alien' })
    return  newChilren
}- 用
React.cloneElement创建一个新的 element,然后混入其他的 props -> author 属性,React.cloneElement 的第二个参数,会和之前的 props 进行合并 ( merge )。
这里还是 Groups 只有单一节点的情况,有些同学会问直接在原来的 children 基础上加入新属性不就可以了吗?像如下这样:
props.children.props.author = 'alien'
- 这样会报错,对于 props ,React 会进行保护,我们无法对 props 进行拓展。所以要想隐式混入 props ,只能通过
cloneElement来实现。
控制渲染
组合模式可以通过 children 方式获取内层组件,也可以根据内层组件的状态来控制其渲染。比如如下的情况:
export default ()=>{
    return <Groups>
    <Item  isShow name="《React进阶实践指南》" />
    <Item  isShow={false} name="《Nodejs深度学习手册》" />
    <div>hello,world</div>
    { null }
</Groups>
}- 如上这种情况组合模式,只渲染
isShow = true的 Item 组件。那么外层组件是如何处理的呢?
实际处理这个很简单,也是通过遍历 children ,然后通过对比 props ,选择需要渲染的 children 。接下来一起看一下如何控制:
function Item (props){
    return <div> 名称: {props.name} </div>
}
/* Groups 组件 */
function Groups (props){
    const newChildren = []
    React.Children.forEach(props.children,(item)=>{
        const { type ,props } = item || {}
        if(isValidElement(item) && type === Item && props.isShow  ){
            newChildren.push(item)
        }
    })
    return  newChildren
}- 通过
newChildren存放满足要求的 React Element ,通过Children.forEach遍历 children 。 - 通过
isValidElement排除非 element 节点;type指向Item函数内存,排除非 Item 元素;获取 isShow 属性,只展示 isShow = true 的Item,最终效果满足要求。
内外层通信
组合模式可以轻松的实现内外层通信的场景,原理就是通过外层组件,向内层组件传递回调函数 callback ,内层通过调用 callback 来实现两层组合模式的通信关系。
function Item (props){
    return <div>
        名称:{props.name}
        <button onClick={()=> props.callback('let us learn React!')} >点击</button>
    </div>
}

function Groups (props){
    const handleCallback = (val) =>  console.log(' children 内容:',val )
    return <div>
        {React.cloneElement( props.children , { callback:handleCallback } )}
    </div>
}Groups向Item组件中隐式传入回调函数callback,将作为新的 props 传递。Item可以通过调用callback向Groups传递信息。实现了内外层的通信。
复杂的组合场景
组合模式还有一种场景,在外层容器中,进行再次组合,这样组件就会一层一层的包裹,一次又一次的强化。这里举一个例子:
function Item (props){
    return <div>
        名称:{props.name}     <br/>
        作者:{props.author}   <br/>
        对大家说:{props.mes}   <br/>
    </div>
}
/* 第二层组合 -> 混入 mes 属性  */
function Wrap(props){
    return React.cloneElement( props.children,{ mes:'let us learn React!' } )
}
/* 第一层组合,里面进行第二次组合,混入 author 属性  */
function Groups (props){
    return <Wrap>
        {React.cloneElement( props.children, { author:'alien' } )}
    </Wrap>
}

export default ()=>{
    return <Groups>
    <Item name="《React进阶实践指南》" />
</Groups>
}- 在
Groups组件里通过Wrap再进行组合。经过两次组合,把author和mes混入到 props 中。

这种组合模式能够一层层强化原始组件,外层组件不用过多关心内层到底做了些什么? 只需要处理 children 就可以,同样内层 children 在接受业务层的 props 外,还能使用来自外层容器组件的状态,方法等。
3 注意细节
组合模式也有很多细节值得注意,首先最应该想到的就是对于 children 的类型校验,因为组合模式,外层容器组件对 children 的属性状态是未知的。如果在不确定 children 的状态下,如果直接挂载,就会出现报错等情况。所以验证 children 的合法性就显得非常重要。
验证children
比如如下,本质上形态是属于 render props 形式。
<Groups>
   {()=>  <Item  isShow name="《React进阶实践指南》" />}
</<Groups>
上面的情况,如果 Groups 直接用 children 挂载的话。
function Groups (props){
    return props.children
}
这样的情况,就会报 Functions are not valid as a React child 的错误。那么需要在 Groups 做判断,我们来一起看一下:
function Groups (props){
    return  React.isValidElement(props.children)
     ? props.children
     : typeof props.children === 'function' ?
       props.children() : null
}- 首先判断 children 是否是 React.element ,如果是那么直接渲染,如果不是,那么接下来判断是否是函数,如果是函数,那么直接函数,如果不是那么直接渲染
null就可以了。
绑定静态属性
现在还有一个暴露的问题是,外层组件和内层组件通过什么识别身份呢?比如如下的场景:
<Groups>
   <Item  isShow name="《React进阶实践指南》" />
   <Text />
<Groups>如下,Groups 内部有两个组件,一个是 Item ,一个是 Text ,但是只有 Item 是有用的,那么如何证明 Item 组件呢。那么我们需要给组件函数或者类绑定静态属性,这里可以统一用 displayName 来标记组件的身份。
那么只需要这么做就可以了:
function Item(){ ... }
Item.displayName = 'Item'
那么在 Groups 中就可以找到对应的 Item 组件,排除 Text 组件。具体可以通过 children 上的 type 属性找到对应的函数或者是类,然后判断 type 上的 displayName 属性找到对应的 Item 组件,本质上 displayName 主要用于调试,这里要记住组合方式,可以使用子组件的静态属性就可以了。 当然也可以通过内存空间相同的方式。
具体参考方式:
function Groups (props){
    const newChildren = []
    React.Children.forEach(props.children,(item)=>{
        const { type ,props } = item || {}
        if(isValidElement(item) && type.displayName === 'Item' ){
            newChildren.push(item)
        }
    })
    return  newChildren
}
通过 displayName 属性找到 Item。
4 实践demo
接下来,我们来简单实现刚开始的 tab,tabItem 切换功能。
tab实现
const Tab = ({ children ,onChange }) => {
    const activeIndex = useRef(null)
    const [,forceUpdate] = useState({})
    /* 提供给 tab 使用  */
    const tabList = []
    /* 待渲染组件 */
    let renderChildren = null
    React.Children.forEach(children,(item)=>{
        /* 验证是否是 <TabItem> 组件  */
        if(React.isValidElement(item) && item.type.displayName === 'tabItem' ){
            const { props } = item
            const { name, label } = props
            const tabItem = {
                name,
                label,
                active: name === activeIndex.current,
                component: item
            }
            if(name === activeIndex.current) renderChildren = item
            tabList.push(tabItem)
        }
    })
    /* 第一次加载,或者 prop chuldren 改变的情况 */
    if(!renderChildren && tabList.length > 0){
        const fisrtChildren = tabList[0]
        renderChildren = fisrtChildren.component
        activeIndex.current = fisrtChildren.component.props.name
        fisrtChildren.active = true
    }

    /* 切换tab */
    const changeTab=(name)=>{
        activeIndex.current = name
        forceUpdate({})
        onChange && onChange(name)
    }

    return <div>
        <div className="header"   >
            {
                tabList.map((tab,index) => (
                    <div className="header_item" key={index}  onClick={() => changeTab(tab.name)} >
                        <div className={'text'}  >{tab.label}</div>
                        {tab.active && <div className="active_bored" ></div>}
                    </div>
                ))
            }
        </div>
        <div>{renderChildren}</div>
    </div>
}

Tab.displayName = 'tab'
我写的这个 Tab,负责了整个 Tab 切换的主要功能,包括 TabItem 的过滤,状态收集,控制对应的子组件展示。
- 首先通过
Children.forEach找到符合条件的TabItem。收集TabItem的 props,形成菜单结构。 - 找到对应的
children,渲染正确的 children 。 - 提供改变 tab 的方法
changeTab。 - displayName 标记
Tab组件。这个主要目的方便调试。
TabItem 的实现
const TabItem = ({ children }) => {
    return <div>{children}</div>
}
TabItem.displayName = 'tabItem'
这个 demo 中的 TabItem 功能十分简单,大部分事情都交给 Tab 做了。
TabItem 做的事情是:
- 展示
children( 我们写在 TabItem 里面的内容 ) - 绑定静态属性
displayName。
效果

5 总结
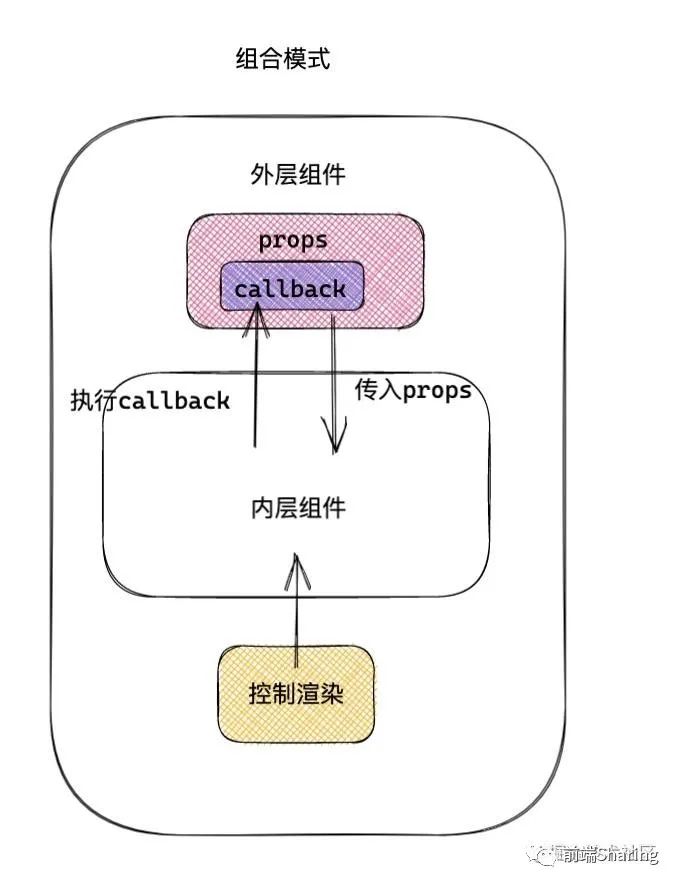
组合模式在日常开发中,用途还是比较广泛的,尤其是在一些比较出色的开源项目中,组合模式的总结内容如下:
- 组合模式通过外层组件获取内层组件 children ,通过 cloneElement 传入新的状态,或者控制内层组件渲染。
- 组合模式还可以和其他组件组合,或者是 render props,拓展性很强,实现的功能强大。
总结流程图如下:
三 render props模式
1 介绍
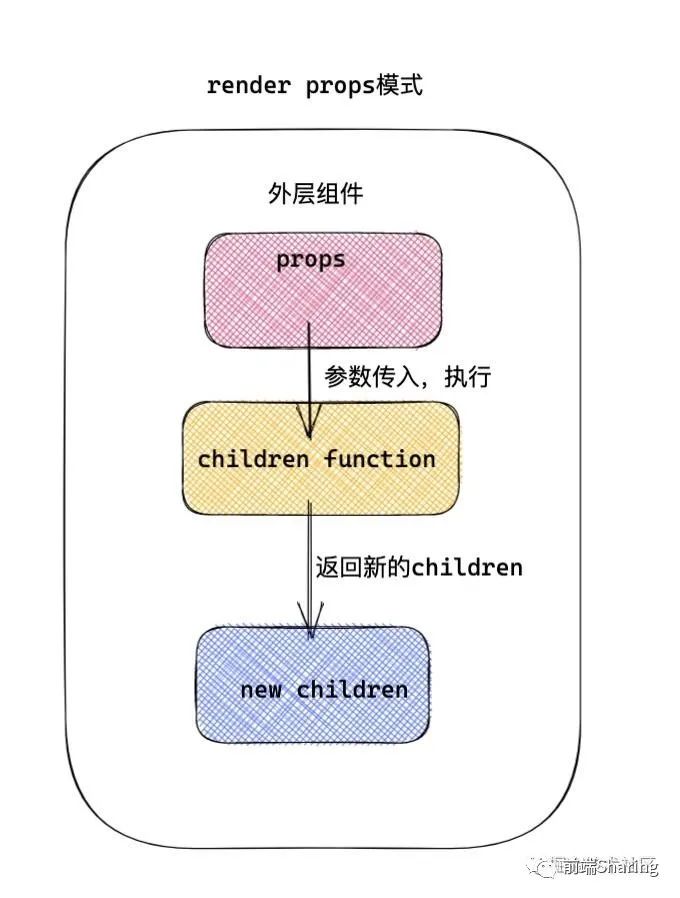
render props 模式和组合模式类似。区别不同的是,用函数的形式代替 children。函数的参数,由容器组件提供,这样的好处,将容器组件的状态,提升到当前外层组件中,这个是一个巧妙之处,也是和组合模式相比最大的区别。
我们先来看一下一个基本的 render props 长什么样子:
export default function App (){
    const aProps = {
        name:'《React进阶实践指南》'
    }
    return <Container>
        {(cProps) => <Children {...cProps} { ...aProps }  />}
    </Container>
}
如上是 render props 的基本样子。可以清楚的看到:
cProps为Container组件提供的状态。aProps为App提供的状态。这种模式优点是,能够给 App 的子组件 Container 的状态提升到 App 的 render 函数中。然后可以组合成新的 props,传递给 Children,这种方式让容器化的感念更显而易见。
接下来我们研究一下 render props 原理和细节。
2 原理和细节
首先一个问题是 render props 这种方式到底适合什么场景,实际这种模式更适合一种,容器包装,状态的获取。可能这么说有的同学不明白。那么一起看一下 context 中的 Consumer。就采用 render props 模式。
const Context = React.createContext(null)
function Index(){
    return <Context.Consumer>
           {(contextValue)=><div>
               名称:{contextValue.name}
               作者:{contextValue.author}
           </div>}
         </Context.Consumer>
}

export default function App(){
    const value = {
        name:'《React进阶实践指南》',
        author:'我不是外星人'
    }
    return <Context.Provider value={value} >
        <Index />
    </Context.Provider>
}- 我们看到 Consumer 就是一个容器组件,包装即将渲染的内容,然后通过 children render 函数执行把状态
contextValue从下游向上游提取。
那么接下来模拟一下 Consumer 的内部实现。
function myConsumer(props){
    const contextValue = useContext(Context)
    return props.children(contextValue)
}
如上就模拟了一个 Consumer 功能,从 Consumer 的实现看 render props 本质就是容器组件产生状态,再通过 children 函数传递下去。所以这种模式我们应该更在乎的是,容器组件能提供些什么?
派生新状态
相比传统的组合模式,render props 还有一个就是灵活性,可以通过容器组件的状态和当前组件的状态结合,派生出新的状态。比如如下
 <Container>
        {(cProps) => {
            const  const nProps =  getNewProps( aProps , cProps )
            return <Children {...nProps} />
        }}
</Container>- nProps 是通过当前组件的状态 aProps 和 Container 容器组件 cProps ,合并计算得到的状态。
反向状态回传
这种情况比较极端,笔者也用过这种方法,就是可以通过 render props 中的状态,提升到当前组件中,也就是把容器组件内的状态,传递给父组件。比如如下情况。
function GetContanier(props){
    const dom = useRef()
    const getDom = () =>  dom.current
    return <div ref={dom} >
        {props.children({ getDom })}
    </div>
}

export default function App(){
     /* 保存 render props 回传的状态 */
     const getChildren = useRef(null)
     useEffect(()=>{
        const childDom = getChildren.current()
        console.log( childDom,'childDom' )
     },[])
    return <GetContanier>
        {({getDom})=>{
            getChildren.current = getDom
            return <div></div>
        }}
    </GetContanier>
}
- 这是一个复杂的状态回传的场景,在
GetContanier将获取元素的方法getDom通过 render props 回传给父组件。 - 父组件 App 通过
getChildren保存 render props 回传的内容,在useEffect调用 getDom 方法,打印内容如下:
但是现实情况不可能是获取一个 dom 这么简单,真实情景下,回传的内容可能更加复杂。
3 注意问题
render props 的注意问题还是对 children 的校验,和组合模式不同的是,这种模式需要校验 children 是一个函数,只有是函数的情况下,才能执行函数,传递 props 。打一个比方:
function Container (props){
    const renderChildren =  props.children
    return typeof renderChildren === 'function' ? renderChildren({ name:'《React进阶时间指南》' }) : null
}
export default function App(){
    return <Container>
        {(props)=> <div> 名称 :{props.name} </div>}
    </Container>
}- 通过
typeof判断children是一个函数,如果是函数,那么执行函数,传递 props 。
4 实践demo
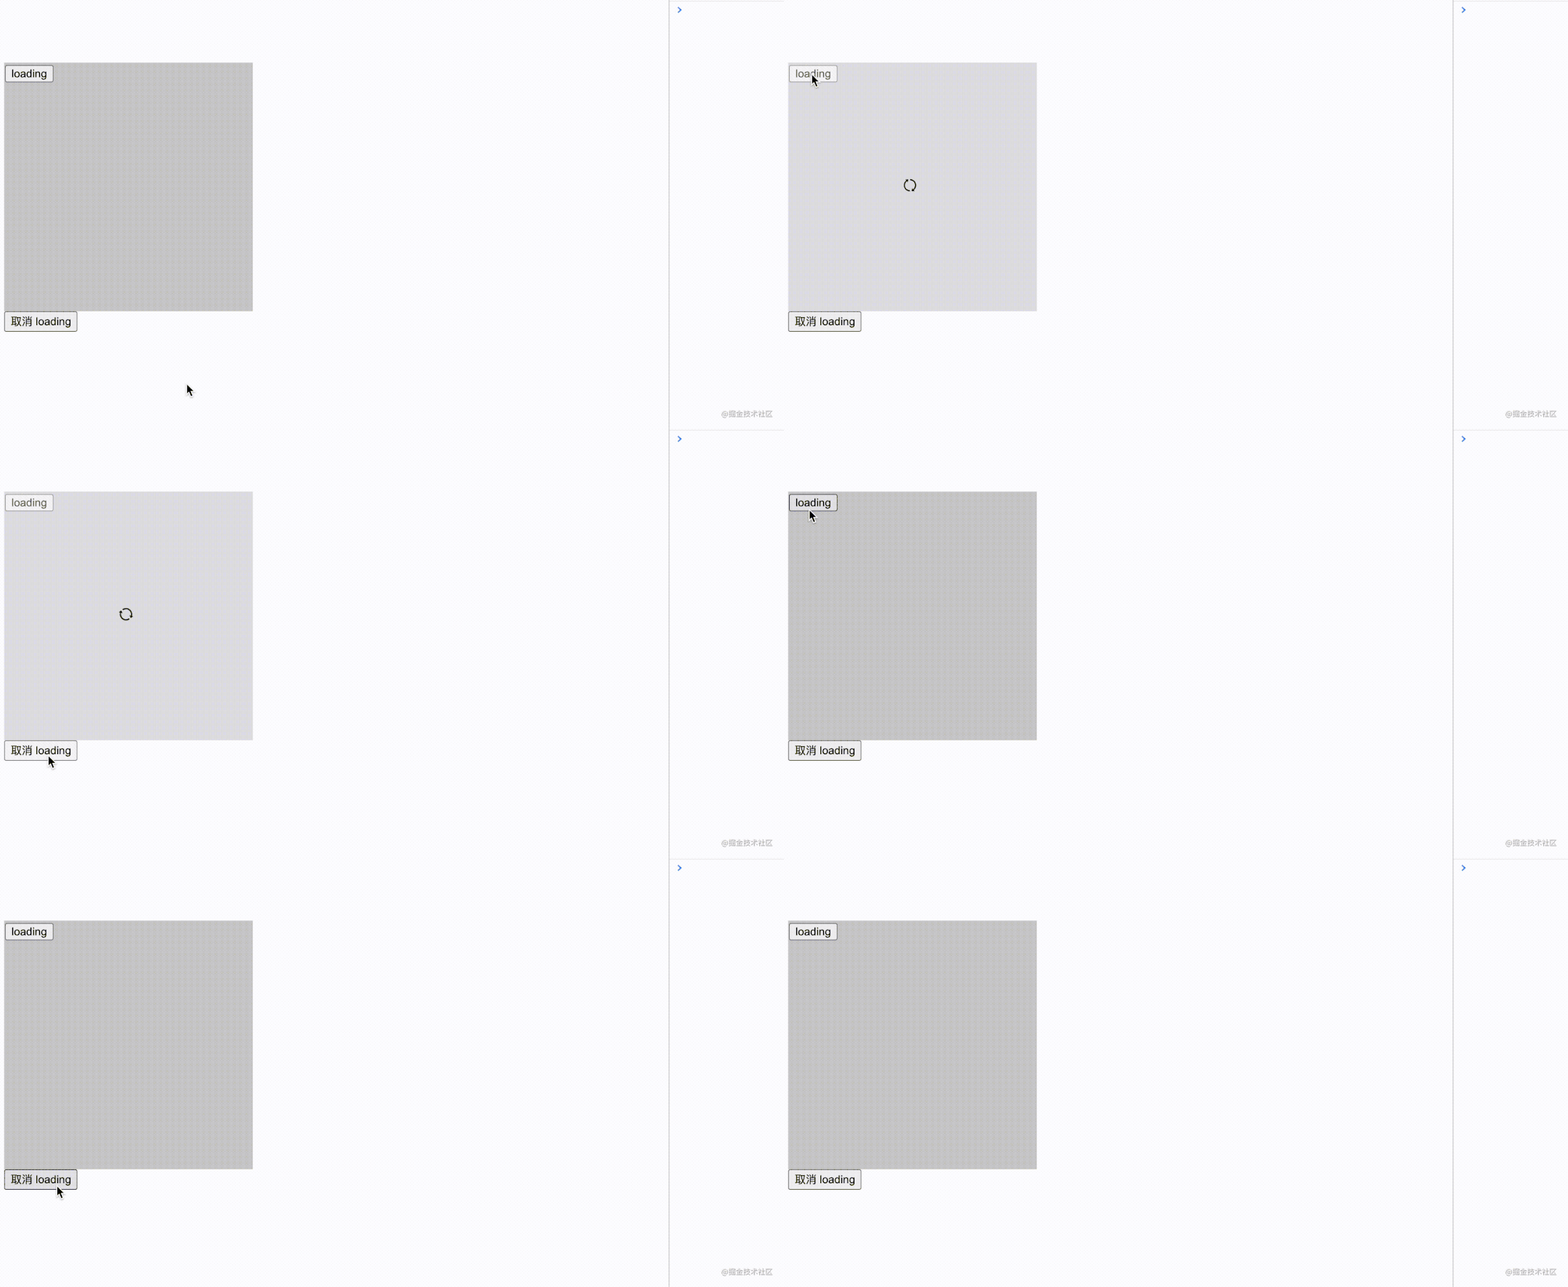
接下来我们实现一个 demo。通过 render props 实现一个带 loading 效果的容器组件,被容器组件包裹,会通过 props 回传开启 loading 的方法 ( 现实场景下,不一定会这么做,这里只是方便同学学习 render props 模式 ) 。
容器组件 Container
function Container({ children }){
   const [ showLoading, setShowLoading ] = useState(false)
   const renderChildren = useMemo(()=> typeof children === 'function' ? children({ setShowLoading }) : null  ,[children] )
   return <div style={{ position:'relative' }} >
     {renderChildren}
     {showLoading &&  <div className="mastBox" >
          {<SyncOutlined  className="icon"  spin twoToneColor="#52c41a" />}
     </div>}
   </div>
}useState用于显示 loading 效果,useMemo 用于执行children函数,把改变 state 的方法 setShowLoading 传入 props 中。这里有一个好处就是当 useState 改变的时候,不会触发children的渲染。- 通过
showLoading来显示 loading 效果。
外层使用
export default function Index(){
    const setLoading = useRef(null)
    return <div>
        <Container>
            {({ setShowLoading })=>{
                console.log('渲染')
                setLoading.current = setShowLoading
                return <div>
                     <div className="index1" >
                         <button onClick={() => setShowLoading(true)} >loading</button>
                     </div>
                </div>
            }}
        </Container>
        <button onClick={() => setLoading.current && setLoading.current(false)} >取消 loading </button>
    </div>
}- 通过直接调用
setShowLoading(true)显示 loading 效果。 - 用 useRef 保存状态 setShowLoading ,
Container外层也可以调用 setShowLoading 来让 loading 效果消失。
效果
5 总结
接下来我们总结一下 render props 的特点。
- 容器组件作用是传递状态,执行 children 函数。
- 外层组件可以根据容器组件回传 props ,进行 props 组合传递给子组件。
- 外层组件可以使用容器组件回传状态。
这种模式下的原理图如下所示:
四 hoc 模式
1 介绍
hoc 高阶组件模式也是 React 比较常用的一种包装强化模式之一,高阶函数是接收一个函数,返回一个函数,而所谓高阶组件,就是接收一个组件,返回一个组件,返回的组件是根据需要对原始组件的强化。
我们来看一下 hoc 的通用模式。hoc 本质上就是一个函数。
function Hoc (Component){
    return class Wrap extends React.Component{
        //---------
        // 强化操作
        //---------
        render(){
            return <Component { ...this.props } />
        }
    }
}
传统的 HOC 模式如上,我们可以看清楚一个传统的 HOC 做了哪些事。
- 1 HOC 本质是一个函数,传入
Component,也就是原始组件本身。 - 2 返回一个新的包装的组件 Wrap ,我们可以在 Wrap 中做一些强化原始组件的事。
- 3 Wrap 中挂载原始组件本身
Component。
2 原理
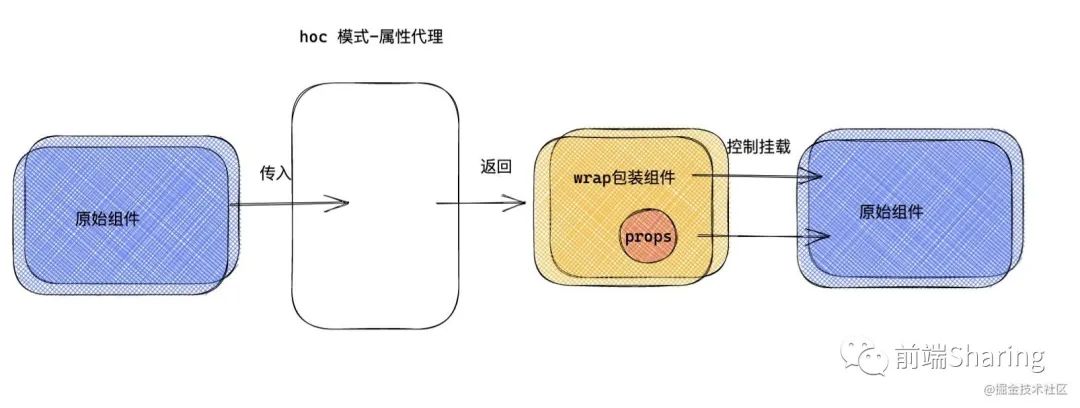
接下来我们看一下 hoc 的具体实现原理。hoc 的实现有两种方式,属性代理和反向继承。
属性代理所谓正向属性代理,就是用组件包裹一层代理组件,在代理组件上,我们可以做一些,对源组件的代理操作。我们可以理解为父子组件关系,父组件对子组件进行一系列强化操作。而 hoc 本身就是返回强化子组件的父组件。
function HOC(WrapComponent){
    return class Advance extends React.Component{
       state={
           name: '《React 进阶实践指南》',
           author:'我不是外星人'
       }
       render(){
           return <WrapComponent  { ...this.props } { ...this.state }  />
       }
    }
}
属性代理特点:
- ① 正常属性代理可以和业务组件低耦合,零耦合,对于条件渲染和
props属性增强,只负责控制子组件渲染和传递额外的props就可以,所以无须知道,业务组件做了些什么。所以正向属性代理,更适合做一些开源项目的hoc,目前开源的HOC基本都是通过这个模式实现的。 - ② 同样适用于
class声明组件,和function声明的组件。 - ③ 可以完全隔离业务组件的渲染,相比反向继承,属性代理这种模式。可以完全控制业务组件渲染与否,可以避免反向继承带来一些副作用,比如生命周期的执行。
- ④ 可以嵌套使用,多个 hoc 是可以嵌套使用的,而且一般不会限制包装HOC的先后顺序。
反向继承
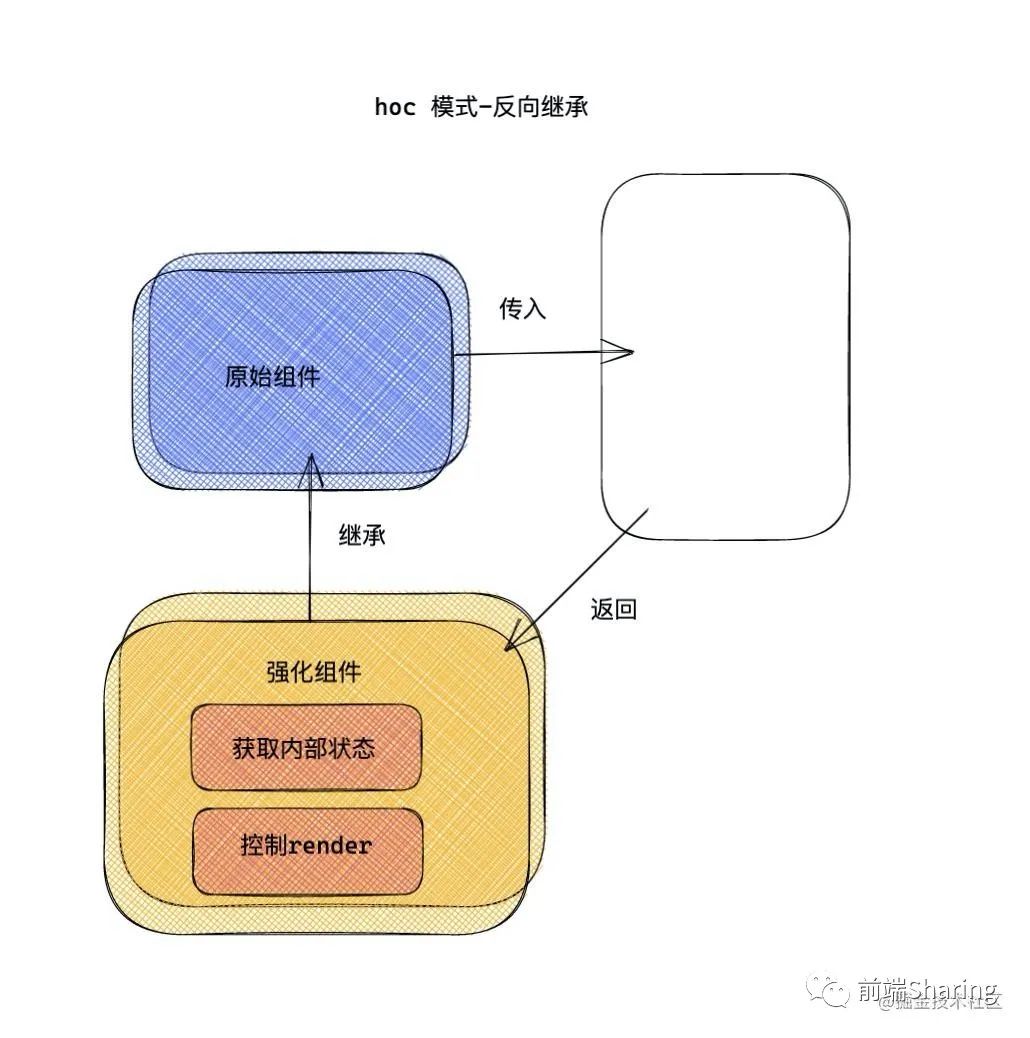
反向继承和属性代理有一定的区别,在于包装后的组件继承了业务组件本身,所以我们我无须再去实例化我们的业务组件。当前高阶组件就是继承后,加强型的业务组件。这种方式类似于组件的强化,所以你必须要知道当前继承的组件的状态,内部做了些什么?
class Index extends React.Component{
  render(){
    return <div> hello,world  </div>
  }
}
function HOC(Component){
    return class wrapComponent extends Component{ /* 直接继承需要包装的组件 */

    }
}
export default HOC(Index) - ① 方便获取组件内部状态,比如state,props ,生命周期,绑定的事件函数等
- ② es6继承可以良好继承静态属性。我们无须对静态属性和方法进行额外的处理。
3 功能及注意事项
上面介绍了 hoc 的二种实现方式,接下来看一下 hoc 能做些什么?以及 hoc 模式的注意事项。
HOC 的功能
对于属性代理HOC,我们可以:
- 强化props & 抽离state。
- 条件渲染,控制渲染,分片渲染,懒加载。
- 劫持事件和生命周期。
- ref控制组件实例。
- 添加事件监听器,日志
对于反向代理的HOC,我们可以:
- 劫持渲染,操纵渲染树。
- 控制/替换生命周期,直接获取组件状态,绑定事件。
如果你对上面的每一个功能的具体场景不清楚的话,建议看一下笔者的另外一篇文章:一文吃透React高阶组件(HOC)
HOC 注意事项
- 1 谨慎修改原型链。
- 2 继承静态属性,这里推荐一个库
hoist-non-react-statics自动拷贝所有的静态方法。 - 3 跨层级捕获
ref,通过forwardRef转发ref。 - 4 render 中不要声明
HOC,如果在 render 声明 hoc,可能会造成组件反复挂载情况发生。
4 实践demo
之前有同学在面试中,遇到了这样一个问题,就是如果控制组件挂载的先后顺序,比如如下的场景
export default function Index(){
    return <div>
        <ComponentA />
        <ComponentB />
        <ComponentC />
    </div>
}如上,有三个子组件,ComponentA ,ComponentB,ComponentC,现在期望执行顺序是 ComponentA 渲染完成,挂载 ComponentB ,ComponentB 渲染完成,挂载 ComponentC,也就是三个组件是按照先后顺序渲染挂载的,那么如何实现呢?
实际上,这种情况完全可以用一个 hoc 来实现,那么接下来,请大家跟上我的思路实现这个场景。 首先这个 hoc 是针对当前 index 下面,ComponentA | ComponentB | ComponentC 一组 component 进行功能强化。所以这个 hoc 最好可以动态创建,而且服务于当前一组组件。那么可以声明一个生产 hoc 的函数工厂。
function createHoc(){
   const renderQueue = []            /* 待渲染队列 */
    return function Hoc(Component){  /* Component - 原始组件   */
        return class Wrap extends React.Component{  /* hoc 包装组件 */

        }
    }
}
那么我们需要先创建一个 hoc,作为这一组组件的使用。
使用:
const loadingHoc = createHoc()
知道了 hoc 的动态产生,接下来具体实现一下这个 hoc 。
function createHoc(){
    const renderQueue = [] /* 待渲染队列 */
    return function Hoc(Component){

        function RenderController(props){  /* RenderController 用于真正挂载原始组件  */
            const { renderNextComponent ,...otherprops  } = props
            useEffect(()=>{
                renderNextComponent() /* 通知执行下一个需要挂载的组件任务 */
            },[])
            return <Component  {...otherprops}  />
        }

        return class Wrap extends React.Component{
            constructor(){
                super()
                this.state = {
                    isRender:false
                }
                const tryRender = ()=>{
                    this.setState({
                        isRender:true
                    })
                }
                if(renderQueue.length === 0) this.isFirstRender = true
                renderQueue.push(tryRender)
            }
            isFirstRender = false      /* 是否是队列中的第一个挂载任务 */
            renderNextComponent=()=>{  /* 从更新队列中,取出下一个任务,进行挂载 */
                if(renderQueue.length > 0 ){
                    console.log('挂载下一个组件')
                    const nextRender = renderQueue.shift()
                    nextRender()
                }
            }
            componentDidMount(){  /* 如果是第一个挂载任务,那么需要 */
                this.isFirstRender && this.renderNextComponent()
            }
            render(){
                const { isRender } = this.state
                return isRender ? <RenderController {...this.props} renderNextComponent={this.renderNextComponent}  /> : <SyncOutlined   spin />
            }
        }
    }
}
分析一下主要流程:
- 首先通过
createHoc来创建需要顺序加载的 hoc ,renderQueue存放待渲染的队列。 - Hoc 接收原始组件
Component。 RenderController用于真正挂载原始组件,用 useEffect 通知执行下一个需要挂载的组件任务,在 hooks 原理的文章中,我讲过 useEffect 采用异步执行,也就是说明,是在渲染之后,浏览器绘制已经完成。- Wrap 组件包装了一层
RenderController,主要用于渲染更新任务,isFirstRender证明是否是队列中的第一个挂载任务,如果是第一个挂载任务,那么需要在componentDidMount开始挂载第一个组件。 - 每一个挂载任务本质上就是
tryRender方法,里面调用了 setState 来渲染RenderController。 - 每一个挂载任务的函数
renderNextComponent原理很简单,就是获取第一个更新任务,然后执行就可以了。 - 还有一些细节没有处理,比如说继承静态属性,ref 转发等。
使用:
/* 创建 hoc  */
const loadingHoc = createHoc()

function CompA(){
    useEffect(()=>{
        console.log('组件A挂载完成')
    },[])
    return <div>组件 A </div>
}
function CompB(){
    useEffect(()=>{
        console.log('组件B挂载完成')
    },[])
    return <div>组件 B </div>
}
function CompC(){
    useEffect(()=>{
        console.log('组件C挂载完成')
    },[])
    return  <div>组件 C </div>
}

function CompD(){
    useEffect(()=>{
        console.log('组件D挂载完成')
    },[])
    return  <div>组件 D </div>
}
function CompE(){
    useEffect(()=>{
        console.log('组件E挂载完成')
    },[])
    return  <div>组件 E </div>
}


const ComponentA = loadingHoc(CompA)
const ComponentB = loadingHoc(CompB)
const ComponentC = loadingHoc(CompC)
const ComponentD = loadingHoc(CompD)
const ComponentE = loadingHoc(CompE)

export default function Index(){
    const [ isShow, setIsShow ] = useState(false)
    return <div>
        <ComponentA />
        <ComponentB />
        <ComponentC />
        {isShow && <ComponentD />}
        {isShow && <ComponentE />}
        <button onClick={()=> setIsShow(true)} > 挂载组件D ,E </button>
    </div>
}
效果:
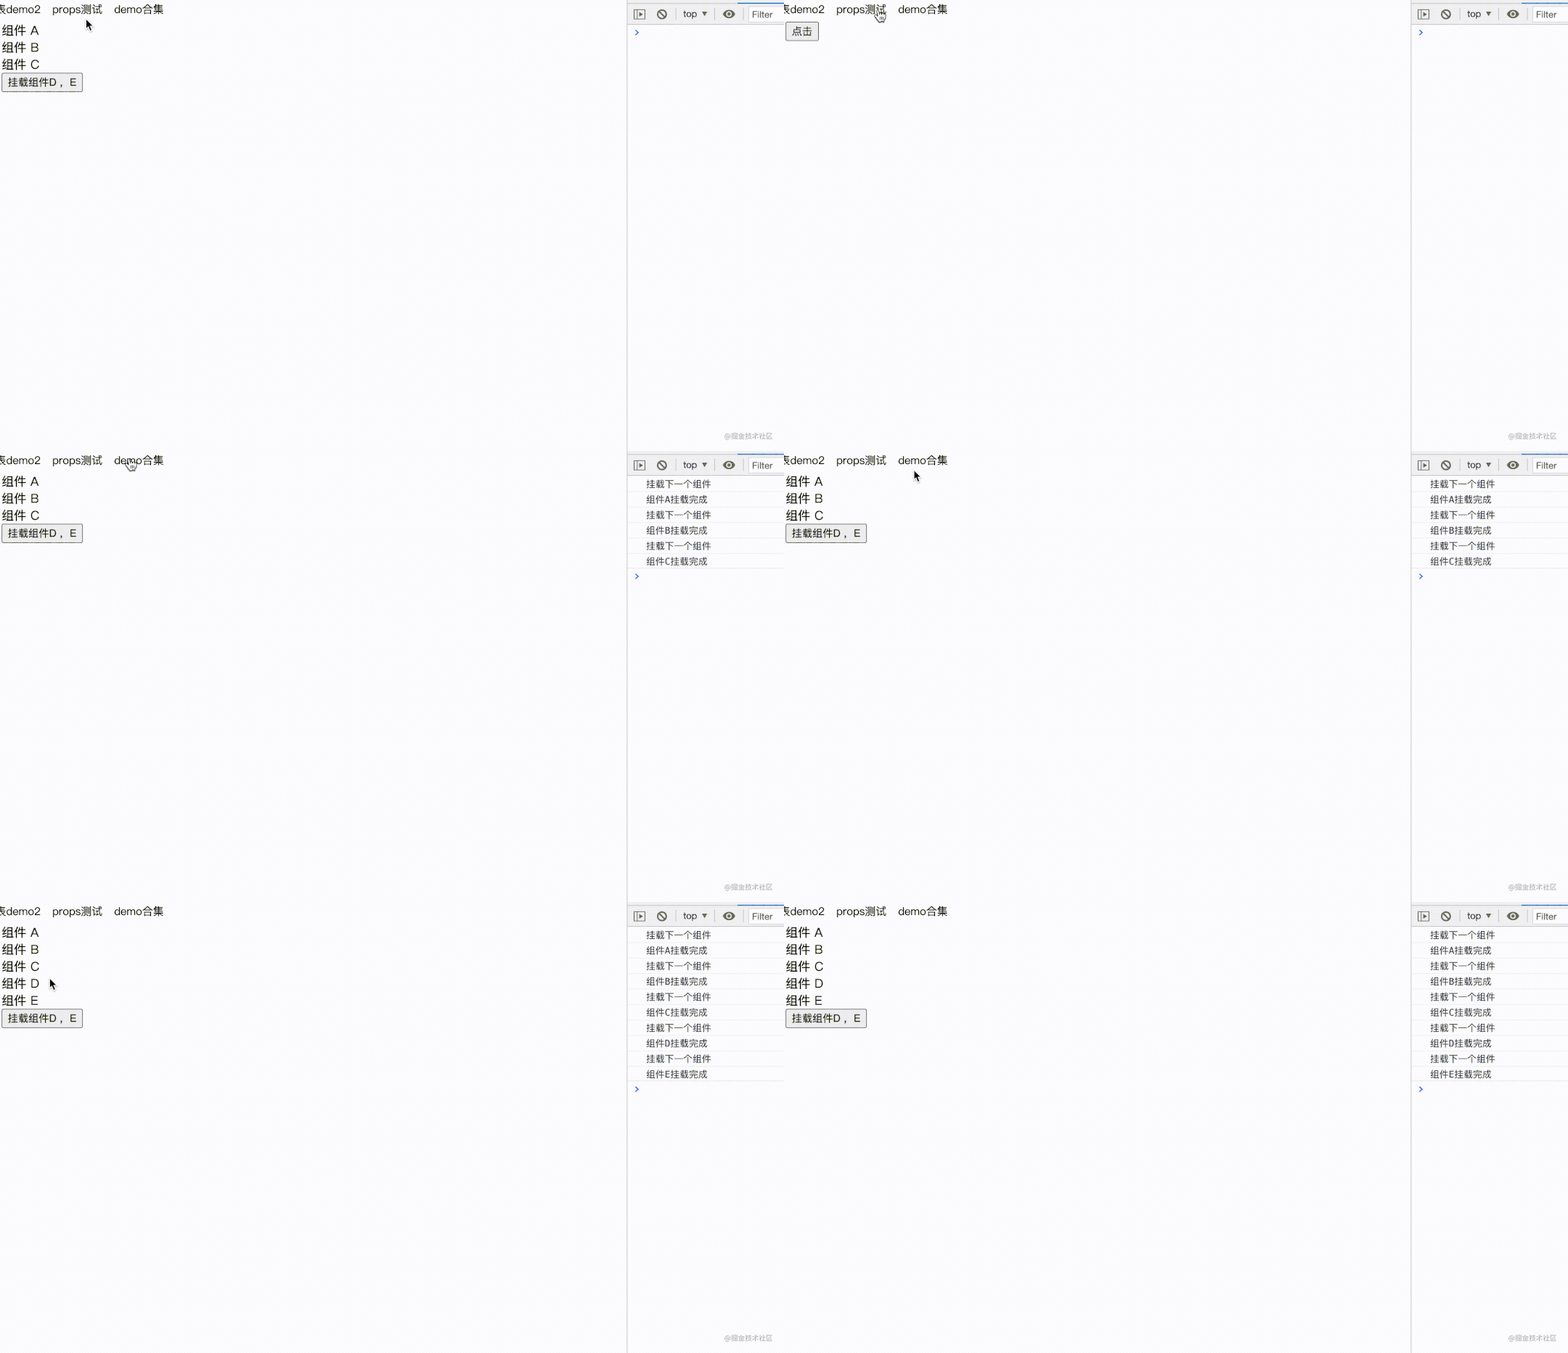
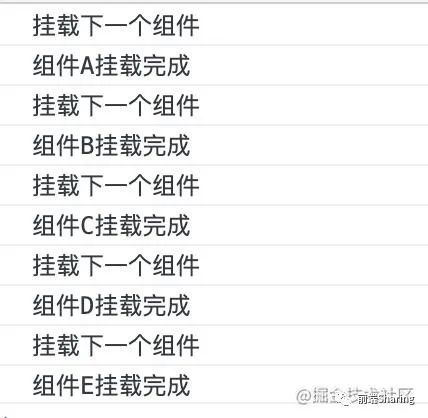
完美达成需求。
5 总结
HOC 在实际项目中,应用还是很广泛的,尤其是一些优秀的开源项目中,这里总结了一下 HOC 的原理图:
属性代理
反向继承
五 提供者模式
1 介绍
首先我们来思考一下,为什么 React 会有提供者这种模式呢?
带着这个疑问,首先假设一个场景:在 React 的项目有一个全局变量 theme ( theme 可能是初始化数据交互获得的,也有可能是切换主题变化的),有一些视图 UI 组件(比如表单 input 框、 button 按钮),需要 theme 里面的变量来做对应的视图渲染,现在的问题是怎么能够把 theme 传递下去,合理分配到用到这个 theme 的地方。
如果用 props 解决这个问题,那么需要通过 props 层层绑定,而且还要考虑 pureComponent, memo 策略的影响。
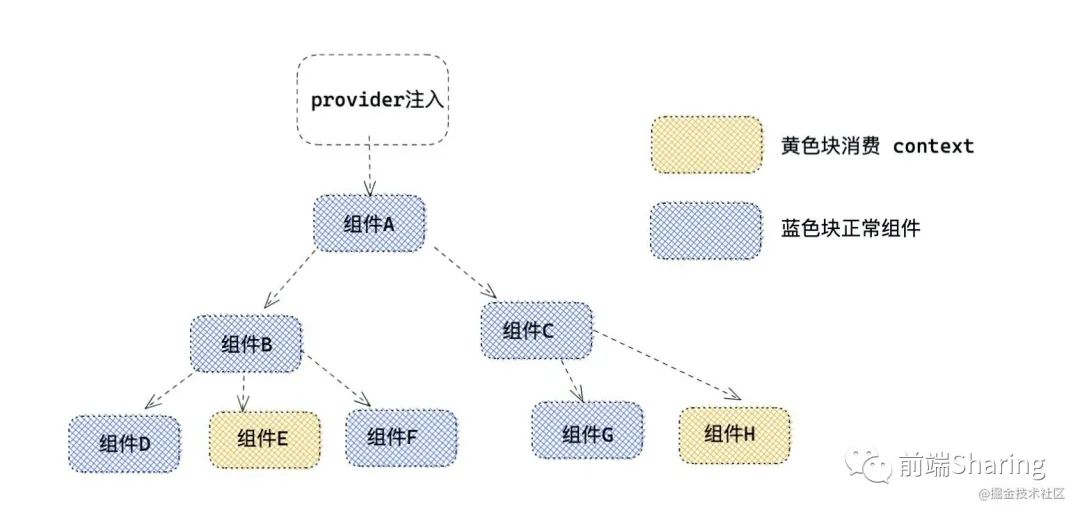
所以这个时候用提供者模式最好不过了。React 提供了 context ‘提供者’模式,具体模式是这样的,React组件树 Root 节点,用 Provider 提供者注入 theme,然后在需要 theme的 地方,用 Consumer 消费者形式取出theme,供给组件渲染使用即可,这样减少很多无用功。用官网上的一句话形容就是Context 提供了一个无需为每层组件手动添加 props,就能在组件树间进行数据传递的方法。
但是必须注意一点是,提供者永远要在消费者上层,正所谓水往低处流,提供者一定要是消费者的某一层父级。提供者模式的结构图如下:
2 用法介绍
对于提供者模式的用法,有老版本的 context 和新版本的 context 之分。接下来重点介绍一下两种方式。
老版本提供者模式
在 React v16.3.0 之前,要实现提供者,就要实现一个 React 组件,不过这个组件要做特殊处理。下面就是一个实现“提供者”的例子,组件名为 ThemeProvider:
提供者
class ThemeProvider extends React.Component {
  getChildContext() {
    return {
      theme: this.props.value
    }
  }

  render() {
    return (
      <div>
         { this.props.children }
      </div>
    );
  }
}
ThemeProvider.childContextTypes = {
  theme: PropTypes.object
}- 需要实现
getChildContext方法,用于返回数据就是向子孙组件传递的上下文; - 需要定义
childContextTypes属性,声明“上下文”的结构类型。
使用
<ThemeProvider value={ { color:'pink' } } >
    <Index />
</ThemeProvider>
消费者
const ThemeConsumer = (props, context) => {
  const {color} = context.theme
  return (
    <p style={{color }}>
      {props.children}
    </p>
  );
}

ThemeConsumer.contextTypes = {
  theme: PropTypes.object
}
- 这里需要注意的是,需要通过
contextTypes指定将要消费哪个 context ,否则将无效。
新版本提供者模式
到了 React v16.3.0 的时候,新的 Context API 出来了,开发者可以创建一个 Context , Context 上有两个属性就是 Provider 和 Consumer 。
Provider用于提供 context 。Consumer用于消费 context 。
那么接下来介绍一下具体如何使用,首先开发者需要用 createContext api 创建一个 context。
const ThemeContext = React.createContext();
然后就是新版本 Provider 和 Consumer的实现。
新版提供者
function ThemeProvider(){
    const theme = { color:'pink' }
    return <ThemeContext.Provider value={ theme } >
        <Index />
    </ThemeContext.Provider>
}- 通过
ThemeContext上的Provider传递主题信息theme。 - Index 是根部组件。
新版消费者
function ThemeConsumer(props){
    return <ThemeContext.Consumer>
      { (theme)=>{ /* render children函数 */
          const { color } = theme
          return <p style={{color }}>
           {props.children}
       </p>
      } }
    </ThemeContext.Consumer>
}- Consumer 采用的就是上述讲到的 render props 模式。
- 通过 Consumer 订阅 context 变化,context 变化, render children 函数重新执行。render children 函数中第一个参数就是保存的 context 信息。
- 在新版消费者中,对于函数组件还有
useContext自定义 hooks ,对于类组件有contextType静态属性。
3 实践demo
接下来我们实现一个提供者模式的实践 demo ,通过动态 context 来让消费 context 的 Consumer 动态渲染。
const ThemeContext = React.createContext(null) // 创建一个 context 上下文 ,主题颜色Context

function ConsumerDemo(){
    return <div>
         <ThemeContext.Consumer>
        {
            (theme) => <div style={{ ...theme}} >
                  <p>i am alien!</p>
                  <p>let us learn React!</p>
             </div>
        }
        </ThemeContext.Consumer>
    </div>
}

class Index extends React.PureComponent{
    render(){
        return <div>
            <ConsumerDemo />
        </div>
    }
}

export default function ProviderDemo(){
    const [ theme , setTheme ]= useState({ color:'pink' , background:'#ccc' })
    return <div>
       <ThemeContext.Provider value={theme}  >
          <Index  />
       </ThemeContext.Provider>
       <button onClick={()=>setTheme({ color:'blue' , background:'orange'  })} >点击</button>
    </div>
}- Provider 改变,消费订阅 Provider 的 Consumer 会重新渲染。
效果:

4 总结
提供者模式在日常开发中,用的频率还是很高的,比如全局传递状态,保存状态。这里用一幅图总结提供者模式的原理。
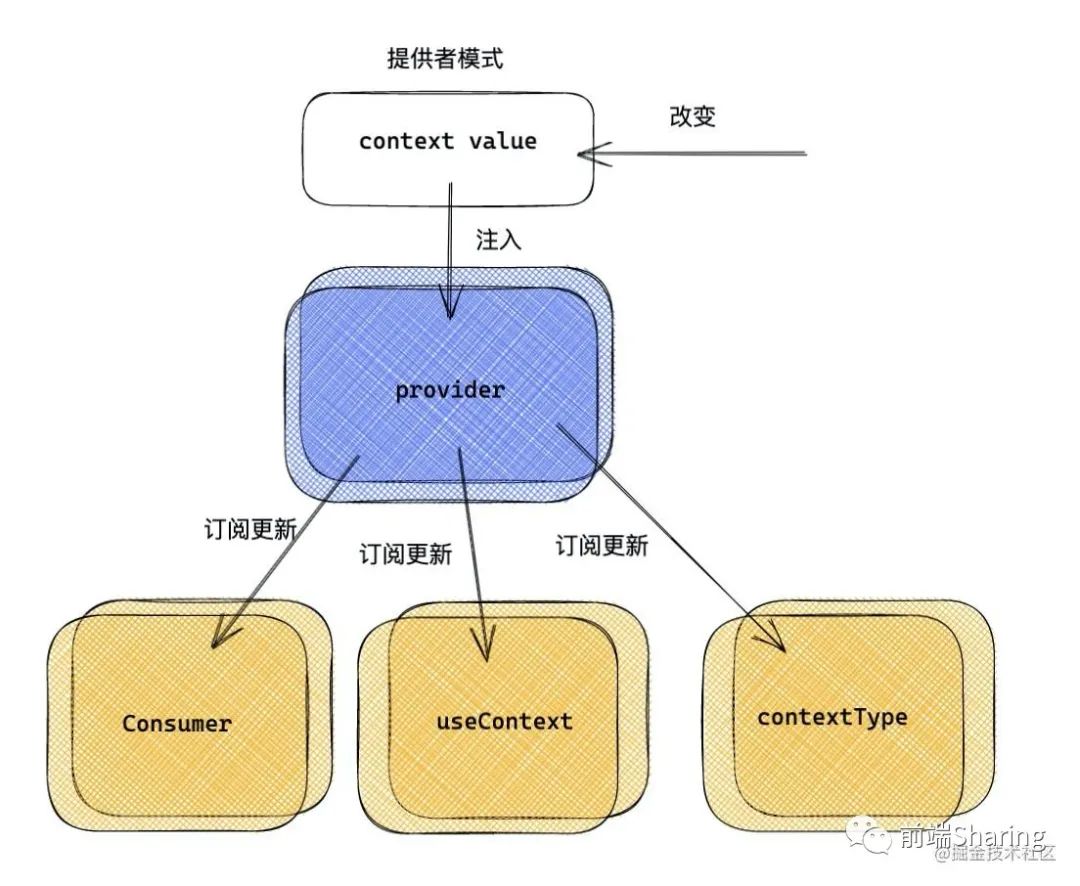
六 类组件继承
1 介绍
React 有十分强大的组合模式。我们推荐使用组合而非继承来实现组件间的代码重用 虽然 React 官方推荐用组合方式,而非继承方式。但是也不是说明继承这种方式没有用武之地,继承方式还是有很多应用场景的。
在 class 组件盛行之后,我们可以通过继承的方式进一步的强化我们的组件。这种模式的好处在于,可以封装基础功能组件,然后根据需要去 extends 我们的基础组件,按需强化组件,但是值得注意的是,必须要对基础组件有足够的掌握,否则会造成一些列意想不到的情况发生。
我们先来看一个
class Base extends React.Component{
  constructor(){
    super()
    this.state={
      name:'《React 进阶实践之指南》'
    }
  }
  componentDidMount(){}
  say(){
    console.log('base components')
  }
  render(){
    return <div> hello,world <button onClick={ this.say.bind(this) } >点击</button>  </div>
  }
}
class Index extends Base{
  componentDidMount(){
    console.log( this.state.name )
  }
  say(){ /* 会覆盖基类中的 say  */
    console.log('extends components')
  }
}
export default IndexBase为基础组件,提供一些基础的方法和功能,包括 UIIndex为基于 Base 继承的组件,可以针对 Index 做一些功能性的强化。
2 特性
继承增强效果很优秀。它的优势如下:
- 可以控制父类 render,还可以添加一些其他的渲染内容;
- 可以共享父类方法,还可以添加额外的方法和属性。
但是也有值得注意的地方,就是 state 和生命周期会被继承后的组件修改。像上述 demo 中, Person 组件中的 componentDidMount 生命周期将不会被执行。
3 实践demo
接下来我们实现一个继承功能,继承的组件就是耳熟能详的 React-Router 中的 Route 组件,强化它,使它变成可以受到权限的控制。
- 当页面有权限,那么直接展示页面内容。
- 当页面没有权限,那么展示无权限页面。
代码编写
import { Route } from 'react-router'

const RouterPermission = React.createContext()

class PRoute extends Route{
    static contextType = RouterPermission  /* 使用 context */
    constructor(...arg){
        super(...arg)
        const { path } = this.props
        /* 如果有权限 */
        console.log(this.context)
        const isPermiss = this.context.indexOf(path) >= 0 /* 判断是否有权限 */
        if(!isPermiss) {
            /* 修改 render 函数,如果没有权限,重新渲染一个 Route ,ui 是无权限展示的内容  */
            this.render = () =>  <Route  {...this.props}   >
                <div>暂无权限</div>
            </Route>
        }
    }
}
export default (props)=>{
    /* 模拟的有权限的路由列表 */
    const permissionList = [ '/extends/a' , '/extends/b'  ]
   return  <RouterPermission.Provider value={permissionList} >
       <Index {...props} />
   </RouterPermission.Provider>
}- 在根组件传入权限路由。通过 context 模式,保存的是存在权限的路由列表。这里模拟为
/extends/a和/extends/b。 - 编写 PRoute 权限路由,继承
react-router中的Route组件。 - PRoute 通过
contextType消费指定的权限上下文RouterPermission context。 - 在
constructor中进行判断,如果有权限,那么不用做任何处理,如果没有权限,那么重写 render 函数,用 Route 做一个展示容器,展示无权限的 UI 。
使用
function Test1 (){
    return <div>权限路由测试一</div>
}

function Test2 (){
    return <div>权限路由测试二</div>
}

function Test3(){
    return <div>权限路由测试三</div>
}

function Index({ history }){
    const routerlist=[
        { name:'测试一' ,path:'/extends/a' },
        { name:'测试二' ,path:'/extends/b' },
        { name:'测试三' ,path:'/extends/c' }
    ]
    return <div>
        {
            routerlist.map(item=> <button key={item.path}
                onClick={()=> history.push(item.path)}
                                  >{item.path}</button> )
        }
        <PRoute component={Test1}
            path="/extends/a"
        />
        <PRoute component={Test2}
            path="/extends/b"
        />
        <PRoute component={Test3}
            path="/extends/c"
        />
    </div>
}
效果
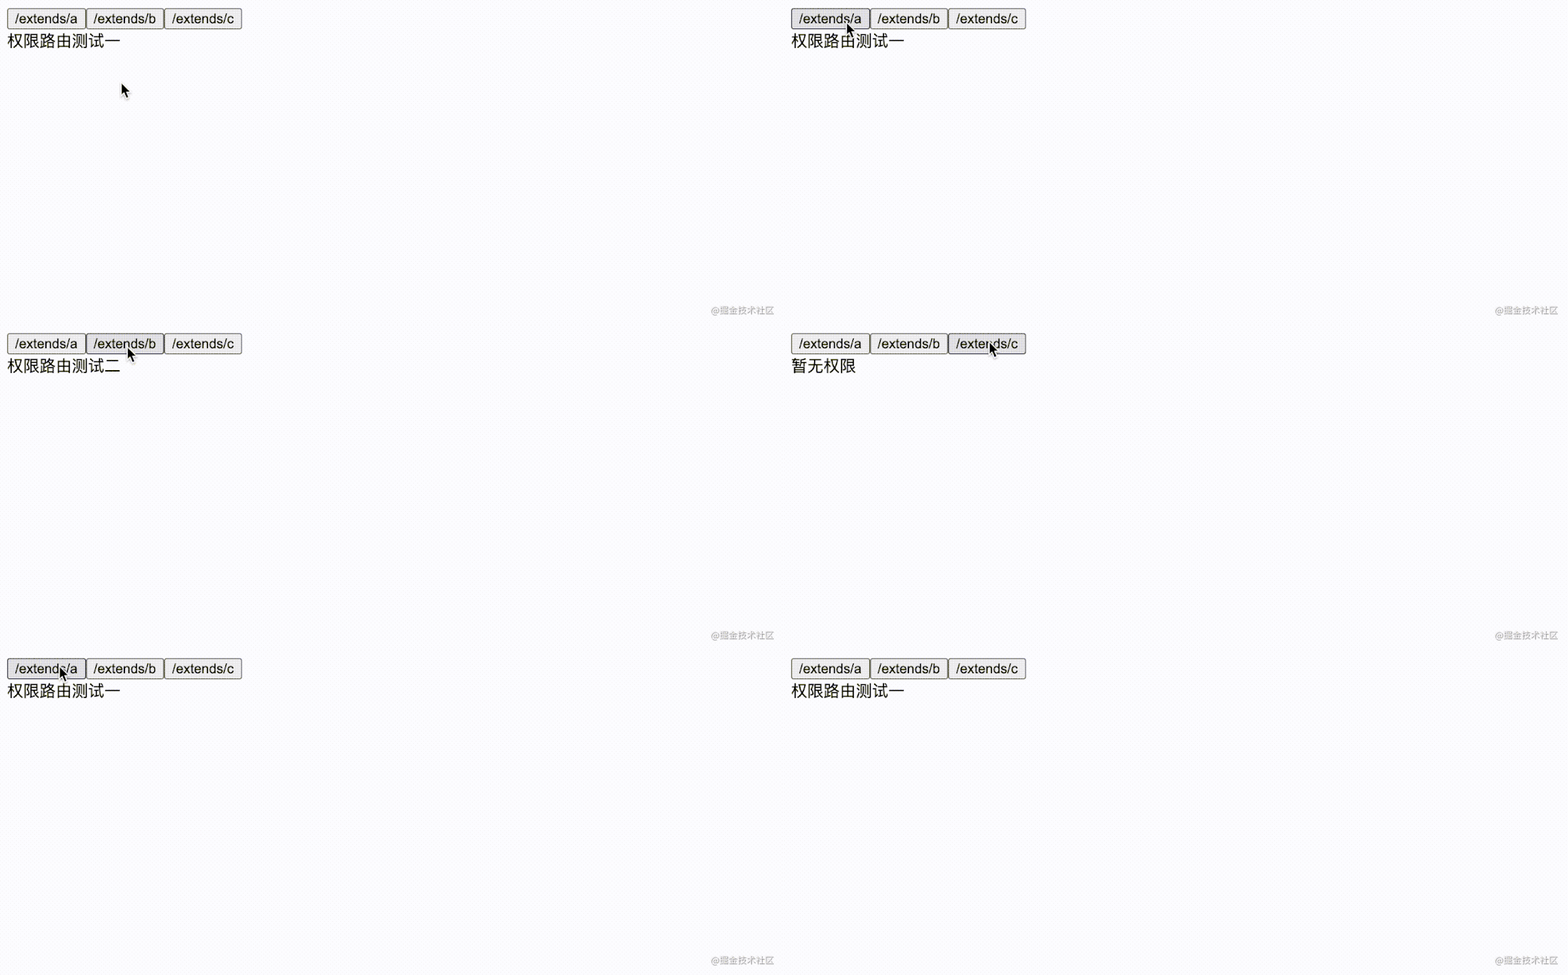
- 可以看到,只有权限列表中的
[ '/extends/a' , '/extends/b' ]权限能展示,无权限提示暂无权限,完美达到效果。
4 总结
继承模式的应用前提是,你需要知道被继承的组件是什么,内部都有什么状态和方法,对继承的组件内部的运转是透明的。接下来用一幅图表示继承模式原理。
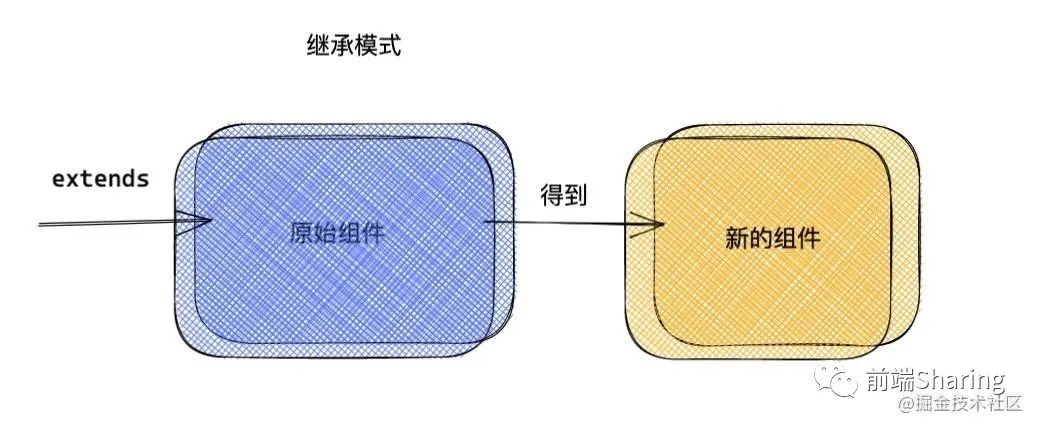
七 总结
本章节讲了 React 中常用的几个设计模式。希望同学们看完可以手动敲起来,把这些设计模式运用到真实的项目中。
参考资料
「react进阶」一文吃透React高阶组件(HOC)
React进阶实践指南
