重生Vue路由模式区别只有"#"?之回家等通知(带图)
前言
我被一个关于VueRouter的问题难倒了,关于VueRouter的面试题不敢说精通,但是熟悉总可以吧,基本要点我虽然菜狗但是我也能描述一个1,2,3...但是直到我遇到了它:
请用
History模式的实现原理去模拟hash模式,把URL中的#后面的内容作为路由地址,可以通过hashchange事件监听路由地址的变化;
本文将会为你具象化的介绍这两种模式,让你不再是死记硬背这两种模式的区别,让别人提到"汉堡",你就会想到"",提到"薯条",就可以联想到"";
相关知识点
-
Vue Router基础不回顾 -
Hash模式和History模式介绍 -
Hash模式和History模式原理模拟 -
用
history模式的原理去模拟hash模式(原生及vue版) -
完成题目:用
history模式的原理去模拟hash模式,可以使用hashchange事件监听路由地址的变化 -
部分源码简单比较
-
Vue Router基础不回顾
对,你没看错标题,就是不回顾,为了简洁,太长你们不想看,我懂

Hash模式和History模式介绍
hash与history区别初印象

要是你在现在第一时间想到的区别跟这个初印象一样,那您对这两种模式的理解并不深入,面试可能这个部分会失分,以下我们将更为深入的去了解:
Hash模式
- URL中
#后面的内容作为路径地址 - 监听
hashchange事件 - 根据当前路由地址找到对应组件重新渲染
history模式:
- 通过
history.pushState()方法改变地址栏 - 监听
popstate事件 - 根据当前路由地址找到对应组件重新渲染
通过history.pushState,通过history.replaceState:不会触发popstate
相信大家都很熟悉这个差别,但是你有没有想过?通过history.pushState改变地址栏
与监听popstate事件并不是history的专利,hash模式也能使用

为了搞清楚这个问题,真正去理解两者的区别,我们先要搞明白以下这些问题:
hash模式:
- 什么是
锚点("#"),它有什么特性,怎么理解这个东西 hashchange有什么作用?
history模式:
history.pushState用什么作用?这里会放在跟锚点一起说(它们有相似的特性)popstate有什么作用?
1.什么是锚点"#":[1]
www.example.com:80/path/to/myf…[2]

#SomewhereInTheDocument是资源本身的另一部分的锚点. 锚点表示资源中的一种“书签”,给浏览器显示位于该“加书签”位置的内容的方向。例如,在HTML文档上,浏览器将滚动到定义锚点的位置;在视频或音频文档上,浏览器将尝试转到锚代表的时间。值得注意的是,#后面的部分(也称为片段标识符)从来没有发送到请求的服务器。
你可能想到一个URL类似普通信件的地址:协议代表你要使用的邮政服务,域名是城市或者城镇,端口则像邮政编码;路径代表着你的信件所有递送的大楼;参数则提供额外的信息,如大楼所在单元;
最后,锚点表示信件的收件人。
在HTML文档上浏览器将滚动到定义锚点的位置:

总结:
- 使用锚点,就不会请求服务器
- 页面不刷新
(这很重要)
2.history.pushState\(\):[3] [可以点击标题查看MDN解释]
从某种程度来说, 调用
pushState()和window.location = "#foo"基本上一样, 他们都会在当前的document中创建和激活一个新的历史记录。但是pushState()有以下优势:
- 新的URL可以是任何和当前URL同源的URL。但是设置
window.location[4] 只会在你只设置锚的时候才会使当前的URL。- 非强制修改URL。相反,设置
window.location = "#foo";仅仅会在锚的值不是#foo情况下创建一条新的历史记录。- 可以在新的历史记录中关联任何数据。
window.location = "#foo"形式的操作,你只可以将所需数据写入锚的字符串中。
注意: pushState() 不会造成 hashchange (en-US) 事件调用, 即使新的URL和之前的URL只是锚的数据不同。
总结:
- 页面不刷新
(这很重要) - 当我们
手动输入url或者刷新页面使用的url是不带'#'(锚点)的还是会请求服务器,当指定路径寻找不到文件/目录就会404
http://168.238.7.88:8000/jerry/id如果后端缺少对/jerry/id的路由处理,将返回 404 错误。
3.HashChange[5]:[可以点击标题查看MDN解释]
HashChangeEvent接口表示一个变化事件,当 URL 中的片段标识符发生改变时,会触发此事件。片段标识符指 URL 中#号和它以后的部分。
总结:
只要#和它以后的部分改变就会触发这个事件- 不论什么方式,只要
改变
4.popstate[6][可以点击标题查看MDN解释]
当活动历史记录条目更改时,将触发
popstate事件。如果被激活的历史记录条目是通过对history.pushState()的调用创建的,或者受到对history.replaceState()的调用的影响,popstate事件的state属性包含历史条目的状态对象的副本。
需要注意的是调用
history.pushState()或history.replaceState()不会触发popstate事件。只有在做出浏览器动作时,才会触发该事件,如用户点击浏览器的回退按钮(或者在Javascript代码中调用history.back()或者history.forward()方法)
总结:
- popstate事件只有
history.go,history.back,history.forword或者做出浏览器动作才会触发 history.pushState,history.replaceState:不会触发popstate

别关网页,看我
Hash模式和History模式原理模拟
模拟演示准备:light-server(简易服务器)
// 安装
// yarn 全局安装
yarn global add light-server
// npm 全局安装
npm -g install light-server
复制代码
Hash模式
新建一个hash.html文件
<!DOCTYPE html>
<html lang="en">
<body>
<a href="#/">home</a>
<a href="#/about">about</a>
<a href="#/404">404</a>


<!-- 渲染路由对应的组件 -->
<div id="routerView"></div>
</body>
<script>
let routerView = document.querySelector('#routerView')

let router = {
  '#/': 'homeComponent',
  '#/about': 'aboutComponent',
  '#/404': '404Component'
}

// 渲染对应的路由组件
function render() {
  let hash = location.hash;
  routerView.innerHTML = router[hash]
}

// 页面锚点发送变化
window.addEventListener('hashchange', () => {
  render()
})

// 页面加载
window.addEventListener('DOMContentLoaded', () => {

  // 当不存在'#'时重定向到首页#/
  location.hash || (location.hash = "/")
  // 渲染组件
  render()
})
</script>
</html>
复制代码
在目录下运行:
light-server -s . --port 3000
复制代码
然后打开要你命3000,http://localhost:3000/hash.html[7]查看效果
简单说一下这个hash原理模拟做了些什么:
-
render函数负责渲染锚点对应路由组件 -
hashchange负责监听锚点的变化,这里的变化是重点,记住不论是什么情况的变化,只要有锚点页面都不会刷新,那么有几种方式可以改变url的呢? -
通过
a标签(如vue中的router-link),上述案例你只看到通过a标签更改,但是下面的几种方式也是可以触发hashchange的 -
router类封装的方法(如router.push) -
手动输入改变地址栏url -
浏览器前进后退或者利用
history.back,history.go -
DOMContentLoaded当页面没有锚点('#')时,把页面重定向到首页,并且渲染首页对应的路由组件
History模式
新建一个history.html
<!DOCTYPE html>
<html lang="en">
<body>
<a href="/">home</a>
<a href="/about">about</a>
<a href="/404">404</a>


<!-- 渲染路由对应的组件 -->
<div id="routerView"></div>
</body>
<script>
let routerView = document.querySelector('#routerView')

let router = {
  '/': 'homeComponent',
  '/about': 'aboutComponent',
  '/404': '404Component'
}

// 绑定事件
function listeners() {
  let aDoms = document.getElementsByTagName('a')
  Array.from(aDoms).forEach(el => el.addEventListener('click', function (e) {
      e.preventDefault()
      history.pushState(null, '', el.getAttribute('href'))
      render()
    })
  )
}

// 渲染对应的路由组件
function render() {
  let pathname = location.pathname;
  routerView.innerHTML = router[pathname]
}

// 页面锚点发送变化
window.addEventListener('popstate', () => {
  render()
})

// 页面加载
window.addEventListener('DOMContentLoaded', () => {
  listeners()
// 渲染组件
  render()
})
</script>
</html>
复制代码
在目录下运行:
light-server -s . --historyindex '/history.html' --port 3000 //模拟真实服务器找到该资源重定向到index.html(初始页面)
复制代码
相当于nginx配置:
try_files $uri $uri/ /index.html
复制代码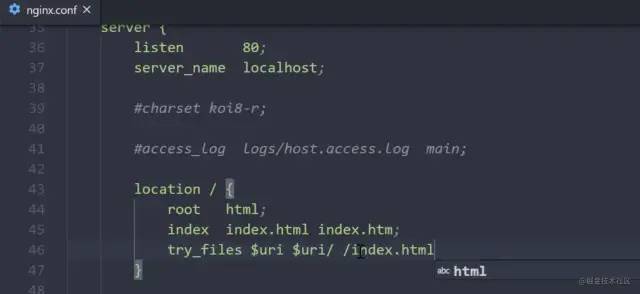
然后打开要你命3000,http://localhost:3000[8]查看效果
简单说一下这个history原理模拟做了些什么:
-
render函数负责渲染pathname对应路由组件 -
listeners负责给每一个a标签绑定一个click事件,该事件: -
利用
pushstate把路由地址的pathname修改为对应a标签的href值 -
render渲染对应的路由 -
e.preventDefault()阻止默认操作(阻止a标签来实现跳转) -
popstate在使用浏览器前进后,退时触发render -
DOMContentLoaded页面加载时负责给a标签注册事件并且渲染首页对应的路由组件
注意:
e.preventDefault()这个默认操作很重要,不阻止默认就会重新向服务器发送请求,使页面刷新pushstate无论带不带锚点,都会加入历史记录
总结
- 两种模式都需要做一个初始化事件:渲染初始路由
- hash模式的核心是
hashchange,监听该事件,当哈希值发生改变触发相应的回调:render路由渲染(因为不论是手动更改url地址还是浏览器前进后退还是内部封装的方法push,router-link跳转,只要带有锚点"#"改变都会触发hashchange) - history模式的核心是
pushstate以及popstate,当手动更改路由就会重定向到index.html再次触发初始化事件,当使用router-link跳转或内部封装的push方法都要用pushstate去更改url地址并且手动触发render路由渲染,popstate则监听浏览器前进后退,然后触发render
精简总结
-
hash(核心
hashchange): -
手动改变url(hashchange->render)
-
router-link跳转,push跳转(hashchange->render)
-
浏览器前进后退(hashchange->render)
-
初始化render
-
所有跳转都是hashchange->render
-
history(核心
pushstate,popstate): -
手动改变url(触发重定向->初始化render)
-
router-link跳转,push跳转(pushstate更改url,添加历史记录,调用render)
-
浏览器前进后退(popstate->render)
-
初始化render
-
跳转情况:

看到这里这里我知道你看懂了,给个反应,点赞评论over,over...
用history模式的原理去模拟hash模式(原生及vue版)
理解了核心,了解了流程,那就开始模拟吧
原生版:
historyToHash.html:
<!DOCTYPE html>
<html lang="en">
<body>
<a href="/">home</a>
<a href="/about">about</a>
<a href="/404">404</a>


<!-- 渲染路由对应的组件 -->
<div id="routerView"></div>
</body>
<script>
let routerView = document.querySelector('#routerView')

let router = {
  '/': 'homeComponent',
  '/about': 'aboutComponent',
  '/404': '404Component'
}

function listeners() {
  let aDoms = document.getElementsByTagName('a')
  Array.from(aDoms).forEach(el => el.addEventListener('click', function (e) {
      history.pushState(null, '', `#${el.getAttribute('href')}`)
      render()
    })
  )
}

//渲染对应的路由组件
function render() {

  let hash = location.hash.substr(1);
  routerView.innerHTML = router[hash]
}

//页面锚点发送变化
window.addEventListener('popstate', () => {
  render()
})


//页面加载
window.addEventListener('DOMContentLoaded', () => {
  //当输入url不带#的给网页加#
  location.hash || (location.hash = "/")
  listeners()
  //渲染组件
  render()
})
</script>
</html>
复制代码
在目录下运行:
light-server -s . --historyindex '/historyToHash.html' --port 3000 //模拟真实服务器找到该资源重定向到index.html(初始页面)
复制代码
然后打开要你命3000,http://localhost:3000[9]查看效果
vue版:
新建一个historyToHashRouter.js文件,装载模拟的VueRouter类
let _Vue = null
export default class VueRouter {
  static install(Vue) {
    // 1 判断当前插件是否被安装
    if (VueRouter.install.installed) {
      return
    }
    VueRouter.install.installed = true
    // 2 把Vue的构造函数记录在全局
    _Vue = Vue
    // 3 把创建Vue的实例传入的router对象注入到Vue实例
    // _Vue.prototype.$router = this.$options.router
    _Vue.mixin({
      beforeCreate() {
        if (this.$options.router) {
          _Vue.prototype.$router = this.$options.router
        }
      }
    })
  }

  constructor(options) {
    this.options = options
    this.routeMap = {}
    // observable 把数据改为响应式
    this.data = _Vue.observable({
      current: ''
    })
    this.init()
  }

  init() {
    this.createRouteMap()
    this.initComponent(_Vue) // 初始化router-link,router-view
    this.initEvent() // 相当于原声版的初始事件
  }

  createRouteMap() {
    // 遍历所有的路由规则 吧路由规则解析成键值对的形式存储到routeMap中
    this.options.routes.forEach(route => {
      this.routeMap[route.path] = route.component
    })
  }

  initComponent(Vue) {
    Vue.component('router-link', {
      props: {
        to: String
      },
      render(h) {
        return h('a', {
          on: {
            click: this.clickhander
          }
        }, [this.$slots.default])
      },
      methods: {
        clickhander(e) {
          // 历史模式
          history.pushState(null, '', `/#${this.to}`)
          this.$router.data.current = this.to // 相当于原生版的render
        }
      }
      // template:"<a :href='to'><slot></slot><>"
    })
    const self = this
    Vue.component('router-view', {
      render(h) {
        // self.data.current
        const cm = self.routeMap[self.data.current]
        return h(cm)
      }
    })
  }


  initEvent() {
    // 历史模式
    // 当输入url不带#的给网页加#
    location.hash || (location.hash = "/")
    this.data.current = location.hash.substr(1) // 相当于原生版的render
    window.addEventListener('popstate', () => { // 监听浏览器前进后退
      this.data.current = location.hash.substr(1) // 相当于原生版的render
    })
  }
}
复制代码完成题目:用history模式的原理去模拟hash模式,可以使用hashchange 事件监听路由地址的变化
终于,来到这里,我也看懂了题目了,整:
let _Vue = null
export default class VueRouter {
  static install(Vue) {
    // 1 判断当前插件是否被安装
    if (VueRouter.install.installed) {
      return
    }
    VueRouter.install.installed = true
    // 2 把Vue的构造函数记录在全局
    _Vue = Vue
    // 3 把创建Vue的实例传入的router对象注入到Vue实例
    // _Vue.prototype.$router = this.$options.router
    _Vue.mixin({
      beforeCreate() {
        if (this.$options.router) {
          _Vue.prototype.$router = this.$options.router
        }
      }
    })
  }

  constructor(options) {
    this.options = options
    this.routeMap = {}
    // observable
    this.data = _Vue.observable({
      current: ''
    })
    this.init()
  }

  init() {
    this.createRouteMap()
    this.initComponent(_Vue)
    this.initEvent()
  }

  createRouteMap() {
    // 遍历所有的路由规则 吧路由规则解析成键值对的形式存储到routeMap中
    this.options.routes.forEach(route => {
      this.routeMap[route.path] = route.component
    })
  }

  initComponent(Vue) {
    Vue.component('router-link', {
      props: {
        to: String
      },
      render(h) {
        return h('a', {
          on: {
            click: this.clickhander
          }
        }, [this.$slots.default])
      },
      methods: {
        clickhander(e) {
        // 历史模式
        history.pushState(null, '', `/#${this.to}`)
        this.$router.data.current = this.to // 相当于render,pushState不会触发hashchange
        }
      }
      // template:"<a :href='to'><slot></slot><>"
    })
    const self = this
    Vue.component('router-view', {
      render(h) {
        // self.data.current
        const cm = self.routeMap[self.data.current]
        return h(cm)
      }
    })
  }


  initEvent() {
    // hashchange
    //当输入url不带#的给网页加#
    location.hash || (location.hash = "/")
    this.data.current = window.location.hash.substr(1) || '/'
    window.addEventListener('hashchange', () => {
      this.data.current = window.location.hash.substr(1) || '/'
    })
  }
}
复制代码- 这里在router-link跳转还是使用了
pushstate - 但是
popstate没有使用,因为hashchange同样也可以监听到浏览器的前进后退(只要url带有锚点"#")
看到这里,你或许会有一个疑问,既然使用history模式模拟hash模式是可行的,为什么题目又提出可以使用hashchange呢?
我的个人猜想:
-
因为dev-server做不到页面重定向的效果,真正的history需要配置nginx重定向
-
因此使用hashchange来模拟这种效果
-
部分源码简单比较
一提到源码,你们就这样,别慌,我们这次只是简单看看,粗略粗略看一下(vue-router版本3.1.6):

不知道你们还记得本文开头提到过的:
但是你有没有想过?通过
history.pushState改变地址栏与监听popstate事件并不是history的专利,hash模式也能使用
// index.js
export default class VueRouter {

    ...
  constructor (options: RouterOptions = {}) {
    ...

    switch (mode) {
      case 'history': // 历史模式
        this.history = new HTML5History(this, options.base)
        break
      case 'hash':   // 哈希模式
        this.history = new HashHistory(this, options.base, this.fallback)
        break
      case 'abstract':
        this.history = new AbstractHistory(this, options.base)
        break
      default:
        if (process.env.NODE_ENV !== 'production') {
          assert(false, `invalid mode: ${mode}`)
        }
    }
  }
}
复制代码
HashHistory
有没有一点疑惑?这个pushState,有点东西?哈希模式难道也用历史模式的东西?
// hash.js
function pushHash (path) {
  if (supportsPushState) {
    pushState(getUrl(path))
  } else {
    window.location.hash = path
  }
}

export class HashHistory extends History {
    ...
    push (location: RawLocation, onComplete?: Function, onAbort?: Function) {
      const { current: fromRoute } = this
      this.transitionTo(
        location,
        route => {
          pushHash(route.fullPath)
          handleScroll(this.router, route, fromRoute, false)
          onComplete && onComplete(route)
        },
        onAbort
      )
    }
    setupListeners () {
      ...
      // 你疑惑了吗?,也用popstate
      const eventType = supportsPushState ? 'popstate' : 'hashchange'
      window.addEventListener(
        eventType,
        handleRoutingEvent
      )
      this.listeners.push(() => {
        window.removeEventListener(eventType, handleRoutingEvent)
      })
    }
}
复制代码
HTML5History
// html5.js
export class HTML5History extends History {
    ...
    push (location: RawLocation, onComplete?: Function, onAbort?: Function) {
      const { current: fromRoute } = this
      this.transitionTo(location, route => {
        pushState(cleanPath(this.base + route.fullPath))
        handleScroll(this.router, route, fromRoute, false)
        onComplete && onComplete(route)
      }, onAbort)
    }

    setupListeners () {
      ...
     window.addEventListener('popstate', handleRoutingEvent)
     this.listeners.push(() => {
       window.removeEventListener('popstate', handleRoutingEvent)
     })
    }
}
复制代码他们使用的pushState方法都是一样的;
总结
相信聪明的你已经从中发现了端倪:
- 哈希模式也使用了历史模式的原理,并且做了
向下兼容:当浏览器不支持history的时候可以使用hash - 在某种程度上它们还真的只是只有#的区别
- 面试官要是这么问你,你要是回答只有
"#"的区别请你一定一定要先说明它们的核心,说你的理解,再说源码,别真憨憨说只有"#",然后不作任何解释