使用“黑魔法”优雅的修改第三方依赖包
背景
Vue项目中使用的element-ui,由于弹窗里表单项太多,一些表单项会在可视范围之外。校验表单时,如果未通过校验的表单项在可视范围外,用户感知不强。所以需要在表单校验未通过时滚动到第一个未通过校验的表单项那里,翻看element-ui文档,发现未提供该API。
起初想到的方案有两种:
- 在业务中封装函数,表单校验失败时调用该函数,根据表单校验失败的className,获取第一个校验失败的dom元素,滚动到指定的dom元素位置。但是如果页面存在多个form表单需要做区分,会增加我们的一个工作量,并且不够优雅。
- 修改element-ui的源码,增加一个API。但是在平台编译时如果重新执行
npm install时代码会被覆盖,并且团队协作时也会遇到这个问题,团队开发中有诸多不便。
后面经过一顿搜索后,发现一个“黑魔法”的解决方案。并且该方案上手简单、便携、且一劳永逸。
黑魔法之patch-package

先看看官方是怎么介绍的
patch-packagelets app authors instantly make and keep fixes to npm dependencies. It's a vital band-aid for those of us living on the bleeding edge.Patches created by
patch-packageare automatically and gracefully applied when you usenpm(>=5) oryarn.No more waiting around for pull requests to be merged and published. No more forking repos just to fix that one tiny thing preventing your app from working.
总而言之,patch-package给开发者提供了通过打“补丁”的方式,使得重新安装依赖包时能够保留之前对第三方依赖包的修改的一种解决方案。
patch-package的应用场景
想想我们在使用第三方依赖包时如果遇到了bug,通常解决的方式都是绕过这个问题,使用其他方式解决,较为麻烦。或者给作者提个issue或者PR,然后等待作者的修复。等待的时间不可控,如果你不想天天被产品、测试后面追着,是不是就可以借助patch-package自己动手去修复该bug,感觉是不是很棒。并且还可以在第三方依赖包上,根据业务需求扩展能力。
Tip:最好还是扩展一些通用性比较高的能力,如果是比较通用且该能力大多数开发者都有这种诉求的话可以给第三方依赖包提个PR。参与开源项目是不是简单了起来了~(不要在魔改的路上越走越远!!!)
patch-package的使用
Step1:安装
使用npm安装
npm i patch-package
使用yarn安装
yarn add patch-package postinstall-postinstall
为什么要使用yarn安装需要多安装postinstall-postinstall这个依赖,有兴趣可以看官方解释。Why use postinstall-postinstall
Step2:修改package.json文件
package.json的scripts中声明了一系列的npm脚本命令,如下:(参考资料:http://caibaojian.com/npm/misc/scripts.html)
- prepublish: 在包发布之前运行,也会在npm install安装到本地时运行
- publish,postpublish: 包被发布之后运行
- preinstall: 包被安装前运行
- install,postinstall: 包被安装后运行
- preuninstall,uninstall: 包被卸载前运行
- postuninstall: 包被卸载后运行
- preversion: bump包版本前运行
- postversion: bump包版本后运行
- pretest,test,posttest: 通过npm test命令运行
- prestop,stop,poststop: 通过npm stop命令运行
- prestart,start,poststart: 通过npm start命令运行
- prerestart,restart,postrestart: 通过npm restart运行
可以看到依赖包在安装完之后会执行postinstall命令
所以我们在package.json的scripts里面增加:"postinstall": "patch-package"
"scripts": {
    ***,
+   "postinstall": "patch-package"
}
Step3:修改依赖包源码
以element-ui为例:

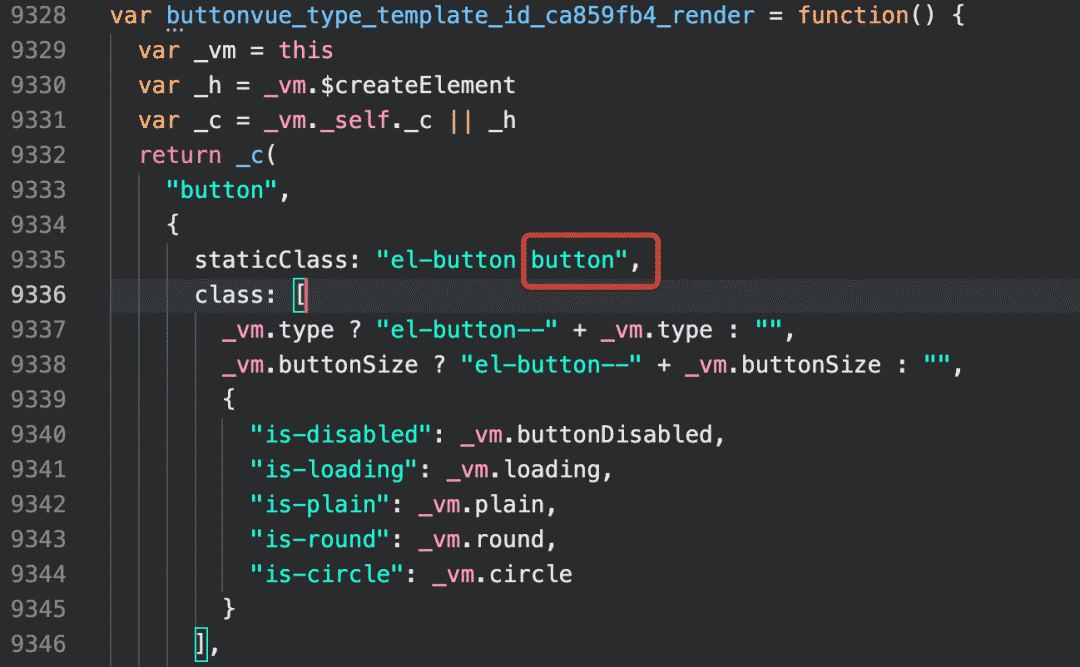
我们在element-ui的Button组件上加一个类名button看看

通过控制台查看我们的修改已经生效
Step4:生成补丁
yarn patch-package package-name(修改的包名)
或者
npx patch-package package-name(npm版本 > 5.2)这里我们执行npx patch-package element-ui命令看看
feiyu@feiyudeMacBook-Pro demo % npx patch-package element-ui
patch-package 6.4.7
patch-package: you have both yarn.lock and package-lock.json
Defaulting to using npm
You can override this setting by passing --use-yarn or deleting
package-lock.json if you don't need it

• Creating temporary folder
• Installing element-ui@2.15.6 with npm
• Diffing your files with clean files
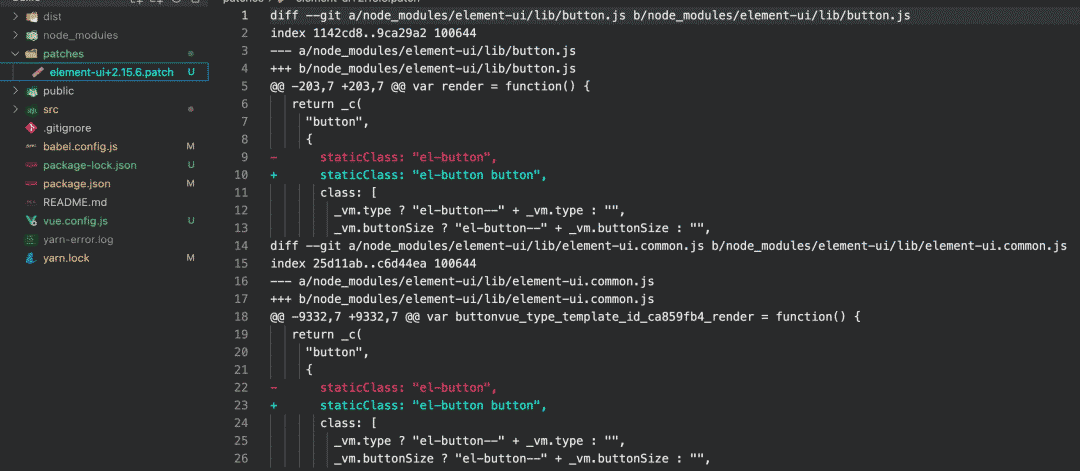
✔ Created file patches/element-ui+2.15.6.patch

 element-ui is on GitHub! To draft an issue based on your patch run

npx patch-package element-ui --create-issue可以看到patch-package已经为我们创建了一个补丁。
默认会在我们的根目录下创建一个patches文件夹。在patches文件夹下会创建依赖包名+版本号.patch的文件,文件描述了我们修改了什么,第几行,有点像git的提交记录。

Step5:测试补丁是否有效
- 手动删除node_modules文件夹,重新执行
npm install安装依赖包。可以看到在依赖包安装结束后执行了patch-package命令,之前生成的补丁被应用了。
> patch-package

patch-package 6.4.7
Applying patches...
element-ui@2.15.6 ✔- 查看node-modules中之前修改的element-ui修改的地方,查看之前修改的代码是否还存在。如果之前修改的代码还存在,说明补丁文件已经生效了,如果不存在,排查下是否哪个步骤出现了问题。
最后将patches文件夹推送到远端仓库,日后无论是谁拉取代码,安装依赖,我们之前修改的部分都会生效的
注意事项
- patch是锁定版本号的,如果升级了版本,patch内容将会失效,最好在package.json能够锁定版本号。
- 魔改的同时,也局限了升级的能力,尽量还是去提issue和PR。
最后
patch-package还提供了一些额外的参数,有兴趣的话可以查看官方文档。
参考资料
patch-package-官方:https://github.com/ds300/patch-package
npm-scripts文档:http://caibaojian.com/npm/misc/scripts.html
Why use postinstall-postinstall:https://github.com/ds300/patch-package#why-use-postinstall-postinstall-with-yarn
- END -