2022 年最新前端 Vue 项目重构总结
本文主要内容
- 对于老旧的项目,升级webpack的时我的操作步骤。
- 基于项目的产品定位和业务发展走势,在重构时我可以从哪方面入手和思考。
本文在项目迭代,优化中一直修改,所以用时一年。如果能给您带来帮助,希望各位大佬可以动动小手给我点赞,您的点赞是我写文的最好的肯定!谢谢
背景及解决方法
因为公司的产品是把同类型的业务软件在不同电商平台上架,所以新开的项目是把老代码移植过来,删改拼凑后上架。因此文件目录零散,引入导出混乱,代码冗余,风格不够统一规范。这些毛病导致代码可读性和维护性很低,且样式冲突很多,奇怪的难复现的bug也很多。我就计划在迭代填坑中,对项目进行一次改造优化。我的解决步骤如下:
- 第一步:了解基本业务(三个月左右),值班时多询问客户建议,了解用户的使用习惯和对我们软件的风格定位。对同类型的竞品(八个左右,我们软件做的还可以)进行了详细的调研,分析我们产品的不足和优势。同时和产品积极沟通项目后期开发方向和计划。我觉得项目在我接手的时候,功能目前只完成了计划的20%,还有很高的完善空间。这个过程大概花费了半年吧。
- 第二步:基于项目目录混乱,我先对项目的目录根据功能模块重新划分,把router路由path对应文件路径,利于后期模块查找。
- 第三步:对基本资源对公共资源统一入口,这样有利于后期资源的管理维护,在代码上也不用做重复引入的操作。例如css的公共css统一入口引入,公共变量通过loader可全局使用,不再手动引入。对font采用动态加载,删除本地存储的svg文件。
- 第四步:因为项目的webpack版本是2,且为全手写,考虑到后期同事维护和我本人计划性分步迭代升级的改造方式,我没有采用vue-cli,也采用了全手配。具体升级步骤在下面也有书写
- 第五步:项目内部高复用逻辑封装和内部代码逻辑优化。因为我们项目面对的是b端客户,有很多数据的查询,我就写了一个具有列表的查询,分页,搜索功能的model,配合vuex就很方便。
项目webpack升级
配置步骤
先把入口文件main.js的所有代码都注释掉,在根目录创建文件夹:webpack(打包脚本的文件夹),webpack文件夹下创建 webpack.common.js(webpack通用配置)、webpack.development.js(webpack开发环境下配置脚本)、webpack.product.js(webpack生产环境下配置脚本)三个文件。
1 . 在main.js引入一个最简单的.vue文件,只有template模版,配置vue-loader,使项目正常运行。在script脚本处编写命令行:
{
    "dev": "webpack-dev-server  ./webpack/webpack.common.js --mode='development'",
    "build": "webpack --config ./webpack/webpack.common.js  --mode='production'"
  }
复制代码
2 . 在.vue文件中写js代码,配置 babel,使项目正常运行。
3 . 在.vue文件中写css、less代码,配置 css和less,使项目正常运行。
4 . 在.vue文件中引入图片,字体等,配置 静态资源,使项目正常运行。
5 . 在app.vue文件内只引入简单组件,再尝试引入一个页面,使项目正常运行。此时项目的基础配置完成
6 . 区分环境变量,分开打包并配置脚本命令并优化打包脚本
资源打包
vue配置
vue-loader: 允许你以一种名为单文件组件 \(SFCs\)[2]的格式撰写 Vue 组件
npm i -D vue-loader
复制代码
modules配置
const { VueLoaderPlugin } = require('vue-loader')

{
    output: {
        path: path.resolve(__dirname, '../dist'),
        filename: '[name].[chunkhash].js',
        chunkFilename: '[name].[chunkhash].js',
        publicPath: '/'
    },
    plugins: [
        new VueLoaderPlugin(),
    ],
    module: {
      rules: [
            {
                test: /\.vue$/,
                use: [
                    {
                    loader: 'cache-loader'
                    },
                    {
                    loader: 'vue-loader',
                    options: {
                        transformAssetUrls: {
                        video: ['src', 'poster'],
                        source: 'src',
                        img: 'src',
                        image: ['xlink:href', 'href'],
                        use: ['xlink:href', 'href']
                        },
                        cssSourceMap: true,
                        hotReload: true,
                        compilerOptions: {
                        preserveWhitespace: true
                        }
                    }
                    }
                ],
                exclude: /node_modules/
            },
        ]
    },
}

复制代码验证:在终端输入命令行npm run build无报错,dist内如下图展示
babel配置
@babel/core: 把js 代码分析成ast ,方便各个插件分析语法进行相应的处理
@babel/cli: 是_babel_ 提供的命令行工具,用于命令行下编译源代码
babel-loader: 在Webpack打包的时候,用Babel将ES6的代码转换成ES5版本的,开启缓存cacheDirectory:true,可以在node_modules/.cache内看到缓存文件
@babel/preset-env: 可以根据配置的目标浏览器或者运行环境来自动将ES2015+的代码转换为es5,配置useBuiltIns:true可实现按需引入。配置corejs:3指定corejs的版本。
core-js: 它是JavaScript标准库的polyfill,尽可能的进行模块化,让你能选择你需要的功能。
可参考文章:\# babel兼容性实现方案[3]
npm install --save-dev @babel/core @babel/cli @babel/preset-env babel-loader @babel/plugin-transform-runtime
复制代码
.babelrc配置
{
    "presets": [
        ["@babel/preset-env", {
            "useBuiltIns": "usage",
            "corejs": 3,
            "targets": {
              "browsers": ["> 1%", "last 2 versions", "not ie <= 8"]
            }
          }]
    ],
    "plugins": [
      "@babel/plugin-transform-runtime"
    ]
}
复制代码
module配置
{
    test: /\.js$/,
    use: [
      {
        loader: 'babel-loader',
        options: {
          presets: ['@babel/preset-env'],
          babelrc: true,
          cacheDirectory: true // 启用缓存
        }
      }
    ],
    exclude: /node_modules/
}
复制代码
"babel": "babel src/index.js \--out-dir dist" 命令来编译 src/index.js测试文件
npm run babel打包后的结果验证
css
vue-style-loader: 把js 代码分析成ast ,方便各个插件分析语法进行相应的处理 css-loader: 解析css文件中的@import和url语句,处理css-modules,并将结果作为一个js模块返回 postcss-loader: 将css3转为低版本浏览器兼容写法,及兼容未来版本的css写法,加载对应的插件 autoprefixer:解析CSS文件并且添加浏览器前缀到CSS内容里 postcss:使用插件去转换CSS的工具 less-loader: 将less代码转译为浏览器可以识别的CSS代码 style-resources-loader:导入css 预处理器的一些公共的样式文件变量
npm install --save-dev vue-style-loader css-loader postcss-loader autoprefixer postcss less-loader style-resources-loader
复制代码
module配置
{
        test: /\.less$/,
        use: [
          'vue-style-loader',
          {
            loader: 'css-loader',
            options: {
              importLoaders: 3
            }
          },
          {
            loader: 'postcss-loader',
            options: {
              indent: 'postcss',
              plugins: (loader) => [
                require('autoprefixer')() // 添加前缀
              ],
              sourceMap: false
            }
          },
          {
            loader: 'less-loader',
            options: {
              javascriptEnabled: true,
              sourceMap: true
            }
          },
          {
            loader: 'style-resources-loader',
            options: {
              patterns: [
                path.resolve(__dirname, '../src/assets/css/variables/*.less'),
              ],
              injector: (source, resources) => {
                const combineAll = type => resources
                  .filter(({ file }) => file.includes(type))
                  .map(({ content }) => content)
                  .join('')

                return combineAll('variables') + combineAll('mixins') + source
              }
            }
          }
        ],
        exclude: /node_modules/
      },
复制代码
npm run build打包后的结果验证
less
style-resources-loader: 避免重复在每个样式文件中@import导入,在各个css 文件中能够直接使用 变量和公共的样式
在css配置的基础上,最后面添加style-resources-loader,这样就再也不用手动引入css变量
{
        loader: 'style-resources-loader',
        options: {
          patterns: [
            path.resolve(__dirname, '../src/assets/css/variables/*.less')
          ],
          injector: (source, resources) => {
            const combineAll = type => resources
              .filter(({ file }) => file.includes(type))
              .map(({ content }) => content)
              .join('')

            return combineAll('variables') + combineAll('mixins') + source
          }
}
复制代码
npm run build打包后的结果验证

const MiniCssExtractPlugin = require('mini-css-extract-plugin')

{
    plugins: [
        new MiniCssExtractPlugin({
          filename: '[name].[contenthash].css',
          chunkFilename: '[id].[contenthash].css',
          ignoreOrder: true
        }),
    ]
}
复制代码
把上面的 vue-style-loader 替换为 MiniCssExtractPlugin.loader
npm run build打包后的结果验证
图片&svg&音频&font
svg-sprite-loader: 把js 代码分析成ast ,方便各个插件分析语法进行相应的处理 url-loader: 解析css文件中的@import和url语句,处理css-modules,并将结果作为一个js模块返回
npm install --save-dev svg-sprite-loader url-loader
复制代码
{
test: /\.svg$/,
loader: 'svg-sprite-loader',
include: [path.join(__dirname, '..', 'src/assets/icon')],
options: {
symbolId: '[name]',
name: path.posix.join('static', 'img/[name].[hash:7].[ext]')
}
},
{
test: /\.(png|jpe?g|gif)(\?.*)?$/,
loader: 'url-loader',
exclude: /node_modules/,
options: {
limit: 10000,
name: path.posix.join('static', 'img/[name].[hash:7].[ext]')
}
},
{
test: /\.(mp4|webm|ogg|mp3|wav|flac|aac)(\?.*)?$/,
loader: 'url-loader',
exclude: /node_modules/,
options: {
limit: 10000,
name: path.posix.join('static', 'media/[name].[hash:7].[ext]')
}
},
{
test: /\.(woff|woff2?|eot|ttf|otf)(\?.*)?$/,
loader: 'url-loader',
options: {
limit: 10000,
name: path.posix.join('static', 'fonts/[name].[hash:7].[ext]')
}
}
复制代码公共部分webpack.common.js优化
1. externals 排除外部依赖打包到bundle中
externals: {
  'vue': 'Vue',
}
复制代码
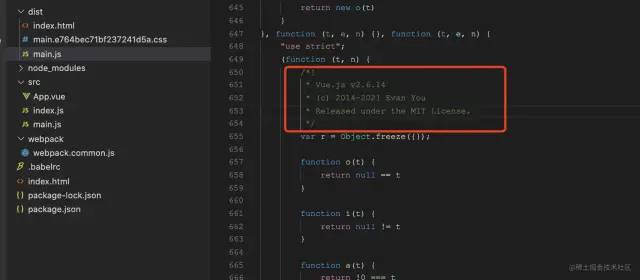
npm run build打包后的结果验证:设置externals后,dist内找不到vue.js的package包了。下图为设置前的截图
2. resolve 缩小查找范围 降低查找速度
resolve: {
    extensions: ['.js', '.vue', '.json'],
    alias: {
      'vue$': 'vue/dist/vue.esm.js',
      '@': path.join(__dirname, '..', 'src'),
      '@services': path.join(__dirname, '..', 'src/api/services.js'),
      '@productsManagement': path.join(__dirname, '..', 'src/modules/productsManagement')
    }
  },
复制代码
3. cache-loader 缓存
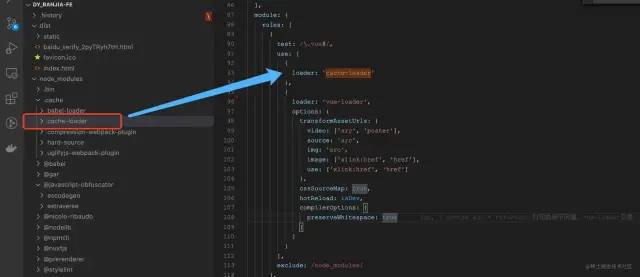
cache-loader: 在一些性能开销较大的 loader 之前添加 cache-loader,以便将结果缓存到磁盘里,此处写在vue-loader的前面
 {
    test: /\.vue$/,
    use: [
      {
        loader: 'cache-loader'
      },
      {
        loader: 'vue-loader'
      }
    ]
  },
复制代码
npm run build打包后的结果验证:可以在node_modules下的.cache看到缓存的文件
3. plugins
- DefinePlugin 变量替换
- WebpackBar 打包进度展示
- FriendlyErrorsWebpackPlugin 配置终端输出日志
- HtmlWebpackPlugin 动态生成html
- LodashModuleReplacementPlugin 按需引入
- VueLoaderPlugin 热重载
- HardSourceWebpackPlugin 缓存 webpack 内部模块
- thread-loader 多线程打包
const WebpackBar = require('webpackbar')
const FriendlyErrorsWebpackPlugin = require('friendly-errors-webpack-plugin')
const LodashModuleReplacementPlugin = require('lodash-webpack-plugin')
const HardSourceWebpackPlugin = require('hard-source-webpack-plugin')

const argv = require('yargs-parser')(process.argv.slice(-3))
const mode = argv.mode || 'development'
const isDev = mode === 'development'
const jsWorkerPool = {
  poolTimeout: 2000
}


plugins: [
    new webpack.DefinePlugin({
      'process.env': JSON.stringify(mode),
      'process.env.BUILD_ENV': JSON.stringify(mode)
    }),
    new WebpackBar({
      name: isDev ? 'development' : 'production',
      color: isDev ? '#00953a' : '#f2a900'
    }),
    new FriendlyErrorsWebpackPlugin(),
    new LodashModuleReplacementPlugin(),
    new VueLoaderPlugin(),
    new HtmlWebpackPlugin({
      filename: 'index.html',
      template: 'index.html',
      inject: true,
      minify: {
        removeComments: true,
        collapseWhitespace: true,
        removeAttributeQuotes: true
      }
    }),
    new HardSourceWebpackPlugin({}),
],
复制代码HardSourceWebpackPlugin: 为模块提供中间缓存,缓存默认的存放路径是: node_modules/.cache/hard-source,首次构建时间没有太大变化,但是第二次开始,构建时间大约可以节约 80%
npm run build打包后,HardSourceWebpackPlugin的结果验证
LodashModuleReplacementPlugin: 该插件将会移除你未用到的lodash特性 npm run build打包后,LodashModuleReplacementPlugin的结果验证
thread-loader: 把这个 loader 放置在其他 loader 之前, 放置在这个 loader 之后的 loader 就会在一个单独的 worker 池(worker pool)中运行,加快打包速度。这里先不实验,因为 thread-loader 适合在耗时的 loader 上使用,不然反而会减慢速度。
4. optimization splitChunks& runtimeChunk(manifest)
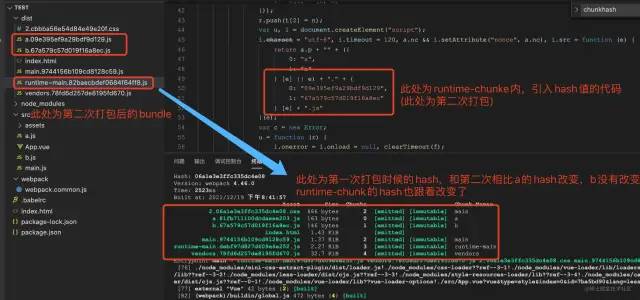
splitChunks: 提取被重复引入的文件,单独生成一个或多个文件,这样避免在多入口重复打包文件 script-ext-html-webpack-plugin: 将 runtimeChunk 内联到我们的 index.html runtimeChunk: 作用是将包含chunks映射关系的list单独从app.js里提取出来,因为每一个chunk的id基本都是基于内容hash出来的,所以你每次改动都会影响它,如果不把它提取出来的话,等于app.js每次都会改变,缓存就失效了
const ScriptExtHtmlWebpackPlugin = require('script-ext-html-webpack-plugin')

output: {
      path: path.resolve(__dirname, '../dist'),
      filename: '[name].[chunkhash].js',
      chunkFilename: '[name].[chunkhash].js',
      publicPath: '/'
},
plugins:[
    new ScriptExtHtmlWebpackPlugin({
      inline: /runtime\..*\.js$/
    }),
],
optimization: {
    runtimeChunk: true, // 构建出runtime~xx文件
    splitChunks: {
      name: true, // 自动处理文件名
      chunks: 'all',
      automaticNameDelimiter: '-',
      cacheGroups: {
        vendors: {
          test: /[\\/]node_modules[\\/]/,
          priority: 10,
          name: 'vendors',
          chunks: 'initial'
        },
        commons: {
          name: 'commons',
          minChunks: 2,
          priority: 5,
          test: path.join(__dirname, '..', 'src/components'),
          reuseExistingChunk: true
        }
      }
    }
  }
复制代码先在src下创建a.js、b.js文件,在main.js通过 动态加载import()引入,webpackChunkName为按需引入后打包的名称。npm run build打包后,runtimeChunk的结果验证 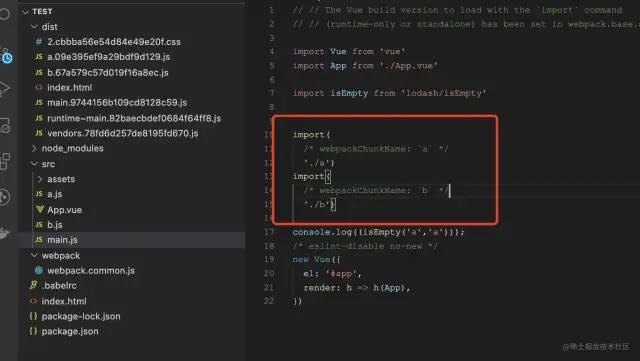
npm run build打包后,splitChunks的结果验证
npm run build打包后,cript-ext-html-webpack-plugin的结果验证
5. stats bundle 配置终端输出日志
stats: 后端打包脚本是通过docker部署,所以需要配置webpack输出信息,不然info都是黑白的,看日志的时候比较费劲
stats: {
    colors: true,
    modules: false,
    children: false,
    chunks: false,
    chunkModules: false
  }
复制代码
开发环境优化
1. devtool 调试方式
在webpack.common.js内配置
const merge = require('webpack-merge')
const argv = require('yargs-parser')(process.argv.slice(-3))
const mode = argv.mode || 'development'
const mergeConfig = require(`./webpack.${mode}.js`)
const common = merge(commonConfig, mergeConfig)
module.exports = common
复制代码
devtool: 'cheap-module-eval-source-map',
复制代码2. devServer & HotModuleReplacementPlugin
这个一般都会,就不赘述了
plugins:[
    new webpack.HotModuleReplacementPlugin()
],
devServer: {
    historyApiFallback: true,
    overlay: {
      errors: true
    },
    // 通知文件更改
    watchOptions: {
      poll: true
    },
    open: false,
    hot: true,
    proxy: {
      '/api': {
        target: 'http://localhost:10080/',
        changeOrigin: true,
        pathRewrite: {
          '^/api': '/api'
        }
      }
    },
    host: '0.0.0.0',
    port: 8000
},
复制代码
生产环境优化
todo: 考虑说出每个插件的作用 zhuanlan.zhihu.com/p/102632472[4]
1. plugins
CleanWebpackPlugin: 删除dist OptimizeCssAssetsPlugin: css优化压缩插件 cssnano: 一个 PostCSS[5] 插件,可以添加到你的构建流程中,用于确保最终生成的 用于生产环境的 CSS 样式表文件尽可能的小。CompressionPlugin: 压缩生成gzip
const {CleanWebpackPlugin} = require('clean-webpack-plugin')
const MiniCssExtractPlugin = require('mini-css-extract-plugin')
const OptimizeCssAssetsPlugin = require('optimize-css-assets-webpack-plugin')
const CompressionPlugin = require('compression-webpack-plugin')

plugins: [
    new CleanWebpackPlugin(),
    new OptimizeCssAssetsPlugin({
      assetNameRegExp: /\.less$/g,
      cssProcessor: require('cssnano'),
      cssProcessorPluginOptions: {
        preset: ['default', {
          discardComments: { removeAll: true },
          normalizeUnicode: false, // 建议false,否则在使用unicode-range的时候会产生乱码
          safe: true // 避免 cssnano 重新计算 z-index
        }]
      },
      canPrint: true
    }),
    new CompressionPlugin({
      algorithm: 'gzip', // 'brotliCompress'
      test: /\.js$|\.html$|\.css/, // + $|\.svg$|\.png$|\.jpg
      threshold: 10240, // 对超过10k的数据压缩
      deleteOriginalAssets: false // 不删除原文件
    })
  ],
  optimization: {
    moduleIds: 'size',
    minimizer: [
      // 这样配置会存在只有css压缩的问题,这时webpack4原本自己配置好的js压缩会无效 ,需要重新配置UglifyJsPlugin(用于压缩js,webpack4内置了)一下
      // https://www.jianshu.com/p/dd9afa5c4d0f
      new OptimizeCssAssetsPlugin({})
    ]
  },
复制代码
在后端项目ngix配置内
gzip on;
gzip_min_length 1k;
gzip_buffers 4 16k;
gzip_http_version 1.1;
gzip_comp_level 5;
gzip_types text/plain application/javascript application/x-javascript text/css application/xml text/javascript application/x-httpd-php image/jpeg image/gif image/png;
gzip_disable "MSIE [1-6]\.";
gzip_vary on;
复制代码
npm run build打包后, OptimizeCssAssetsPlugin的结果验证 
npm run build打包后, CompressionPlugin 的结果验证 
2. optimization
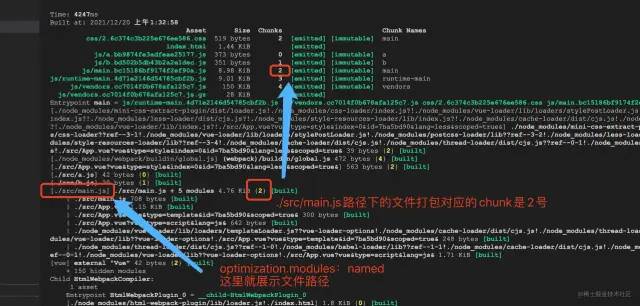
- moduleIds 持久化缓存 如何看打包后的chunk效果[6]
optimization.moduleIds: 'size'
2 . UglifyJsPlugin
 minimizer: [
  new UglifyJsPlugin({
    exclude: /\.min\.js$/,
    parallel: os.cpus().length,
    cache: true,
    sourceMap: true,
    uglifyOptions: {
      compress: {
        warnings: false,
        drop_console: true,
        collapse_vars: true,
        reduce_vars: true
      },
      output: {
        beautify: false,
        comments: false
      }
    }
  })
]
复制代码
项目优化之动态加载
对于项目里比较大的组建都可以使用 es6的 import() 动态加载,添加webpackChunkName魔法注释。
- 不常用的modal、draw等弹出框,可以对这些组件异步延迟加载,从首屏加载的代码剥离
- 路由懒加载
{
  path: '/productsManagement/allProducts',
  name: 'AllProducts',
  component: () => import(
    /* webpackChunkName: `AllProducts` */
    /* webpackMode: "lazy" */
    '@productsManagement/allProducts/DyProductList'),
  meta: {
    keepAlive: true,
    requiresAuth: true
  }
},
复制代码
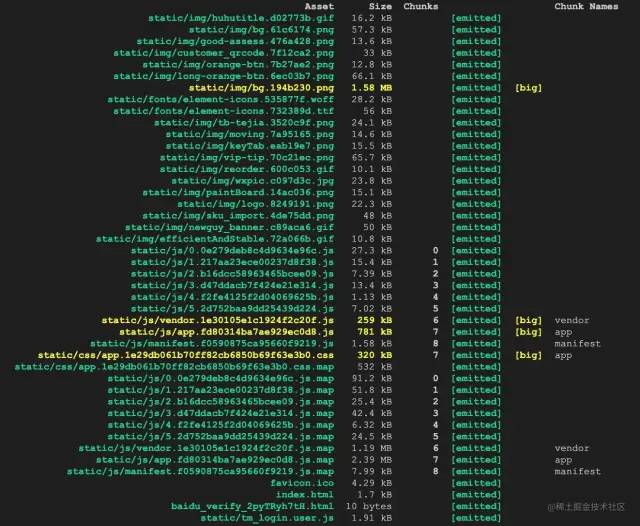
成果对比
打包速度
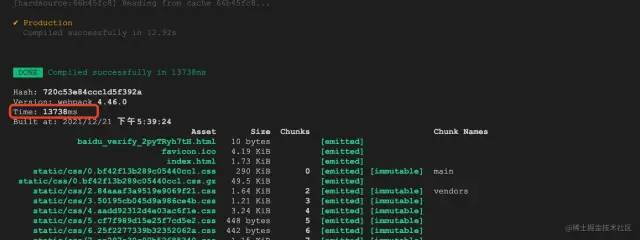
优化前,生产环境第一次打包时间:49038ms 


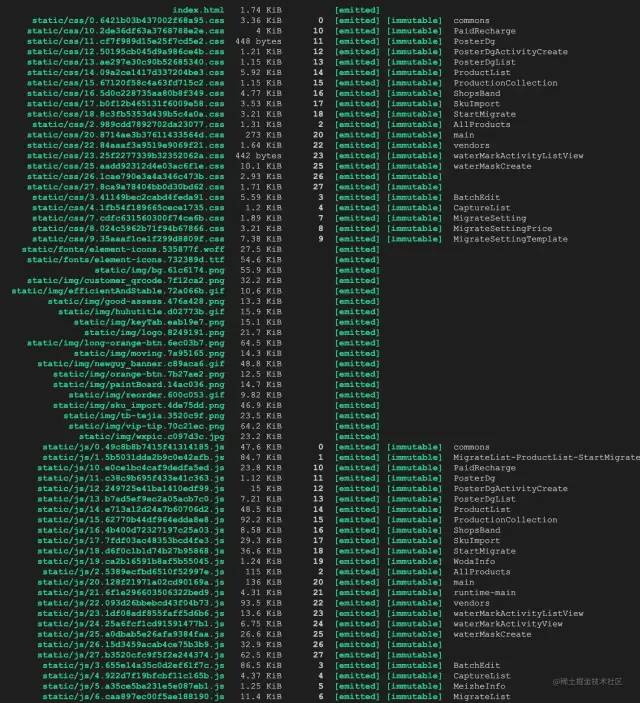
打包后资源大小展示
静态资源整理
icon
我写了一个icon组建vue-midou-icon[7] 。此组建支持iconfont平台对接,不需手动下载icon。使用方式如下:
// 注册
import MdUi from 'vue-midou-icon'
// 在main.js内导入
import "vue-midou-icon/lib/midou.css"

const IconFont = MdUi.createFromIconfontCN({
  scriptUrl:[
    'your-iconfont-symbbol-url'
  ],
  // name可以不写 默认为 md-icon
  name: 'your-iconfont-component-name',
})
Vue.use(IconFont)


//组建使用
<your-iconfont-component-name type="iconType" class="className">
</your-iconfont-component-name>
复制代码
images
- 图片需要压缩,压缩地址[8]。可以根据图片的实际大小,多次压缩。
- 当图片比较小。就可以考虑放在本地。在webpack的配置中进行打包处理
- 如果图片是gif动态图。可以考虑让ui逐帧截取后再做图片预加载。如何做预加载可以参考 页面图片预加载与懒加载策略[9]
- 长列表图片使用element—ui的image,支持懒加载
<el-image v-for="url in urls" :key="url" :src="url" lazy></el-image>
fonts
我们的项目里有在线编辑图片,所以要加载很多ui字体。每个字体包在转换之前有17M。通过压缩转换字体,把otf转换成woff。就变成了5kb,不过字体会稍微有点点改变。点击进入字体压缩地址[10]
css
- css变量规范,使用style-resources-loader[11]全局注入
- 公共css分开整理,统一入口引入
- 业务css与组建统一文件夹
代码优化
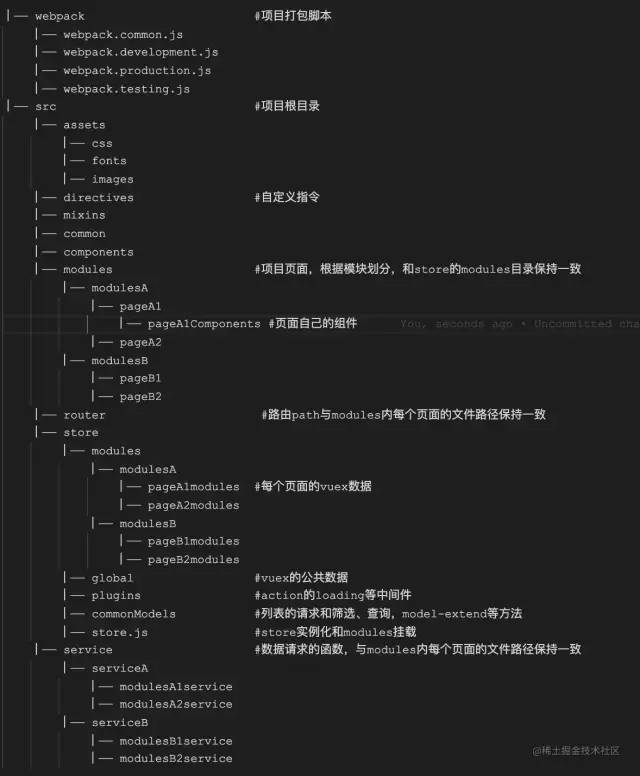
目录整理与模块划分
原来的目录结构的公共组件和页面业务组件没有分开,所以组件越来越多,且有路由直接加载components里的组件的现象。目录结构混乱。没有模块划分的概念。
公共逻辑抽离 createLoading、modelExtengs、listModel、baseModel
- modelExtend[12] 类目dva的 dva-model-extend,点击名称可查看代码
- createBaseModel[13] 列表请求的筛选和查询封装,点击名称可查看代码
- createLoadingPlugin[14] 类目dva的 action的loading中间件,点击名称可查看代码
下面是代码使用demo
在store.js中的注册
import Vue from 'vue'
import Vuex from 'vuex'
import createLoadingPlugin from './plugins/createLoadingPlugin'
import {setBaseModelConfig} from '@commonModels/createBaseModel.js'
import productManagement from './modules/productManagement'
import customerSetting from './modules/customerSetting'

setBaseModelConfig({
  // 列表获取
  getList: (response) => {
    let tableData
    tableData = response.items
    return {
      tableData,
      total: response.total
    }
  },
  // 参数格式化
  formatParmas: (parmas) => {
    // 合并分页和筛选的数据
    return {
      ...parmas.pagination,
      ...parmas.filters
    }
  },
  // 错误警告
  handleError: (err, self) => {
    self._vm.$message({
      message: `${err}`,
      type: 'error'
    })
  },
  // 分页配置
  pagination: {
    page_size: 10,
    page_index: 1
  }
})

Vue.use(Vuex)
const modules = {
  ...productManagement,
  ...customerSetting
}

export default new Vuex.Store({
  modules,
  plugins: [createLoadingPlugin({Vue})]
})
复制代码[15]在vuex文件中的挂载
import createBaseModel from '@commonModels/createBaseModel.js'
import modelExtend from '@commonModels/modelExtend.js'
import services from '@services'

const model = modelExtend(
  createBaseModel({
    fetch: services.userCapturePage
  }),
  {
    namespaced: true,
    state: () => ({
    }),
    actions: {
      async fetch ({commit, state, dispatch}, payload) {
        await dispatch('query', { ...payload })
      }
    },
    getters: {

    }
  })
export default model
复制代码
[16]在**.vue**文件中的调用
<!-- 额度消耗记录-->
<template>
    <el-table
      :data="tableData"
      v-loading="loading"
      style="width: 100%">
      <el-table-empty slot="empty" />
      <el-table-column
        prop="create_time"
        label="复制时间"
        width="180">
      </el-table-column>
      <el-table-column
        prop="url"
        label="复制链接">
      </el-table-column>
    </el-table>
    <el-pagination
      @size-change="handleSizeChange"
      @current-change="handleCurrentChange"
      :current-page="pagination.page_index"
      class="pt-20 right mr-20"
      :page-size="pagination.page_size"
      :page-sizes="[10, 20, 50, 100]"
      layout="total, sizes, prev, pager, next, jumper"
      :total="total"
    >
    </el-pagination>
</template>

<script>
import { mapState, mapActions } from 'vuex'

export default {
  name: 'ConsumptionRecord',
  data () {
    return {
    }
  },
  created(){
    this.fetch({
        pagination: {
          page_size: 10,
          page_index: 1
        }
      })
  },
  computed: {
    // customerSetting/paidRecharge/consumptionRecord
    // 组建层级路径 在store内也保持一致 利于后期代码维护和模块分离
    ...mapState('customerSetting/paidRecharge/consumptionRecord', [
      'tableData',
      'total',
      'pagination',
      'filters'
    ]),
    ...mapState({
      loading: state => state['@@loading'].effects['customerSetting/paidRecharge/consumptionRecord/fetch']
    })
  },
  methods: {
    ...mapActions('customerSetting/paidRecharge/consumptionRecord', [
      'handleCurrentChange',
      'handleSizeChange',
      'setFilter',
      'fetch'
    ])
  }
}
</script>
复制代码
利用require.context自动注册
const requireDirectives = require.context(
  '@/dirname',
  false,
  /([\w\W]*)\.(vue|js)$/
)

export const registerDirectives = () =>
  requireDirectives.keys().forEach(fileName => {
    const directiveConfig = requireDirectives(fileName)
    const directiveName = fileName.split('/').pop().replace(/\.\w+$/, '')
    Vue.directive(
      directiveName,
      directiveConfig.default || directiveConfig
    )
  })
复制代码


