动手实现一个localcache - 实现篇
前言
哈喽,大家好, 经过了前面两篇的介绍,我们已经基本了解该如何设计一个本地缓存了,本文就是这个系列的终结篇,自己动手实现一个本地缓存,接下来且听我细细道来!!!
本文代码已经上传到github:https://github.com/asong2020/go-localcache
现在这一版本算是一个1.0,后续会继续进行优化和迭代。
第一步:抽象接口
第一步很重要,以面向接口编程为原则,我们先抽象出来要暴露给用户的方法,给用户提供简单易懂的方法,因此我抽象出来的结果如下:
// ICache abstract interface
type ICache interface {
 // Set value use default expire time. default does not expire.
 Set(key string, value []byte) error
 // Get value if find it. if value already expire will delete.
 Get(key string) ([]byte, error)
 // SetWithTime set value with expire time
 SetWithTime(key string, value []byte, expired time.Duration) error
 // Delete manual removes the key
 Delete(key string) error
 // Len computes number of entries in cache
 Len() int
 // Capacity returns amount of bytes store in the cache.
 Capacity() int
 // Close is used to signal a shutdown of the cache when you are done with it.
 // This allows the cleaning goroutines to exit and ensures references are not
 // kept to the cache preventing GC of the entire cache.
 Close() error
 // Stats returns cache's statistics
 Stats() Stats
 // GetKeyHit returns key hit
 GetKeyHit(key string) int64
}
Set(key string, value []byte):使用该方法存储的数据使用默认的过期时间,如果清除过期的异步任务没有enable,那么就永不过期,否则默认过期时间为10min。Get(key string) ([]byte, error):根据key获取对象内容,如果数据过期了会在这一步删除。SetWithTime(key string, value []byte, expired time.Duration):存储对象是使用自定义过期时间Delete(key string) error:根据key删除对应的缓存数据Len() int:获取缓存的对象数量Capacity() int:获取当前缓存的容量Close() error:关闭缓存Stats() Stats:缓存监控数据GetKeyHit(key string) int64:获取key的命中率数据
第二步:定义缓存对象
第一步我们抽象好了接口,下面就要定义一个缓存对象实例实现接口,先看定义结构:
type cache struct {
 // hashFunc represents used hash func
 hashFunc HashFunc
 // bucketCount represents the number of segments within a cache instance. value must be a power of two.
 bucketCount uint64
 // bucketMask is bitwise AND applied to the hashVal to find the segment id.
 bucketMask uint64
 // segment is shard
 segments []*segment
 // segment lock
 locks    []sync.RWMutex
 // close cache
 close chan struct{}
}hashFunc:分片要用的哈希函数,用户可以自行定义,实现HashFunc接口即可,默认使用fnv算法。bucketCount:分片的数量,一定要是偶数,默认分片数为256。bucketMask:因为分片数是偶数,所以可以分片时可以使用位运算代替取余提升性能效率,hashValue % bucketCount == hashValue & bucketCount - 1。segments:分片对象,每个分片的对象结构我们在后面介绍。locks:每个分片的读写锁close:关闭缓存对象时通知其他goroutine暂停
接下来我们来写cache对象的构造函数:
// NewCache constructor cache instance
func NewCache(opts ...Opt) (ICache, error) {
 options := &options{
  hashFunc: NewDefaultHashFunc(),
  bucketCount: defaultBucketCount,
  maxBytes: defaultMaxBytes,
  cleanTime: defaultCleanTIme,
  statsEnabled: defaultStatsEnabled,
  cleanupEnabled: defaultCleanupEnabled,
 }
 for _, each := range opts{
  each(options)
 }

 if !isPowerOfTwo(options.bucketCount){
  return nil, errShardCount
 }

  if options.maxBytes <= 0 {
  return nil, ErrBytes
 }

 segments := make([]*segment, options.bucketCount)
 locks := make([]sync.RWMutex, options.bucketCount)

 maxSegmentBytes := (options.maxBytes + options.bucketCount - 1) / options.bucketCount
 for index := range segments{
  segments[index] = newSegment(maxSegmentBytes, options.statsEnabled)
 }

 c := &cache{
  hashFunc: options.hashFunc,
  bucketCount: options.bucketCount,
  bucketMask: options.bucketCount - 1,
  segments: segments,
  locks: locks,
  close: make(chan struct{}),
 }
    if options.cleanupEnabled {
  go c.cleanup(options.cleanTime)
 }

 return c, nil
}这里为了更好的扩展,我们使用Options编程模式,我们的构造函数主要做三件事:
- 前置参数检查,对于外部传入的参数,我们还是要做基本的校验
- 分片对象初始化
- 构造缓存对象
这里构造缓存对象时我们要先计算每个分片的容量,默认整个本地缓存256M的数据,然后在平均分到每一片区内,用户可以自行选择要缓存的数据大小。
第三步:定义分片结构
每个分片结构如下:
type segment struct {
 hashmap map[uint64]uint32
 entries buffer.IBuffer
 clock   clock
 evictList  *list.List
 stats IStats
}hashmp:存储key所对应的存储索引entries:存储key/value的底层结构,我们在第四步的时候介绍,也是代码的核心部分。clock:定义时间方法evicList:这里我们使用一个队列来记录old索引,当容量不足时进行删除(临时解决方案,当前存储结构不适合使用LRU淘汰算法)stats:缓存的监控数据。
接下来我们再来看一下每个分片的构造函数:
func newSegment(bytes uint64, statsEnabled bool) *segment {
 if bytes == 0 {
  panic(fmt.Errorf("bytes cannot be zero"))
 }
 if bytes >= maxSegmentSize{
  panic(fmt.Errorf("too big bytes=%d; should be smaller than %d", bytes, maxSegmentSize))
 }
 capacity := (bytes + segmentSize - 1) / segmentSize
 entries := buffer.NewBuffer(int(capacity))
 entries.Reset()
 return &segment{
  entries: entries,
  hashmap: make(map[uint64]uint32),
  clock:   &systemClock{},
  evictList: list.New(),
  stats: newStats(statsEnabled),
 }
}
这里主要注意一点:
我们要根据每个片区的缓存数据大小来计算出容量,与上文的缓存对象初始化步骤对应上了。
第四步:定义缓存结构
缓存对象现在也构造好了,接下来就是本地缓存的核心:定义缓存结构。
bigcache、fastcache、freecache都使用字节数组代替map存储缓存数据,从而减少GC压力,所以我们也可以借鉴其思想继续保持使用字节数组,这里我们使用二维字节切片存储缓存数据key/value;画个图表示一下:

bigcache的优势在于可以直接根据索引删除对应的数据,虽然也会有虫洞的问题,但是我们可以记录下来虫洞的索引,不断填充。
每个缓存的封装结构如下:
基本思想已经明确,接下来看一下我们对存储层的封装:
type Buffer struct {
 array [][]byte
 capacity int
 index int
 // maxCount = capacity - 1
 count int
 // availableSpace If any objects are removed after the buffer is full, the idle index is logged.
 // Avoid array "wormhole"
 availableSpace map[int]struct{}
 // placeholder record the index that buffer has stored.
 placeholder map[int]struct{}
}
array [][]byte:存储缓存对象的二维切片capacity:缓存结构的最大容量index:索引,记录缓存所在的位置的索引count:记录缓存数量availableSpace:记录"虫洞",当缓存对象被删除时记录下空闲位置的索引,方便后面容量满了后使用"虫洞"placeholder:记录缓存对象的索引,迭代清除过期缓存可以用上。
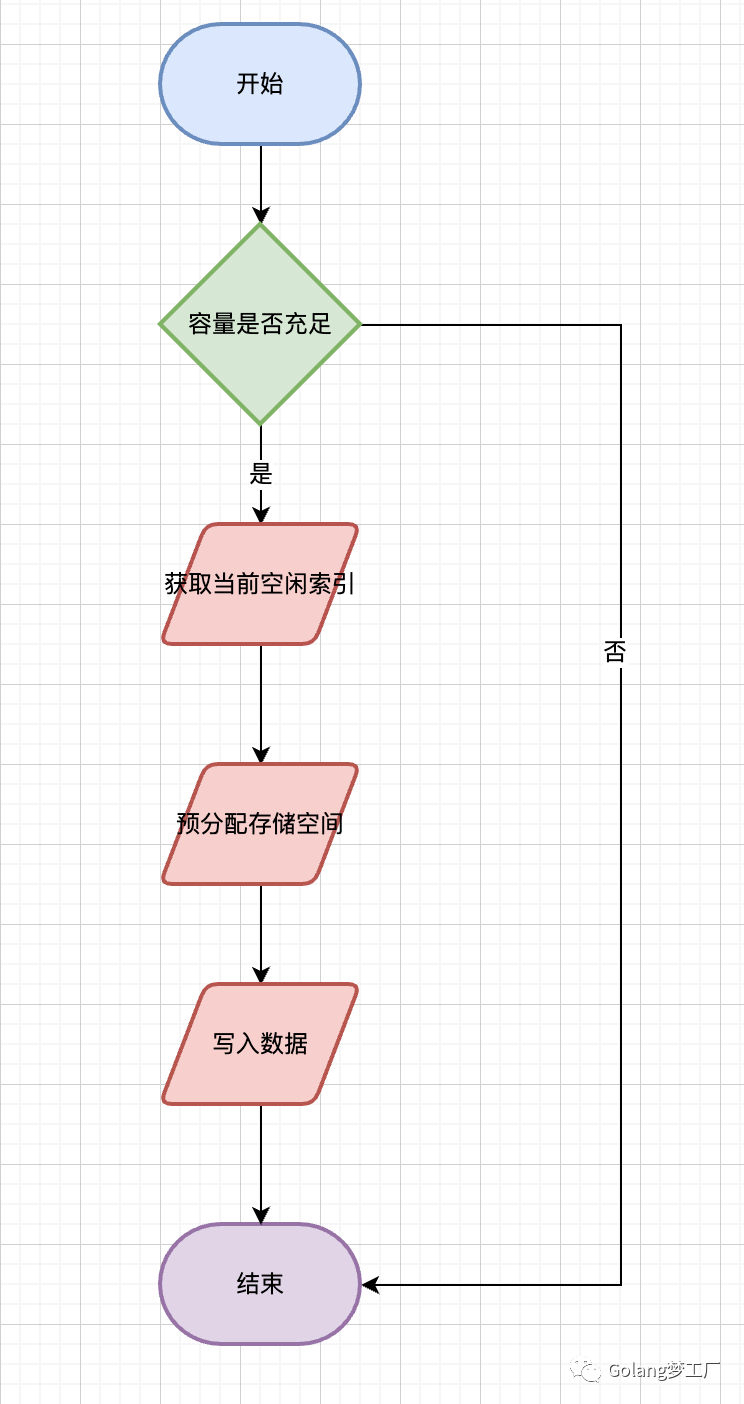
向buffer写入数据的流程(不贴代码了):
第五步:完善向缓存写入数据方法
上面我们定义好了所有需要的结构,接下来就是填充我们的写入缓存方法就可以了:
func (c *cache) Set(key string, value []byte) error  {
 hashKey := c.hashFunc.Sum64(key)
 bucketIndex := hashKey&c.bucketMask
 c.locks[bucketIndex].Lock()
 defer c.locks[bucketIndex].Unlock()
 err := c.segments[bucketIndex].set(key, hashKey, value, defaultExpireTime)
 return err
}

func (s *segment) set(key string, hashKey uint64, value []byte, expireTime time.Duration) error {
 if expireTime <= 0{
  return ErrExpireTimeInvalid
 }
 expireAt := uint64(s.clock.Epoch(expireTime))

 if previousIndex, ok := s.hashmap[hashKey]; ok {
  if err := s.entries.Remove(int(previousIndex)); err != nil{
   return err
  }
  delete(s.hashmap, hashKey)
 }

 entry := wrapEntry(expireAt, key, hashKey, value)
 for {
  index, err := s.entries.Push(entry)
  if err == nil {
   s.hashmap[hashKey] = uint32(index)
   s.evictList.PushFront(index)
   return nil
  }
  ele := s.evictList.Back()
  if err := s.entries.Remove(ele.Value.(int)); err != nil{
   return err
  }
  s.evictList.Remove(ele)
 }
}
流程分析如下:
- 根据
key计算哈希值,然后根据分片数获取对应分片位置 - 如果当前缓存中存在相同的
key,则先删除,在重新插入,会刷新过期时间 - 封装存储结构,根据过期时间戳、
key长度、哈希大小、缓存对象进行封装 - 将数据存入缓存,如果缓存失败,移除最老的数据后再次重试
第六步:完善从缓存读取数据方法
第一步根据key计算哈希值,再根据分片数获取对应的分片位置:
func (c *cache) Get(key string) ([]byte, error)  {
 hashKey := c.hashFunc.Sum64(key)
 bucketIndex := hashKey&c.bucketMask
 c.locks[bucketIndex].RLock()
 defer c.locks[hashKey&c.bucketMask].RUnlock()
 entry, err := c.segments[bucketIndex].get(key, hashKey)
 if err != nil{
  return nil, err
 }
 return entry,nil
}
第二步执行分片方法获取缓存数据:
- 先根据哈希值判断
key是否存在于缓存中,不存返回key没有找到 - 从缓存中读取数据得到缓存中的
key判断是否发生哈希冲突 - 判断缓存对象是否过期,过期删除缓存数据(可以根据业务优化需要是否返回当前过期数据)
- 在每个记录缓存监控数据
func (s *segment) getWarpEntry(key string, hashKey uint64) ([]byte,error) {
 index, ok := s.hashmap[hashKey]
 if !ok {
  s.stats.miss()
  return nil, ErrEntryNotFound
 }
 entry, err := s.entries.Get(int(index))
 if err != nil{
  s.stats.miss()
  return nil, err
 }
 if entry == nil{
  s.stats.miss()
  return nil, ErrEntryNotFound
 }

 if entryKey := readKeyFromEntry(entry); key != entryKey {
  s.stats.collision()
  return nil, ErrEntryNotFound
 }
 return entry, nil
}

func (s *segment) get(key string, hashKey uint64) ([]byte, error) {
 currentTimestamp := s.clock.TimeStamp()
 entry, err := s.getWarpEntry(key, hashKey)
 if err != nil{
  return nil, err
 }
 res := readEntry(entry)

 expireAt := int64(readExpireAtFromEntry(entry))
 if currentTimestamp - expireAt >= 0{
  _ = s.entries.Remove(int(s.hashmap[hashKey]))
  delete(s.hashmap, hashKey)
  return nil, ErrEntryNotFound
 }
 s.stats.hit(key)

 return res, nil
}
第七步:来个测试用例体验一下
先来个简单的测试用例测试一下:
func (h *cacheTestSuite) TestSetAndGet() {
 cache, err := NewCache()
 assert.Equal(h.T(), nil, err)
 key := "asong"
 value := []byte("公众号:Golang梦工厂")

 err = cache.Set(key, value)
 assert.Equal(h.T(), nil, err)

 res, err := cache.Get(key)
 assert.Equal(h.T(), nil, err)
 assert.Equal(h.T(), value, res)
 h.T().Logf("get value is %s", string(res))
}
运行结果:
=== RUN   TestCacheTestSuite
=== RUN   TestCacheTestSuite/TestSetAndGet
    cache_test.go:33: get value is 公众号:Golang梦工厂
--- PASS: TestCacheTestSuite (0.00s)
    --- PASS: TestCacheTestSuite/TestSetAndGet (0.00s)
PASS大功告成,基本功能通了,剩下就是跑基准测试、优化、迭代了(不在文章赘述了,可以关注github仓库最新动态)。
参考文章
- https://github.com/allegro/bigcache
- https://github.com/VictoriaMetrics/fastcache
- https://github.com/coocood/freecache
- https://github.com/patrickmn/go-cache
总结
实现篇到这里就结束了,但是这个项目的编码仍未结束,我会继续以此版本为基础不断迭代优化,该本地缓存的优点:
- 实现简单、提供给用户的方法简单易懂
- 使用二维切片作为存储结构,避免了不能删除底层数据的缺点,也在一定程度上避免了"虫洞"问题。
- 测试用例齐全,适合作为小白的入门项目
待优化点:
- 没有使用高效的缓存淘汰算法,可能会导致热点数据被频繁删除
- 定时删除过期数据会导致锁持有时间过长,需要优化
- 关闭缓存实例需要优化处理方式
- 根据业务场景进行优化(特定业务场景)
迭代点:
- 添加异步加载缓存功能
- ...... (思考中)
本文代码已经上传到github:https://github.com/asong2020/go-localcache
好啦,本文到这里就结束了, 我们下期见。

