用 TypeScript 编写一个 2D 格斗游戏
今天我将介绍如何用JavaScript编写一个简单的2D格斗游戏。
项目设置
此项目在CSS方面非常简单,所以我将使用原生CSS并省去构建相关CSS的步骤。
默认使用TypeScript。所以还需要一个构建工具来编译JavaScript。我选择的是ESBuild。
#!/usr/bin/env node

const watchFlag = process.argv.indexOf("--watch") > -1;

require("esbuild")
    .build({
        entryPoints: ["src/ts/main.ts", "src/ts/sw.ts"],
        bundle: true,
        outdir: "public",
        watch: watchFlag,
    })
    .catch(() => process.exit(1));
➜ attacke git:(main) yarn build
yarn run v1.22.10
$ ./esbuild.js
✨ Done in 0.47s.HTML基础构建
提供<canvas>的网站并没有什么特别之处。唯一重要的元素是canvas本身。它本身不能获得焦点,需要tabindex才能通过键盘访问。点击键盘上下键将上下移动页面。而我们需要避免canvas有焦点的这种情况,否则页面会随着角色移动而上下跳跃。宽度和高度也是固定的,canvas可能不会以全高清显示,但其尺寸是画布坐标系的端点,因此需要计算位置。
我还添加了一个Loading加载器,以获得更流畅的游戏启动体验。
<div class="loader">
    <progress value="0" max="100"></progress>
</div>
<canvas tabindex="0" id="canvas" width="1920" height="1080"></canvas>
游戏循环
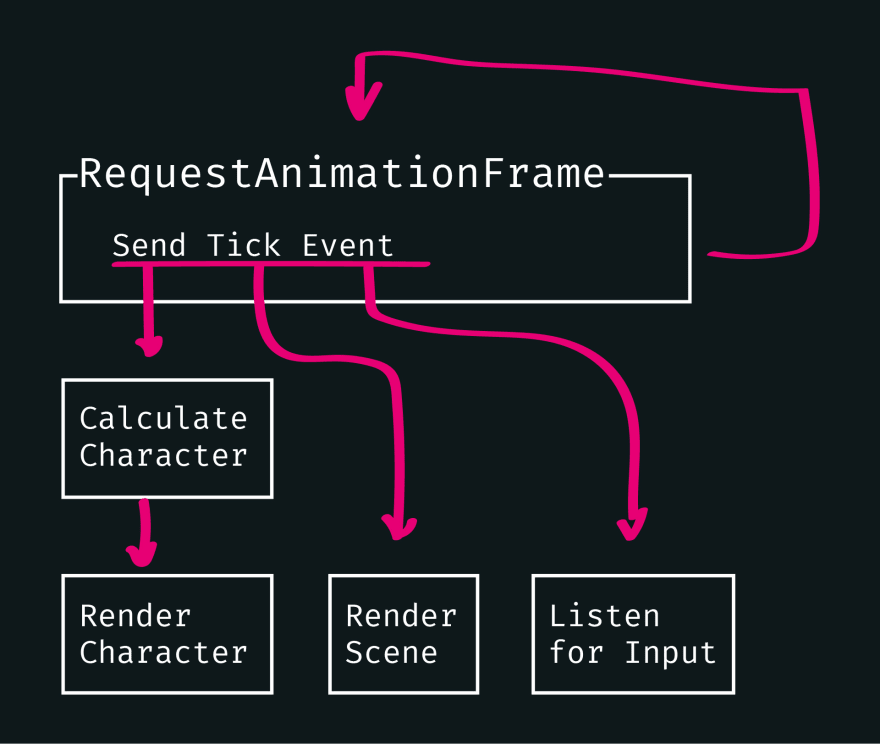
JavaScript的实时游戏需要游戏循环:递归函数在每一帧调用自身。即如果我们想保持在60fps或达到每33ms 30fps的目标,那么渲染一帧的性能预算是16ms。循环本身没有游戏逻辑。因而我打算每一帧发送一个tick事件。游戏的所有其他部分都可以侦听该事件。
然后,第一次尝试我失败了。
export class Renderer {
    ctx: CanvasRenderingContext2D;
    ticker: number;

    constructor(ctx: CanvasRenderingContext2D) {
        this.ctx = ctx;
        this.ticker = setInterval(() => {
            const tick = new Event("tick", {
                bubbles: true,
                cancelable: true,
                composed: false,
            });
            ctx.canvas.dispatchEvent(tick);
        }, 1000 / 60); // aim for 60fps
    }
}我使用了一个定时器来调用游戏循环。这在Chrome上运行良好,但在Firefox和Safari上就崩溃了。Firefox在drawImage()方面表现不佳,因此我决定绘制sprites。不过,虽然Safari即使在每帧绘制大图像时,也能够以60fps的速度渲染,但有时却实现不了。原因是Macbooks默认启用节电模式,只要未连接电源线,Safari就会限制为30fps。我花了一段时间才搞清楚这一点。
这两个问题的解决方法都是使用requestAnimationFrame取代setInterval。
constructor(ctx: CanvasRenderingContext2D, theme: Theme) {
    this.ctx = ctx;
    this.theme = theme;
    this.fps = 60; // aim for 60fps
    this.counter = 0;
    this.initTicker();
}

private initTicker() {
    window.requestAnimationFrame(() => {
        this.tick();
        this.initTicker();
    });
}
现在虽然游戏在这些浏览器中都能流畅运行,但是游戏速度仍然不同。30fps的浏览器将以一半的速度运行游戏。下面我将通过测量帧之间的时间并将跳过的帧数注入计算来解决这个问题。
private tick() {
    const timeStamp = performance.now();
    const secondsPassed = (timeStamp - this.oldTimeStamp) / 1000;
    this.oldTimeStamp = timeStamp;

    // Calculate fps
    const fps = Math.round(1 / secondsPassed);
    const frameSkip = clamp(Math.round((60 - fps) / fps), 0, 30);

    // to allow for animations lasting 1s
    if (this.counter >= this.fps * 2) {
        this.counter = 0;
    }

    const tick: TickEvent = new CustomEvent("tick", {
        bubbles: true,
        cancelable: true,
        composed: false,
        detail: {
            frameCount: this.counter,
            frameSkip: frameSkip,
        },
    });
    this.ctx.clearRect(0, 0, this.ctx.canvas.width, this.ctx.canvas.height);
    this.ctx.canvas.dispatchEvent(tick);

    this.counter++;
}
玩家角色
每个游戏角色都会在各自的character类实例中被调用。它控制玩家的行为、动作、外观和声音。
角色行为
在现实世界中的对象,当角色四处移动时,不是立即从零加速到最高速度。这中间有一个加速和减速的过程。且以一定的速度移动。这些要求反映到类上就是:
class Character {
    position: coordinates;
    orientation: number;
    speed: number;
    maxVelocity: number;
    velocity: coordinates;
    obstacle: Obstacle;
    action: {
        movingX: number;
        movingY: number;
    };
    //...
}当按下移动键时,action.movingX|Y属性设置为+-1。释放键时,该属性设置为0。这可作为玩家开始或继续移动的指示器。
// 向左移动
config.controls[this.player].left.forEach((key: string) => {
    document.addEventListener("keydown", (event: KeyboardEvent) => {
        this.captureEvent(event);
        if (event.code === key && event.repeat === false) {
            this.action.movingX = -1;
        }
    });
    document.addEventListener("keyup", (event: KeyboardEvent) => {
        this.captureEvent(event);
        if (event.code === key) {
            this.action.movingX = 0;
        }
    });
});

// 向左、向上、向下也是类似的方式注意,按键的映射关系作为数组存储在config.controls中,每个玩家都有自己的控制键。
我们现在可以忽略captureEvent。这只用来防止页面在按下光标键时滚动。还记得如何为每一帧发送一个tick事件吗?我们将在这里侦听这个事件。对于每一帧,我都会在重新绘制角色之前更新位置。
private move(): void {
    const { position, velocity, action } = this;
    const newX = position.x + action.movingX * this.speed + velocity.x * this.speed;
    const newY = position.y + action.movingY * this.speed + velocity.y * this.speed;

    position.x = newX;
    position.y = newY;

    if (position.x < 0) {
        position.x = 0;
    } else if (newX > this.ctx.canvas.width - this.size) {
        position.x = this.ctx.canvas.width - this.size;
    }

    if (position.y < 0) {
        position.y = 0;
    } else if (newY > this.ctx.canvas.height - this.size) {
        position.y = this.ctx.canvas.height - this.size;
    }

    this.velocity.x = clamp(
        (action.movingX ? this.velocity.x + action.movingX : this.velocity.x * 0.8) * this.speed,
        this.maxVelocity * -1,
        this.maxVelocity
    );
    this.velocity.y = clamp(
        (action.movingY ? this.velocity.y + action.movingY : this.velocity.y * 0.8) * this.speed,
        this.maxVelocity * -1,
        this.maxVelocity
    );
}这里出现了速度(velocity)。速度是一个值,随着玩家持续按住移动键,它会不断增加,最高可达maxVelocity。当玩家松开移动键时,角色不会突然停止而是减速直到停止。速度又平缓地回到0。
角色不仅可以四处移动,还可以转身。玩家应该专注于攻击,而不是总是需要转身对着对手。
private turn(): void {
    const otherPlayer = this.player === 0 ? 1 : 0;
    const orientationTarget: coordinates = this.players[otherPlayer]?.position || { x: 0, y: 0 };
    const angle = Math.atan2(orientationTarget.y - this.position.y, orientationTarget.x - this.position.x);
    this.orientation = angle;
}
小格斗游戏现在是这样的!好像在跳舞。
角色动作
角色需要能够互相攻击。同时为了增加游戏的深度,还应该有防守。两者都被定义为角色动作,并且都有冷却时间来防止滥发。
class Character {
    range: number;
    attackDuration: number;
    blockDuration: number;
    cooldownDuration: number;
    action: {
        attacking: boolean;
        blocking: boolean;
        cooldown: boolean;
    };
    // ...
}触发这些动作的工作方式与移动相同——通过侦听键盘事件,然后将动作值设置为true……
// attack
config.controls[this.player].attack.forEach((key: string) => {
    document.addEventListener("keydown", (event: KeyboardEvent) => {
        if (
            this.active &&
            event.code === key &&
            event.repeat === false &&
            !this.action.cooldown
        ) {
            this.action.attacking = true;
        }
    });
});

// block
config.controls[this.player].block.forEach((key: string) => {
    document.addEventListener("keydown", (event: KeyboardEvent) => {
        if (
            this.active &&
            event.code === key &&
            event.repeat === false &&
            !this.action.cooldown
        ) {
            this.action.blocking = true;
        }
    });
});
最后在游戏循环中执行动作。
private attack(): void {
    if (!this.active || !this.action.attacking || this.action.cooldown) {
        return;
    }

    this.action.cooldown = true;

    // strike duration
    window.setTimeout(() => {
        this.action.attacking = false;
    }, this.attackDuration);

    // cooldown to next attack/block
    window.setTimeout(() => {
        this.action.cooldown = false;
    }, this.cooldownDuration);

    this.strike();
}攻击只实现了一半工作。另一半是确保对手被击中——这意味着对方不能阻挡攻击并且武器在射程内。我们在trike()方法中处理。
private strike(): void {
    const otherPlayerId = this.player === 0 ? 1 : 0;
    const otherPlayer: rectangle = this.players[otherPlayerId].obstacle?.getObject();

    const blocked = this.players[otherPlayerId].action.blocking;
    if (blocked) {
        // opponent blocked the attack
        return;
    }

    // attack hits

    const otherPlayerPolygon = new Polygon(new Vector(0, 0), [
        new Vector(otherPlayer.a.x, otherPlayer.a.y),
        new Vector(otherPlayer.b.x, otherPlayer.b.y),
        new Vector(otherPlayer.c.x, otherPlayer.c.y),
        new Vector(otherPlayer.d.x, otherPlayer.d.y),
    ]);

    const weaponPosition = this.getWeaponPosition();
    const weaponPolygon = new Polygon(new Vector(0, 0), [
        new Vector(weaponPosition.a.x, weaponPosition.a.y),
        new Vector(weaponPosition.b.x, weaponPosition.b.y),
        new Vector(weaponPosition.c.x, weaponPosition.c.y),
        new Vector(weaponPosition.d.x, weaponPosition.d.y),
    ]);

    const hit = this.collider.testPolygonPolygon(weaponPolygon, otherPlayerPolygon) as boolean;
    if (hit) {
        // finish this round
        this.finish();
    }
}
这会在玩家周围同时向对手的方向延申150%创建一个碰撞框。如果武器碰撞框与对手的碰撞箱发生撞击,则攻击落地且玩家赢得该回合。
那么碰撞框是怎么回事?
碰撞检测
碰撞检测并不像我想象的那么简单。假设canvas上有两个矩形,可以直接比较它们的x和y坐标。但是,一旦旋转矩形,比较x和y坐标就没什么用了。于是我尝试着从矩形的边界线创建线性函数并检查交叉点。但仍然会产生一些边缘情况,也非常低效。
然后我转而上网搜索解决方案。并在StackOverflow上找到了:
这个解决方案聪明、优雅、高效,而且——最重要的是——远高于我的几何技能水平。就是它了!
yarn add collider2d
我在每个相关对象周围添加了碰撞多边形作为碰撞框,相关对象包括玩家角色、画布边界和竞技场中可能存在的障碍物。这些多边形由描述周长的向量组成。角色多边形存储在角色类的一个属性中,并在move()、turn()和stroke()方法中更新。
// inside character.strike()
const otherPlayerPolygon = new Polygon(new Vector(0, 0), [
    new Vector(otherPlayer.a.x, otherPlayer.a.y),
    new Vector(otherPlayer.b.x, otherPlayer.b.y),
    new Vector(otherPlayer.c.x, otherPlayer.c.y),
    new Vector(otherPlayer.d.x, otherPlayer.d.y),
]);

const weaponPosition = this.getWeaponPosition();
const weaponPolygon = new Polygon(new Vector(0, 0), [
    new Vector(weaponPosition.a.x, weaponPosition.a.y),
    new Vector(weaponPosition.b.x, weaponPosition.b.y),
    new Vector(weaponPosition.c.x, weaponPosition.c.y),
    new Vector(weaponPosition.d.x, weaponPosition.d.y),
]);

const hit = this.collider.testPolygonPolygon(
    weaponPolygon,
    otherPlayerPolygon
) as boolean;
现在我们来看看实际的游戏玩法!
角色可以你来我往地相互碰撞。Collider2D可以返回一些关于碰撞的信息,比如向量和位置。这与我之前确定的速度解决方案配合得很好。我可以直接将现有速度指向碰撞的方向:
private collide(): void {
    const obstacles = this.obstacles.filter((obstacle) => obstacle.getId() !== this.obstacle.getId());
    obstacles.forEach((obstacle) => {
        const collision = this.obstacle.collidesWith(obstacle);
        const friction = 0.8;

        if (!collision) {
            return;
        }

        this.velocity.x = (this.velocity.x + collision.overlapV.x * -1) * friction;
        this.velocity.y = (this.velocity.y + collision.overlapV.y * -1) * friction;
    });
}现在,可以在游戏循环中调用collide()与move()、turn(),每一帧都有一个用于碰撞检测的轮询。
图形
这样的跳舞方块可能很实用,但并不漂亮。我想要制作成复古的像素艺术风格,因而选择了灰绿色屏幕(后来我设置为灰蓝色)和放大像素上的阴影效果。
角色尺寸为16x16px。武器射程为150%,也就是能达到40x16px。所有的sprites设置为角色居中,其Photoshop画布是64x64px。导出图像时,放大到100x100px字符大小,因为全高清屏幕上的16px字符太小了。按方向在分组层中对sprites进行排序,每个sprite都需要八种变化——每个罗盘方向一个。然后将其乘以动画sprites的帧数。
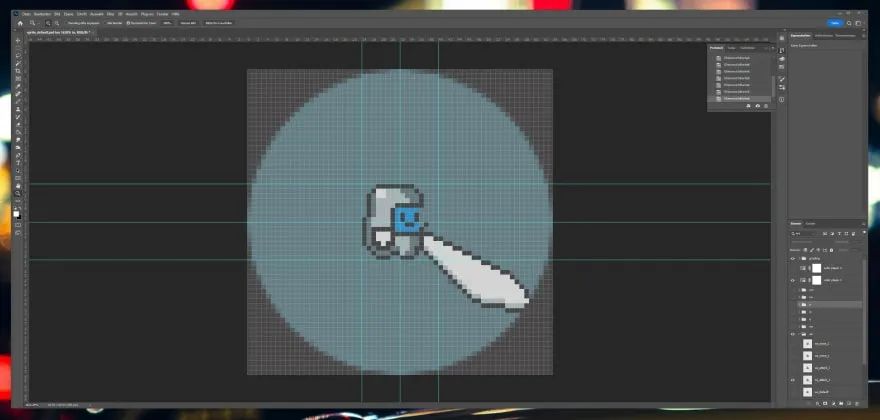
我需要控制每个像素,而锯齿是我最大的敌人,因为它会根据定义影响相邻像素。当我需要变换、缩放或旋转某些东西时,我就使用钢笔工具而不是画笔,并使用像素重复模式。
导出图像有点麻烦。我需要导出8位png。它们有一个alpha通道,并且比gifs甚至是webp的字节更小。由于某种原因,Photoshop的批量导出不支持8bit png。而且也不能自动裁剪单层。所以我只能手动导出。
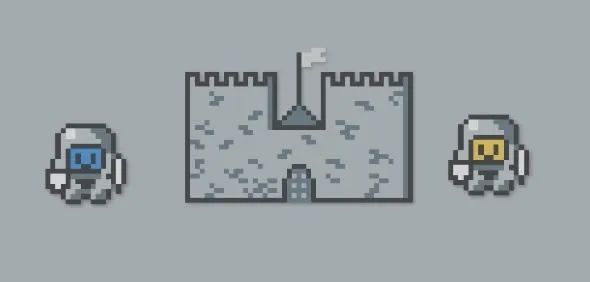
主题
目前,我只有一组sprites。在某些时候,我想每轮加载不同的集合。这意味着每个集合都需要遵守一套特定的规则。因此我需要定义主题。
一堆JavaScript和一堆png,需要相互匹配,同时还要达到一些次要目标:
- 所有sprites必须能实现动画
- 与主题相关的所有内容都必须是可互换的。我希望以后能够切换整个样式。
在画布中动画sprites并不像加载gif那样简单。drawImage()只会绘制第一帧。有些技术可以在画布内实现gif查看器,但对于这里的用例来说过于复杂。因此我选择直接使用带有单个帧的数组。
declare type Sprite = {
    name: string;
    images: string[];
    animationSpeed: number; // use next image every N frames, max 60
    offset: coordinates;
};然后为drawImage()编写包装器,它将使用合并的sprites并根据帧数切换动画步骤:
public drawSprite(ctx: CanvasRenderingContext2D, name: string, pos: coordinates, frameCount = 0) {
    const sprite = this.sprites.find((x) => x.name === name);
    if (!sprite) {
        return;
    }

    const spriteFrame = Math.floor((frameCount / sprite.animationSpeed) % sprite.images.length);

    const img = this.images.find((x) => x.src.endsWith(`${sprite.images[spriteFrame].replace("./", "")}`));

    if (!img) {
        return;
    }

    ctx.drawImage(img, pos.x + sprite.offset.x, pos.y + sprite.offset.y);
}
很好,我们现在可以制作动画了!
互换性需要一致。下面创建主题配置,定义使用哪些sprites以及如何使用。
declare type SpriteSet = {
    n: Sprite; // sprite facing north
    ne: Sprite; // sprite facing north-east
    e: Sprite; // etc
    se: Sprite;
    s: Sprite;
    sw: Sprite;
    w: Sprite;
    nw: Sprite;
};

declare type themeConfig = {
    name: string; // has to match folder name
    scene: Sprite; // scene image, 1920x1080
    obstacles: rectangle[]; // outline obsacles within the scene
    turnSprites?: boolean; // whether to turn sprites with characters
    players: {
        default: SpriteSet; // player when standing still, 100x100
        move: SpriteSet; // player when moving, 100x100
        attack: SpriteSet; // player when attacking, 250x100
        block: SpriteSet; // player when blocking, 100x100
    }[]; // provide sprites for each player, else player 1 sprites will be re-used
};这个配置表示我们处理的主题并从中选择资源。例如,character类现在可以像这样绘制主题资源:
this.theme.drawSprite(
    this.ctx,
    "p1_move_s",
    { x: this.size / -2, y: this.size / -2 },
    frameCount
);
还记得我在移动角色中添加了转向部分吗?这对于转动的主题可能很有用——例如小行星。但在我的这个例子中,转动sprite看起来有点傻。
我需要一种分配sprite方向值的方法。我必须将8个罗盘方向映射到一整圈方向值。一段圆弧表示一个方向。由于起点和终点正好在同一个方向的中间,所以这个重叠的方向需要分配两次——第一次和最后一次。
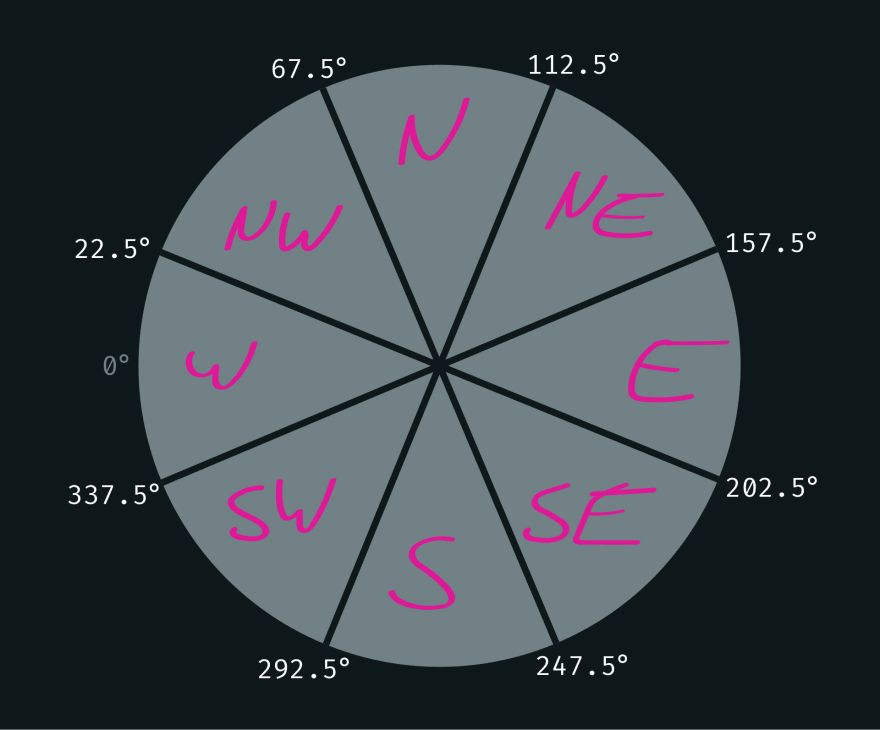
private getSprite(): Sprite {
    const directions = ["w", "nw", "n", "ne", "e", "se", "s", "sw", "w"];
    const zones = directions.map((z, i) => ({
        zone: z,
        start: (Math.PI * -1) - (Math.PI / 8) + (i * Math.PI) / 4,
        end: (Math.PI * -1) - (Math.PI / 8) + ((i + 1) * Math.PI) / 4,
    }));

    const direction = zones.find((zone) => this.orientation >= zone.start && this.orientation < zone.end);

    // action refers to moving, attacking, blocking...
    return this.theme.config.players[this.player][action][direction.zone];
}最后,我在character类中使用this.theme.config.turnSprites以便在基于转向和方向的主题之间切换。
音效
视觉效果只是主题的一个方面。另一方面是声音。我想要用特定的声音来表示攻击、阻挡、撞到东西,以及还有背景音乐。
我采用了一个简单直接的方式,使用<audio>元素。每当需要声音时,创建一个元素,自动播放,然后删除。
const audio = new Audio("./sound.mp3");
audio.play();
这很好用,至少在Chrome和Firefox中是这样。但是Safari在播放声音之前总是有延迟。
我为声音设置了AudioContext:一个由游戏的所有其他部分共享的上下文。
Web Audio API的构建就像一个真正的模块化合成器。我们需要将一个设备连接到下一个设备。在这种情况下,我们使用音频文件作为输入源,缓冲,连接到Gain Node设置音量,最后播放出来。
this.ctx = new (window.AudioContext || window.webkitAudioContext)();

async function play(sound: string): Promise<void> {
    if (this.sounds[this.getAudioUrl(sound)].playing) {
        return;
    }

    this.sounds[this.getAudioUrl(sound)].playing = true;

    const arrayBuffer = await this.getSoundFile(this.getAudioUrl(sound));
    const source = this.ctx.createBufferSource();

    this.ctx.decodeAudioData(arrayBuffer, (audioBuffer) => {
        source.buffer = audioBuffer;
        source.connect(this.vol);
        source.loop = false;
        source.onended = () => {
            this.terminateSound(source);
            this.sounds[this.getAudioUrl(sound)].playing = false;
        };
        source.start();
    });
}
以那样的方式我可以注册声音:
// theme config
{
    // ...
    bgAudio: "./assets/bgm.mp3",
    attackAudio: "./assets/attack.mp3",
    blockAudio: "./assets/block.mp3",
    collideAudio: "./assets/bump.mp3",
    winAudio: "./assets/win.mp3",
}
并调用它们:
this.audio.play(this.theme.config.collideAudio);
现在,即使是Safari也会在我需要的时候播放声音了。
使用Gamepad
这里我使用Gamepad API,它与多达四个连接的Gamepad接口。
不过,Gamepad API使用起来有点笨拙。与键盘和鼠标等更常见的输入方法不同,Gamepads不发送事件。相反,一旦站点检测到Gamepad交互,就会填充Gamepad对象。
interface Gamepad {
    readonly axes: ReadonlyArray<number>;
    readonly buttons: ReadonlyArray<GamepadButton>;
    readonly connected: boolean;
    readonly hapticActuators: ReadonlyArray<GamepadHapticActuator>;
    readonly id: string;
    readonly index: number;
    readonly mapping: GamepadMappingType;
    readonly timestamp: DOMHighResTimeStamp;
}

interface GamepadButton {
    readonly pressed: boolean;
    readonly touched: boolean;
    readonly value: number;
}每次交互都会改变对象。由于没有发送浏览器原生事件,因此我需要监听gamead对象的变化。
if (
    this.gamepads[gamepadIndex]?.buttons &&
    gamepadButton.button.value !==
        this.gamepads[gamepadIndex]?.buttons[gamepadButton.index]?.value &&
    gamepadButton.button.pressed
) {
    // send press event
    this.pressButton(gamepadIndex, b.index, gamepadButton.button);
} else if (
    this.gamepads[gamepadIndex]?.buttons &&
    gamepadButton.button.value !==
        this.gamepads[gamepadIndex]?.buttons[gamepadButton.index]?.value &&
    !gamepadButton.button.pressed
) {
    // send release event
    this.releaseButton(gamepadIndex, b.index, gamepadButton.button);
}pressButton和releaseButton发送自定义事件,我可以在character类中使用这些事件并扩展我输入法以识别游戏手柄。
因为我只有Xbox 360控制器,所以我就用这个来构建和测试了。据我所知,键盘映射对于游戏机控制器的工作方式相同。Xbox的A B X Y按钮的映射方式与Playstation的几何形状相同。

我无法让GamepadHapticActuator(也称为Rumble或Vibration)与我的360控制器一起工作。也不确定Chrome和Firefox是否可以配合这个控制器或根本不支持它。我可能还需要使用更新的控制器来进行测试。但现在,就先这样吧。
游戏玩法
现在我们虽然可以做一些攻击命中和移动的动作,但到目前为止还做不了其他任何事情,游戏显得非常无聊。因此我在想,要是谁赢了就给出反馈,然后重新开始就好了。由于这是一款节奏非常快的游戏,回合数很短,所以最好还能显示分数。
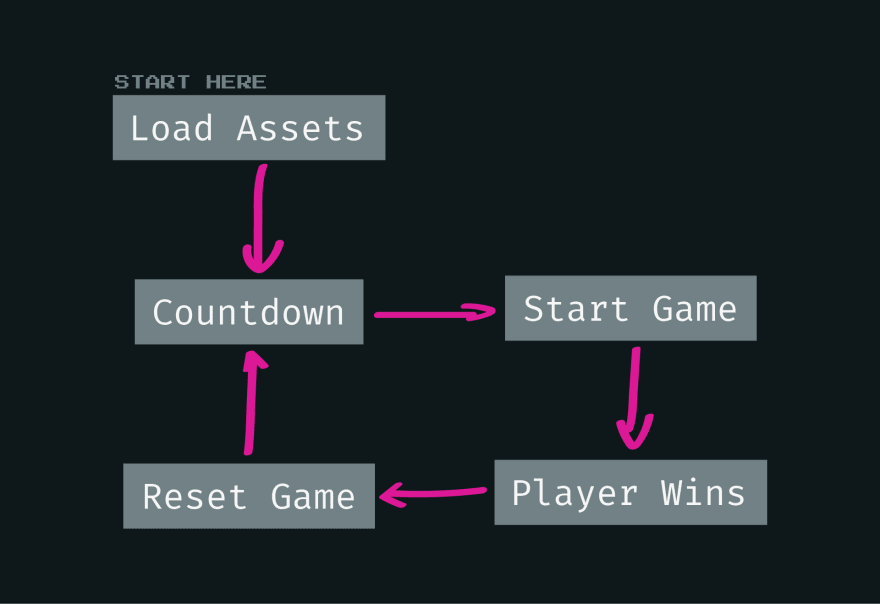
character.strike()方法确定一轮的获胜者。谁调用该方法并注册一个实际命中,谁就赢。我打算发送一个包含这部分信息的事件并触发以下调用:
- 显示获胜者
- 增加分数计数器
- 重置字符
- 开始新一轮倒计时
declare interface FinishEvent extends Event {
readonly detail?: {
winner: number;
};
}
this.ctx.canvas.addEventListener("countdown", ((e: FinishEvent) => {
if (typeof e.detail?.winner === "number") {
this.gui.incrementScore(e.detail.winner);
}
this.startCountdown(e.detail?.winner);
this.togglePlayers(false);
}) as EventListener);
this.ctx.canvas.addEventListener("play", () => {
this.togglePlayers(true);
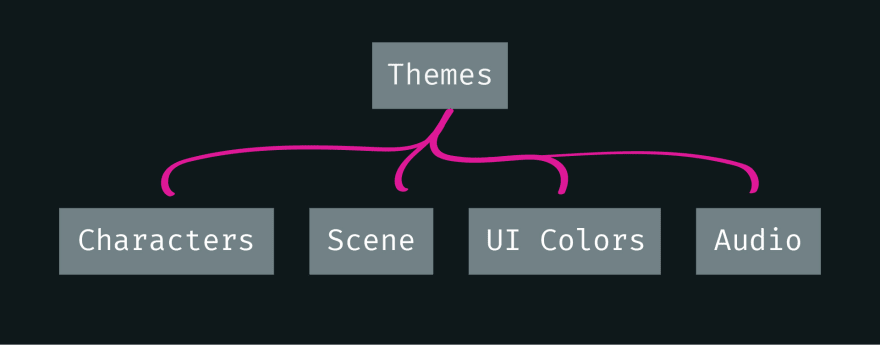
});此时的事件机制还不够复杂,不足以让我厌烦重构。如果用图表表示就是这样:
游戏加载
启动游戏并开始第一轮时,声音和图形不但加载滞后,而且会在登陆浏览器缓存时不断弹出。因此我需要一个加载策略。
我通过创建新的Image原型并为其提供src来加载图像。浏览器将开始自动获取图像。
private loadImage(src: string): Promise<HTMLImageElement> {
    const url = `./themes/${this.config.name}/${src}`;
    return fetch(url).then(() => {
        const img = new Image();
        img.src = url;
        if (!this.images.includes(img)) {
            this.images.push(img);
        }
        return img;
    });
}
现在我可以遍历主题配置中找到的每个图像并加载所有内容。图像存储在一个数组中。
this.config.players.forEach((player) => {
    const spriteSets = ["default", "move", "attack", "block"];
    spriteSets.forEach((spriteSet) => {
        Object.keys(player[spriteSet]).forEach((key: string) => {
            player[spriteSet][key].images.forEach(async (image: string) => {
                const imageResp = await this.loadImage(image);
                if (toLoad.includes(imageResp)) {
                    return;
                }
                imageResp.onload = () => {
                    this.onAssetLoaded(toLoad);
                };
                toLoad.push(imageResp);
            });
            this.sprites.push(player[spriteSet][key]);
        });
    });
});每次加载图像,我都会检查数组中的所有promise是否都已解决。如果是,则所有图像都已加载,发送一个事件告知已经加载了多少游戏资源。
private onAssetLoaded(assetList: HTMLImageElement[]) {
    const loadComplete = assetList.every((x) => x.complete);
    const progress = Math.floor(
        ((assetList.length - assetList.filter((x) => !x.complete).length) / assetList.length) * 100
    );
    const loadingEvent: LoadingEvent = new CustomEvent("loadingEvent", { detail: { progress } });
    this.ctx.canvas.dispatchEvent(loadingEvent);

    if (loadComplete) {
        this.assetsLoaded = true;
    }
}映射进度信息到<progress>元素。每当它达到100%时,则淡入<canvas>并开始游戏。

收尾工作
严格来说,游戏已经结束了。但它仍然是一个网站,因此应该尽力保持其快速、兼容和可访问性。
Lighthouse和验证器
我还没有添加描述<meta>标签。我将画布tabindex设置为1,而它应该为0(只是为了让它可聚焦)。我还有一个不受Safari支持的SVG favicon,因此当我使用它时,添加了一个apple-touch-icon。并且<input>也缺少一个<label>。
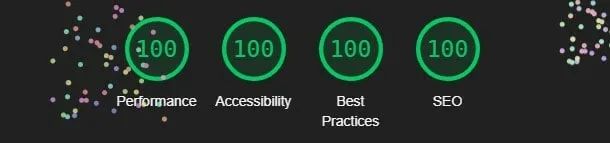
渐进式web app
遗漏了一个Lighthouse类别:PWA。向这个项目添加PWA功能是有意义的。游戏应该允许安装和离线。
第一步是清单。这不需要做太多,只需要包含必要的图标、颜色和标题字符串,以便在安装时格式化主屏幕图标、启动屏幕和浏览器 UI。指定PWA在全屏模式下运行,从而隐藏所有浏览器UI元素。
{
    "theme_color": "#1e212e",
    "background_color": "#1e212e",
    "display": "fullscreen",
    "scope": "/",
    "start_url": "/",
    "name": "Attacke!",
    "short_name": "Attacke!",
    "icons": [
        {
            "src": "assets/icon-192x192.png",
            "sizes": "192x192",
            "type": "image/png"
        },
        ...
    ]
}
我希望游戏PWA只是游戏本身。只要在全屏视图中打开,任何其他链接,例如版权页和指向源代码的链接都应该在新的浏览器窗口中打开。当app在常规浏览器窗口中打开时,我非常喜欢让用户控制链接的行为方式。
下面的代码段询问浏览器是否处于全屏模式,如果处于全屏模式,则在新选项卡中打开所有标有data-link='external'的链接:
if (window.matchMedia("(display-mode: fullscreen)").matches) {
    document.querySelectorAll("[data-link='external']").forEach((el) => {
        el.setAttribute("target", "_blank");
        el.setAttribute("rel", "noopener noreferrer");
    });
}
离线模式
下一步是Service Worker。对于有效的PWA,它只需要注册并为离线请求提供answer即可。我想创建包含所有游戏资源的离线缓存。如此一来在安装时会产生相当多的网络流量。
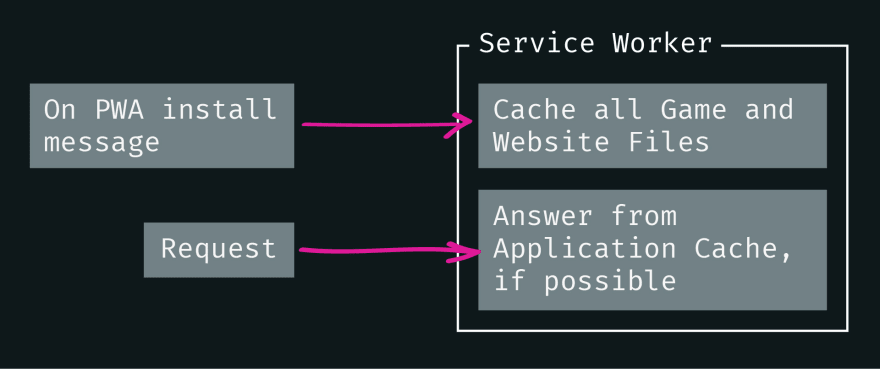
缓存进来的离线请求相对容易,响应也是如此。但是由于需要下载网络上的大量资源,因此我只想在用户安装app时才缓存这些资源。否则,在需要时流式传输资源才是更好的选择。由于我所有的主题都遵循相同的模式,因此我可以遍历资源,然后返回一个资源列表:
export const getGameAssets = (): string[] => {
    const assets = [];

    Object.keys(themes).forEach((theme) => {
        const themeConfig = themes[theme] as themeConfig;

        // add player sprites
        ["p1", "p2"].forEach((player, pi) => {
            ["default", "move", "attack", "block"].forEach((action) => {
                const spriteSet = themeConfig.players[pi][action] as SpriteSet;

                ["n", "ne", "e", "se", "s", "sw", "w", "nw"].forEach(
                    (direction) => {
                        const images = spriteSet[direction].images as string[];
                        const paths = images.map(
                            (image) => `/themes/${theme}/${image}`
                        );
                        assets.push(...paths);
                    }
                );
            });
        });

        // add background sprite
        themeConfig.scene.images.forEach((image) => {
            assets.push(`/themes/${theme}/${image}`);
        });

        // add sounds
        [
            "bgAudio",
            "attackAudio",
            "blockAudio",
            "collideAudio",
            "winAudio",
        ].forEach((audio) => {
            assets.push(`/themes/${theme}/${themeConfig[audio]}`);
        });
    });

    // return uniques only
    return [...new Set(assets)];
};
这个函数在Service Worker中被调用,并缓存运行全功能游戏所需的一切。
const cacheAssets = () => {
    const assets = [
        "/index.html",
        "/styles.css",
        "/main.js",
        "/assets/PressStart2P.woff2",
        ...getGameAssets(),
    ];

    caches.open(cacheName).then(function (cache) {
        cache.addAll(assets);
    });
};

channel.addEventListener("message", (event) => {
    switch (event.data.message) {
        case "cache-assets":
            cacheAssets();
            break;
    }
});这是什么?cache-assets消息吗?来自哪里?为什么不是安装事件监听器呢?
哈,因为我不喜欢PWA安装提示的当前状态。
自定义安装按钮
Chrome on Android会展示一个又大又丑的安装横幅。Chrome on Desktop也是如此,会弹出窗口。Firefox on Android将安装按钮隐藏在浏览器菜单中,好吧,至少明确标记“安装”了。最差劲的是Safari,为什么要在共享菜单中隐藏安装按钮??
Chrome提供了实现自己安装UX的方法(请注意,这部分的内容不符合规范。出于道德原因,你可能会嗤之以鼻)。安装提示由事件监听器触发,可以连接。我可以完全隐藏提示并将其事件绑定到自定义按钮。单击此按钮,将安装PWA以及附带的所有资源。
window.addEventListener("appinstalled", () => {
    button.setAttribute("hidden", "hidden");
    deferredPrompt = null;
    channel.postMessage({ message: "cache-assets" });
});
没有未经请求的安装提示,也不会在没有警告的情况下向用户的设备发送大量下载请求,只有一个老式的安装按钮。非常好。
总结
现在我们完成了一款游戏,完全用typescript编写并在<canvas>中渲染,甚至可以在所有主流浏览器上流畅运行,并打包在PWA中。
构建游戏逻辑和绘制图形让我获得了很多乐趣。掌握Photoshop对我帮助很大。找出问题让我颇费一番功夫(说的就是你,Safari),但最后的成果也是最好的回报。
感谢大家的阅读!我们下次再见!