用compose撸一个雷达图
介绍
项目中需要使用雷达图来展示各个属性的不同比例,文字根据控件大小自动换行。
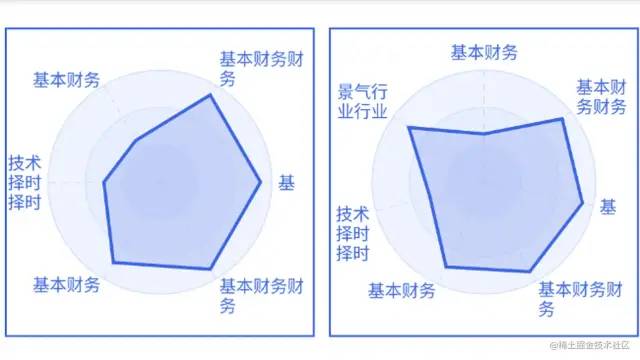
效果图
如何实现
1、绘制背景的三个圆形
从外圆向内圆绘制,这样内圆的颜色正确覆盖在外圆上,style = Stroke(2f)用来绘制圆形的border。
val CIRCLE_TURN = 3
val center = Offset(size.width / 2, size.height / 2)
val textNeedRadius = 25.dp.toPx() // 文本绘制范围
val radarRadius = center.x - textNeedRadius
val turnRadius = radarRadius / CIRCLE_TURN

for (turn in 0 until CIRCLE_TURN) {
    drawCircle(colors[turn], radius = turnRadius * (CIRCLE_TURN - turn))
    drawCircle(colors[3], radius = turnRadius * (CIRCLE_TURN - turn), style = Stroke(2f))
}
2、绘制圆环内的虚线
使用360/data.size算出每个区块需要的角度。
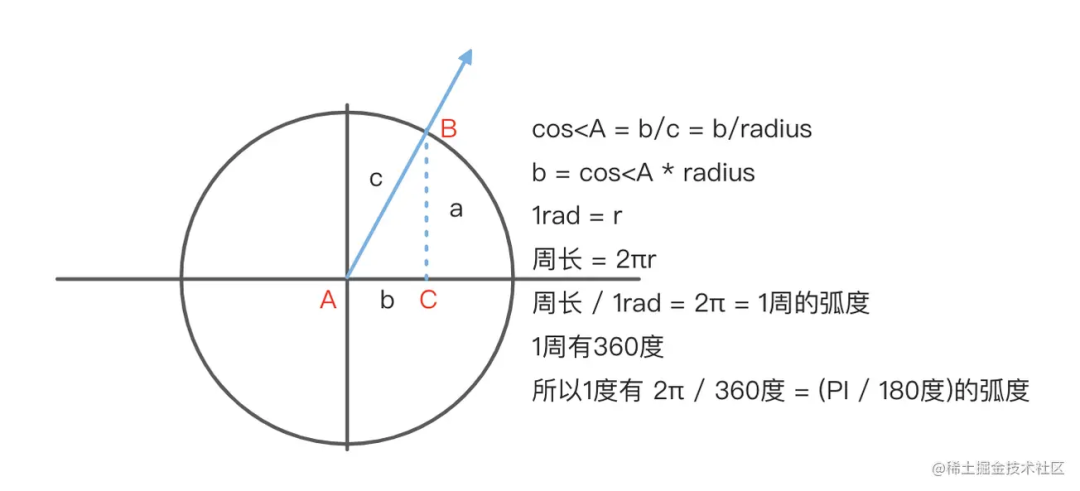
我们知道,竖直向上为-90度,当区块数量为奇数时,第一条虚线应当在竖直方向上,即起始绘制角度为-90度;当区块数量为偶数时,虚线绘制应当左右对称,所以将初始角度设置为-90 - itemAngle / 2。inCircleOffset()是用来获取在圆形中的xy位置,点击 kotlin.math.cos()/sin()查看方法的描述Computes the cosine of the angle x given in radians可知,我们需要传入一个弧度,角度换算弧度的推导如下。
val itemAngle = 360 / data.size
val startAngle = if (data.size % 2 == 0) {
    -90 - itemAngle / 2
} else {
    -90
}

for (index in data.indices) {
    // 绘制虚线
    val currentAngle = startAngle + itemAngle * index
    val xy = inCircleOffset(center, progress * radarRadius, currentAngle)
    drawLine(colors[4], center, xy, pathEffect = PathEffect.dashPathEffect(floatArrayOf(10f, 10f)))
}

/**
 * 根据圆心,半径以及角度获取圆形中的xy坐标
 */
fun DrawScope.inCircleOffset(center: Offset, radius: Float, angle: Int): Offset {
    return Offset((center.x + radius * cos(angle * PI / 180)).toFloat(), (center.y + radius * sin(angle * PI / 180)).toFloat())
}
3、绘制雷达范围
在最大值为100的情况下,根据bean的value换算出应当绘制点的radius。并算出对应的xy的位置,将其记录到path中方便连成闭合区间绘制。
data class RadarBean(
    val text: String,
    val value: Float
)
for (index in data.indices) {
    val pointData = data[index]
    val pointRadius = radarRadius * pointData.value / 100
    val fixPoint = inCircleOffset(center, pointRadius, currentAngle)
    if (index == 0) {
        path.moveTo(fixPoint.x, fixPoint.y)
    } else {
        path.lineTo(fixPoint.x, fixPoint.y)
    }
}
drawPath(path, colors[5]) // 绘制闭合区间
drawPath(path, colors[6], style = Stroke(5f)) // 绘制区间的深色描边
4、绘制文字位置
接下来就是绘制最重要的文字的位置啦,首先我们先了解什么是StaticLayout,这里面有1.4小节介绍StaticLayout是如何使用的。
- 垂直方向的文字x轴在文字宽度的正中间,y轴在文字的底部
- 水平方向的文字x轴与y轴皆在文字的正中间
- 左上角的文字x轴在文字的最右边,y轴在最后一行文字的中间
- 右上角的文字x轴在文字的最左边,y轴在最后一行文字的中间
- 左下角的文字x轴在文字的最右边,y轴在第一行文字的中间
- 右下角的文字x轴在文字的最左边,y轴在第一行文字的中间
根据以上规律,需要对文字绘制区域进行区分:
private fun quadrant(angle: Int): Int {
    return if (angle == -90 || angle == 90) {
        0 // 垂直
    } else if (angle == 0) {
        -1 // 水平右边
    } else if (angle == 180) {
        -2 // 水平左边
    } else if (angle > -90 && angle < 0) {
        1 // 右上角
    } else if (angle > 0 && angle < 90) {
        2 // 右下角
    } else if (angle > 90 && angle < 180) {
        3 // 左下角
    } else {
        4 // 左上角
    }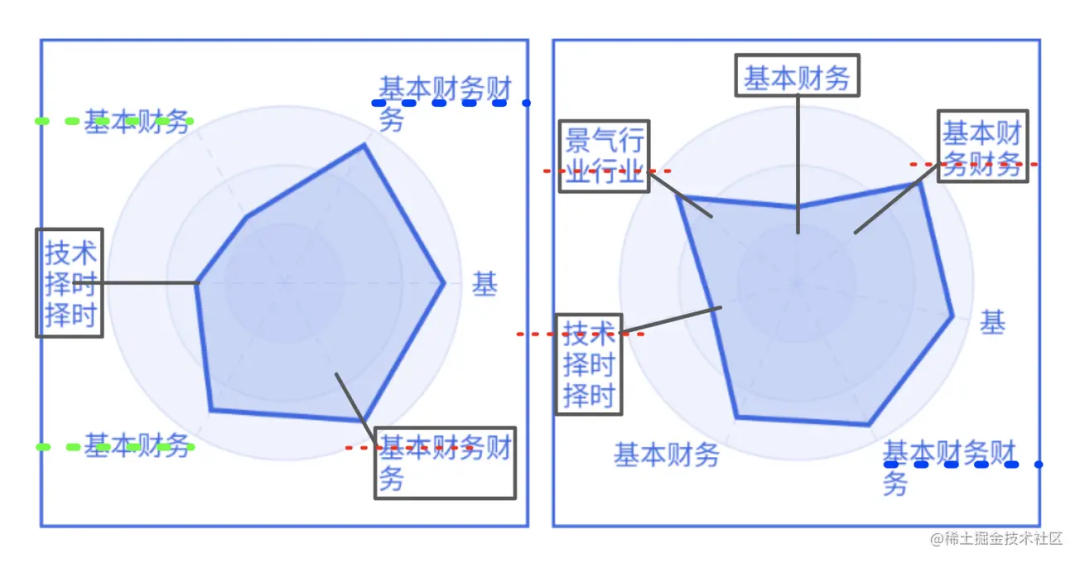
}设置文本的最大宽度:绿色虚线为左半边的文字最大宽度,蓝色虚线为右半边的文字最大宽度。通过quadrant(currentAngle)获取文字需要绘制的区域,垂直区域的文字最大宽度设置为雷达控件的一半,绿色虚线的文字最大宽度为offset.x,蓝色虚线的文字最大宽度为size.width - offset.x。
fun DrawScope.wrapText(
    text: String, // 绘制的文本
    textPaint: TextPaint, // 文字画笔
    width: Float, // 雷达控件的宽度
    offset: Offset, // 未调整前的文字绘制的xy位置
    currentAngle: Int, // 当前文字绘制所在的角度
    chineseWrapWidth: Float? = null // 用来处理UI需求中文每两个字符换行
) {
    val quadrant = quadrant(currentAngle)
    var textMaxWidth = width
    when (quadrant) {
        0 -> {
            textMaxWidth = width / 2
        }
        -1, 1, 2 -> {
            textMaxWidth = size.width - offset.x
        }
        -2, 3, 4 -> {
            textMaxWidth = offset.x
        }
    }
}创建StaticLayout,传入文本绘制的最大宽度textMaxWidth,该控件会根据设置的最大宽度对文本自动换行。
val staticLayout = if (Build.VERSION.SDK_INT >= Build.VERSION_CODES.M) {
    StaticLayout.Builder.obtain(text, 0, text.length, textPaint, textMaxWidth.toInt()).apply {
        this.setAlignment(Layout.Alignment.ALIGN_NORMAL)
    }.build()
} else {
    StaticLayout(text, textPaint, textMaxWidth.toInt(), Layout.Alignment.ALIGN_NORMAL, 1.0f, 0f, false)
}通过staticLayout获取文本的高度,文本的行数。这里不能使用staticLayout.width来获取文本的宽度,因为假设设置的textMaxWidth=100,而文本绘制后的宽度只有50,通过staticLayout.width获取的宽度为100,这不是我们想要的。所以通过lines>1来判断文本是否换行,如果未换行,直接通过textPaint.measureText获取文本的真实宽度;如果换行,则staticLayout.getLineWidth(0)用来获取文本第一行的宽度就是文本的真实宽度。
val textHeight = staticLayout.height
val lines = staticLayout.lineCount
val isWrap = lines > 1
val textTrueWidth = if (isWrap) staticLayout.getLineWidth(0) else textPaint.measureText(text)使用canvas绘制文本,这里的save()``translate()``staticLayout.draw(canvas)``restore()是使用StaticLayout绘制的四步曲。
// 绘制文字
val textPointRadius = progress * radarRadius + 10f
val offset = inCircleOffset(center, textPointRadius, currentAngle)
val text = data[index].text
wrapText(
    text,
    textPaint,
    size.width,
    offset,
    currentAngle,
    if (specialHandle) textPaint.textSize * 2 else null
)

drawContext.canvas.nativeCanvas.save()
when (quadrant) {
    0 -> { // 规律1
        drawContext.canvas.nativeCanvas.translate(offset.x - textTrueWidth / 2, offset.y - textHeight)
    }
    -1 -> { // 规律2
        drawContext.canvas.nativeCanvas.translate(offset.x, offset.y - textHeight / 2)
    }
    -2 -> { // 规律2
        drawContext.canvas.nativeCanvas.translate(offset.x - textTrueWidth, offset.y - textHeight / 2)
    }
    1 -> { // 规律4
        drawContext.canvas.nativeCanvas.translate(
            offset.x,
            if (!isWrap) offset.y - textHeight / 2 else offset.y - (textHeight - textHeight / lines / 2)
        )
    }
    2 -> { // 规律6
        drawContext.canvas.nativeCanvas.translate(offset.x, if (!isWrap) offset.y - textHeight / 2 else offset.y - textHeight / lines / 2)
    }
    3 -> { // 规律5
        drawContext.canvas.nativeCanvas.translate(
            offset.x - textTrueWidth,
            if (!isWrap) offset.y - textHeight / 2 else offset.y - textHeight / lines / 2
        )
    }
    4 -> { // 规律3
        drawContext.canvas.nativeCanvas.translate(
            offset.x - textTrueWidth,
            if (!isWrap) offset.y - textHeight / 2 else offset.y - (textHeight - textHeight / lines / 2)
        )
    }
}
staticLayout.draw(drawContext.canvas.nativeCanvas)
drawContext.canvas.nativeCanvas.restore()
这样就画好了,但是产品看完效果图后不喜欢换行的效果,希望每两个字就换行,于是新增如下判断。
// 需要特殊处理换行&&包含中文字符&&文本绘制一行的宽度>文本最大宽度
if (chineseWrapWidth != null && isContainChinese(text) && textPaint.measureText(text) > textMaxWidth) {
    textMaxWidth = chineseWrapWidth
}
private fun isContainChinese(str: String): Boolean {
    val p = Pattern.compile("[\u4e00-\u9fa5]")
    val m = p.matcher(str)
    return m.find()
}
5、增加个小动画
当雷达图从屏幕中出现的时候,做一个绘制值从0到实际值的动画
var enable by remember {
    mutableStateOf(false)
}
val progress by animateFloatAsState(if (enable) 1f else 0f, animationSpec = tween(2000))

Modifier.onGloballyPositioned {
    enable = it.boundsInRoot().top >= 0 && it.boundsInRoot().right > 0
}
如何使用
private val list = listOf(
    RadarBean("基本财务", 43f),
    RadarBean("基本财务财务", 90f),
    RadarBean("基", 90f),
    RadarBean("基本财务财务", 90f),
    RadarBean("基本财务", 83f),
    RadarBean("技术择时择时", 50f),
    RadarBean("景气行业行业", 83f)
)
ComposeRadarView(
    modifier = Modifier
        .padding(horizontal = 4.dp)
        .size(180.dp),
    list
)
最后贴上项目的地址:ComposeRadar:https://github.com/Loren-Moon/ComposeRadar 如果觉得对您有帮助就点个吧~