GitLab CI 从入门到实践
一、Gitlab CI 是什么?
现代持续的软件开发导致了开发者需要持续的build, test 和 deploy 重复的代码更改,这些重复的过程非常的繁琐,但是对保证代码持续更新迭代来说又非常的重要。此时便需要一种非人为手动的方法来帮助我们自动完成这些重复的工作。
这个自动完成工作的理念被称为CI/CD. 在这里Gitlab CI/CD就是Gitlab官方发布的一种自动流水线帮助开发者完成重复性工作的一个服务。
比如字节某内部工具E*** CI 则是在Gitlab CI 和 Codebase CI的基础上改进,增加更细节的使用场景分类,对monorepo支持更加的友好。
二、如何使用?
Gitlab CI的使用主要需要2大步骤
步骤一:配置runner
我们可以简单的把Gitlab runner给理解成
.gitlab-ci.yml文件内容的执行者,.gitlab-ci.yml告诉了Gitlab runner去做什么。Gitlab runner不是一个配置项,它是需要专门部署的,比如用docker部署一个runner镜像到可以连接内网的容器。也可以使用公司内配好的shared runners.
使用公共的runner,或者自己创建一个runner
1 . 使用shared runner:
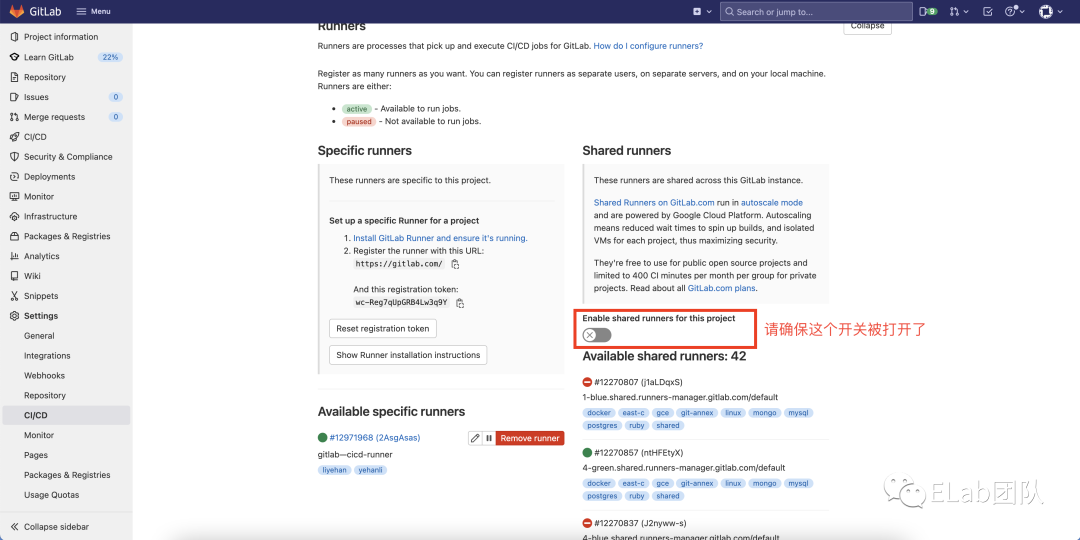
无需多余操作,请确保shared runner选项被enable了即可直接使用公共runner。(如下)
2 . 自己配置runner:
部署Gitlab runner官方文档:Run GitLab Runner in a container | GitLab[1]
关联runner到gitlab官方文档:Registering runners | GitLab[2]
A. 安装docker:
$ brew install --cask docker
B. 启动Gitlab runner container:
起一个docker container来执行Gitlab Runner镜像
  docker run -d --name gitlab-runner --restart always \
   -v /Users/Shared/gitlab-runner/config:/etc/gitlab-runner \
   -v /var/run/docker.sock:/var/run/docker.sock \
   gitlab/gitlab-runner:latest
/Users/Shared/而不是/srv
C. 注册runner到Gitlab:
只用docker起一个gitlab runner不能将我们当前使用的gitlab repository和上一步创建的runner进行关联。在此需要将其进行相互关联,将runner注册到我们的gitlab repository
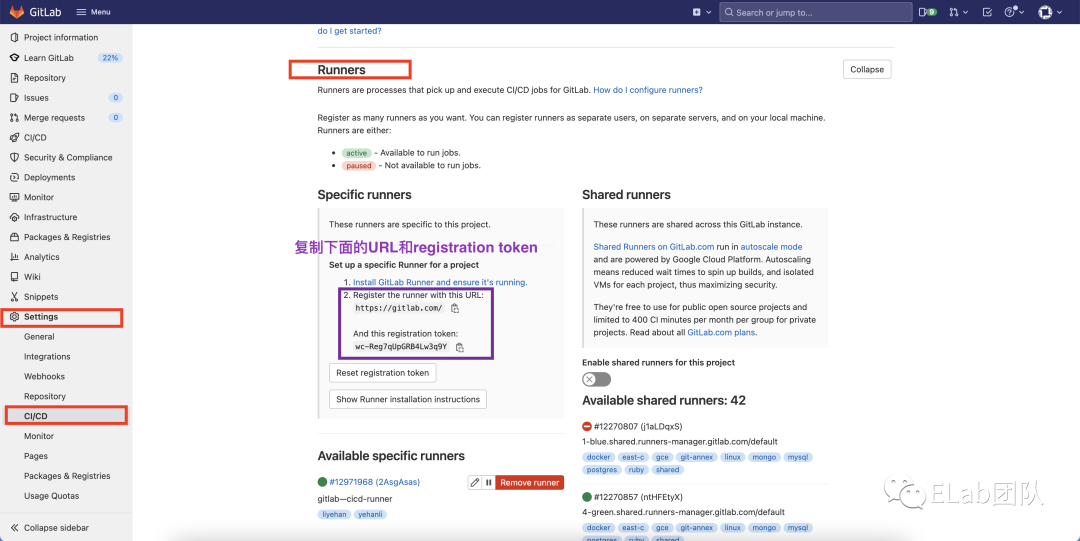
--url和--registration-token
--tag-list 为当前runner的标签,在配置流水线job的时候使用,在此可随意配置不同的标签名
docker run --rm -v /Users/Shared/gitlab-runner/config:/etc/gitlab-runner gitlab/gitlab-runner register \
 --non-interactive \
 --executor "docker" \
 --docker-image alpine:latest \
 --url "https://gitlab.com/" \
 --registration-token "wc-Reg7qUpGRB4Lw3q9Y" \
 --description "gitlab—cicd-runner" \
 --tag-list "yehanli,liyehan" \
 --run-untagged="true" \
 --locked="false" \
 --access-level="not_protected"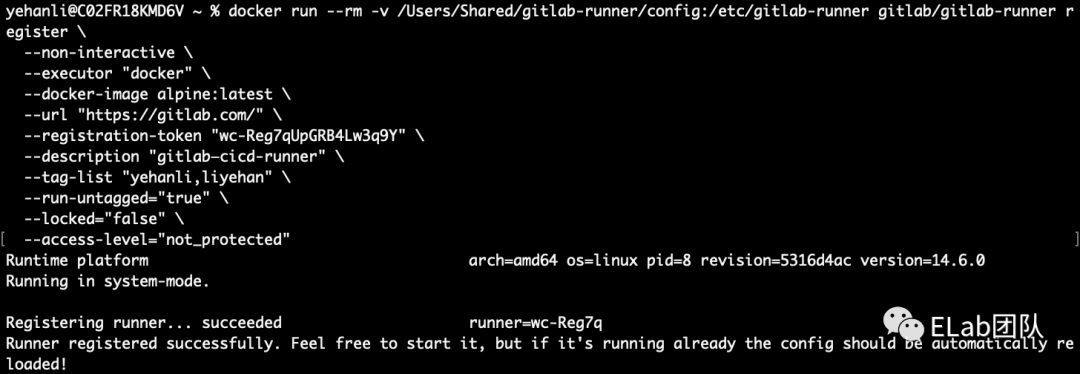
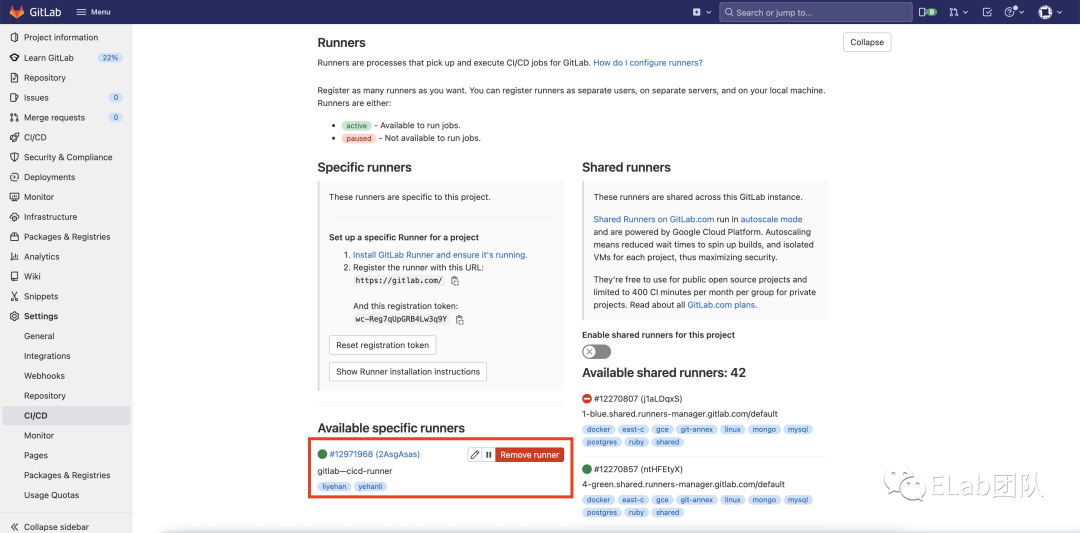
暂时无法在飞书文档外展示此内容
步骤二:创建.gitlab-ci.yml文件
在mono repo的根目录创建一个文件, 命名为.gitlab-ci.yml, 并将其push到master分支。
git add .gitlab-ci.yml
git commit -m "Add .gitlab-ci.yml"
git push origin master
Note:
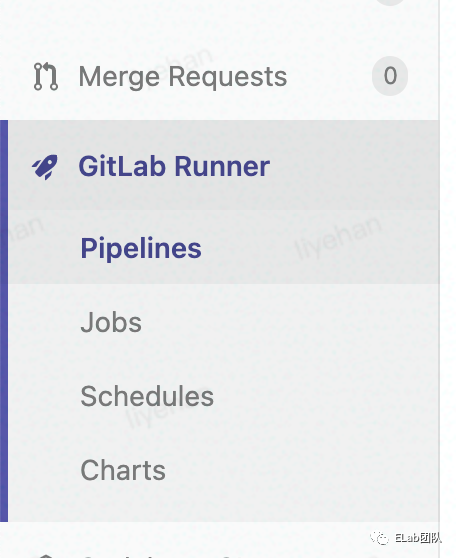
- 在较低gitlab版本(比如11.4),如果在master主分支下没有
.gitlab-ci.yml的话,在Gitlab左侧的导航栏不会有Gitlab Runner这个tab。
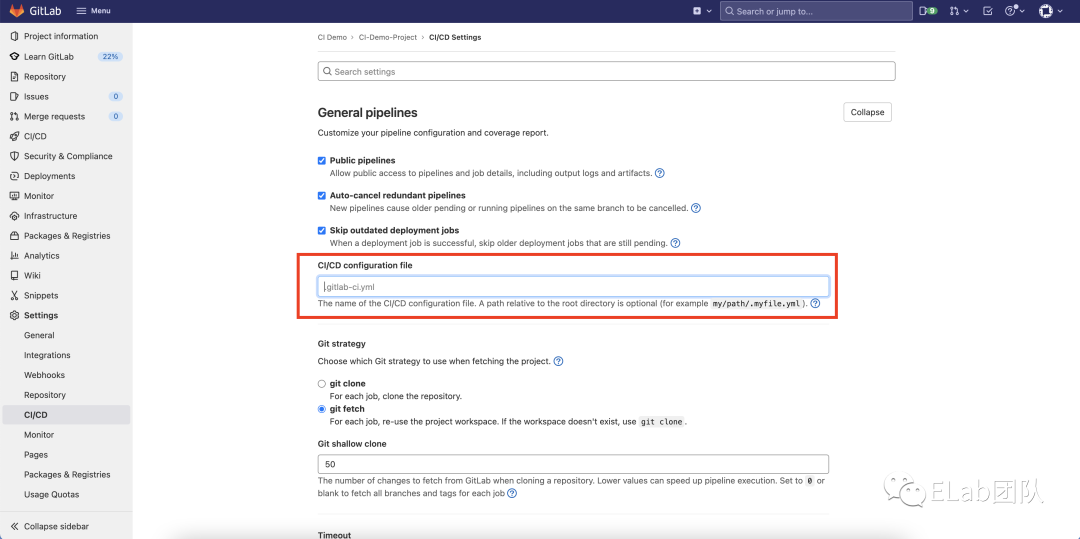
- 在项目的setting/CI/CD/General pipelines中,我们可以自定义设置CI设置文件的路径,默认如下
三、如何编写.gitlab-ci.yml文件?
首先,让我们先来熟悉下yaml的常见写法,以及对比下它与json有什么不同。
Yaml Syntax写法详情具体请见 => YAML Syntax ‒ Ansible Documentation[3]
YAML语法:
数组写法:
{
    "array": ["red", "blue", "yellow"]
}
转化为yaml为
array:
  - red
  - blue
  - yellow
对象写法:
{
  "student1": {
    "name": "小明"
  },
  "array": ["red", "blue", "yellow"],
  "student2": {
    "name": "小明"
  }
}
转化为yaml为
# 我是注释
student1:
  name: 小明
array:
  - red
  - blue
  - yellow
student2:
name: 小明- yaml中不像json那样无法注释,我们可以用
#进行注释
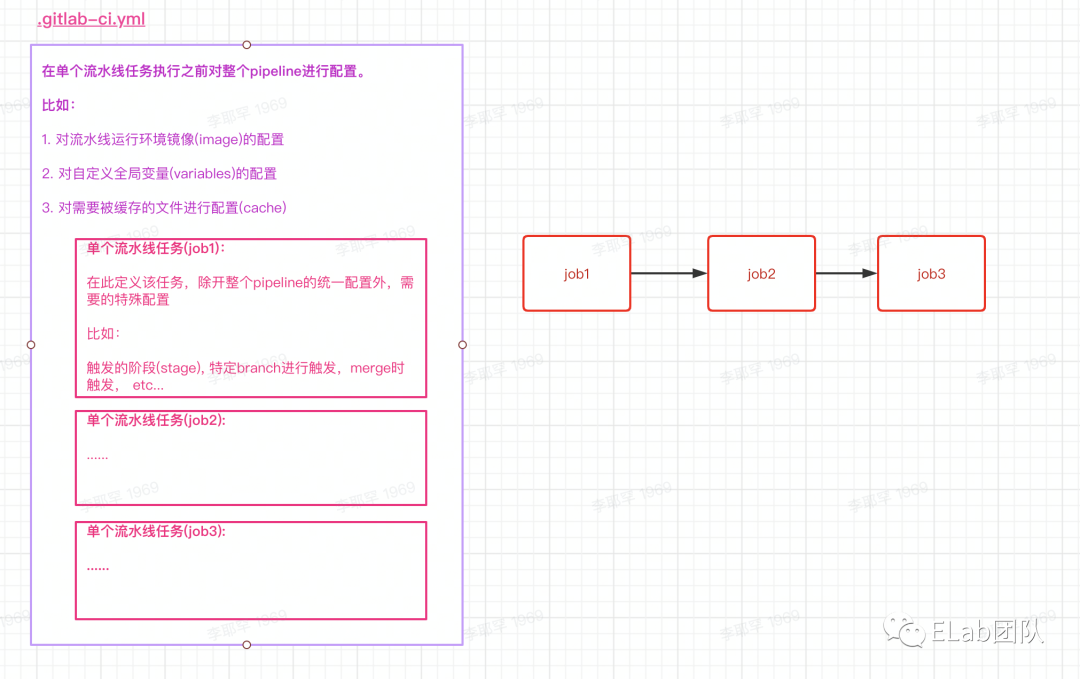
流水线环节梳理:
流水线的流程,根据配置的.gitlab-ci.yml文件可以分为如下几个环节:
-
在单个的流水线任务执行之前进行配置
-
定义单个流水线任务(job),并对此任务进行针对配置
结构图:
# 这个my_job的任务名是可以自定义起的
my_job:
  only:
    - master
  tags:
    - yehanli
  script:
    - echo 'job ========= 完成'
  stage: build
  retry: 2
Gitlab-CI 关键字:
Gitlab CI的关键字有很多,但实际常用的只有较小一部分。在此部分会对常用关键字进行详解。
如果需要特殊配置可参考关键字文档=> Keyword reference for the
.gitlab-ci.ymlfile | [4]GitLab[5]
首先让我们先来介绍下关键字,然后再看一份完整的配置demo进行详解。
script
需要被运行的脚本。以数组形式配置。
pipeline_job:
  ......
  script:
    - cd <文件夹目录路径>
    - npm install
    - npm build
  ......
before_script
在所有的流水线任务执行之前需要执行的脚本,或者单个流水线任务中的script执行之前执行某些script
variables变量
在Gitlab-CI中,变量大致可分为三类:
- Gitlab给我们预先定义的变量,比如
CI_COMMIT_BRANCH.
a . Predefined variables reference | GitLab[6]
2 . Setting => Gitlab CI/CD => variables中定义的变量
3 . 在.gitlab-ci.yml中定义的变量(如下示例) GitLab[7] [8]CI[9]/[10]CD[11] variables | GitLab[12]
variables:
  TEST_VAR: "All jobs can use this variable's value"

job1:
  variables:
    TEST_VAR_JOB: "Only job1 can use this variable's value"
  script:
    - echo "$TEST_VAR"
  ......
image
CI流水线运行环境的docker镜像(任何相关的代码运行环境镜像皆可),比如字节某内部工具e***的镜像,里面装了nvm管理器.
- 比较常用的有:node, python, java, etc...
stages
Gitlab CI允许我们进行自定义的流水线阶段配置,我们可以将自己的流水线自我划分为若干stages,然后在不同的stage来做不同的事。(稍后会有示例)
stages会依次执行,如果前一个stage的任务没有运行完,后面的stage不会被触发。
一旦有一个stage中的任务fail掉了,下一个stage的任务便不会执行。如果当前stage定义了多个任务,那么其中一个任务失败,另外一个任务还是会被继续执行。
以下为自定义的stages:
stages:
  - first_stage
  - second_stage
  - third_stage
  - fourth_stage
- fifth_stage如果没有自定义stages,那么默认的stages为.pre => build => test => deploy => .post
(自定义stages会重写除了.pre, .post之外所有的默认stages)
stages:
  - .pre # 执行在所有的stages之前
  - build
  - test
  - deploy
- .post # 执行在所有的stages之后Note: build 中如果定义多个jobs,这些jobs是并行执行的,别的stage中的为依次执行。
stage
stage为stages的一个子项,在我们自定义单个流水线任务时可以配置
cache:
缓存多个流水线任务之间共用的文件,目录, etc...
cache:
  key: cache-node-modules
  # 在这里写出需要缓存的文件的路径,在此为node_modules
  paths:
    - node_modules
retry:
一个job可以被重新执行的最大数量。必须是个正整数, 0-2, 2为最大值
- when可设置在特定失败原因的情况下执行
job:
  script: rspec
  retry:
    max: 2
    when: runner_system_failure
only & except
-
only: 设置流水线任务执行时机
-
except: 设置流水线任务不执行时机
可配置选项(常用的几个):
| <分支名> | 特定分支change的时候触发 |
|---|---|
| pushes | git push时触发,适用于所有分支 |
| merge_requests | MR被创建时触发,适用于所有分支 |
| web |  |
配置branch名称来规定触发任务的分支(如下),
myjob:
  only:
    - master
# 以上写法等同于
myjob:
  only:
    variables:
    # $CI_COMMIT_REF_NAME是一个gitlab的预设变量,代表当前commit给哪个branch上了
    - $CI_COMMIT_REF_NAME == "master"
rules:if
此字段可以在单个流水线job或者workflow字段下进行配置。
rules关键词下可以进行if语句配置,如果if满足的话可执行某些自定义配置(会在流水线任务demo2中和workflow配置中展示如何使用)
rules:
- if: $CI_COMMIT_REF_NAME =~ /feature/注意: only & except和rules:if都是用来决定单个job执行时机的,在配置时只能存在一个,否则会报错。
workflow
需要和rules配合用来控制整个pipeline的行为,比如整个流水线执行与否。整个流水线正常运行的前提是其rules配置中的if语句至少需要触发一个.
在各个流水线任务的外层进行配置
variables:
  IS_FEATURE: "false"
workflow:
  rules:
    - if: $CI_COMMIT_REF_NAME =~ /feature/
      variables:
        IS_FEATURE: "true"
    - when: always # Run the pipeline in other cases
when
这个关键字和stage需要配合使用。如果一个stage fail掉了,那么我们应该期待下个stage怎么办呢?
(When to run a job?)
-
on_success(default): 所有之前stage的任务都执行成功了才执行当前stage的任务,或者之前fail的任务有配置了allow_failure: true -
on_failure:只有在之前的流水线任务有至少一次的fail之下才执行当前任务。 -
always:无论之前的stage的流水线的任务状态如何,当前的任务都会触发。 -
never:不运行当前任务 -
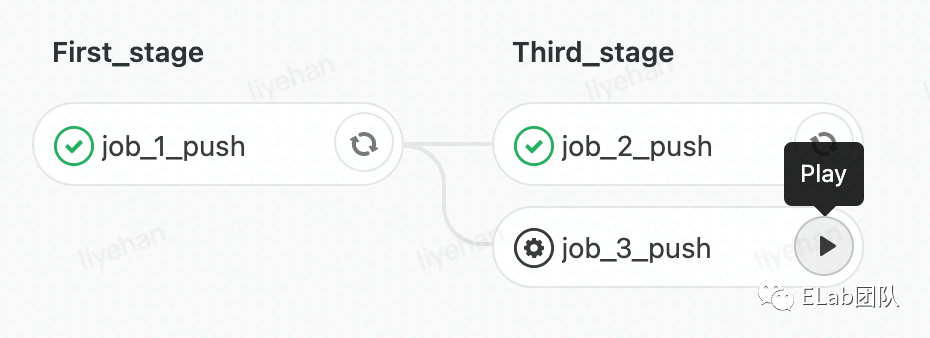
manual:流水线手动触发,点击play,如下图
delayed:延迟一段时间执行
timed rollout 10%:
  stage: deploy
  script: echo 'Rolling out 10% ...'
  when: delayed
  # 在之前的stage执行后30mins后再运行这个任务
  # 时间单位可以是seconds,minutes,day, week
  start_in: 30 minutes
tags
这个是设定Gitlab 在执行脚本时使用哪个runner
注意事项:
配置时有些关键字比如workflow,rules什么的会显示报错 XXX config conatins unknown keys.
这个是因为公司的Gitlab版本较旧,Gitlab 12.5之后才支持这些配置。
e.g:

only中的merge_requests配置在11.6的版本后才支持,所以有些公司的Gitlab版本还是不支持 :(
模块化写法
随着流水线任务的变多,把所有的任务都写在.gitlab-ci.yml文件中会显得很臃肿
解决方法是拆分多个任务到不同的模块
在.gitlab.yml文件中按照如下写法即可引入不同的yml文件
include:
  - '/yml/job_1_install.yml'
  - '/yml/job_2_build.yml'
  - '/yml/job_3_deploy.yml'
四、Demo配置+运行示例
下面让我们来配合运行示例看一看文件配置是如何生效的
流水线Demo1(基础用法):
# .gitlab-ci.yml
# 镜像为node的环境镜像,如果用的是别的环境可以更改为别的项目环境的镜像
image: node:latest

# 自定义stages
stages:
  - first_stage
  - second_stage
  - third_stage
  - fourth_stage
  - fifth_stage

# 自定义任务1
job_1_push:
  only:
    - pushes
  # 设置使用fe tags标签的shared runner
  tags:
    - yehanli
  # 当前任务需要执行的脚本
  script:
    - echo 'job1 ========= 完成'
  # 设置当前任务的stage
  stage: first_stage

# 自定义任务2
job_2_push:
  only:
    - pushes
  tags:
    - yehanli
  script:
    - echo 'job2 ========= 完成'
  stage: third_stage
# 自定义任务3
job_3_push:
  only:
    - pushes
  tags:
    - yehanli
  script:
    - echo 'job3 ========= 完成'
  stage: fourth_stage
  # 设置当前任务为手动触发
  when: manual

# 自定义任务4
job_4_push:
  only:
    - pushes
    - tags
  tags:
    - yehanli
  script:
    - echo 'job4 ========= 完成'
  stage: fourth_stage
  when: always

# 自定义任务5
job_5_web:
  only:
  # 设置为点击run pipeline时触发,流水线不自动触发
    - web
  tags:
    - yehanli
  script:
    - echo 'job5 ========= 完成'
  stage: fifth_stage
如下为前4个jobs运行输出结果(点击上图的各个jobs即可看到下图输出)
如设想的一样,所有的jobs都按照设定执行了任务。
如图所示,我们没有定义second_stage的任务,那么默认就会跳过,按照成功处理
job5可以按照如下方式触发:
- pipeline界面点击run pipeline
2 . 选择branch,然后再点击run pipeline

流水线Demo2(详细示例):
# .gitlab-ci.yml
image: node:latest
# # 在运行所有任务之前执行如下脚本
before_script:
  - echo '====== 在所有jobs之前进行执行 ========='

variables:
  IS_EXPERIENCING_MERGING: "false"
  IS_ON_MYBRANCH: "false"

workflow:
  rules:
    - if: $CI_PIPELINE_SOURCE == "merge_request_event"
      variables:
        IS_EXPERIENCING_MERGING: "true"
    - if: $CI_COMMIT_REF_NAME =~ /myBranch/
      variables:
        IS_ON_MYBRANCH: "true"
    - if: $CI_COMMIT_REF_NAME =~ /.*/

cache:
  key: cache-node-modules
  # 在这里写出需要缓存的文件的路径,在此为node_modules
  paths:
    - node_modules

# 自定义stages
stages:
  - first_stage
  - second_stage
  - third_stage
  - fourth_stage
  - fifth_stage

include:
  - '/yml/job_1_install.yml'
  - '/yml/job_2_build.yml'
  - '/yml/job_3_deploy.yml'
  - '/yml/job_4_mybranch.yml'
  - '/yml/job_5_beforeMR.yml'
# '/yml/job_1_install.yml'
# install 阶段
job_1_install:
only:
- master
tags:
- yehanli
before_script:
- echo '========== job1 的script之前执行 =========='
- npm install
script:
- echo 'job1 ========= 完成'
stage: first_stage
# 最多失败重试次数为3次
retry: 2# '/yml/job_2_build.yml'
# build 阶段
job_2_build:
only:
- master
tags:
- yehanli
script:
- npm run build
- echo 'job2 ========= 完成'
stage: second_stage
retry: 2# '/yml/job_3_deploy.yml'
# deploy 阶段
job_3_deploy:
image: docker
only:
- master
tags:
- yehanli
script:
- docker build -t reactimages .
- if [ $(docker ps -aq --filter name=react-container) ]; then docker rm -f react-container; fi
- docker run -d -p 8000:80 --name react-container reactimages
- echo 'job3 ========= 完成'
stage: third_stage
when: always# '/yml/job_4_mybranch.yml'
job_4_mybranch:
only:
- myBranch
tags:
- yehanli
script:
- echo 'is it on myBranch?' $IS_ON_MYBRANCH
- echo 'job4 ========= 完成'
stage: fourth_stage
retry: 2# '/yml/job_5_beforeMR.yml'
job_5_afterMR:
rules:
- if: '$CI_COMMIT_BRANCH == "master"'
tags:
- yehanli
script:
- echo 'Is experiencing merging?' $IS_EXPERIENCING_MERGING
- echo '========== job_5_afterMR 完成 ==========='
stage: fifth_stage
retry: 2
job_5_beforeMR:
rules:
- if: '$CI_MERGE_REQUEST_TARGET_BRANCH_NAME == "master"'
tags:
- yehanli
script:
- echo 'Is experiencing before-merge?' $IS_EXPERIENCING_MERGING
- echo '========== job_5_beforeMR 完成 ==========='
stage: fifth_stage
retry: 2# pull 官方的镜像,重命名为builder
FROM node:latest as builder
# 设置工作目录为/app
WORKDIR /app
# 按照package.json来安装依赖
COPY package.json ./
COPY package-lock.json ./
RUN npm install --registry=https://bnpm.byted.org
# 加入/app下
COPY . ./
# build一下
RUN npm run build
# 将 /app/dist dir 放入 /nginx/html dir
# Nginx是一款轻量级的Web服务器
FROM nginx:latest
COPY --from=builder /app/build /usr/share/nginx/html参考资料
[1]Run GitLab Runner in a container | GitLab: https://docs.gitlab.com/runner/install/docker.html
[2]Registering runners | GitLab: https://docs.gitlab.com/runner/register/index.html#docker
[3]YAML Syntax ‒ Ansible Documentation: https://docs.ansible.com/ansible/latest/reference_appendices/YAMLSyntax.html
[4]Keyword reference for the .gitlab-ci.yml file | : https://docs.gitlab.com/ee/ci/yaml/
[5]GitLab: https://docs.gitlab.com/ee/ci/yaml/
[6]Predefined variables reference | GitLab: https://docs.gitlab.com/ee/ci/variables/predefined_variables.html
[7]GitLab: https://docs.gitlab.com/ee/ci/variables/index.html#create-a-custom-cicd-variable-in-the-gitlab-ciyml-file
[8]: https://docs.gitlab.com/ee/ci/variables/index.html#create-a-custom-cicd-variable-in-the-gitlab-ciyml-file
[9]CI: https://docs.gitlab.com/ee/ci/variables/index.html#create-a-custom-cicd-variable-in-the-gitlab-ciyml-file
[10]/: https://docs.gitlab.com/ee/ci/variables/index.html#create-a-custom-cicd-variable-in-the-gitlab-ciyml-file
[11]CD: https://docs.gitlab.com/ee/ci/variables/index.html#create-a-custom-cicd-variable-in-the-gitlab-ciyml-file
[12]variables | GitLab: https://docs.gitlab.com/ee/ci/variables/index.html#create-a-custom-cicd-variable-in-the-gitlab-ciyml-file
