Decorator 装饰器
前言
大家在前端开发过程中有遇到过 @ + 方法名 这种写法吗?当我第一次看到的时候,直接懵了,这是什么东东……
遇到困难解决困难,在我的一番查找后,我知道了,原来这东西叫装饰器,英文名叫 Decorator ,那它到底是干什么的呢?接下来就让我跟大家说道说道~
什么是装饰器
装饰者模式
装饰者模式就是能够在不改变对象自身的基础上,在程序运行期间给对象动态地添加职责。打个比方,一个人在天气冷的时候要穿棉衣,天气热的时候穿短袖,可无论穿什么,本质上他还是一个人,只不过身上穿了不同的衣服。
所以简单来说, Decorator 就是一种动态地往一个类中添加新的行为的设计模式, 它可以在类运行时, 扩展一个类的功能, 并且去修改类本身的属性和方法, 使其可以在不同类之间更灵活的共用一些属性和方法。
@ 是针对这种设计模式的一个语法糖,不过目前还处于第 2 阶段提案中,使用它之前需要使用 Babel 模块编译成 ES5 或 ES6。
怎么使用装饰器
三方库使用
Babel 版本 ≥ 7.x
如果项目的 Babel 版本大于等于 7.x,那么可以使用 @babel/plugin-proposal-decorators
-
安装
npm install --save-dev @babel/plugin-proposal-decorators -
配置 .babelrc
{
"plugins": [
  ["@babel/plugin-proposal-decorators", { "legacy": true }],
]
}
Babel 版本 ≤ 6.x
如果小于等于 6.x,则可以使用 babel-plugin-transform-decorators-legacy
-
安装
npm install --save-dev @babel/plugin-proposal-decorators -
配置 .babelrc
{
  "plugins": ["transform-decorators-legacy"]
}
使用方法
装饰器的写法是 @ + 返回装饰器函数的表达式,所以其使用方法如下:
@classDecorator
class TargetClass { // 类
  @fieldDecorator
  targetField = 0; // 类实例属性

  @funDecorator
  targetFun() { } // 类方法

  @accessorDecorator
  get targetGetFun() { } // 类访问器
}
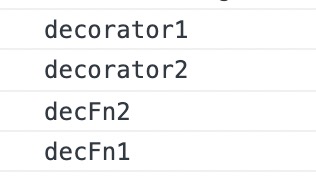
如果一个对象使用多个装饰器,那么执行顺序是什么呢?
function decorator1() {
  console.log('decorator1');
  return function decFn1(targetClass) {
    console.log('decFn1');
    return targetClass;
  };
}

function decorator2() {
  console.log('decorator2');
  return function decFn2(targetClass) {
    console.log('decFn2');
    return targetClass;
  };
}
执行顺序:


使用范围
根据使用方法,我们可以看出装饰器可以应用于以下几种类型:
- 类(class)
- 类实例属性(公共、私有和静态)
- 类方法(公共、私有和静态)
- 类访问器(公共、私有和静态)
函数的装饰
当我们看完装饰器的使用方法和使用范围时,我们发现,装饰器不能修饰函数,那原因到底是什么呢?原因就是函数有函数提升。
var num = 0;
function add () {
  num ++;
}
@add
function fn() {}
在这个例子中,我们想要在执行后让 num 等于 1,但其实结果并不是这样,因为函数提升,实际上代码是这样执行的:
function add () {
  num ++;
}
@add
function fn() {}
var num;
num = 0;
如果一定要装饰函数的话,可以采用高阶函数的形式,这篇文章主要讲装饰器,有关高阶函数就不在此赘述了,不了解的小伙伴们可自行查阅资料哈~
装饰器原理
根据装饰器的使用范围,可以把它分为两大类:类的装饰与类方法的装饰,下面就让我为大家逐个分享一下。
类的装饰
传参
首先我们先根据一个小例子看一下装饰器接收参数的情况:
function decorator(...args) {
  args.forEach((arg, index) => {
    console.log(`参数${index}`, arg);
  });
}

@decorator
class TargetClass { }

console.log('targetClass:', TargetClass);
打印结果如下:

返回值
我们继续通过一个小例子来看返回值的情况:
function returnStr(targetClass) {
  return 'hello world~';
}

function returnClass(targetClass) {
  return targetClass;
}

@returnStr
class ClassA { }

@returnClass
class ClassB { }

console.log('ClassA:', ClassA);
console.log('ClassB:', ClassB);
结果如下:

结论
通过以上的两个例子,我们可以得出以下这个结论:
@decorator
class TargetClass { }

// 等同于

class TargetClass { }
TargetClass = decorator(TargetClass) || TargetClass;
所以说,装饰器的第一个参数就是要装饰的类,它的功能就是对类进行处理。
类装饰器的使用
-
添加属性
因为装饰器接收的参数就是类定义本身,所以我们可以给类添加属性:
  function addAttribute(targetClass) {
  targetClass.isUseDecorator = true;
}

@addAttribute
class TargetClass { }

console.log(TargetClass.isUseDecorator); // true
在这个例子中,我们定义了 addAttribute 的装饰器,用于对 TargetClass 添加 isUseDecorator 标记,这个用法就跟 Java 中的注解比较相似,仅仅是对目标类型打上一些标记。
-
返回装饰器函数的表达式
上面有说装饰器的写法是
@ + 返回装饰器函数的表达式,也就是说,@后边可以不是一个方法名,还可以是能返回装饰器函数的表达式:
 function addAttribute(content) {
  return function decFn(targetClass) {
    targetClass.content = content;
    return targetClass;
  };
}

@addAttribute('这是内容~~~')
class TargetClass { }

console.log(TargetClass.content); // 这是内容~~~
我们看到 TargetClass 通过 addAttribute 的装饰,添加了 content 这个属性,并且可以向 addAttribute 传参来给 content 属性赋值,这种使用方法使装饰器变得更加灵活。
-
添加原型方法
在前面的例子中我们添加的都是类的静态属性,但是既然装饰器接收的参数就是类定义本身,那么它也可以通过访问类的
prototype属性来添加或修改原型方法:
function decorator(targetClass) {
  targetClass.prototype.decFun = function () {
    console.log('这里是装饰器 decorator 添加的原型方法 decFun~');
  };
}

@decorator
class TargetClass { }

const targetClass = new TargetClass();

console.log(targetClass);
targetClass.decFun();
结果如下:
以上就是类装饰器的使用,由此我们可以得出,装饰器还可以对类型进行静态标记和方法扩展,还挺有用的对吧~那么看到这里,小伙伴们是不是发现了在实际项目中就有类装饰器的使用,比如 react-redux 的 connect 就是一个类装饰器、Antd 中的 Form.create 也是一个类装饰器。
// connect
class App extends React.Component {}
export default connect(mapStateToProps, mapDispatchToProps)(App);

// 等同于

@connect(mapStateToProps, mapDispatchToProps)
export default class App extends React.Component {}

// Form.create
const WrappedApp = Form.create()(App);

// 等同于

@Form.create()
class App extends React.Component {}
类方法的装饰
传参
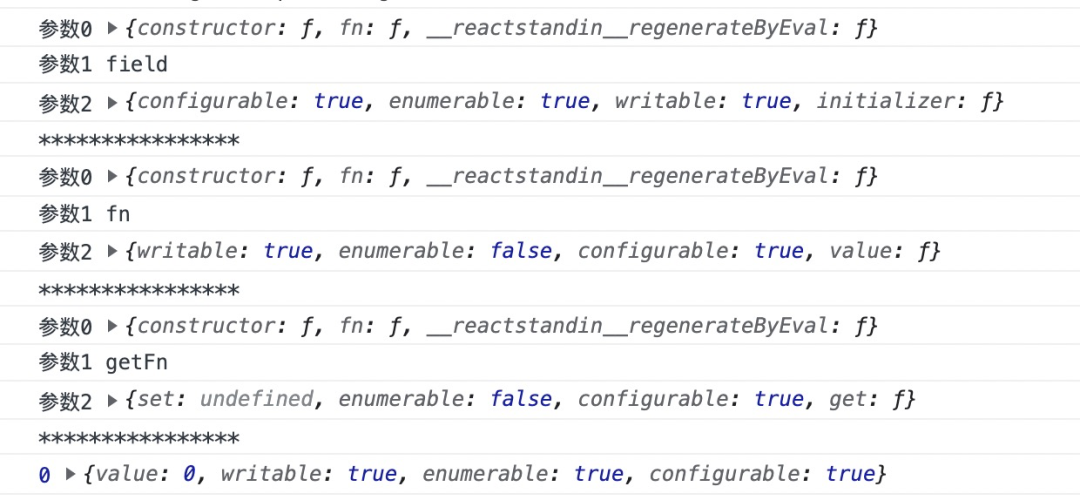
我们把类实例属性、类方法、类访问器都归到这一类中的原因其实是因为它们三个就是作为某个对象的属性(实例属性、原型方法、实例访问器属性),也就是说它们接收的参数是类似的:
function decorator(...args) {
  args.forEach((arg, index) => {
    console.log(`参数${index}`, arg);
  });
  console.log('****************');
}

class TargetClass {
  @decorator
  field = 0;

  @decorator
  fn() { }

  @decorator
  get getFn() { }
}

const targetOne = new TargetClass();
console.log(targetOne.field, Object.getOwnPropertyDescriptor(targetOne, 'field'));
结果如下:

Object.defineProperty() 接收的参数很像。
Object.defineProperty(obj, props, descriptor)
Object.defineProperty() 的作用就是直接在一个对象上定义一个新属性,或者修改一个对象的现有属性,并返回此对象。该方法一共接收三个参数:
- 要定义属性的对象(obj)
- 要定义或修改的属性名或
Symbol(props) - 要定义或修改的属性描述符(descriptor)
而对象里目前存在的属性描述符有两种主要形式:数据描述符和存取描述符。数据描述符是一个具有值的属性,该值可以是可写的,也可以是不可写的;存取描述符是由 getter 函数和 setter 函数所描述的属性。一个描述符只能是这两者其中之一,不能同时是两者。
它们共享以下可选键值:
-
configurable属性是否可以被删除和重新定义特性,默认值为
false -
enumerable是否会出现在对象的枚举属性中,默认值为
false
数据描述符特有键值:
-
value该属性对应的值,默认值为
undefined -
writable是否可以被更改,默认值为
false
存取操作符特有键值:
-
get属性的
getter函数,如果没有getter,则为undefined;默认为undefined -
set属性的
setter函数,如果没有setter,则为undefined;默认为undefined
讲完 Object.defineProperty(),接下来就让我们看看该怎么使用它吧~
类方法装饰器的使用
让我们通过一个例子来了解一下:
function readonly(target, name, descriptor) {
  descriptor.writable = false;
  return descriptor;
}

class Person {
  @readonly
  name = 'zhangsan';
}

const person = new Person();
console.log(person.name, Object.getOwnPropertyDescriptor(person, 'name'));
打印结果如下:

结论
由此我们可以得出结论:
function changeName(target, name, descriptor) {
  descriptor.value = 'lisi';
  return descriptor;
}
class Person {
  @changeName
  name = 'zhangsan';
}
const person = new Person();

// 等同于

class Person {
  name = 'zhangsan';
}
const person = new Person();
Object.defineProperty(person, 'name', {
  value: 'lisi',
});
装饰器的应用
在项目中,可能会遇到这样一种情况,好几个组件的数据都是调用同一个后端接口获得,只是传参不同,有些小伙伴们在写代码的时候可能就是每个组件都去手动调用一次后端接口(以 React 项目为例):
...
export default class CompOne extends Component {
  ...
  getData = async () => { // 调用后端接口
    const data = await request('/xxx', {
      params: {
        id: '123', // 不同组件传参不同
      },
    });
    this.setState({ data });
  }
  render() {
    ...
    return (
      <div>
        ...
        我是组件一: {data}
        ...
      </div>
    )
  }
}
遇到这种情况,我们就可以用装饰器解决呀~
// 装饰器
function getData(params) {
  return (Comp) => {
    class WrapperComponent extends Component {
      ...
      getData = async () => {
        const data = await request('/xxx', {
          params,
        });
        this.setState({ data });
      }
      render() {
        ...
        return (
          <Comp data={data} />
        )
      }
    }

    return Comp;
  }
}

// 组件
...
@getData({
  id: '123'
})
export default class index extends Component {
  ...
  render() {
    ...
    const data = this.props.data; // 直接从 this.props 中获取想要的数据
    return (
      <div>
        ...
        我是组件一: {data}
        ...
      </div>
    )
  }
}
总结
好啦,今天的分享就要到此结束了哦,希望通过这篇文章大家能够对装饰器有一定的了解,如有不同意见,欢迎在评论区评论呦~就让暴风雨来得更猛烈些吧!
参考链接
装饰器(https://www.bookstack.cn/read/es6-3rd/docs-decorator.md)
ES7 提案: Decorators 装饰器(https://blog.csdn.net/weixin_44691608/article/details/117180409)
Object.defineProperty()(https://developer.mozilla.org/zh-CN/docs/Web/JavaScript/Reference/Global_Objects/Object/defineProperty)
babel-plugin-transform-decorators-legacy(https://www.npmjs.com/package/babel-plugin-transform-decorators-legacy)
