NDK OpenGLES3.0 开发(六):EGL
什么是 EGL
EGL 是 OpenGL ES 和本地窗口系统(Native Window System)之间的通信接口,它的主要作用:- 与设备的原生窗口系统通信;
- 查询绘图表面的可用类型和配置;
- 创建绘图表面;
- 在OpenGL ES 和其他图形渲染API之间同步渲染;
- 管理纹理贴图等渲染资源。
OpenGL ES 的平台无关性正是借助 EGL 实现的,EGL 屏蔽了不同平台的差异(Apple 提供了自己的 EGL API 的 iOS 实现,自称 EAGL)。
本地窗口相关的 API 提供了访问本地窗口系统的接口,而 EGL 可以创建渲染表面 EGLSurface ,同时提供了图形渲染上下文 EGLContext,用来进行状态管理,接下来 OpenGL ES 就可以在这个渲染表面上绘制。
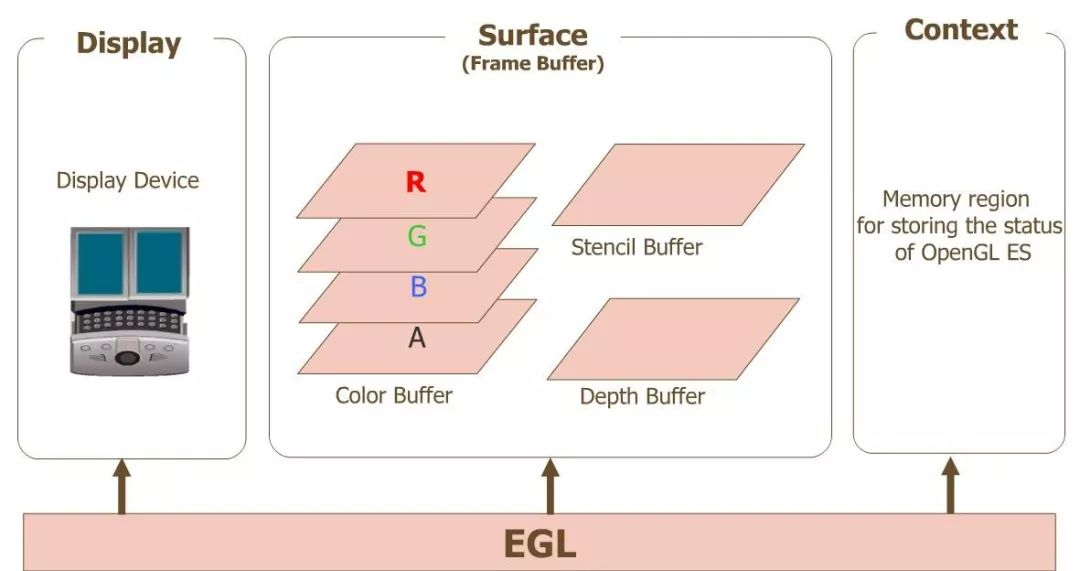
egl、opengles 和设备之间的关系
图片中:
- Display(EGLDisplay) 是对实际显示设备的抽象;
- Surface(EGLSurface)是对用来存储图像的内存区域 FrameBuffer 的抽象,包括 Color Buffer(颜色缓冲区), Stencil Buffer(模板缓冲区) ,Depth Buffer(深度缓冲区);
- Context (EGLContext) 存储 OpenGL ES 绘图的一些状态信息;
在 Android 平台上开发 OpenGL ES 应用时,类 GLSurfaceView 已经为我们提供了对 Display , Surface , Context 的管理,即 GLSurfaceView 内部实现了对 EGL 的封装,可以很方便地利用接口 GLSurfaceView.Renderer 的实现,使用 OpenGL ES API 进行渲染绘制,很大程度上提升了 OpenGLES 开发的便利性。
当然我们也可以自己实现对 EGL 的封装,本文就是在 Native 层对 EGL 进行封装,不借助于 GLSurfaceView ,实现图片后台渲染,利用 GPU 完成对图像的高效处理。
EGL 的应用
EGL 后台渲染实现效果图
使用 EGL 渲染的一般步骤:
- 获取 EGLDisplay 对象,建立与本地窗口系统的连接 调用 eglGetDisplay 方法得到 EGLDisplay。
- 初始化 EGL 方法 打开连接之后,调用 eglInitialize 方法初始化。
- 获取 EGLConfig 对象,确定渲染表面的配置信息 调用 eglChooseConfig 方法得到 EGLConfig。
- 创建渲染表面 EGLSurface 通过 EGLDisplay 和 EGLConfig ,调用 eglCreateWindowSurface 或 eglCreatePbufferSurface 方法创建渲染表面,得到 EGLSurface,其中 eglCreateWindowSurface 用于创建屏幕上渲染区域,eglCreatePbufferSurface 用于创建屏幕外渲染区域。
- 创建渲染上下文 EGLContext 通过 EGLDisplay 和 EGLConfig ,调用 eglCreateContext 方法创建渲染上下文,得到 EGLContext。
- 绑定上下文 通过 eglMakeCurrent 方法将 EGLSurface、EGLContext、EGLDisplay 三者绑定,绑定成功之后 OpenGLES 环境就创建好了,接下来便可以进行渲染。
- 交换缓冲 OpenGLES 绘制结束后,使用 eglSwapBuffers 方法交换前后缓冲,将绘制内容显示到屏幕上,而屏幕外的渲染不需要调用此方法。
- 释放 EGL 环境 绘制结束后,不再需要使用 EGL 时,需要取消 eglMakeCurrent 的绑定,销毁 EGLDisplay、EGLSurface、EGLContext 三个对象。
代码实现:
https://mp.weixin.qq.com/s/iu81lgL3zwbXwgf_WoNnXQJava 层的代码,主要是一个 ImageView 用于展示渲染前后的图像。
// 创建渲染对象
NativeBgRender mBgRender = new NativeBgRender();
// 初始化创建 GLES 环境
mBgRender.native_BgRenderInit();
// 加载图片数据到纹理
loadRGBAImage(R.drawable.java, mBgRender);
// 离屏渲染
mBgRender.native_BgRenderDraw();
// 从缓冲区读出渲染后的图像数据,加载到 ImageView
mImageView.setImageBitmap(createBitmapFromGLSurface(0, 0, 421, 586));
// 释放 GLES 环境
mBgRender.native_BgRenderUnInit();


private void loadRGBAImage(int resId, NativeBgRender render) {
    InputStream is = this.getResources().openRawResource(resId);
    Bitmap bitmap;
    try {
        bitmap = BitmapFactory.decodeStream(is);
        if (bitmap != null) {
            int bytes = bitmap.getByteCount();
            ByteBuffer buf = ByteBuffer.allocate(bytes);
            bitmap.copyPixelsToBuffer(buf);
            byte[] byteArray = buf.array();
            render.native_BgRenderSetImageData(byteArray, bitmap.getWidth(), bitmap.getHeight());
        }
    }
    finally
    {
        try
        {
            is.close();
        }
        catch(IOException e)
        {
            e.printStackTrace();
        }
    }
}

private Bitmap createBitmapFromGLSurface(int x, int y, int w, int h) {
    int bitmapBuffer[] = new int[w * h];
    int bitmapSource[] = new int[w * h];
    IntBuffer intBuffer = IntBuffer.wrap(bitmapBuffer);
    intBuffer.position(0);
    try {
        GLES20.glReadPixels(x, y, w, h, GLES20.GL_RGBA, GLES20.GL_UNSIGNED_BYTE,
                intBuffer);
        int offset1, offset2;
        for (int i = 0; i < h; i++) {
            offset1 = i * w;
            offset2 = (h - i - 1) * w;
            for (int j = 0; j < w; j++) {
                int texturePixel = bitmapBuffer[offset1 + j];
                int blue = (texturePixel >> 16) & 0xff;
                int red = (texturePixel << 16) & 0x00ff0000;
                int pixel = (texturePixel & 0xff00ff00) | red | blue;
                bitmapSource[offset2 + j] = pixel;
            }
        }
    } catch (GLException e) {
        return null;
    }
    return Bitmap.createBitmap(bitmapSource, w, h, Bitmap.Config.ARGB_8888);
}
EGL 后台渲染实现代码路径: https://github.com/githubhaohao/NDK_OpenGLES_3_0
-- END --


