Android Systrace 基础知识(6) - Input 解读
本文是 Android Systrace 系列文章的第六篇,主要是对 Systrace 中的 Input 进行简单介绍,介绍其 Input 的流程;Systrace 中 Input 信息的体现 ,以及如何结合 Input 信息,分析与 Input 相关的问题
本系列的目的是通过 Systrace 这个工具,从另外一个角度来看待 Android 系统整体的运行,同时也从另外一个角度来对 Framework 进行学习。也许你看了很多讲 Framework 的文章,但是总是记不住代码,或者不清楚其运行的流程,也许从 Systrace 这个图形化的角度,你可以理解的更深入一些。
系列文章目录
- [Systrace 简介]
- [Systrace 基础知识 - Systrace 预备知识]
- [Systrace 基础知识 - Why 60 fps ?]
- [Systrace 基础知识 - SystemServer 解读]
- [Systrace 基础知识 - SurfaceFlinger 解读]
- Systrace 基础知识 - Input 解读
- Systrace 基础知识 - Vsync 解读
- Systrace 基础知识 - Vsync-App :基于 Choreographer 的渲染机制详解
- Systrace 基础知识 - MainThread 和 RenderThread 解读
- Systrace 基础知识 - Binder 和锁竞争解读
- Systrace 基础知识 - Triple Buffer 解读
- Systrace 基础知识 - CPU Info 解读
正文
在Android 基于 Choreographer 的渲染机制详解 这篇文章中,我有讲到,Android App 的主线程运行的本质是靠 Message 驱动的,这个 Message 可以是循环动画、可以是定时任务、可以是其他线程唤醒,不过我们最常见的还是 Input Message ,这里的 Input 是以 InputReader 这里的分类,不仅包含触摸事件(Down、Up、Move) , 可包含 Key 事件(Home Key 、 Back Key) . 这里我们着重讲的是「触摸事件」
由于 Android 系统在 Input 链上加了一些 Trace 点,且这些 Trace 点也比较完善,部分厂家可能会自己加一些,不过我们这里以标准的 Trace 点来讲解,这样不至于你换了个手机抓的 Trace 就不一样了
Input 在 Android 中的地位是很高的,我们在玩手机的时候,大部分应用的滑动、跳转这些都依靠 Input 事件来驱动,后续我会专门写一篇文章,来介绍 Android 中基于 Input 的运行机制。这里是从 Systrace 的角度来看 Input 。看下面的流程之前,脑子里先有个关于 Input 的大概处理流程,这样看的时候,就可以代入:
- 「触摸屏每隔几毫秒扫描一次,如果有触摸事件,那么把事件上报到对应的驱动」
- 「InputReader 读取触摸事件交给 InputDispatcher 进行事件派发」
- 「InputDispatcher 将触摸事件发给注册了 Input 事件的 App」
- 「App 拿到事件之后,进行 Input 事件分发,如果此事件分发的过程中,App 的 UI 发生了变化,那么会请求 Vsync,则进行一帧的绘制」
「另外在看 Systrace 的时候,要牢记 Systrace 中时间是从左到右流逝的,也就是说如果你在 Systrace 上画一条竖直线,那么竖直线左边的事件永远比右边的事件先发生,这也是我们分析源码流程的一个基石。我希望大家在看基于 Systrace 的源码流程分析之后,脑子里有一个图形化的、立体的流程图,你跟的代码走到哪一步了在图形你在脑中可以快速定位出来」
Input in Systrace
下面这张图是一个概览图,以滑动桌面为例 (「滑动桌面包括一个 Input_Down 事件 + 若干个 Input_Move 事件 + 一个 Input_Up 事件,这些事件和事件流都会在 Systrace 上有所体现,这也是我们分析 Systrace 的一个重要的切入点」),主要牵扯到的模块是 SystemServer 和 App 模块,其中用蓝色标识的是事件的流动信息,红色的是辅助信息。
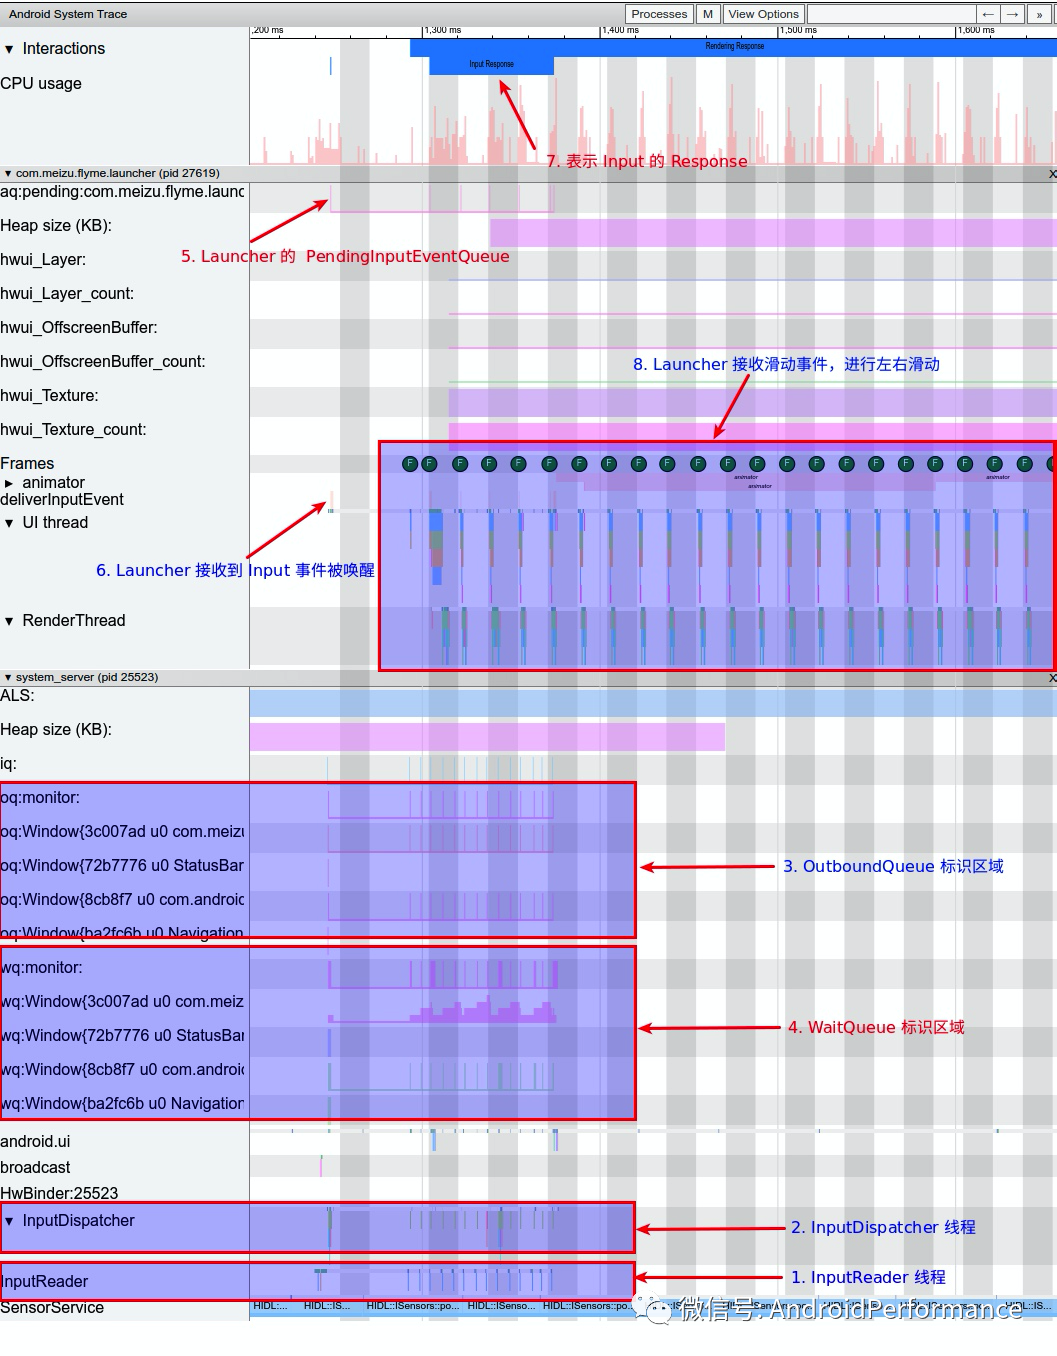
「InputReader」 和 「InputDispatcher」 是跑在 SystemServer 里面的两个 Native 线程,负责读取和分发 Input 事件,我们分析 Systrace 的 Input 事件流,首先是找到这里。下面针对上图中标号进行简单说明
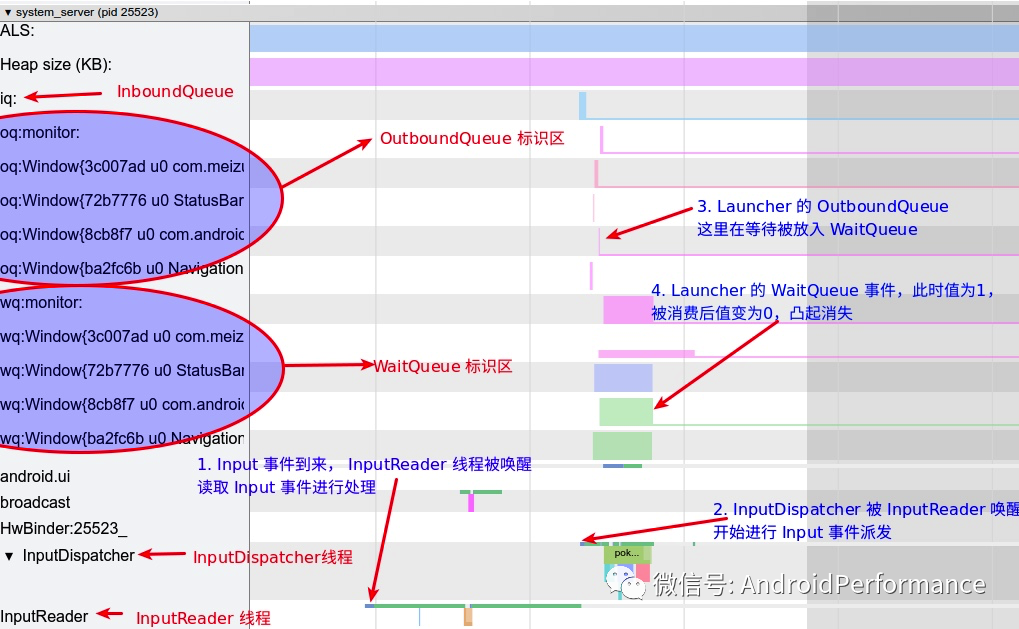
- 「InputReader」 负责从 EventHub 里面把 Input 事件读取出来,然后交给 InputDispatcher 进行事件分发
- 「InputDispatcher」 在拿到 InputReader 获取的事件之后,对事件进行包装和分发 (也就是发给对应的)
- 「OutboundQueue」 里面放的是即将要被派发给对应 AppConnection 的事件
- 「WaitQueue」 里面记录的是已经派发给 AppConnection 但是 App 还在处理没有返回处理成功的事件
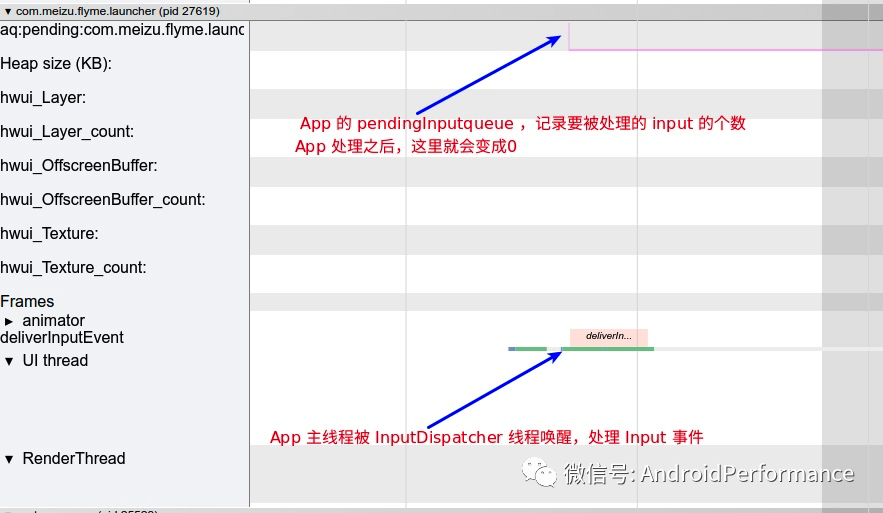
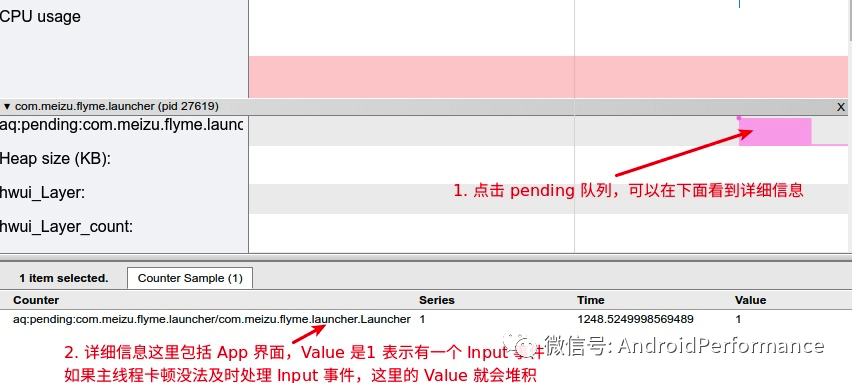
- 「PendingInputEventQueue」 里面记录的是 App 需要处理的 Input 事件,这里可以看到已经到了应用进程
- 「deliverInputEvent」 标识 App UI Thread 被 Input 事件唤醒
- 「InputResponse」 标识 Input 事件区域,这里可以看到一个 Input_Down 事件 + 若干个 Input_Move 事件 + 一个 Input_Up 事件的处理阶段都被算到了这里
- 「App 响应 Input 事件」 :这里是滑动然后松手,也就是我们熟悉的桌面滑动的操作,桌面随着手指的滑动更新画面,松手后触发 Fling 继续滑动,从 Systrace 就可以看到整个事件的流程
下面以第一个 Input_Down 事件的处理流程来进行详细的工作流说明,其他的 Move 事件和 Up 事件的处理是一样的(部分不一样,不过影响不大)
InputDown 事件在 SystemServer 的工作流
放大 SystemServer 的部分,可以看到其工作流(蓝色),「滑动桌面包括 Input_Down + 若干个 Input_Move + Input_Up ,我们这里看的是 Input_Down 这个事件」
InputDown 事件在 App 的工作流
应用在收到 Input 事件后,有时候会马上去处理 (没有 Vsync 的情况下),有时候会等 Vsync 信号来了之后去处理,这里 Input_Down 事件就是直接去唤醒主线程做处理,其 Systrace 比较简单,最上面有个 Input 事件队列,主线程则是简单的处理
App 的 Pending 队列
主线程处理 Input 事件
主线程处理 Input 事件这个大家比较熟悉,从下面的调用栈可以看到,Input 事件传到了 ViewRootImpl,最终到了 DecorView ,然后就是大家熟悉的 Input 事件分发机制

关键知识点和流程
从上面的 Systrace 来看,Input 事件的基本流向如下:
- 「InputReader 读取 Input 事件」
- 「InputReader 将读取的 Input 事件放到 InboundQueue 中」
- 「InputDispatcher 从 InboundQueue 中取出 Input 事件派发到各个 App(连接) 的 OutBoundQueue」
- 「同时将事件记录到各个 App(连接) 的 WaitQueue」
- 「App 接收到 Input 事件,同时记录到 PendingInputEventQueue ,然后对事件进行分发处理」
- 「App 处理完成后,回调 InputManagerService 将负责监听的 WaitQueue 中对应的 Input 移除」
通过上面的流程,一次 Input 事件就被消耗掉了(当然这只是正常情况,还有很多异常情况、细节处理,这里就不细说了,自己看相关流程的时候可以深挖一下) , 那么本节就从上面的关键流中取几个重要的知识点讲解(部分流程和图参考和拷贝了 Gityuan 的博客的图,链接在最下面「参考」那一节)
InputReader
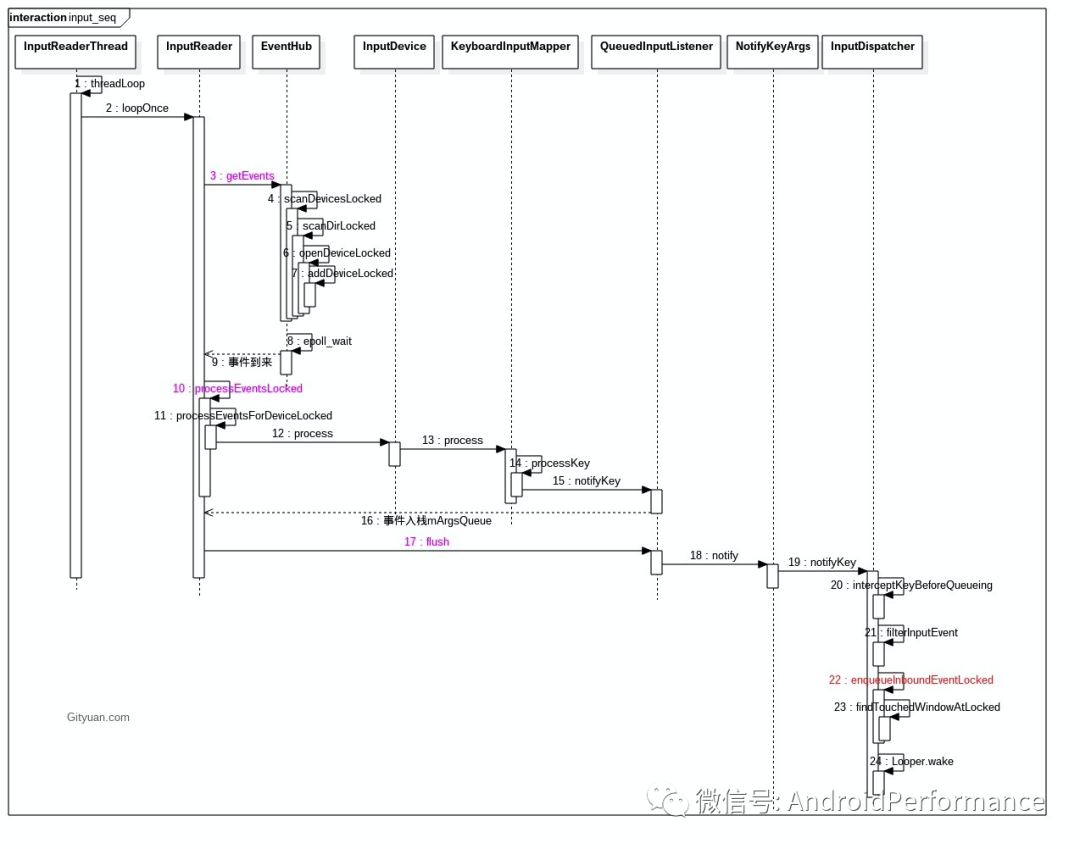
InputReader 是一个 Native 线程,跑在 SystemServer 进程里面,其核心功能是从 EventHub 读取事件、进行加工、将加工好的事件发送到 InputDispatcher
InputReader Loop 流程如下
- getEvents:通过 EventHub (监听目录 /dev/input )读取事件放入 mEventBuffer ,而mEventBuffer 是一个大小为256的数组, 再将事件 input_event 转换为 RawEvent
- processEventsLocked: 对事件进行加工, 转换 RawEvent -> NotifyKeyArgs(NotifyArgs)
- QueuedListener->flush:将事件发送到 InputDispatcher 线程, 转换 NotifyKeyArgs -> KeyEntry(EventEntry)
核心代码 loopOnce 处理流程如下:
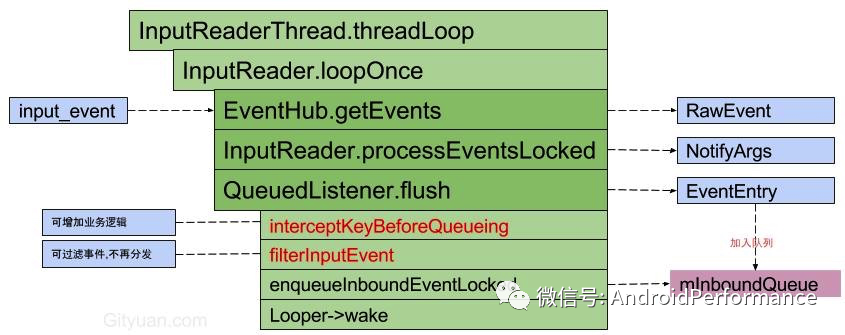
void InputReader::loopOnce() {
    int32_t oldGeneration;
    int32_t timeoutMillis;
    bool inputDevicesChanged = false;
    std::vector<InputDeviceInfo> inputDevices;
    { // acquire lock
    ......
    //获取输入事件、设备增删事件,count 为事件数量
    size_t count = mEventHub ->getEvents(timeoutMillis, mEventBuffer, EVENT_BUFFER_SIZE);
    {
    ......
        if (count) {//处理事件
            processEventsLocked(mEventBuffer, count);
        }

    }
    ......
    mQueuedListener->flush();//将事件传到 InputDispatcher,这里getListener 得到的就是 InputDispatcher
}
InputDispatcher
上面的 InputReader 调用 mQueuedListener->flush 之后 ,将 Input 事件加入到InputDispatcher 的 mInboundQueue ,然后唤醒 InputDispatcher , 从 Systrace 的唤醒信息那里也可以看到 InputDispatch 线程是被 InputReader 唤醒的
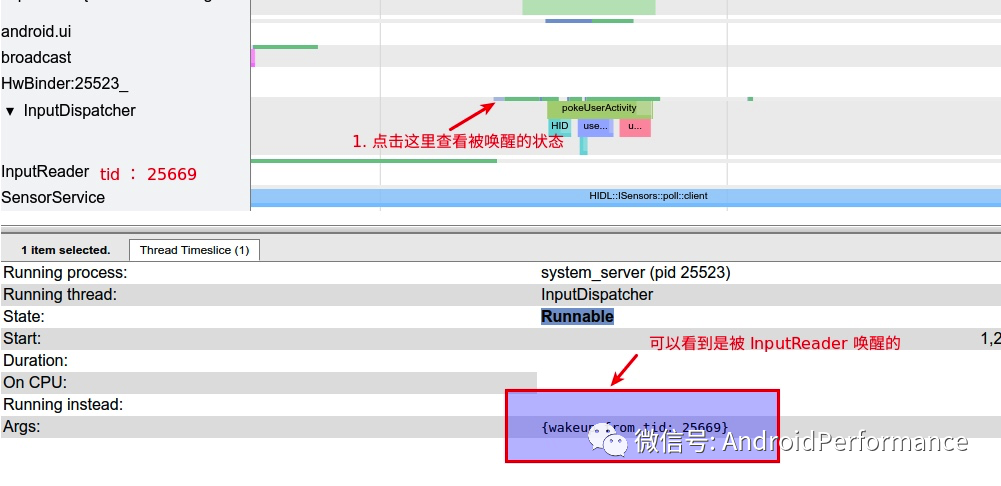
InputDispatcher 的核心逻辑如下:
- dispatchOnceInnerLocked(): 从 InputDispatcher 的 mInboundQueue 队列,取出事件 EventEntry。另外该方法开始执行的时间点 (currentTime) 便是后续事件 dispatchEntry 的分发时间 (deliveryTime)
- dispatchKeyLocked():满足一定条件时会添加命令 doInterceptKeyBeforeDispatchingLockedInterruptible;
- enqueueDispatchEntryLocked():生成事件 DispatchEntry 并加入 connection 的 outbound 队列
- startDispatchCycleLocked():从 outboundQueue 中取出事件 DispatchEntry, 重新放入 connection 的 waitQueue 队列;
- InputChannel.sendMessage 通过 socket 方式将消息发送给远程进程;
- runCommandsLockedInterruptible():通过循环遍历的方式,依次处理 mCommandQueue 队列中的所有命令。而 mCommandQueue 队列中的命令是通过 postCommandLocked() 方式向该队列添加的。
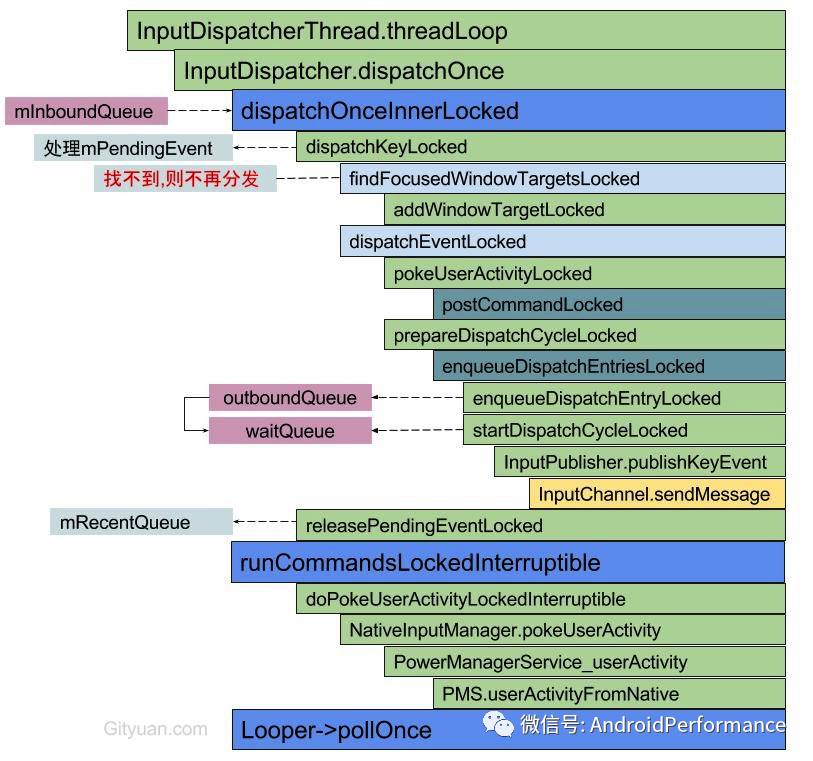
其核心处理逻辑在 dispatchOnceInnerLocked 这里
void InputDispatcher::dispatchOnceInnerLocked(nsecs_t* nextWakeupTime) {
    // Ready to start a new event.
    // If we don't already have a pending event, go grab one.
    if (! mPendingEvent) {
        if (mInboundQueue.isEmpty()) {
        } else {
            // Inbound queue has at least one entry.
            mPendingEvent = mInboundQueue.dequeueAtHead();
            traceInboundQueueLengthLocked();
        }

        // Poke user activity for this event.
        if (mPendingEvent->policyFlags & POLICY_FLAG_PASS_TO_USER) {
            pokeUserActivityLocked(mPendingEvent);
        }

        // Get ready to dispatch the event.
        resetANRTimeoutsLocked();
    }
    case EventEntry::TYPE_MOTION: {
        done = dispatchMotionLocked(currentTime, typedEntry,
                &dropReason, nextWakeupTime);
        break;
    }

    if (done) {
        if (dropReason != DROP_REASON_NOT_DROPPED) {
            dropInboundEventLocked(mPendingEvent, dropReason);
        }
        mLastDropReason = dropReason;
        releasePendingEventLocked();
        *nextWakeupTime = LONG_LONG_MIN;  // force next poll to wake up immediately
    }
}
InboundQueue
InputDispatcher 执行 notifyKey 的时候,会将 Input 事件封装后放到 InboundQueue 中,后续 InputDispatcher 循环处理 Input 事件的时候,就是从 InboundQueue 取出事件然后做处理
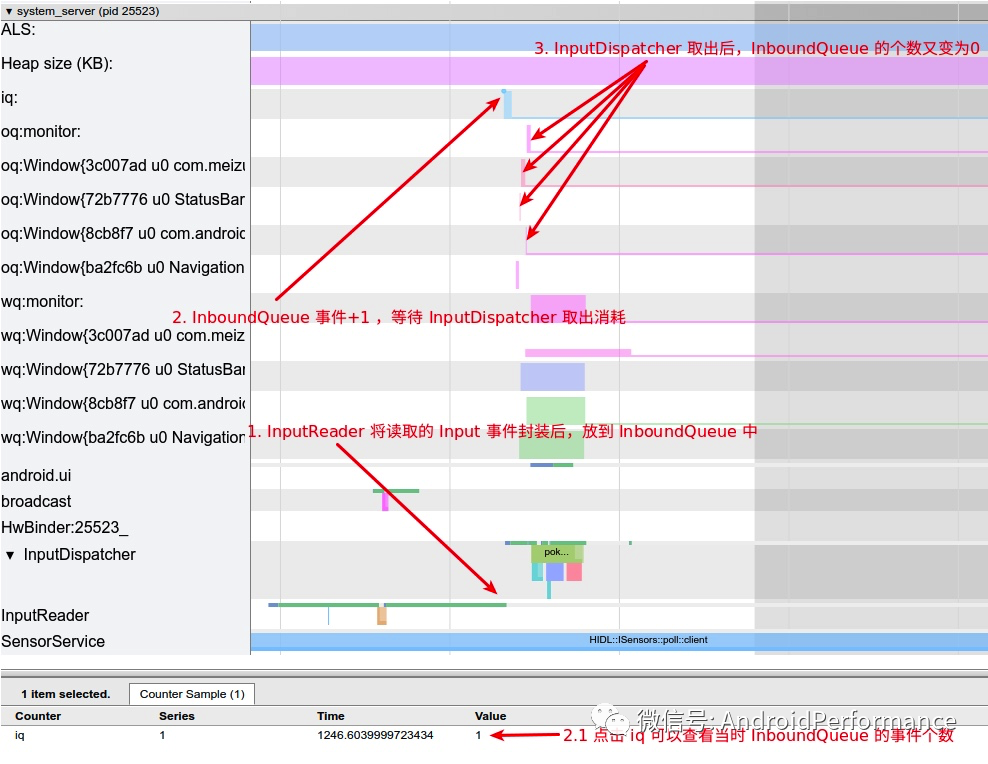
OutboundQueue
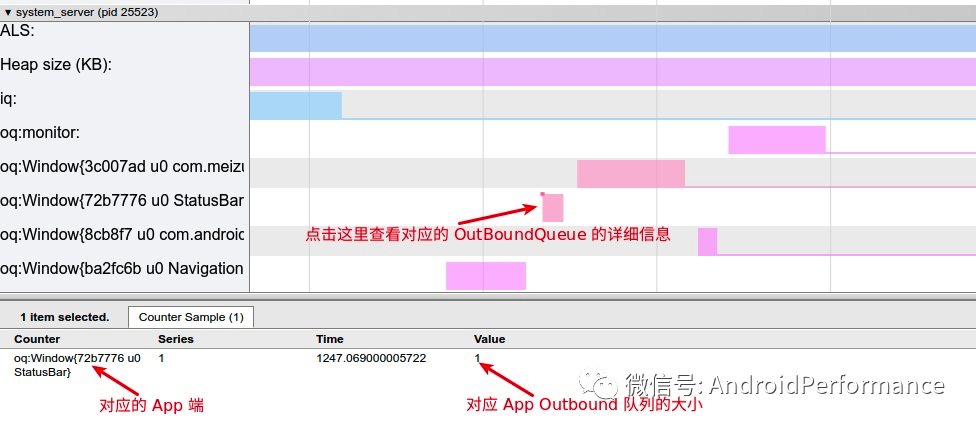
Outbound 意思是出站,这里的 OutboundQueue 指的是要被 App 拿去处理的事件队列,每一个 App(Connection) 都对应有一个 OutboundQueue ,从 InboundQueue 那一节的图来看,事件会先进入 InboundQueue ,然后被 InputDIspatcher 派发到各个 App 的 OutboundQueue
WaitQueue
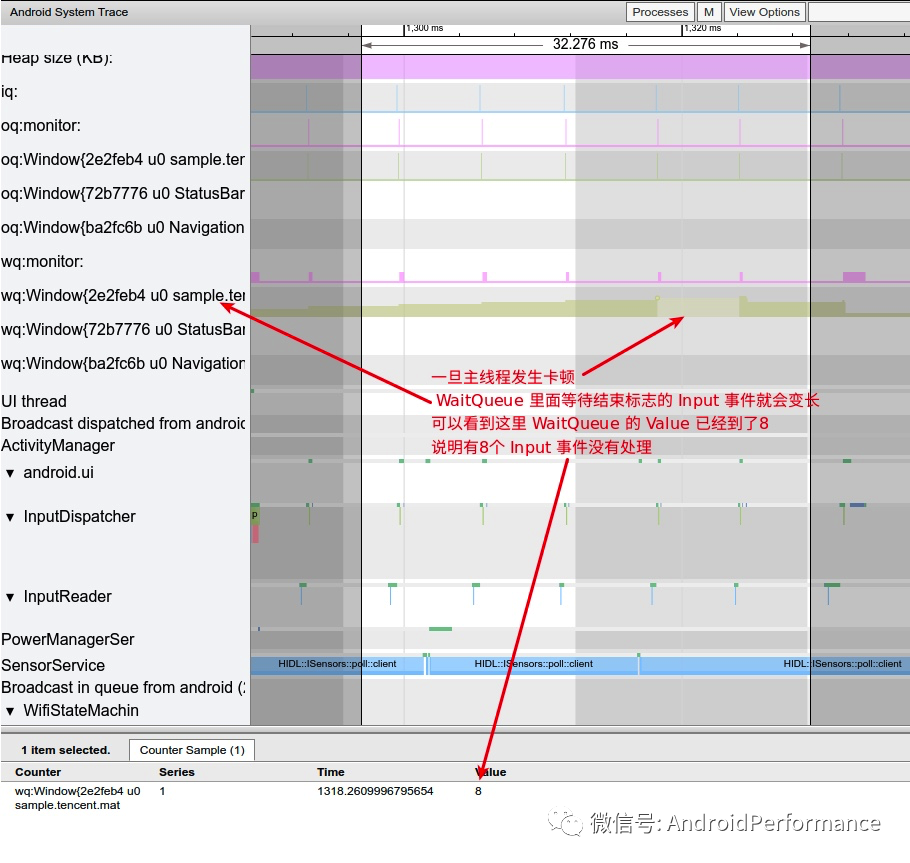
当 InputDispatcher 将 Input 事件分发出去之后,将 DispatchEntry 从 outboundQueue 中取出来放到 WaitQueue 中,当 publish 出去的事件被处理完成(finished),InputManagerService 就会从应用中得到一个回复,此时就会取出 WaitQueue 中的事件,从 Systrace 中看就是对应 App 的 WaitQueue 减少
如果主线程发生卡顿,那么 Input 事件没有及时被消耗,也会在 WaitQueue 这里体现出来,如下图:
整体逻辑
图来自 Gityuan 博客
Input 刷新与 Vsync
Input 的刷新取决于触摸屏的采样,目前比较多的屏幕采样率是 120Hz 和 160Hz (不过随着目前屏幕刷新率的提升, Input 的采样率已经到了 180Hz 或者 240Hz) ,对应就是 8ms 采样一次或者 6.25ms 采样一次,我们来看一下其在 Systrace 上的展示
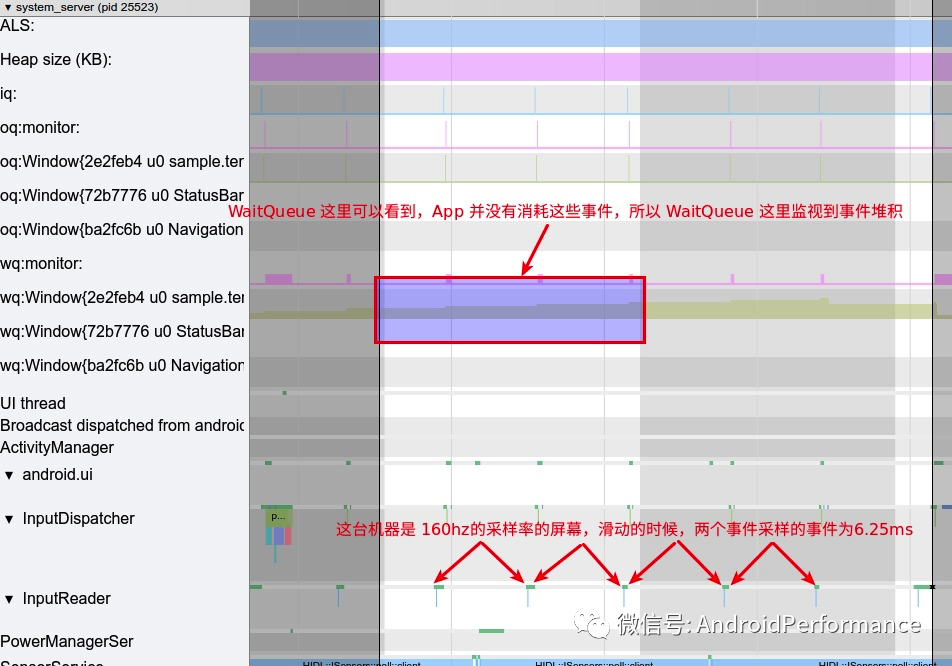
可以看到上图中, InputReader 每隔 6.25ms 就可以读上来一个数据,交给 InputDispatcher 去分发给 App ,那么是不是屏幕采样率越高越好呢?也不一定,比如上面那张图,虽然 InputReader 每隔 6.25ms 就可以读上来一个数据给 InputDispatcher 去分发给 App ,但是从 WaitQueue 的表现来看,应用并没有消耗这个 Input 事件,这是为什么呢?
原因在于应用消耗 Input 事件的时机是 Vsync 信号来了之后,刷新率为 60Hz 的屏幕,一般系统也是 60 fps ,也就是说两个 Vsync 的间隔在 16.6ms ,这期间如果有两个或者三个 Input 事件,那么必然有一个或者两个要被抛弃掉,只拿最新的那个。也就是说:
- 「在屏幕刷新率和系统 FPS 都是 60 的时候,盲目提高触摸屏的采样率,是没有太大的效果的,反而有可能出现上面图中那样,有的 Vsync 周期中有两个 Input 事件,而有的 Vsync 周期中有三个 Input 事件,这样造成事件不均匀,可能会使 UI 产生抖动」
- 「在屏幕刷新率和系统 FPS 都是 60 的时候,使用 120Hz 采样率的触摸屏就可以了」
- 「如果在屏幕刷新率和系统 FPS 都是 90 的时候 ,那么 120Hz 采样率的触摸屏显然不够用了,这时候应该采用 180Hz 采样率的屏幕」
Input 调试信息
Dumpsys Input 主要是 Debug 用,我们也可以来看一下其中的一些关键信息,到时候遇到了问题也可以从这里面找 , 其命令如下:
adb shell dumpsys input
其中的输出比较多,我们终点截取 Device 信息、InputReader、InputDispatcher 三段来看就可以了
Device 信息
主要是目前连接上的 Device 信息,下面摘取的是 touch 相关的
    3: main_touch
      Classes: 0x00000015
      Path: /dev/input/event6
      Enabled: true
      Descriptor: 4055b8a032ccf50ef66dbe2ff99f3b2474e9eab5
      Location: main_touch/input0
      ControllerNumber: 0
      UniqueId:
      Identifier: bus=0x0000, vendor=0xbeef, product=0xdead, version=0x28bb
      KeyLayoutFile: /system/usr/keylayout/main_touch.kl
      KeyCharacterMapFile: /system/usr/keychars/Generic.kcm
      ConfigurationFile:
      HaveKeyboardLayoutOverlay: false
Input Reader 状态
InputReader 这里就是当前 Input 事件的一些展示
  Device 3: main_touch
    Generation: 24
    IsExternal: false
    HasMic:     false
    Sources: 0x00005103
    KeyboardType: 1
    Motion Ranges:
      X: source=0x00005002, min=0.000, max=1079.000, flat=0.000, fuzz=0.000, resolution=0.000
      Y: source=0x00005002, min=0.000, max=2231.000, flat=0.000, fuzz=0.000, resolution=0.000
      PRESSURE: source=0x00005002, min=0.000, max=1.000, flat=0.000, fuzz=0.000, resolution=0.000
      SIZE: source=0x00005002, min=0.000, max=1.000, flat=0.000, fuzz=0.000, resolution=0.000
      TOUCH_MAJOR: source=0x00005002, min=0.000, max=2479.561, flat=0.000, fuzz=0.000, resolution=0.000
      TOUCH_MINOR: source=0x00005002, min=0.000, max=2479.561, flat=0.000, fuzz=0.000, resolution=0.000
      TOOL_MAJOR: source=0x00005002, min=0.000, max=2479.561, flat=0.000, fuzz=0.000, resolution=0.000
      TOOL_MINOR: source=0x00005002, min=0.000, max=2479.561, flat=0.000, fuzz=0.000, resolution=0.000
    Keyboard Input Mapper:
      Parameters:
        HasAssociatedDisplay: false
        OrientationAware: false
        HandlesKeyRepeat: false
      KeyboardType: 1
      Orientation: 0
      KeyDowns: 0 keys currently down
      MetaState: 0x0
      DownTime: 521271703875000
    Touch Input Mapper (mode - direct):
      Parameters:
        GestureMode: multi-touch
        DeviceType: touchScreen
        AssociatedDisplay: hasAssociatedDisplay=true, isExternal=false, displayId=''
        OrientationAware: true
      Raw Touch Axes:
        X: min=0, max=1080, flat=0, fuzz=0, resolution=0
        Y: min=0, max=2232, flat=0, fuzz=0, resolution=0
        Pressure: min=0, max=127, flat=0, fuzz=0, resolution=0
        TouchMajor: min=0, max=512, flat=0, fuzz=0, resolution=0
        TouchMinor: unknown range
        ToolMajor: unknown range
        ToolMinor: unknown range
        Orientation: unknown range
        Distance: unknown range
        TiltX: unknown range
        TiltY: unknown range
        TrackingId: min=0, max=65535, flat=0, fuzz=0, resolution=0
        Slot: min=0, max=20, flat=0, fuzz=0, resolution=0
      Calibration:
        touch.size.calibration: geometric
        touch.pressure.calibration: physical
        touch.orientation.calibration: none
        touch.distance.calibration: none
        touch.coverage.calibration: none
      Affine Transformation:
        X scale: 1.000
        X ymix: 0.000
        X offset: 0.000
        Y xmix: 0.000
        Y scale: 1.000
        Y offset: 0.000
      Viewport: displayId=0, orientation=0, logicalFrame=[0, 0, 1080, 2232], physicalFrame=[0, 0, 1080, 2232], deviceSize=[1080, 2232]
      SurfaceWidth: 1080px
      SurfaceHeight: 2232px
      SurfaceLeft: 0
      SurfaceTop: 0
      PhysicalWidth: 1080px
      PhysicalHeight: 2232px
      PhysicalLeft: 0
      PhysicalTop: 0
      SurfaceOrientation: 0
      Translation and Scaling Factors:
        XTranslate: 0.000
        YTranslate: 0.000
        XScale: 0.999
        YScale: 1.000
        XPrecision: 1.001
        YPrecision: 1.000
        GeometricScale: 0.999
        PressureScale: 0.008
        SizeScale: 0.002
        OrientationScale: 0.000
        DistanceScale: 0.000
        HaveTilt: false
        TiltXCenter: 0.000
        TiltXScale: 0.000
        TiltYCenter: 0.000
        TiltYScale: 0.000
      Last Raw Button State: 0x00000000
      Last Raw Touch: pointerCount=1
        [0]: id=0, x=660, y=1338, pressure=44, touchMajor=44, touchMinor=44, toolMajor=0, toolMinor=0, orientation=0, tiltX=0, tiltY=0, distance=0, toolType=1, isHovering=false
      Last Cooked Button State: 0x00000000
      Last Cooked Touch: pointerCount=1
        [0]: id=0, x=659.389, y=1337.401, pressure=0.346, touchMajor=43.970, touchMinor=43.970, toolMajor=43.970, toolMinor=43.970, orientation=0.000, tilt=0.000, distance=0.000, toolType=1, isHovering=false
      Stylus Fusion:
        ExternalStylusConnected: false
        External Stylus ID: -1
        External Stylus Data Timeout: 9223372036854775807
      External Stylus State:
        When: 9223372036854775807
        Pressure: 0.000000
        Button State: 0x00000000
        Tool Type: 0
InputDispatcher 状态
InputDispatch 这里的重要信息主要包括
- FocusedApplication :当前获取焦点的应用
- FocusedWindow :当前获取焦点的窗口
- TouchStatesByDisplay
- Windows :所有的 Window
- MonitoringChannels :Window 对应的 Channel
- Connections :所有的连接
- AppSwitch: not pending
- Configuration
Input Dispatcher State:
  DispatchEnabled: 1
  DispatchFrozen: 0
  FocusedApplication: name='AppWindowToken{ac6ec28 token=Token{a38a4b ActivityRecord{7230f1a u0 com.meizu.flyme.launcher/.Launcher t13}}}', dispatchingTimeout=5000.000ms
  FocusedWindow: name='Window{3c007ad u0 com.meizu.flyme.launcher/com.meizu.flyme.launcher.Launcher}'
  TouchStatesByDisplay:
    0: down=true, split=true, deviceId=3, source=0x00005002
      Windows:
        0: name='Window{3c007ad u0 com.meizu.flyme.launcher/com.meizu.flyme.launcher.Launcher}', pointerIds=0x80000000, targetFlags=0x105
        1: name='Window{8cb8f7 u0 com.android.systemui.ImageWallpaper}', pointerIds=0x0, targetFlags=0x4102
  Windows:
    2: name='Window{ba2fc6b u0 NavigationBar}', displayId=0, paused=false, hasFocus=false, hasWallpaper=false, visible=true, canReceiveKeys=false, flags=0x21840068, type=0x000007e3, layer=0, frame=[0,2136][1080,2232], scale=1.000000, touchableRegion=[0,2136][1080,2232], inputFeatures=0x00000000, ownerPid=26514, ownerUid=10033, dispatchingTimeout=5000.000ms
    3: name='Window{72b7776 u0 StatusBar}', displayId=0, paused=false, hasFocus=false, hasWallpaper=false, visible=true, canReceiveKeys=false, flags=0x81840048, type=0x000007d0, layer=0, frame=[0,0][1080,84], scale=1.000000, touchableRegion=[0,0][1080,84], inputFeatures=0x00000000, ownerPid=26514, ownerUid=10033, dispatchingTimeout=5000.000ms
    9: name='Window{3c007ad u0 com.meizu.flyme.launcher/com.meizu.flyme.launcher.Launcher}', displayId=0, paused=false, hasFocus=true, hasWallpaper=true, visible=true, canReceiveKeys=true, flags=0x81910120, type=0x00000001, layer=0, frame=[0,0][1080,2232], scale=1.000000, touchableRegion=[0,0][1080,2232], inputFeatures=0x00000000, ownerPid=27619, ownerUid=10021, dispatchingTimeout=5000.000ms
  MonitoringChannels:
    0: 'WindowManager (server)'
  RecentQueue: length=10
    MotionEvent(deviceId=3, source=0x00005002, action=MOVE, actionButton=0x00000000, flags=0x00000000, metaState=0x00000000, buttonState=0x00000000, edgeFlags=0x00000000, xPrecision=1.0, yPrecision=1.0, displayId=0, pointers=[0: (524.5, 1306.4)]), policyFlags=0x62000000, age=61.2ms
    MotionEvent(deviceId=3, source=0x00005002, action=MOVE, actionButton=0x00000000, flags=0x00000000, metaState=0x00000000, buttonState=0x00000000, edgeFlags=0x00000000, xPrecision=1.0, yPrecision=1.0, displayId=0, pointers=[0: (543.5, 1309.4)]), policyFlags=0x62000000, age=54.7ms
  PendingEvent: <none>
  InboundQueue: <empty>
  ReplacedKeys: <empty>
  Connections:
    0: channelName='WindowManager (server)', windowName='monitor', status=NORMAL, monitor=true, inputPublisherBlocked=false
      OutboundQueue: <empty>
      WaitQueue: <empty>
    5: channelName='72b7776 StatusBar (server)', windowName='Window{72b7776 u0 StatusBar}', status=NORMAL, monitor=false, inputPublisherBlocked=false
      OutboundQueue: <empty>
      WaitQueue: <empty>
    6: channelName='ba2fc6b NavigationBar (server)', windowName='Window{ba2fc6b u0 NavigationBar}', status=NORMAL, monitor=false, inputPublisherBlocked=false
      OutboundQueue: <empty>
      WaitQueue: <empty>
    12: channelName='3c007ad com.meizu.flyme.launcher/com.meizu.flyme.launcher.Launcher (server)', windowName='Window{3c007ad u0 com.meizu.flyme.launcher/com.meizu.flyme.launcher.Launcher}', status=NORMAL, monitor=false, inputPublisherBlocked=false
      OutboundQueue: <empty>
      WaitQueue: length=3
        MotionEvent(deviceId=3, source=0x00005002, action=MOVE, actionButton=0x00000000, flags=0x00000000, metaState=0x00000000, buttonState=0x00000000, edgeFlags=0x00000000, xPrecision=1.0, yPrecision=1.0, displayId=0, pointers=[0: (634.4, 1329.4)]), policyFlags=0x62000000, targetFlags=0x00000105, resolvedAction=2, age=17.4ms, wait=16.8ms
        MotionEvent(deviceId=3, source=0x00005002, action=MOVE, actionButton=0x00000000, flags=0x00000000, metaState=0x00000000, buttonState=0x00000000, edgeFlags=0x00000000, xPrecision=1.0, yPrecision=1.0, displayId=0, pointers=[0: (647.4, 1333.4)]), policyFlags=0x62000000, targetFlags=0x00000105, resolvedAction=2, age=11.1ms, wait=10.4ms
        MotionEvent(deviceId=3, source=0x00005002, action=MOVE, actionButton=0x00000000, flags=0x00000000, metaState=0x00000000, buttonState=0x00000000, edgeFlags=0x00000000, xPrecision=1.0, yPrecision=1.0, displayId=0, pointers=[0: (659.4, 1337.4)]), policyFlags=0x62000000, targetFlags=0x00000105, resolvedAction=2, age=5.2ms, wait=4.6ms
  AppSwitch: not pending
  Configuration:
    KeyRepeatDelay: 50.0ms
    KeyRepeatTimeout: 500.0ms
参考
本文部分图文参考和拷贝自下面几篇文章,同时下面几篇文章讲解了 Input 流程的细节部分,推荐大家在看完这篇文章后,如果对代码细节感兴趣,可以仔细研读下面这几篇非常棒的文章。
- http://gityuan.com/2016/12/11/input-reader/
- http://gityuan.com/2016/12/10/input-manager/
- http://gityuan.com/2016/12/17/input-dispatcher/
- https://zhuanlan.zhihu.com/p/29386642
附件
本文涉及到的附件也上传了,各位下载后解压,使用 「Chrome」 浏览器打开即可点此链接下载文章所涉及到的 Systrace 附件