我用 JS 和 CSS 实现了 Win10 网格悬停效果
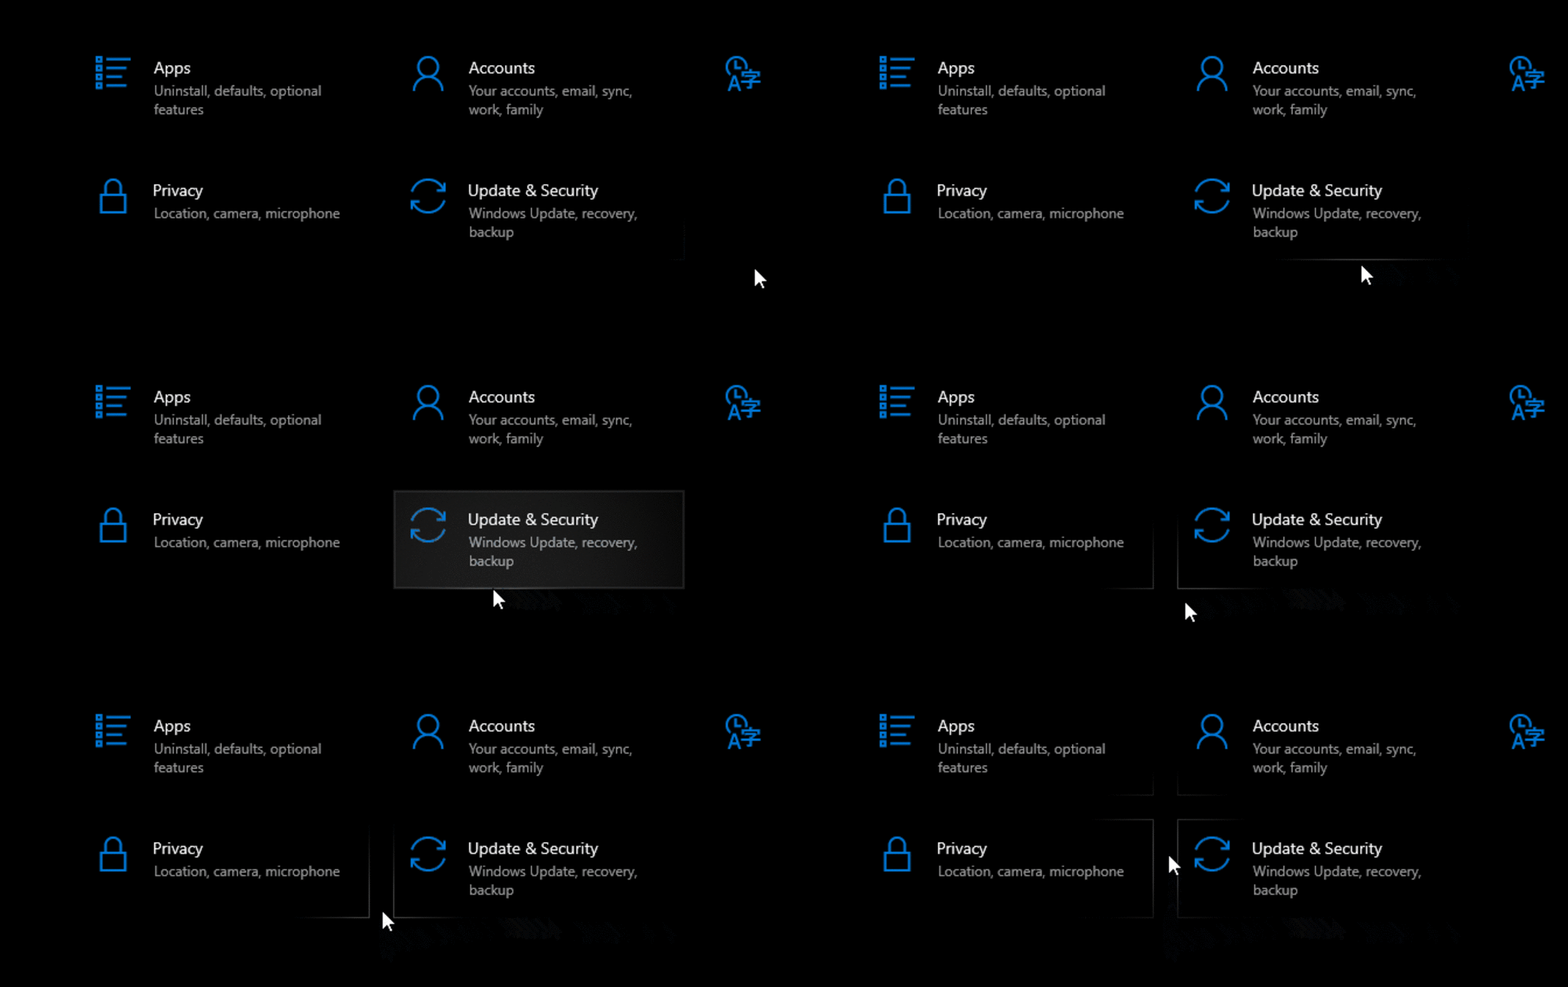
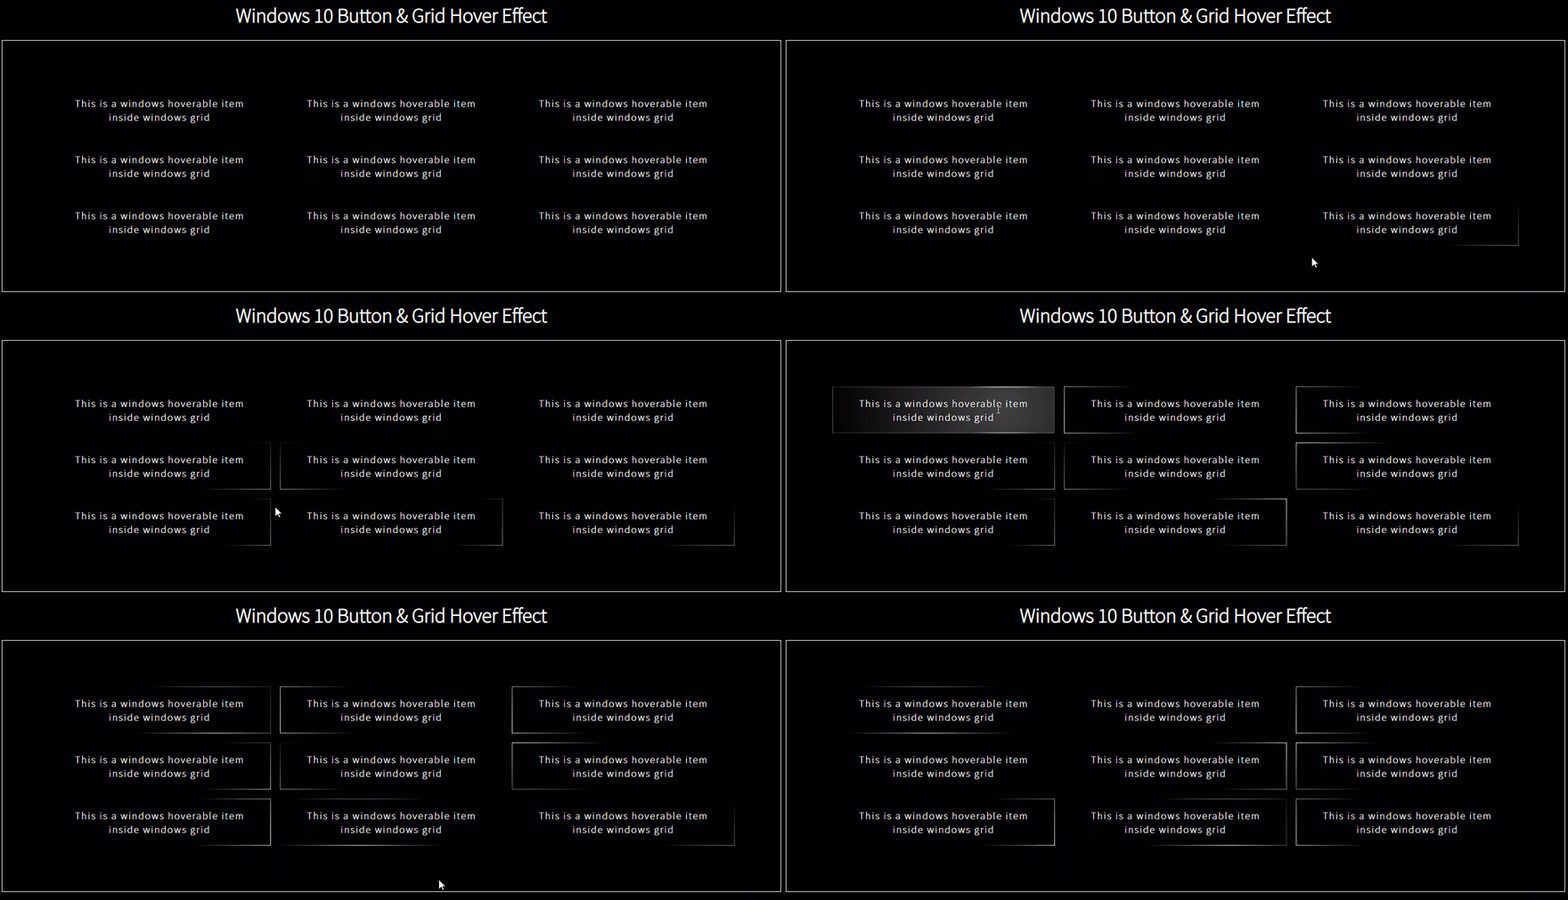
首先让我们看一下最终的网格悬停效果。
观察结果:
- 光标移到某个网格项附近。
- 一旦达到网格项的最小距离,边界就会突出显示。
- 网格项边框上的高亮光强度取决于光标的位置。
因此,很明显,这次的关键在于鼠标事件,尤其是mousemove事件。
源码下载
代码我也整理了,这次的Win10 网格悬停效果源码也供大家下载。
代码仅供参考和学习,请不要用于商业用途。
开始制作
我将通过派生我之前已完成的代码实现来启动基础设置,然后将鼠标事件添加到win-grid元素。以下是初始代码。
HTML
<html>

<head>
  <title>Windows 10 grid hover effect</title>
</head>

<body>
  <h1>Windows 10 Button & Grid Hover Effect</h1>
  <div class="win-grid">
    <div class="win-btn" id="1">This is a windows hoverable item inside windows grid</div>
    <div class="win-btn" id="2">This is a windows hoverable item inside windows grid</div>
    <div class="win-btn" id="3">This is a windows hoverable item inside windows grid</div>
    <div class="win-btn" id="4">This is a windows hoverable item inside windows grid</div>
    <div class="win-btn" id="5">This is a windows hoverable item inside windows grid</div>
    <div class="win-btn" id="6">This is a windows hoverable item inside windows grid</div>
    <div class="win-btn" id="7">This is a windows hoverable item inside windows grid</div>
    <div class="win-btn" id="8">This is a windows hoverable item inside windows grid</div>
    <div class="win-btn" id="9">This is a windows hoverable item inside windows grid</div>
  </div>

</body>

</html>
CSS
@import url("https://fonts.googleapis.com/css2?family=Noto+Sans+JP:wght@100&display=swap");

* {
  box-sizing: border-box;
  color: white;
  font-family: "Noto Sans JP", sans-serif;
}
body {
  background-color: black;
  display: flex;
  flex-flow: column wrap;
  justofy-content: center;
  align-items: center;
}

.win-grid {
  border: 1px solid white;
  letter-spacing: 2px;
  display: grid;
  grid-template-columns: repeat(3, 1fr);
  align-items: stretch;
  text-align: center;
  grid-gap: 1rem;
  padding: 5rem;
}

.win-btn {
  padding: 1rem 2rem;
  text-align: center;
  border: none;
  border-radius: 0px;
  border: 1px solid transparent;
}

button:focus {
  outline: none;
}
JS
document.querySelectorAll(".win-btn").forEach((b) => {

  b.onmouseleave = (e) => {
    e.target.style.background = "black";
    e.target.style.borderImage = null;
  };

  b.addEventListener("mousemove", (e) => {
    const rect = e.target.getBoundingClientRect();
    const x = e.clientX - rect.left; //x position within the element.
    const y = e.clientY - rect.top; //y position within the element.
    e.target.style.background = `radial-gradient(circle at ${x}px ${y}px , rgba(255,255,255,0.2),rgba(255,255,255,0) )`;
    e.target.style.borderImage = `radial-gradient(20% 75% at ${x}px ${y}px ,rgba(255,255,255,0.7),rgba(255,255,255,0.1) ) 1 / 1px / 0px stretch `;
  });
});


const body = document.querySelector(".win-grid");
body.addEventListener("mousemove", (e) => {
   //effect logic here
});
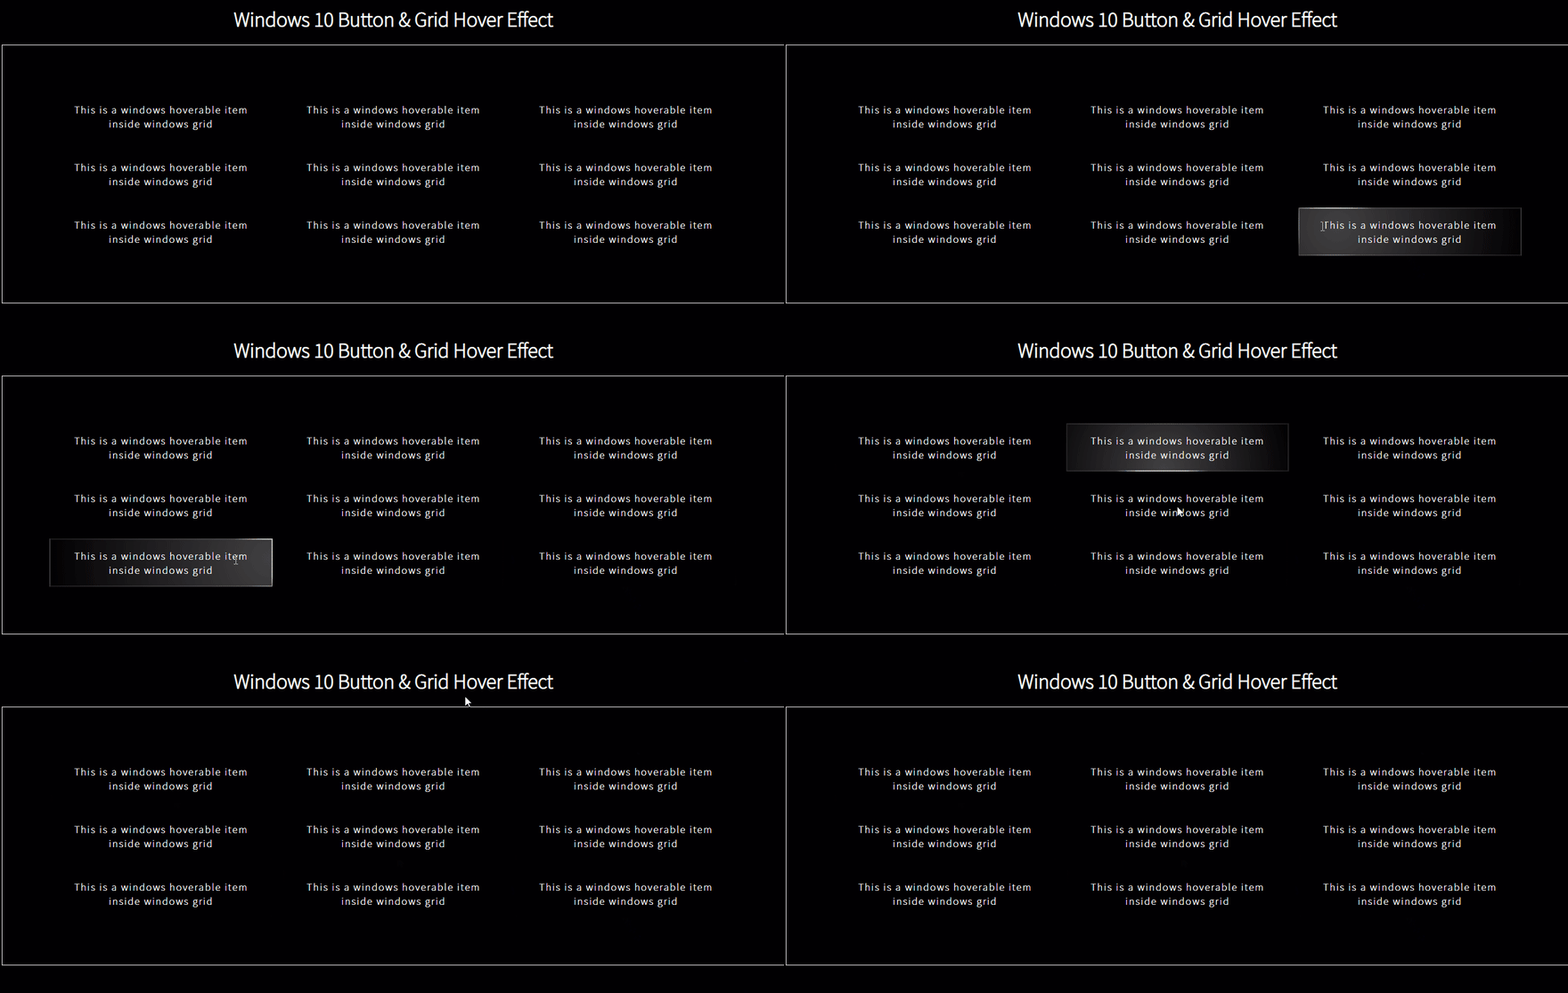
此时我们的代码输出的效果是这样子的:
对上面的代码做一个简要说明:
- HTML代码非常简单,一个容器div是网格,其内部是网格项。
- CSS中,我使用CSS网格对每一个网格项进行布局,以使设计支持响应式布局。网格布局有3个项,网格有
win-grid类,网格项属于win-btn类。 - JS是按钮悬停效果代码。
有意思的地方来了!
难点
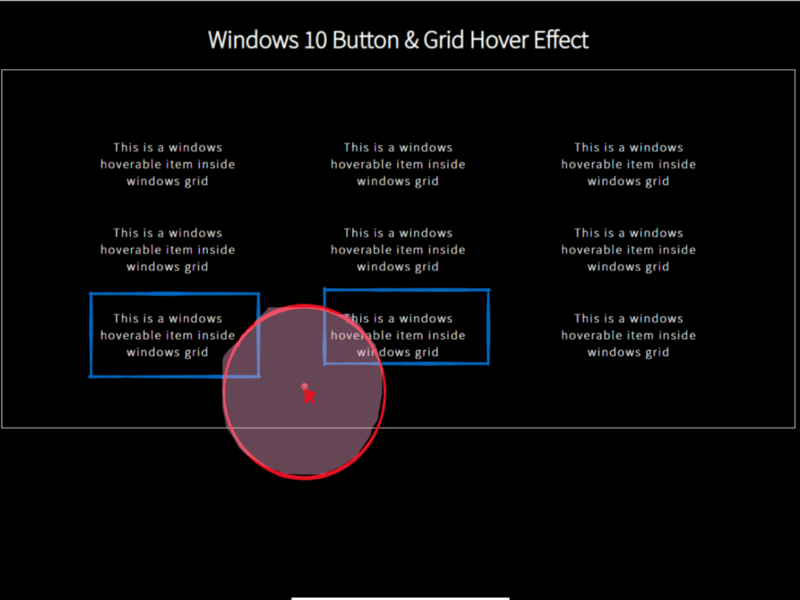
当光标进入网格区域内时,我们需要围绕光标的元素达到一个特定的距离。我在我的代码中将此半径或距离值称为offset。坏消息是JS中没有方法可以在某个区域中查找元素,但是好消息是存在一个方法可以找到给定坐标的元素!
该方法就是document.elementFromPoint(x,y)。
它返回位于坐标下作为参数传递的最顶层元素。因此,如果坐标有效,则该方法将返回body或body内部的一些其他元素。
这时你可能要问了,那么我们如何精确地使用这个方法来查找周围附近的元素,以及我们要传递什么坐标呢?
要回答这个问题,请看下面。
查找光标附近的元素
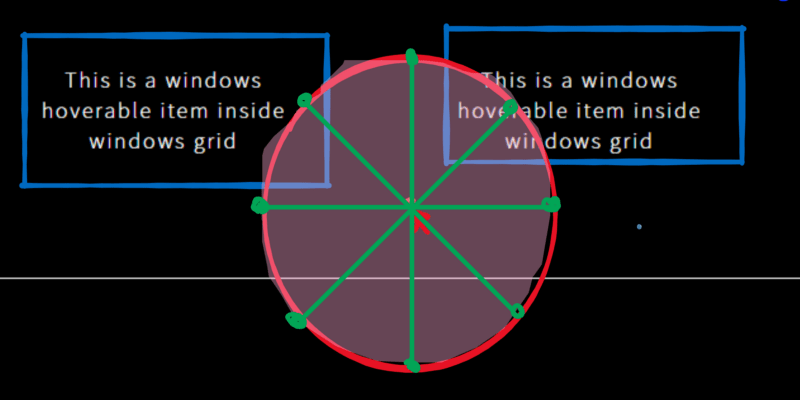
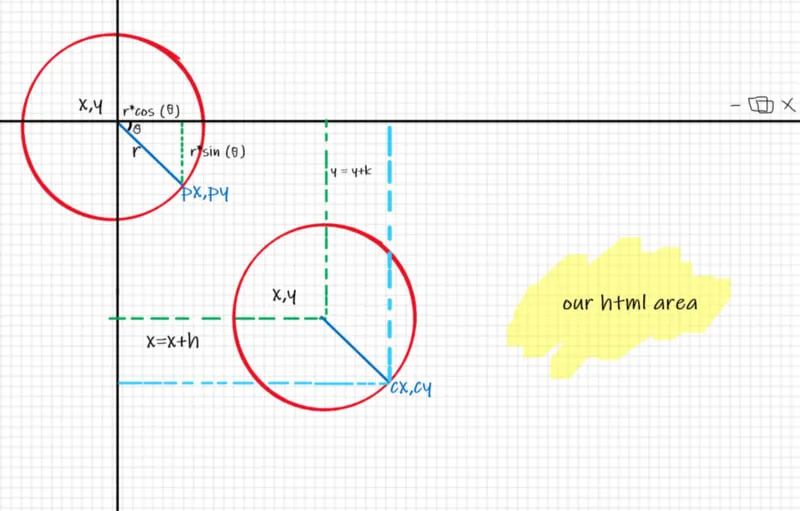
从上图中,你或许已经猜到我们将检查圆形区域圆周上的点。对的,没错!
这里我们有两种方法:
- 要么检查圆周上的所有点
- 要么跳过一些点
显然,选项2会简单一点。但是哪些点是要检查的,哪些点是要跳过的呢?
由于网格内靠近光标的元素的最大数量为4,因此我们可以在光标周围的8个方向上进行检查,就像在现实生活中一样!
如何计算附近的点
由于这些点位于圆的圆周上,因此我们可以使用简单的矢量数学来查找它们。
假设p(x,y)是圆周上的一个点,半径为r,与X轴成特定角度的坐标计算如下:
px = r*cos(angle)
py = r*sin(angle)
注意:角度以弧度为单位(
degrees * PI / 180)你也可以通过简单的逻辑:
(x-offset,y)表示左侧,(x + offset,y)表示右侧,以此类推来直接计算这些点。但这将导致太多的硬编码。一开始。我用的也是这种方法,但后来意识到,如果我要增加或减少光标位置周围的点的数量,则必须声明或注释掉代码行,这样一来编写代码就非常低效了。
由于光标将不在原点上,因此我们需要加上从原点到坐标px和py的x和y距离(请参见上图)。现在,圆周上的点的新坐标变为cx,cy。
因此公式改为:
cx = x + r*cos(angle)
cy = y + r*sin(angle)

//其中x,y表示光标在屏幕上的当前位置
注:屏幕的原点是左上角,左边缘是
Y轴正方向,上边缘是X轴正方向。
给元素选择和指定合适的样式
现在,我们知道了如何找到这8个点,就可以在这些点上找元素了。检查元素是否不为null,然后检查其类是否为win-btn,并且,还需要检查元素是否已存在于nearBy数组中。如果元素在nearBy数组中不存在,则只能带着元素继续进行;然后最终给元素应用border-image。
为什么我们不先保存元素,然后再遍历数组...老实说,这样既艰苦单调又无趣。
之所以需要检查nearBy数组,是因为每次移动光标时
mouseover事件都会触发,并且每次事件触发时逻辑也会被触发。因此,我们需要确保不会一次又一次地保存相同的元素。
废话不多说,还是上代码。
//generate the angle values in radians
const angles = [];
for (let i = 0; i <= 360; i += 45) {
  angles.push((i * Math.PI) / 180);
}

//for each angle, find and save elements at that point
let nearBy = [];
nearBy = angles.reduce((acc, rad, i, arr) => {
    //find the coordinate for current angle
    const cx = Math.floor(x + Math.cos(rad) * offset);
    const cy = Math.floor(y + Math.sin(rad) * offset);
    const element = document.elementFromPoint(cx, cy);

    if (element !== null) {
      ;
      if (
        element.className === "win-btn" &&
        acc.findIndex((ae) => ae.id === element.id) < 0
      ) {
        const brect = element.getBoundingClientRect();
        const bx = x - brect.left; //x position within the element.
        const by = y - brect.top; //y position within the element.
        if (!element.style.borderImage)
          element.style.borderImage = `radial-gradient(${offset * 2}px ${
            offset * 2
          }px at ${bx}px ${by}px ,rgba(255,255,255,0.7),rgba(255,255,255,0.1),transparent ) 9 / 1px / 0px stretch `;
        return [...acc, element];
      }
    }
    return acc;
}, []);- 这是什么代码?
- 为什么使用
reduce(),为什么不使用map()和forEach()? - 这里的
reduce()方法有什么用?
对于angles数组中的每个角度,
- 从坐标中找到元素。
- 将样式应用于元素(如果元素有效)
- 将应用样式的元素保存到nearBy数组中
因此,在处理angles数组的每个角度之后,我们需要一个单独的结果,即包含所有附近元素的数组,然后将其存储在nearBy数组中。
在这样的情况下——希望在对数组的每个项执行某些操作后只得到单个输出,我们使用reduce()方法。
Reduce方法
方法需要2个参数:
- 对数组中的每个项执行的函数,并通过对先前结果执行某些操作来返回更新的结果。
- 和上述函数返回的最新结果的变量相同的值(通常称为累加器)。
第一个参数,也就是函数。
函数也有几个参数:
- 累加器(将是当前项的结果)
- 数组的当前项
- 项的索引(可选参数)
- 我们要遍历的数组本身(可选参数)
所以,在reduce里面发生的情况是:
从angle数组的第一项开始。累加器具有代码中设置的初始值(在本例中,是一个空数组)。当前索引为0且在函数内,根据当前角度找到元素并将CSS应用于该元素(如果适用),最后我们要做的是返回一个带有累加器现有项的新数组(此时它是不存在的,因为累加器为空),将新元素设为e1,即[...acc, element]。
因此,更新的累加器为[e1]。
- 现在,对于数组中的第二项,重复此过程,因此累加器变为
[e1,e2]。 - 继续上述过程直到到达数组末尾为止。假设得到一个元素
e3,它本身有win-grid类,我们不想将其添加到accumulator,因此我们只是按原样返回accumulator。所以,累加器仅保留[e1,e2]。
我们为什么不使用map()或forEach()?
有两个原因:
- 如果
map函数中没有返回任何内容,它将在结果数组中保存一个undefined的值,要删除那些不需要的,我们必须使用filter()方法,并且我们不想为此重复数组。 forEach方法不返回任何值,它将为每个项运行函数,并且我们将不得不手动将每个项推送到nearby数组中,这并不是不正确的,但是对于这方面用例存在reduce()方法,所以此处更适合使用reduce()。
讲得有点太多了!!!
还是看代码和效果吧。
const offset = 69;
const angles = []; //in deg
for (let i = 0; i <= 360; i += 45) {
  angles.push((i * Math.PI) / 180);
}
let nearBy = [];

/*Effect #1 - https://codepen.io/struct_dhancha/pen/QWdqMLZ*/
document.querySelectorAll(".win-btn").forEach((b) => {

  b.onmouseleave = (e) => {
    e.target.style.background = "black";
    e.target.style.borderImage = null;
    e.target.border = "1px solid transparent";
  };

  b.addEventListener("mousemove", (e) => {
    e.stopPropagation();
    e.target.border = "1px solid transparent";
    const rect = e.target.getBoundingClientRect();
    const x = e.clientX - rect.left; //x position within the element.
    const y = e.clientY - rect.top; //y position within the element.
    e.target.style.background = `radial-gradient(circle at ${x}px ${y}px , rgba(255,255,255,0.25),rgba(255,255,255,0) )`;
    e.target.style.borderImage = `radial-gradient(20% 65% at ${x}px ${y}px ,rgba(255,255,255,0.7),rgba(255,255,255,0.7),rgba(255,255,255,0.1) ) 9 / 2px / 0px stretch `;
  });
});

const body = document.querySelector(".win-grid");

body.addEventListener("mousemove", (e) => {
  const x = e.x; //x position within the element.
  const y = e.y; //y position within the element.

  nearBy = angles.reduce((acc, rad, i, arr) => {
    const cx = Math.floor(x + Math.cos(rad) * offset);
    const cy = Math.floor(y + Math.sin(rad) * offset);
    const element = document.elementFromPoint(cx, cy);

    if (element !== null) {

      if (
        element.className === "win-btn" &&
        acc.findIndex((ae) => ae.id === element.id) < 0
      ) {
        const brect = element.getBoundingClientRect();
        const bx = x - brect.left; //x position within the element.
        const by = y - brect.top; //y position within the element.
        if (!element.style.borderImage)
          element.style.borderImage = `radial-gradient(${offset * 2}px ${
            offset * 2
          }px at ${bx}px ${by}px ,rgba(255,255,255,0.7),rgba(255,255,255,0.1),transparent ) 9 / 1px / 0px stretch `;
        return [...acc, element];
      }
    }
    return acc;
  }, []);
});
下面是效果输出:
如你所见,我们成功地检测到并高亮了附近的元素。
但是,当鼠标移动时,我们一定不要忘记清除先前应用的效果。这样,每次鼠标移动时,在前一个位置高亮的元素都会变回其原始的透明边框状态,然后再次重新计算所有附近的元素,并将效果应用于有效元素!再说一次,不要忘记清除先前保存的nearBy元素,否则光标已经移至新位置,但当前的nearBy和先前的nearBy这两个元素都高亮了,那就滑稽了。
因此,要做2件事,移除所有nearBy元素和元素上的border-image属性。在计算新的nearBy元素之前执行此操作。
//inside the event listener

nearBy.splice(0, nearBy.length).forEach((e) => (e.style.borderImage = null));

//reduce method belowSplice()方法获取起始索引以及要从该起始索引中删除的项目数(包括起始索引),并修改原始数组。因此,在执行Splice()操作之后,nearBy数组为空。Splice()方法返回包含所有已删除项的数组。因此,我们遍历该数组并删除所有那些元素的border-image属性!
快完成了哦...
处理边界案例
还有一些小的边界案例要处理:
- 当我们进入按钮时,我们想要清除所有应用于该按钮的网格效果
- 当光标离开
win-grid时清除所有效果
对于案例1
清除win-btn的mouseenter事件中的nearBy数组!
对于案例2
清除win-grid的mouseleave事件中的nearBy数组!
由于清理nearby已执行了多次,因此我将这部分代码移至clearNearBy()方法,并在要进行清理的地方调用该代码。
最后,请看所有的代码。
const offset = 69;
const angles = []; //in deg
for (let i = 0; i <= 360; i += 45) {
  angles.push((i * Math.PI) / 180);
}
let nearBy = [];

function clearNearBy() {
  nearBy.splice(0, nearBy.length).forEach((e) => (e.style.borderImage = null));
}

/*Effect #1 - https://codepen.io/struct_dhancha/pen/QWdqMLZ*/
document.querySelectorAll(".win-btn").forEach((b) => {

  b.onmouseleave = (e) => {
    e.target.style.background = "black";
    e.target.style.borderImage = null;
    e.target.border = "1px solid transparent";
  };

  b.onmouseenter = (e) => {
    clearNearBy();
  };

  b.addEventListener("mousemove", (e) => {
    e.target.border = "1px solid transparent";
    const rect = e.target.getBoundingClientRect();
    const x = e.clientX - rect.left; //x position within the element.
    const y = e.clientY - rect.top; //y position within the element.
    e.target.style.background = `radial-gradient(circle at ${x}px ${y}px , rgba(255,255,255,0.25),rgba(255,255,255,0) )`;
    e.target.style.borderImage = `radial-gradient(20% 65% at ${x}px ${y}px ,rgba(255,255,255,0.7),rgba(255,255,255,0.7),rgba(255,255,255,0.1) ) 9 / 2px / 0px stretch `;
  });
});

const body = document.querySelector(".win-grid");

body.addEventListener("mousemove", (e) => {

  const x = e.x; //x position within the element.
  const y = e.y; //y position within the element.

  clearNearBy();
  nearBy = angles.reduce((acc, rad, i, arr) => {
    const cx = Math.floor(x + Math.cos(rad) * offset);
    const cy = Math.floor(y + Math.sin(rad) * offset);
    const element = document.elementFromPoint(cx, cy);

    if (element !== null) {

      if (
        element.className === "win-btn" &&
        acc.findIndex((ae) => ae.id === element.id) < 0
      ) {
        const brect = element.getBoundingClientRect();
        const bx = x - brect.left; //x position within the element.
        const by = y - brect.top; //y position within the element.
        if (!element.style.borderImage)
          element.style.borderImage = `radial-gradient(${offset * 2}px ${
            offset * 2
          }px at ${bx}px ${by}px ,rgba(255,255,255,0.7),rgba(255,255,255,0.1),transparent ) 9 / 1px / 0px stretch `;
        return [...acc, element];
      }
    }
    return acc;
  }, []);
});

body.onmouseleave = (e) => {
  clearNearBy();
};
感谢阅读!如果你觉得文章写的对你有帮助的话,也欢迎分享给你的朋友!
