Airflow 2.1.0入门指南
介绍
Airflow是一个以编程方式来创建、调度和监控工作流的平台。Airflow用有向无环图(DAGs:Directed Acyclic Graphs)来表示工作流。一个DAG可以包含多个任务(task),且这些任务之间可以定义依赖关系。
DAGs是可编程的,也即意味着可以用Python来编写。Airflow调度器(scheduler)使用一组worker来执行任务。
另外,Airflow提供了丰富的命令行工具以及Web界面使得执行DAG、监控以及问题追踪变得非常容易。而且由于DAG是以编程方式实现的,那么它会有更好的可维护性、可测试性以及可追溯的版本变更历史。
安装
本文基于MacOS Catalina(10.15.7)操作系统来安装Airflow 2.1.0,在安装前需要确保计算机上已装有以下软件:
1.Python 3.6+
2.Pip
3.MySQL 8.0
在Airflow 2.1.0中,MySQL 5.x不支持Airflow运行多调度器,因此不推荐使用该版本。另外,MariaDB也是未经测试的,也不推荐使用。
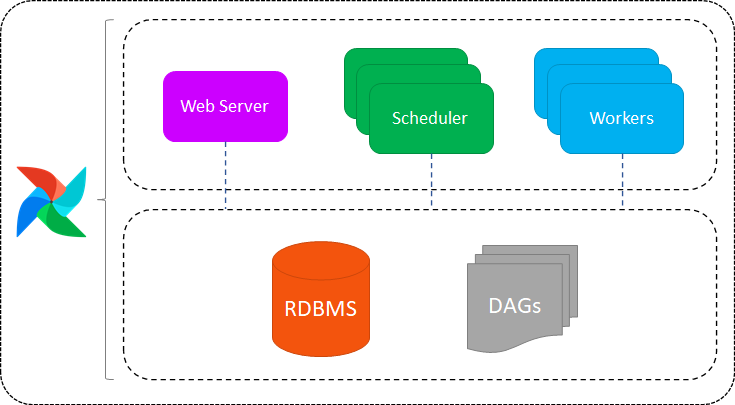
以下是在单机上安装Airflow,其各个组件之间关系的整体架构图:
了解这张图可以让你对Airflow的整体有个大概的印象。
安装步骤:
1、假设你已经装好了MySQL,找到配置文件my.cnf[1],在[mysqld]下面加入以下参数:
explicit_defaults_for_timestamp=1
2、在MySQL中创建airflow的数据库,并创建一个用户:
CREATE DATABASE airflow_db CHARACTER SET utf8mb4 COLLATE utf8mb4_unicode_ci;
CREATE USER 'airflow_user' IDENTIFIED BY 'airflow_pass';
GRANT ALL PRIVILEGES ON airflow_db.* TO 'airflow_user';
3、创建一个名为airflow的目录,并在该目录下使用venv创建虚拟环境:
# Run this from newly created directory to create the venv
python3 -m venv venv
# Activate your venv
source venv/bin/activate
4、安装Airflow(包含MySQL依赖):
pip install 'apache-airflow[mysql]'
还可以使用约束文件的方式进行安装,约束文件是一个文本文件,里面包含Airflow的某一版本与其所有依赖库及库版本的关系。在venv中执行:
`AIRFLOW_VERSION=2.1.0
# For example: 3.6
PYTHON_VERSION="$(python --version | cut -d " " -f 2 | cut -d "." -f 1-2)"
# For example: https://raw.githubusercontent.com/apache/airflow/constraints-2.1.0/constraints-3.6.txt
CONSTRAINT_URL="https://raw.githubusercontent.com/apache/airflow/constraints-${AIRFLOW_VERSION}/constraints-${PYTHON_VERSION}.txt"
pip install "apache-airflow==${AIRFLOW_VERSION}" --constraint "${CONSTRAINT_URL}"`
5、初始化数据库:
airflow db init
此时初始化的是Airflow内置的SQLite数据库,执行这一步的目的是为了在目录下生成airflow.cfg配置文件,以便后续步骤要用到。
如果执行过程中报以下错误:
ImportError: dlopen(/Users/yuhao/Downloads/othercode/opensource/airflow/venv/lib/python3.6/site-packages/MySQLdb/_mysql.cpython-36m-darwin.so, 2): Library not loaded: @rpath/libmysqlclient.21.dylib
  Referenced from: /Users/yuhao/Downloads/othercode/opensource/airflow/venv/lib/python3.6/site-packages/MySQLdb/_mysql.cpython-36m-darwin.so
  Reason: image not found
需要执行以下命令[2]:
sudo ln -s /usr/local/mysql/lib/libmysqlclient.21.dylib /usr/local/lib/libmysqlclient.21.dylib
6、修改airflow.cfg的配置:
sql_alchemy_conn = mysql+mysqldb://airflow_user:airflow_pass@localhost:3306/airflow_db
sql_engine_collation_for_ids = utf8mb3_general_ci
然后再次执行:
airflow db init
7、创建airflow Web平台的初始用户:
airflow users create \
    --username admin \
    --firstname Peter \
    --lastname Parker \
    --role Admin \
    --email spiderman@superhero.org
并在提示后初始化admin用户的密码
8、启动webserver和调度器,在两个命令行分别执行:
airflow webserver --port 8080airflow scheduler
在浏览器中输入http://127.0.0.1:8080/即可打开Web界面了。
使用
我们以Python来编写一个DAG,并在Web中执行。
1、在你的airflow目录下新建一个名为dags的目录,用于存放稍后编写的DAG文件。另外,Web页面也是从这个目录下加载DAGs。
该目录由airflow.cfg中的dags_folder配置项来指定。
2、创建一个名为simple_bash_dag的Python文件,并键入以下代码:
# Python standard modules
from datetime import datetime, timedelta
# Airflow modules
from airflow import DAG
from airflow.operators.bash_operator import BashOperator
default_args = {
    'owner': 'airflow',
    'depends_on_past': False,
    # Start on 2th of June, 2021
    'start_date': datetime(2021, 6, 2),
    'email': ['airflow@example.com'],
    'email_on_failure': False,
    'email_on_retry': False,
    # In case of errors, do one retry
    'retries': 1,
    # Do the retry with 30 seconds delay after the error
    'retry_delay': timedelta(seconds=30),
    # Run once every 1 minute
    'schedule_interval': '0 /1 * ? * *'
}
with DAG(dag_id='simple_bash_dag',
         default_args=default_args,
         schedule_interval=None,
         tags=['my_dags'],
         ) as dag:
    # Here we define our first task
    t1 = BashOperator(bash_command="touch ~/my_bash_file.txt", task_id="create_file")
    # Here we define our second task
    t2 = BashOperator(bash_command="mv ~/my_bash_file.txt ~/my_bash_file_changed.txt", task_id="change_file_name")
    # Configure T2 to be dependent on T1's execution
    t1 >> t2
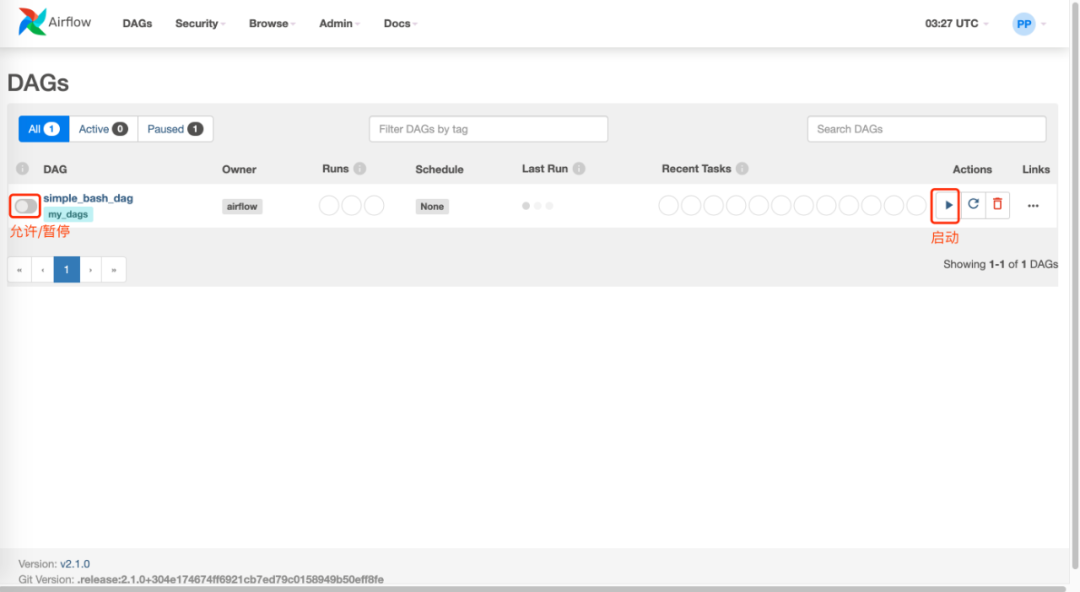
这样,在Web界面中就能看到你创建的这个DAG了:
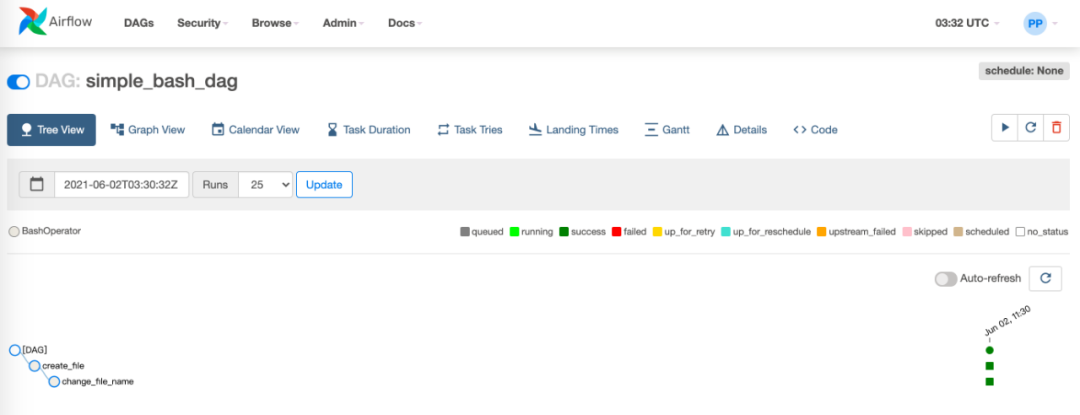
当启动该DAG后,可以看到执行状态、执行次数以及各种信息的视图:
如果在Web主界面中你看到不止你创建的DAG,是因为加载了许多内置的样例DAGs,可以在airflow.cfg中将load_examples配置项设为False。
参考资料:
•Apache Airflow Tutorial, Part 1: Data Pipeline Orchestration on Steroids(https://medium.com/abn-amro-developer/data-pipeline-orchestration-on-steroids-apache-airflow-tutorial-part-1-87361905db6d)
•Apache Airflow Tutorial, Part 2: Complete Guide for a Basic Production Installation Using LocalExecutor(https://medium.com/abn-amro-developer/apache-airflow-tutorial-part-2-complete-guide-for-a-basic-production-installation-using-e0e6a7541d2a)
•Set up a Database Backend(https://airflow.apache.org/docs/apache-airflow/stable/howto/set-up-database.html)
•Running Airflow locally(https://airflow.apache.org/docs/apache-airflow/stable/start/local.html)
引用链接
[1] my.cnf: https://blog.csdn.net/fdipzone/article/details/52705507
[2] 以下命令: https://stackoverflow.com/questions/53590645/library-not-loaded-rpath-libmysqlclient-21-dylib-reason-image-not-found-djang


