零基础理解 ESLint 核心原理
概述
本文将介绍 ESLint 的工作原理,内容涉及 ESLint 如何读取配置、加载配置,检验,修复的全流程。
为什么需要 ESLint
ESLint 相信大家都不陌生,如今前端工作越来越复杂,一个项目往往是多人参与开发,虽然说每个人的代码风格都不一样,但是如果我们完全不做任何约束,允许开发人员任意发挥,随着项目规模慢慢变大,很快项目代码将会成为不堪入目的山,因此对于代码的一些基本写法还是需要有个约定,并且当代码中出现与约定相悖的写法时需要给出提醒,对于一些简单的约定最好还能帮我们自动修复,而这正是 ESLint 要干的事情,下面引用一下 ESLint 官网的介绍。
- 「Find Problems」:ESLint statically analyzes your code to quickly find problems. ESLint is built into most text editors and you can run ESLint as part of your continuous integration pipeline.
- 「Fix Automatically」:Many problems ESLint finds can be automatically fixed. ESLint fixes are syntax-aware so you won't experience errors introduced by traditional find-and-replace algorithms.
- 「Customize」:Preprocess code, use custom parsers, and write your own rules that work alongside ESLint's built-in rules. You can customize ESLint to work exactly the way you need it for your project.
也就是三部分:「找出代码问题」,「自动修复」,「自定义规则」。ESLint 经过许多年的发展已经非常成熟,加上社区诸多开发者的不断贡献,目前社区也已经积累了许多优秀的代码写法约定,为了项目代码的健康,也为了开发人员的身心健康,尽早地引入合适的 ESLint 规则是非常有必要的。
ESLint 是如何工作的
知其然更应知其所以然,ESLint 是如何做到“读懂”你的代码甚至给你修复代码的呢,没错,还是 AST(抽象语法树),大学编译原理课程里我们也学习过它,另外了解 Babel 或者 Webpack 的同学更应该对 AST 很熟悉了。其中 ESLint 是使用 espree 来生成 AST 的。
概括来说就是,ESLint 会遍历前面说到的 AST,然后在遍历到「不同的节点」或者「特定的时机」的时候,触发相应的处理函数,然后在函数中,可以抛出错误,给出提示。
读取配置
ESLint 首先会从各种配置文件里读取配置,例如 eslintrc 或者 package.json 中的 eslintConfig 字段中,也可以在使用命令行执行 eslint 时指定任意一个配置文件。配置文件里的具体可配置项我们下面再详细介绍,这里我们需要注意,
- ESLint 会先读取「给定目录下最近的」一个配置文件。
- 如果相同目录下存在多个配置文件,那这层目录里只有一个配置文件会被读取,其中 .eslintrc 的优先级会高于 package.json 配置。
- 默认会再继续向外层文件夹「逐层读取」配置文件,最终配置合并成一个。
- 其中如果多个配置文件里都配置了重复的字段的话,那离给定目录「最近的配置会生效,」 我们也可以在配置文件中添加
root: true来阻止 ESLint 逐层读取配置。
以下是读取配置的核心代码:
// Load the config on this directory.
        try {
            configArray = configArrayFactory.loadInDirectory(directoryPath);
        } catch (error) {
            throw error;
        }

        // 这里如果添加了 root 字段将会中断向外层遍历的操作
        if (configArray.length > 0 && configArray.isRoot()) {
            configArray.unshift(...baseConfigArray);
            return this._cacheConfig(directoryPath, configArray);
        }

        // Load from the ancestors and merge it.
        const parentPath = path.dirname(directoryPath);
        const parentConfigArray = parentPath && parentPath !== directoryPath
            ? this._loadConfigInAncestors()
            : baseConfigArray;

        if (configArray.length > 0) {
            configArray.unshift(...parentConfigArray);
        } else {
            configArray = parentConfigArray;
        }


const configFilenames = [
     .eslintrc.js ,
     .eslintrc.cjs ,
     .eslintrc.yaml ,
     .eslintrc.yml ,
     .eslintrc.json ,
     .eslintrc ,
     package.json
];

loadInDirectory(directoryPath, { basePath, name } = {}) {
        const slots = internalSlotsMap.get(this);
        // 这里是以 configFilenames 数组中元素的顺序决定优先级的
        for (const filename of configFilenames) {
            const ctx = createContext();
            if (fs.existsSync(ctx.filePath) && fs.statSync(ctx.filePath).isFile()) {
                let configData;
                try {
                    configData = loadConfigFile(ctx.filePath);
                } catch (error) {
                }
                if (configData) {
                    return new ConfigArray();
                }
            }
        }
        return new ConfigArray();
    }
加载配置
在上述的 configArrayFactory.**loadInDirectory**方法中,ESLint 会依次加载配置里的extends, parser,plugin 等,其中
- extends 是其他配置文件,秉着尽可能复用的原则,ESLint 允许我们使用插件中的配置或者是第三方模块中的配置;
- parser 用于解析 AST;
- plugin 则是用户自定义的插件,可以引入自己定义的规则,以及对非 js 文件的检查和处理等。
extends 处理
ESLint 会递归地去读取配置文件中的 extends。那问题来了,如果 extends 的层级很深的话,配置文件里的优先级怎么办?️
_loadExtends(extendName, ctx) {
        ...
        return this._normalizeConfigData(loadConfigFile(ctx.filePath), ctx);
}

_normalizeConfigData(configData, ctx) {
        const validator = new ConfigValidator();

        validator.validateConfigSchema(configData, ctx.name || ctx.filePath);
        return this._normalizeObjectConfigData(configData, ctx);
    }

*_normalizeObjectConfigData(configData, ctx) {
        const { files, excludedFiles, ...configBody } = configData;
        const criteria = OverrideTester.create();
        const elements = this._normalizeObjectConfigDataBody(configBody, ctx);
    }

*_normalizeObjectConfigDataBody({extends: extend}, ctx) {
        const extendList = Array.isArray(extend) ? extend : [extend];
        ...
        // Flatten `extends`.
        for (const extendName of extendList.filter(Boolean)) {
            yield* this._loadExtends(extendName, ctx);
        }

        yield {

            // Debug information.
            type: ctx.type,
            name: ctx.name,
            filePath: ctx.filePath,

            // Config data.
            criteria: null,
            env,
            globals,
            ignorePattern,
            noInlineConfig,
            parser,
            parserOptions,
            plugins,
            processor,
            reportUnusedDisableDirectives,
            root,
            rules,
            settings
        };

}
可以看到,这里是先递归处理 extends,完了再返回自己的配置,所以最终得到的 ConfigArray 里的顺序则是[配置中的extends,配置]。那这么看的话,自己本身的配置优先级怎么还不如extends里的呢?别急,我们继续往下看。ConfigArray 类里有一个extractConfig方法,当所有配置都读取完了,最终在使用的时候,都需要调用extractConfig把一个所有的配置对象合并成一个最终对象。
extractConfig(filePath) {
        const { cache } = internalSlotsMap.get(this);
        const indices = getMatchedIndices(this, filePath);
        const cacheKey = indices.join( , );

        if (!cache.has(cacheKey)) {
            cache.set(cacheKey, createConfig(this, indices));
        }

        return cache.get(cacheKey);
}

function getMatchedIndices(elements, filePath) {
    const indices = [];

    for (let i = elements.length - 1; i >= 0; --i) {
        const element = elements[i];

        if (!element.criteria || (filePath && element.criteria.test(filePath))) {
            indices.push(i);
        }
    }

    return indices;
}
刚刚我们说了,我们通过之前的操作得到的 ConfigArray 对象里,各个配置对象的顺序其实是[{外层配置里的extends配置},{外层配置},{内层配置里的extends配置},{内层配置}],这看起来跟我们理解的优先级是完全相反的,而这里的getMatchedIndices 方法则会把数组顺序调转过来,这样一来,整个顺序就正常了。调整完ConfigArray的顺序后,createConfig方法则具体执行了合并操作。
function createConfig(instance, indices) {
    const config = new ExtractedConfig();
    const ignorePatterns = [];

    // Merge elements.
    for (const index of indices) {
        const element = instance[index];

        // Adopt the parser which was found at first.
        if (!config.parser && element.parser) {
            if (element.parser.error) {
                throw element.parser.error;
            }
            config.parser = element.parser;
        }

        // Adopt the processor which was found at first.
        if (!config.processor && element.processor) {
            config.processor = element.processor;
        }

        // Adopt the noInlineConfig which was found at first.
        if (config.noInlineConfig === void 0 && element.noInlineConfig !== void 0) {
            config.noInlineConfig = element.noInlineConfig;
            config.configNameOfNoInlineConfig = element.name;
        }

        // Adopt the reportUnusedDisableDirectives which was found at first.
        if (config.reportUnusedDisableDirectives === void 0 && element.reportUnusedDisableDirectives !== void 0) {
            config.reportUnusedDisableDirectives = element.reportUnusedDisableDirectives;
        }

        // Collect ignorePatterns
        if (element.ignorePattern) {
            ignorePatterns.push(element.ignorePattern);
        }

        // Merge others.
        mergeWithoutOverwrite(config.env, element.env);
        mergeWithoutOverwrite(config.globals, element.globals);
        mergeWithoutOverwrite(config.parserOptions, element.parserOptions);
        mergeWithoutOverwrite(config.settings, element.settings);
        mergePlugins(config.plugins, element.plugins);
        mergeRuleConfigs(config.rules, element.rules);
    }

    // Create the predicate function for ignore patterns.
    if (ignorePatterns.length > 0) {
        config.ignores = IgnorePattern.createIgnore(ignorePatterns.reverse());
    }

    return config;
}
这里分析一下具体的合并逻辑
-
对于 parser 和 processor 字段,后面的配置文件会覆盖前面的配置文件。
-
对于 env,globals,parserOptions,settings 字段则会合并在一起,但是这里注意,只有当后面的配置里存在前面没有的字段时,这个字段才会被合并进来,如果前面已经有了这个字段,那后面的相同字段会被摒弃。
-
例如 [{a: 1, b: 2}, {c: 3, b: 4}] 这个数组的合并结果则是 {a: 2, b: 2, c: 3}。
-
对于 rules 字段,同样是前面的配置优先级高于后面的,但是如果某个已存在的 rule 里带了参数,那么 rule 的参数会被合并。
把 extends 处理完后会继续处理 parser 和 plugin 字段
parser 和 plugin 处理
这里 parser 和 plugin 都是以第三方模块的形式加载进来的,因此如果我们要自定义的话,需要先发包,然后再引用。对于 plugin,通常约定的包名格式是 eslint-plugin-${name} ,而在在配置中可以把包名中的 eslint-plugin 前缀省略。
_loadParser(nameOrPath, ctx) {
        try {
            const filePath = resolver.resolve(nameOrPath, relativeTo);
            return new ConfigDependency({
                definition: require(filePath),
                ...
            });
        } catch (error) {
            // If the parser name is  espree , load the espree of ESLint.
            if (nameOrPath ===  espree ) {
                debug( Fallback espree. );
                return new ConfigDependency({
                    definition: require( espree ),
                    ...
                });
            }
            return new ConfigDependency({
                error,
                id: nameOrPath,
                importerName: ctx.name,
                importerPath: ctx.filePath
            });
        }
    }

    _loadPlugin(name, ctx) {
        const request = naming.normalizePackageName(name,  eslint-plugin );
        const id = naming.getShorthandName(request,  eslint-plugin );
        const relativeTo = path.join(ctx.pluginBasePath,  __placeholder__.js );

        // Check for additional pool.
        // 如果已有的 plugin 则复用
        const plugin =
            additionalPluginPool.get(request) ||
            additionalPluginPool.get(id);

        if (plugin) {
            return new ConfigDependency({
                definition: normalizePlugin(plugin),
                filePath:   , // It's unknown where the plugin came from.
                id,
                importerName: ctx.name,
                importerPath: ctx.filePath
            });
        }

        let filePath;
        let error;
        filePath = resolver.resolve(request, relativeTo);

        if (filePath) {
            try {
                const startTime = Date.now();
                const pluginDefinition = require(filePath);
                return new ConfigDependency({...});
            } catch (loadError) {
                error = loadError;
            }
        }
    }
加载流程总结
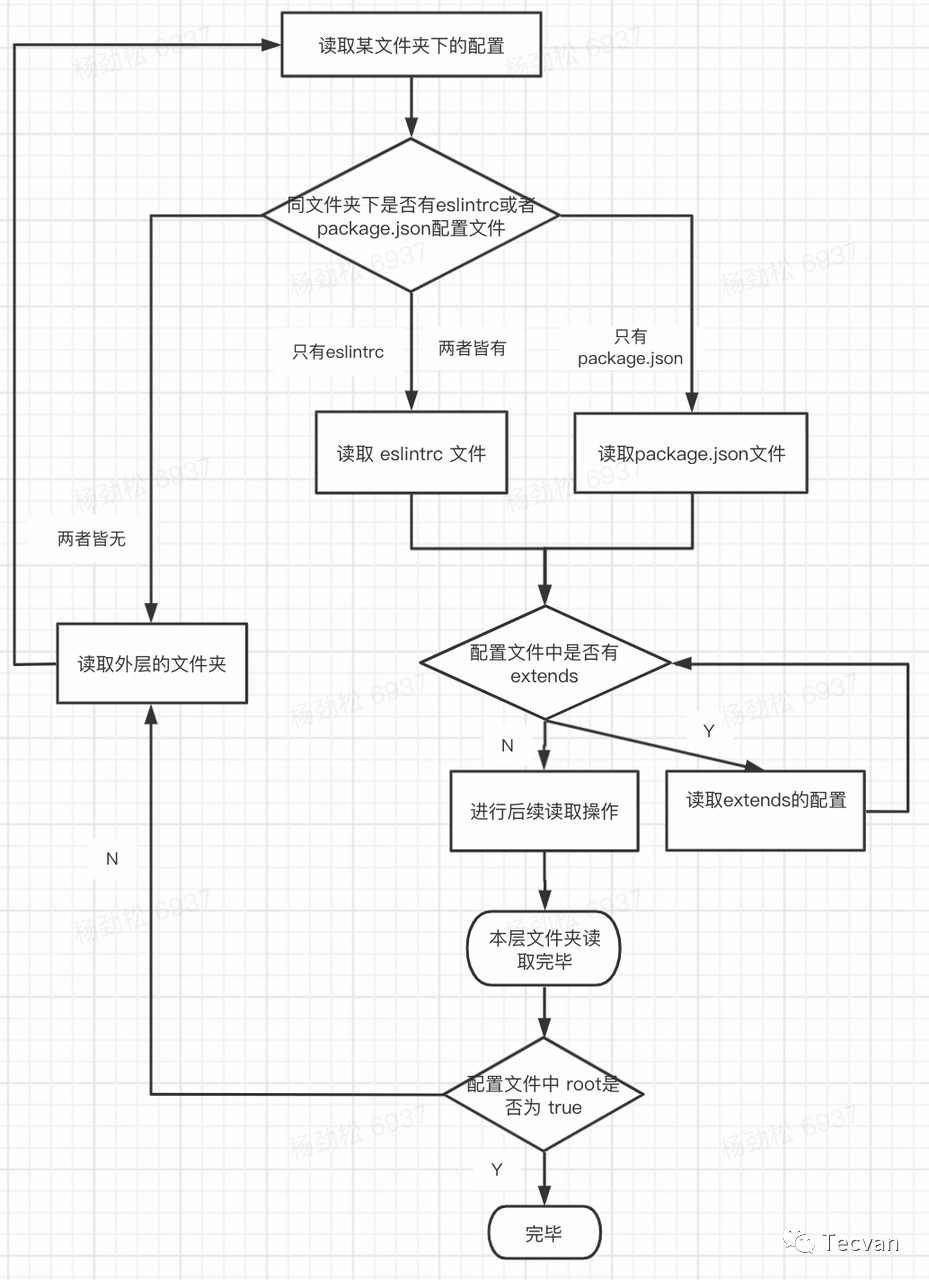
整个加载配置涉及到多层文件夹的多个配置文件,甚至包括配置文件里的extends ,这里以一张流程图来总结一下
检验
经过前面的步骤之后,基本上我们已经获取了所有需要的配置,接下来就会进入检验流程,主要对应源码中的 Lint 类的 verify 方法。这个 verify 方法里主要也就是做一些判断然后分流到其他处理方法里。
verify(textOrSourceCode, config, filenameOrOptions) {
        const { configType } = internalSlotsMap.get(this);
        if (config) {
            if (configType ===  flat ) {
                let configArray = config;
                if (!Array.isArray(config) || typeof config.getConfig !==  function ) {
                    configArray = new FlatConfigArray(config);
                    configArray.normalizeSync();
                }
                return this._distinguishSuppressedMessages(this._verifyWithFlatConfigArray(textOrSourceCode, configArray, options, true));
            }

            if (typeof config.extractConfig ===  function ) {
                return this._distinguishSuppressedMessages(this._verifyWithConfigArray(textOrSourceCode, config, options));
            }
        }
        if (options.preprocess || options.postprocess) {
            return this._distinguishSuppressedMessages(this._verifyWithProcessor(textOrSourceCode, config, options));
        }
        return this._distinguishSuppressedMessages(this._verifyWithoutProcessors(textOrSourceCode, config, options));
    }
不管是哪个分支,他们大致都按照以下顺序执行:
- ☝️先处理 processor。
- ☝️☝️解析代码,获取 AST 和节点数组。
- ☝️☝️☝️跑规则
runRules。
下面我们对上面三个过程逐个介绍。
processor
processor 是在插件上定义的处理器,processor 能针对特定后缀的文件定义 preprocess 和 postprocess 两个方法。其中 preprocess 方法能接受文件源码和文件名作为参数,并返回一个数组,且数组中的每一项就是需要被 ESLint 检验的代码或者文件;通常我们使用 preprocess 从非 js 文件里提取出需要被检验的部分 js 代码,使得非 js 文件也可以被 ESLint 检验。而 postprocess 则是可以在文件被检验完之后对所有的 lint problem 进行统一处理(过滤或者额外的处理)的。
获取 AST
当用户没有指定 parser 时,默认使用 espree,若有指定 parser 则使用指定的 parser。
        let parser = espree;
        if (typeof config.parser ===  object  && config.parser !== null) {
            parserName = config.parser.filePath;
            parser = config.parser.definition;
        } else if (typeof config.parser ===  string ) {
            if (!slots.parserMap.has(config.parser)) {
                return [{
                    ruleId: null,
                    fatal: true,
                    severity: 2,
                    message: `Configured parser '${config.parser}' was not found.`,
                    line: 0,
                    column: 0
                }];
            }
            parserName = config.parser;
            parser = slots.parserMap.get(config.parser);
        }

        const parseResult = parse(
                text,
                languageOptions,
                options.filename
            );
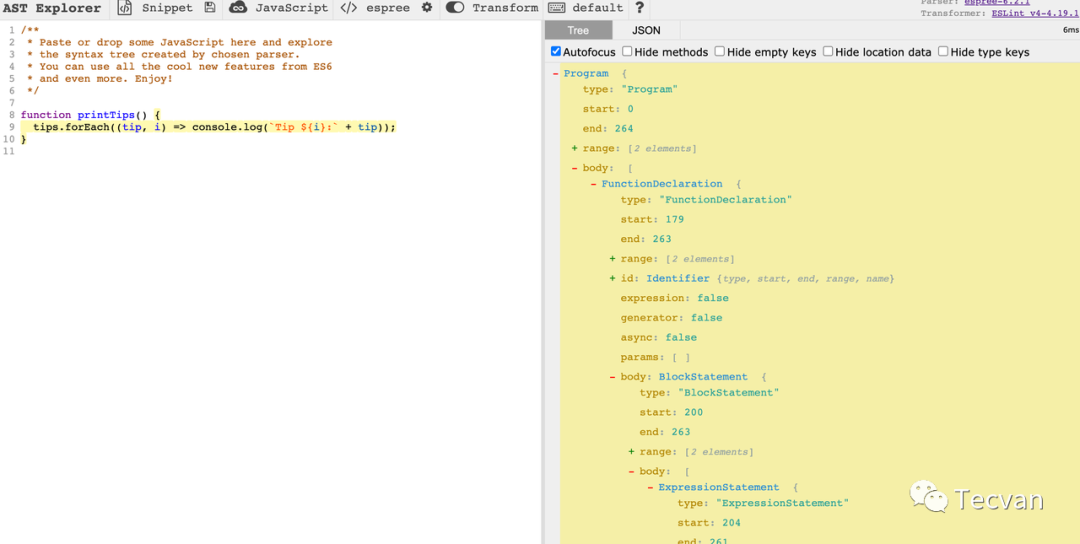
这里推荐一个网站https://astexplorer.net/,它能方便让我们查看一段代码转化出来的 AST 长什么样
runRules
正如我们前面说到的,规则是 ESLint 的核心,ESLint 的工作全是基于一条一条的规则,ESLint 是怎么处理规则的,核心就在 runRules 这个函数中。首先会定义nodeQueue数组,用于收集 AST 所有的节点。注意每个 AST 节点都会被推进数组中两次(进一次出一次)。
Traverser.traverse(sourceCode.ast, {
        enter(node, parent) {
            node.parent = parent;
            nodeQueue.push({ isEntering: true, node });
        },
        leave(node) {
            nodeQueue.push({ isEntering: false, node });
        },
        visitorKeys: sourceCode.visitorKeys
    });
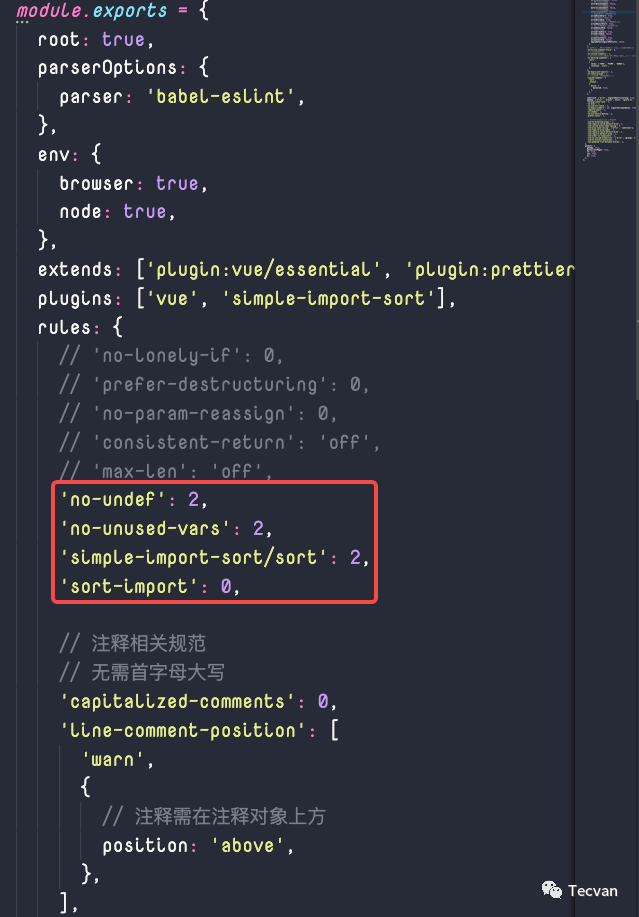
然后就会遍历所有配置中的 rule,并通过 rule 的名称找到对应的 rule 对象,注意,这里的两个 rule 不完全一样。「配置中的 rule」指的是在 eslintrc 等配置文件中的 rules 字段下的每个 rule 名称,例如下面这些

// 这里的 ruleListeners 就是{[AST节点]: 对应的处理函数}键值对
Object.keys(ruleListeners).forEach(selector => {
            const ruleListener = timing.enabled
                ? timing.time(ruleId, ruleListeners[selector])
                : ruleListeners[selector];

            emitter.on(
                selector,
                addRuleErrorHandler(ruleListener)
            );
        });
为所有的 rule 对象添加好了监听之后,就开始遍历前面收集好的nodeQueue,在遍历到的不同节点时相应触发节点监听函数,然后在监听函数中调用方法收集所有的的 eslint 问题。
nodeQueue.forEach(traversalInfo => {
        currentNode = traversalInfo.node;

        try {
            if (traversalInfo.isEntering) {
                eventGenerator.enterNode(currentNode);
            } else {
                eventGenerator.leaveNode(currentNode);
            }
        } catch (err) {
            err.currentNode = currentNode;
            throw err;
        }
    });
applyDisableDirectives
我们已经获取到所有的 lint 问题了,接下来会处理注释里的命令,没错,相信大家都不陌生,就是 eslint-disable、eslint-disable-line 等,主要就是对前面的处理结果过滤一下,另外还要处理没被用到的命令注释等。
修复
接下来就是修复过程了,这里主要调用SourceCodeFixer类的applyFixes方法,而这个方法里,有调用了 attemptFix 来执行修复操作。这里的 problem.fix实际上是一个对象,这个对象描述了修复的命令,类型是这样的,{range: Number[]; text: string} 。这里我们只需要知道他是由规则的开发者定义的fix函数中返回的对象,所以这个对象描述的修复命令都由规则开发者决定。细节的我们将在之后的实战篇里讲解,这里不再展开。
    /**
     * Try to use the 'fix' from a problem.
     * @param {Message} problem The message object to apply fixes from
     * @returns {boolean} Whether fix was successfully applied
     */
    function attemptFix(problem) {
        const fix = problem.fix;
        const start = fix.range[0];
        const end = fix.range[1];

        // Remain it as a problem if it's overlapped or it's a negative range
        if (lastPos >= start || start > end) {
            remainingMessages.push(problem);
            return false;
        }

        // Remove BOM.
        if ((start < 0 && end >= 0) || (start === 0 && fix.text.startsWith(BOM))) {
            output =   ;
        }

        // Make output to this fix.
        output += text.slice(Math.max(0, lastPos), Math.max(0, start));
        output += fix.text;
        lastPos = end;
        return true;
    }
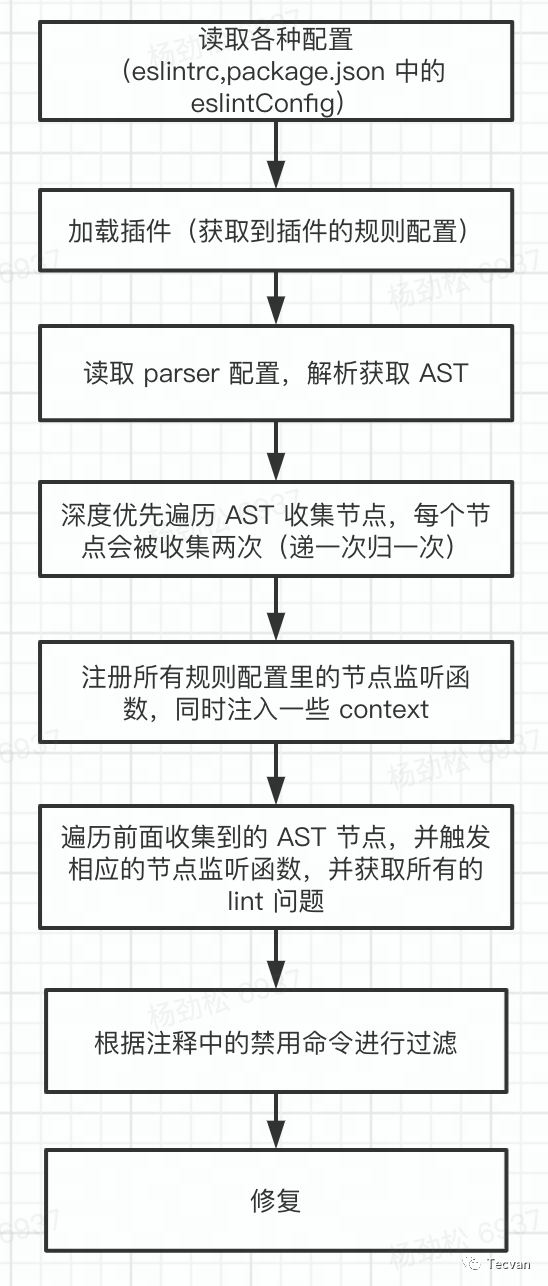
至此,ESLint 工作的大致流程就已经介绍完了,下面以一张图来总结一下整个流程:


