【Web技术】1395- Esbuild Bundler HMR
Esbuild 虽然 bundler 非常快,但是其没有提供 HMR 的能力,在开发过程中只能采用 live-reload 的方案,一有代码改动,页面就需要全量 reload ,这极大降低开发体验。为此添加 HMR 功能至关重要。
经过调研,社区内目前存在两种 HMR 方案,分别是 Webpack/ Parcel 为代表的 Bundler HMR 和 Vite 为代表的 Bundlerless HMR。经过考量,我们决定实现 Bundler HMR,在实现过程中遇到一些问题,做了一些记录,希望大家有所了解。
ModuleLoader 模块加载器
Esbuild 本身具有 Scope hosting 的功能,这是生产模式经常会开启的优化,会提高代码的执行速度,但是这模糊了模块的边界,无法区分代码具体来自于哪个模块,针对模块的 HMR 更无法谈起,为此需要先禁用掉 Scope hosting 功能。由于 Esbuild 未提供开关,我们只能舍弃其 Bundler 结果,自行 Bundler。
受 Webpack 启发,我们将模块内的代码转换为 Common JS,再 wrapper 到我们自己的 Moduler loader 运行时,其中循环依赖的情况需要提前导出 module.exports 需要注意一下。
转换为 Common JS 目前是使用 Esbuild 自带的 transform,但需要注意几个问题。
- Esbuild dynamic import 遵循 浏览器 target 无法直接转换 require,目前是通过正则替换 hack。
- Esbuild 转出的代码包含一些运行时代码,不是很干净。
- 代码内的宏(process.env.NODE_ENV 等)需要注意进行替换。
比如下面的模块代码的转换结果:
// a.ts
import { value } from 'b'

// transformed to
 moduleLoader.registerLoader('a'/* /path/to/a */, (require, module, exports) => {
  const { value } = require('b');

});- Cjs 动态导出模块的特性。
export function name(a) {
    return a + 1
}

const a = name(2)
export default a
如上模块转换后结果如下:
var __defProp = Object.defineProperty;
var __export = (target, all) => {
  for (var name2 in all)
    __defProp(target, name2, { get: all[name2], enumerable: true });
};
var __copyProps = (to, from, except, desc) => {};
var __toCommonJS = (mod) => __copyProps(__defProp({}, "__esModule", { value: true }), mod);
var entry_exports = {};
// 注意这里
__export(entry_exports, {
  default: () => entry_default,
  name: () => name
});
module.exports = __toCommonJS(entry_exports);
function name(a2) {
  return a2 + 1;
}
var a = name(2);
var entry_default = a;
注意两部分:
- 第 7 行代码可以看到,
ESM转CJS后会给模块加上__esModule标记。 - 第 10 行代码中可以看到,CJS 的导出是 computed 的, module.exports 赋值时需要保留 computed 导出。
ModuleLoader 的实现注意兼容此行为,伪代码如下:
class Module {
    _exports = {}
    get exports() {
        return this._exports
    }
    set exports(value) {
        if(typeof value === 'object' && value) {
            if (value.__esModule) {
                this._exports.__esModule = true;
            }
            for (const key in value) {
                Object.defineProperty(this._exports, key, {
                  get: () => value[key],
                  enumerable: true,
                });
            }
        }
    }
}
由于 Scope Hosting 的禁用,在 bundler 期间无法对模块的导入导出进行检查,只能得到在运行期间的代码报错,Webpack 也存在此问题。
Module Resolver
虽然对模块进行了转换,但无法识别 alias,node_modules 等模块。
如下面例子, node 模块 b 无法被执行,因为其注册时是 /path/to/b
// a.ts
import { value } from 'b'
另外,由于 HMR API 接受子模块更新也需要识别模块。
module.hot.accpet('b', () => {})
有两种方案来解决:
- Module URL Rewrite
Webpack/Vite 等都采用的是此方案,对模块导入路径进行改写。
2 . 注册映射表
由于 Module Rerewrite 需要对 import 模块需要分析,会有一部分开销和工作量,为此采用注册映射表,在运行时进行映射。如下:
moduleLoader.registerLoader('a'/* /path/to/a */, (require, module, exports) => {
  const { value } = require('b');
  expect(value).equal(1);
});
moduleLoader.registerResolver('a'/* /path/to/a */, {
   'b': '/path/to/b'
 });
HMR
当某个模块发生变化时,不用刷新页面就可以更新对应的模块。
首先看个 HMR API 使用的例子:
// bar.js
import foo from './foo.js'

foo()

if (module.hot) {
  module.hot.accept('./foo.js' ,(newFoo) => {
    newFoo.foo()
  })
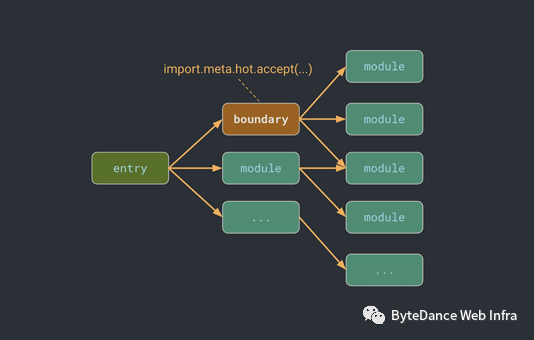
}在上面例子中,bar.js 是 ./foo.js 的 HMR Boundary ,即接受更新的模块。如果./foo.js 发生更新,只要重新执行 ./foo.js 并且执行第七行的 callback 即可完成更新。
具体的实现如下:
1 . 构建模块依赖图。
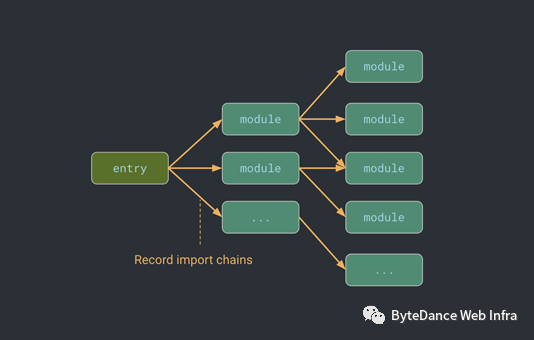
在 ModuleLoader 过程中,执行模块的同时记录了模块之间的依赖关系。

如果模块中含有 module.hot.accept 的 HMR API 调用则将模块标记成 boundary。

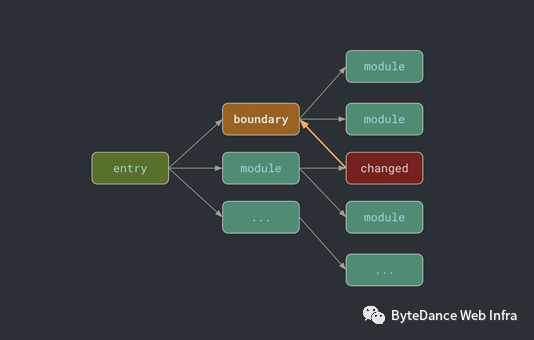
2 . 当模块发生变更时,会重新生成此模块相关的最小 HMR Bundle,并且将其通过 websocket 消息告知浏览器此模块发生变更,浏览器端依据模块依赖图寻找 boundaries,并且开始重新执行模块更新以及相应的 calllback。

注意 HMR API 分为 接受子模块的更新 和 接受自更新 ,在查找 HMR Boundray 的过程需要注意区分。
目前,只在 ModulerLoader 层面支持了 accpet``dispose API。
Bundle
由于模块转换后没有先后关系,我们可以直接把代码进行合并即可,但是这样会缺少 sourcemap。
为此,进行了两种方案的尝试:
1 . Magic-string Bundle + remapping
伪代码如下:
import MagicString from 'magic-string';
import remapping from '@ampproject/remapping';

const module1 = new MagicString('code1')
const module1Map = {}
const module2 = new MagicString('code2')
const module2Map = {}

function bundle() {
    const bundle = new MagicString.Bundle();
    bundle.addSource({
      filename: 'module1.js',
      content: module1
    });
    bundle.addSource({
      filename: 'module2.js',
      content: module2
    });
    const map = bundle.generateMap({
      file: 'bundle.js',
      includeContent: true,
      hires: true
    });
    remapping(map, (file) => {
        if(file === 'module1.js') return module1Map
        if(file === 'module2.js') return module2Map
        return null
    })
    return {
        code: bundle.toString(),
        map:
    }
}
实现过后发现二次构建存在显著的性能瓶颈,remapping 没有 cache 。
2 . Webpack-source
伪代码如下:
import { ConcatSource, CachedSource, SourceMapSource } from 'webpack-sources';

const module1Map = {}
const module1 = new CachedSource(new SourceMapSource('code1'), 'module1.js', module1Map)
const module2 = new CachedSource(new SourceMapSource('code2'), 'module2.js', module1Map)

function bundle(){
    const concatSource = new ConcatSource();
    concatSource.add(module1)
    concatSource.add(module2)
    const { source, map } = concatSource.sourceAndMap();
    return {
      code: source,
      map,
    };
}
其 CacheModule 有每个模块的 sourcemap cache,内部的 remapping 开销很小,二次构建是方案一的数十倍性能提升。
另外,由于 esbuild 因为开启了生产模式的优化,metafile.inputs 中并不是全部的模块,其中没有可执行代码的模块会缺失,所以合并代码时需要从模块图中查找全部的模块。
Lazy Compiler(未实现)
页面中经常会包含 dynamic import 的模块,这些模块不一定被页面首屏使用,但是也被 Bundler,因此 Webpack 提出了 Lazy Compiler 。Vite 利用 ESM Loader 的 unbundler 天生避免了此问题。
React Refresh
What is React Refresh and how to integrate it .
和介绍的一样,分为两个过程。
1 . 将源代码通过 react-refresh/babel 插件进行转换,如下:
function FunctionDefault() {
  return <h1>Default Export Function</h1>;
}

export default FunctionDefault;
转换结果如下:
var _jsxDevRuntime = require("node_modules/react/jsx-dev-runtime.js");
function FunctionDefault() {
    return (0, _jsxDevRuntime).jsxDEV("h1", {
        children: "Default Export Function"
    }, void 0, false, {
        fileName: "</Users/bytedance/bytedance/pack/examples/react-refresh/src/FunctionDefault.tsx>",
        lineNumber: 2,
        columnNumber: 10
    }, this);
}
_c = FunctionDefault;
var _default = FunctionDefault;
exports.default = _default;
var _c;
$RefreshReg$(_c, "FunctionDefault");
依据 bundler hmr 实现加入一些 runtime。
var prevRefreshReg = window.$RefreshReg$;
var prevRefreshSig = window.$RefreshSig$;
var RefreshRuntime = require('react-refresh/runtime');
window.$RefreshReg$ = (type, id) => {
  RefreshRuntime.register(type, fullId);
}
window.$RefreshSig$ = RefreshRuntime.createSignatureFunctionForTransform;
// source code
window.$RefreshReg$ = prevRefreshReg;
window.$RefreshSig$ = prevRefreshSig;
// accept self update
module.hot.accept();
const runtime = require('react-refresh/runtime');
let enqueueUpdate = debounce(runtime.performReactRefresh, 30);
enqueueUpdate();
2 . Entry 加入下列代码。
 const runtime = require('react-refresh/runtime');
  runtime.injectIntoGlobalHook(window);
  window.$RefreshReg$ = () => {};
  window.$RefreshSig$ = () => type => type;
注意这些代码需要运行在
react-dom之前。
- END -