Go实战 | 基于Prometheus+Grafana搭建完整的监控系统
大家好, 今天主要给大家介绍一下基于prometheus+grafana如何搭建一套完整的监控系统。
监控,是应用程序中必不可少的组成部分。通过监控,使我们可以对所研发的服务运行状态进行收集、告警、查看趋势等。目前较为流行的监控系统是prometheus系统。prometheus是基于指标的监控系统,下面是prometheus的官网架构图:
分为5大部分:
- prometheus server用于从目标监控中定时采集指标数据并计算处理数据,同时提供报警规则以及对接可视化的监控系统,例如Grafana。
- Service discovery用于采集目标的发现。prometheus server通过该服务发现要采集的目标服务
- Prometheus targets是被prometheus server采集的目标。实际上就是在业务系统中加入的指标监控。该部分首先将指标数据记录到本地内存中,并提供标准的http接口供prometheus server定时拉取。
- 数据可视部分是将prometheus server中收集到的监控数据以图标的形式展示出来。例如Grafana
- 告警系统是当系统状态有异常时可及时通知相关人员用于及时处理
本文主要介绍在业务系统中各个部分是如何有机地结合在一起的。即从零搭建一套基于prometheus + grafana的监控完整监控系统。
一、Prometheus targets搭建
Prometheus targets的指的就是被监控的目标。在业务系统中指的就是依赖于Prometheus库来定义指标、注册指标、指标采集数据。这里指标采集的数据是存在本地的。然后再通过提供的标准的http接口供Prometheus server端定时拉取。
1.1 定义监控的指标
定义指标就是指的在程序中定义一个Prometheus类型的指标采集器,可以是Counter类型、Gauage类型、Summary类型、Histogram类型的指标。
我们以采集请求的数量为例,因为请求的数量只增不减,所以我们使用Counter类型。同时通过Counter类型的rate函数也能计算出一段时间内的平均请求数量,即QPS。如下:
var (
    HttpRequestTotal = prometheus.NewCounterVec(
    prometheus.CounterOpts{
            Namespace: "promdemo",
            Subsystem: "demo",
            Name:      "http_request_total",
            Help:      "http request total",
    },
    []string{"from"},
    )
)
HttpRequestTotal变量就是我们定义的Counter类型的指标采集器。在该采集器中,我们指定了一个标签from,代表可以按from的维度进行统计。这个from是指的业务中的请求来源,大家在项目中根据实际需要定义标签就好。
1.2 注册指标采集器
指标定义完成后,就需要将该指标注册到采集器集合中。这样,当Prometheus server来抓取该机器上的指标数据时,才能成功将该指标的数据抓取到。所以,我们需要执行如下代码进行指标注册:
prometheus.MustRegister(HttpRequestTotal)
1.3 指标数据采集
指标数据采集实际上就是往定义的指标采集器中记录相关的指标数据。在Counter指标中,通过Inc函数可以让指标的数据加1。如下:
HttpRequestTotal.WithLabelValues("mobile").Inc()
这里的WithLabelValues函数指定from维度具体的值是mobile,在例子中指的是来源于移动端的请求。当然不同类型的指标采集器有不同的采集数据的函数,在实际使用中根据类型使用就好。
1.4 提供数据采集接口
经过上面3个步骤我们已经可以在本地机器上采集指标数据了。但是这些指标数据还需要传递给Prometheus server统一处理。这就需要提供一个遵循Prometheus标准的http接口,以便Prometheus server可以通过这个接口来定时抓取数据。Prometheus标准的http接口是放在/metrics目录下,所以我们需要注册一个http路由:
http.Handle("/metrics", promhttp.Handler())
这里promhttp是标准的库,其主要功能是依次读取本地所有注册的指标采集器的数据。并将数据响应给调用方--prometheus server。
好了,到这里我们的targets部分就 搭建完成了。下面是一段完整的示例代码:
package main
import (
    "net/http"

    "github.com/prometheus/client_golang/prometheus"

    "github.com/prometheus/client_golang/prometheus/promhttp"
)
var (

    MetricHttpRequestTotal = prometheus.NewCounterVec(
            prometheus.CounterOpts{
        Namespace: "promdemo",
        Subsystem: "demo",
        Name:      "http_request_total",
        Help:      "http request total",
            },
            []string{"from"},
    )
)
func init() {

    prometheus.MustRegister(MetricHttpRequestTotal)
}
func main() {
   go func() {

        muxProm := http.NewServeMux()
    muxProm.Handle("/metrics", promhttp.Handler())

    http.ListenAndServe(":9527", muxProm)
    }()

    http.HandleFunc("/", func(w http.ResponseWriter, req *http.Request) {
    values := req.URL.Query()
    from := values.Get("from")
    MetricHttpRequestTotal.WithLabelValues(from).Inc()
    w.Write([]byte("Hello,from " + from))
    })

    http.ListenAndServe(":8080", nil)

}
在浏览器中输入http://localhost:9527/metrics 就能显示出本地采集指标采集到的数据。
这里需要注意的一点就是,我们暴露的/metrics路径在9527这个端口下,和正常的业务的http端口做了分离。
二、Prometheus Server搭建
2.1 安装prometheus server
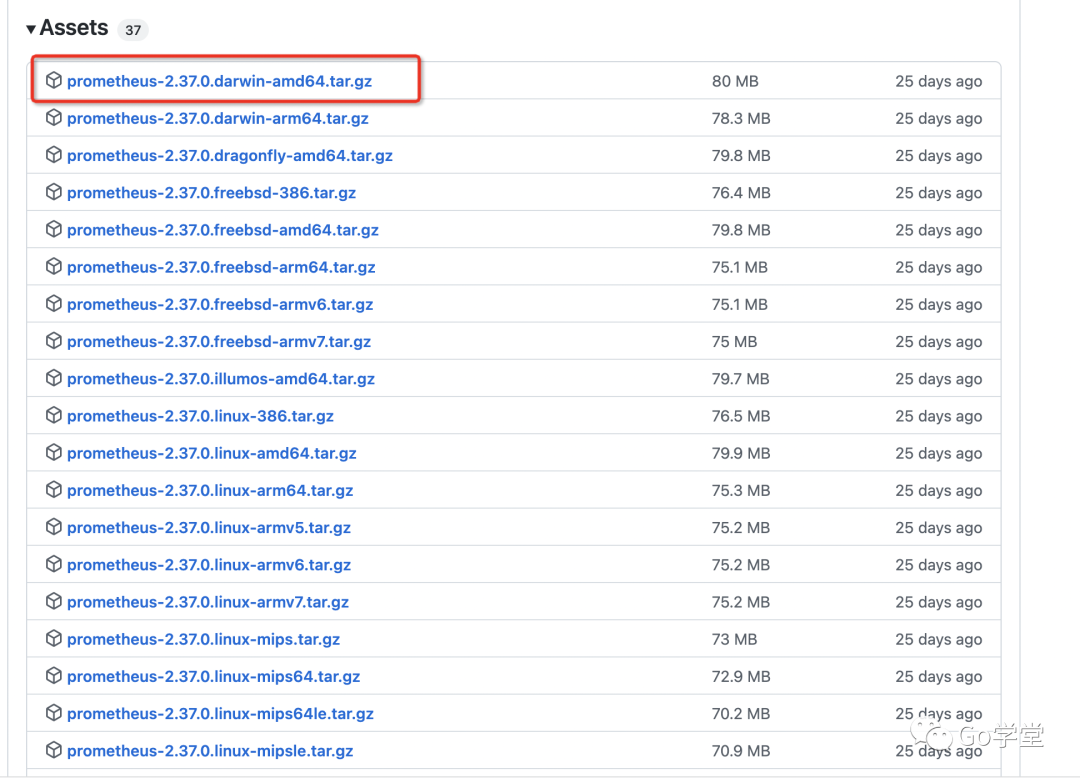
对于该服务搭建就比较简单,有可用的二进制版本,下载下来就能用。我们在github下找到Prometheus的发布版本列表:https://github.com/prometheus/prometheus/releases,
然后选择对应平台的版本。作者使用的是macbook,选择使用了 https://github.com/prometheus/prometheus/releases/download/v2.37.0/prometheus-2.37.0.darwin-arm64.tar.gz这个版本。将该版本下载完成后,解压后,并将目录移动到/usr/local/bin/prometheus目录下,当然这里的目录可根据自己的实际情况而定。
2.2 配置抓取的目标
Prometheus在运行时 需要读取配置文件,该文件默认是当前目录下的prometheus.yml文件,打开该文件如下:
# my global config
global:
  scrape_interval: 15s # Set the scrape interval to every 15 seconds. Default is every 1 minute.
  evaluation_interval: 15s # Evaluate rules every 15 seconds. The default is every 1 minute.
  # scrape_timeout is set to the global default (10s).

# Alertmanager configuration
alerting:
  alertmanagers:
    - static_configs:
        - targets:
          # - alertmanager:9093# Load rules once and periodically evaluate them according to the global 'evaluation_interval'.
rule_files:
  # - "first_rules.yml"
  # - "second_rules.yml"# A scrape configuration containing exactly one endpoint to scrape:
# Here it's Prometheus itself.
scrape_configs:
  # The job name is added as a label `job=<job_name>` to any timeseries scraped from this config.
  - job_name: "prometheus"

    # metrics_path defaults to '/metrics'
    # scheme defaults to 'http'.

    static_configs:
      - targets: ["localhost:9527"]
这里主要说下scrape_configs下的targets参数,该参数是指要抓取的目标数据地址,就是我们在第一部分中介绍的指标采集数据。这里我们填写localhost:9527,这样prometheus server 就会从http://localhost:9527/metrics 目录下抓取指标数据。因为第一部分我们将/metrics路径暴露在了9527这个端口下。
另外,我们再看最上面的global下的scrape_interval参数,该参数指定了多久从目标接口拉取一次指标数据。这里默认配置的是15秒,代表每15秒从客户端拉取一次指标数据。
最后,启动Prometheus server:
./prometheus --config.file="prometheus.yml"
到这里,如果我们运行第一部分中请求地址 http://localhost:8080?from=mobile 则会记录到请求来源的指标数据。
三、Grafana安装--将指标数据可视化
3.1 安装grafana
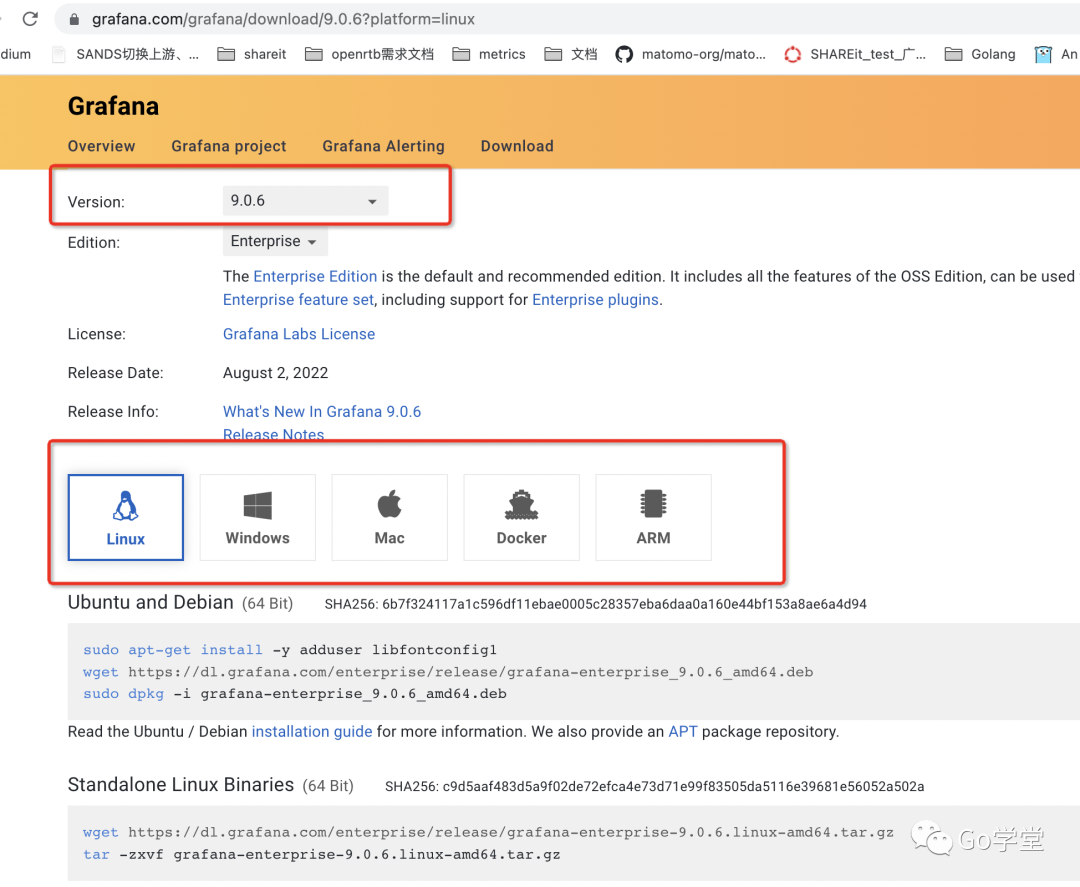
grafana的安装也比较简单,通过对应版本的下载页面,我们可以看到对应平台下的安装方法,我们以https://grafana.com/grafana/download/9.0.6?platform=linux 为例,可以看到对应的页面如下:
当然,在mac下还有一种安装方式就是使用brew方式安装:
brew install grafana

# 启动grafana服务
brew services start grafana

#关闭grafana服务
brew services stop grafana
当我们启动完成后,grafana默认运行在3000端口。在浏览器中输入:http://localhost:3000 即打开了grafana的页面。
3.2 设置数据源
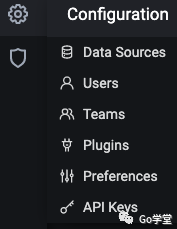
点击左边的设置符号,会出现如下选项
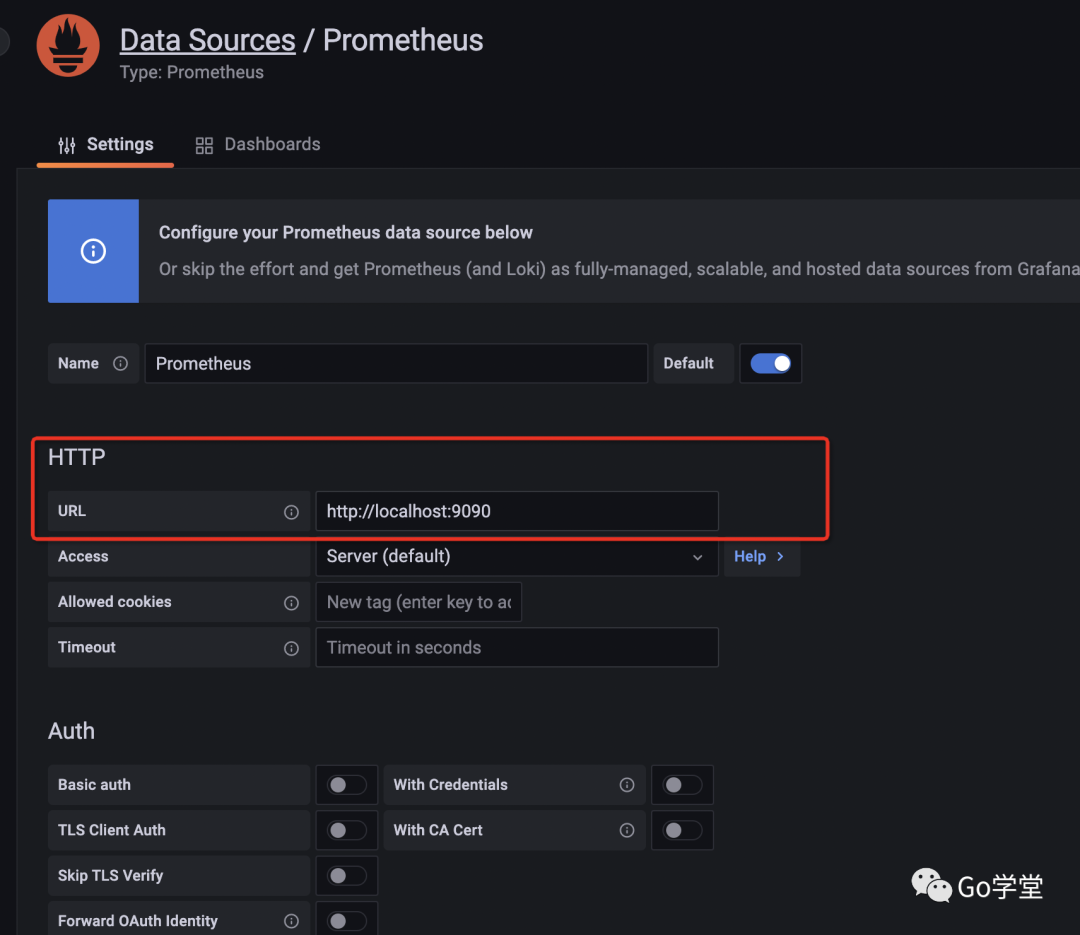
Data Sources:在这里可以选择数据来源,我们选择prometheus数据源,然后点击进入数据源的配置页面,在url处填写prometheus server的服务器地址,在第二部分我们搭建prometheus server时使用的9090端口,如下:
3.3 添加监控面板
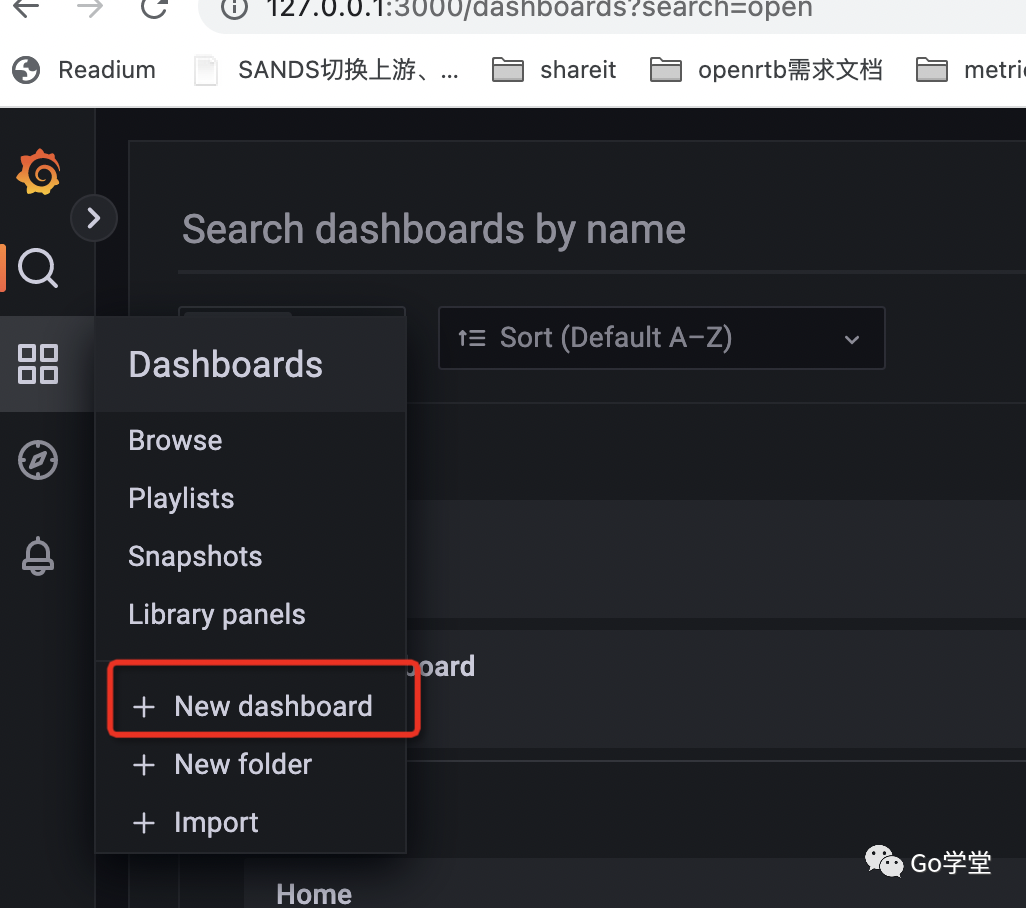
配置好数据源后,然后我们点击左侧的dashboard选项,新建一个dashboard,如下:
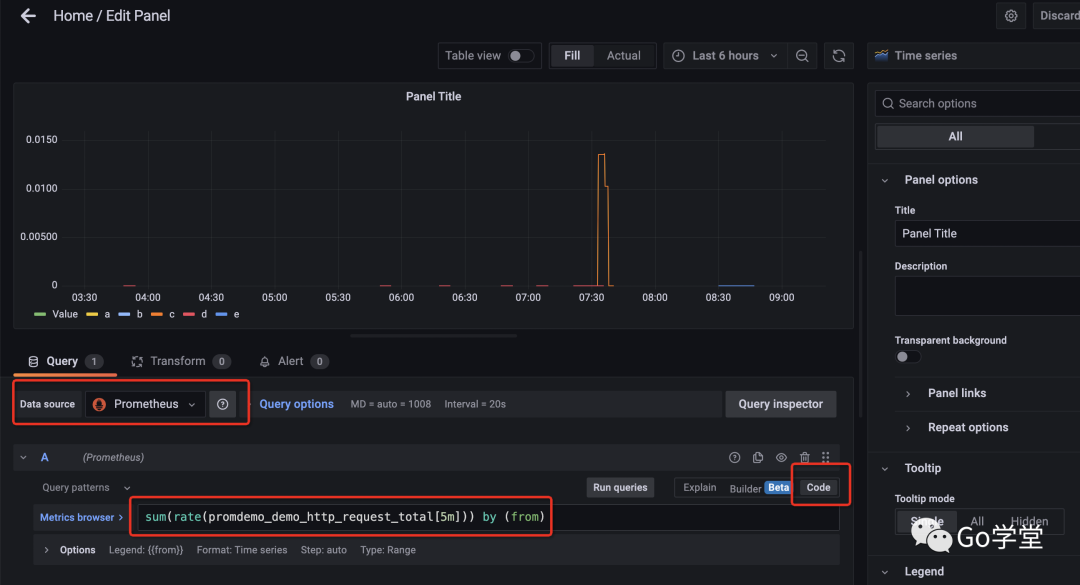
然后选择 add a new panel,出现如下界面:
这里注意,data source这里选择 prometheus, 右侧选择 Code,然后再Metrics browser这里输入要展示的指标,这里我们使用在第一部分数据采集客户端中添加的promdemo_demo_http_request_total指标的数据,[5m] 代表5分钟之内的平均值,by (from)代表通过该指标中的from标签分组。
在Options中的Legend中填写{{from}}代表图例。
这样,该指标的数据就以可视化的方式显示出来了。
四、Alert Manager搭建
告警分为两部分:在prometheus server中添加告警规则并将告警传递给alertmanager,其次是alertmanger将警报转化为通知:钉钉、邮件、企业微信等。
4.1 添加告警规则
告警规则是在prometheus server的配置文件prometheus.yml中配置的。配置包括和alertmanager服务通信的配置以及告警规则的定义。如下alerting的标签中的targets下就是要配置的alertmanger的地址,其中localhost:9093就是我们接下来要安装的alertmanager服务的http接口地址:
# my global config
global:
  scrape_interval: 15s # Set the scrape interval to every 15 seconds. Default is every 1 minute.
  evaluation_interval: 15s # Evaluate rules every 15 seconds. The default is every 1 minute.
  # scrape_timeout is set to the global default (10s).

# Alertmanager configuration
alerting:
  alertmanagers:
    - static_configs:
        - targets: ["localhost:9093"]

# Load rules once and periodically evaluate them according to the global 'evaluation_interval'.
rule_files:
   - "first_rules.yml"
  # - "second_rules.yml"# A scrape configuration containing exactly one endpoint to scrape:
# Here it's Prometheus itself.
scrape_configs:
  # The job name is added as a label `job=<job_name>` to any timeseries scraped from this config.
  - job_name: "prometheus"

    # metrics_path defaults to '/metrics'
    # scheme defaults to 'http'.

    static_configs:
      - targets: ["localhost:9527"]
然后,我们再看告警规则的定义,该定义是在rule_files配置下包含的first_rules.yml文件,如下:
groups:
  - name: example
    rules:
     - alert: high-request
       expr: sum(increase(promdemo_demo_http_request_total[1m])) > 5
这里定义的告警规则就是当请求指标在1分钟内增量大于5个的时候就触发告警。
4.2 将警报转换为通知
首先从https://prometheus.io/download/#alertmanager 这里下载对应的alertmanager并安装,我们选择了alertmanager-0.24.0.darwin-amd64.tar.gz 这个版本。
将下载下来的目录拷贝到/usr/local/bin/alertmanager这个目录下,然后就可以编辑alertmanager.yml文件来配置具体的通知形式了。这里我们以通过邮件发送告警为例:
global:
  resolve_timeout: 5m
  smtp_smarthost: 'smtp.126.com:465'
  smtp_from: 'xxxx@126.com'
  smtp_auth_username: 'xxx@126.com'
  smtp_auth_password: 'xxxxxx'
  smtp_require_tls: falseroute:
  receiver: 'example-email'receivers:
  - name: 'example-email'
    email_configs:
      - to: 'xxxxx@126.com'inhibit_rules:
  - source_match:
      severity: 'critical'
    target_match:
      severity: 'warning'
    equal: ['alertname', 'dev', 'instance']
这里需要注意的是smtp_auth_password一定是126邮箱中开启smpt服务的专用密码,而非是登录邮件的密码。在配置文件中填写好要发送的邮件地址和接收的邮件地址。
最后,启动alertmanager:
./alertmanager
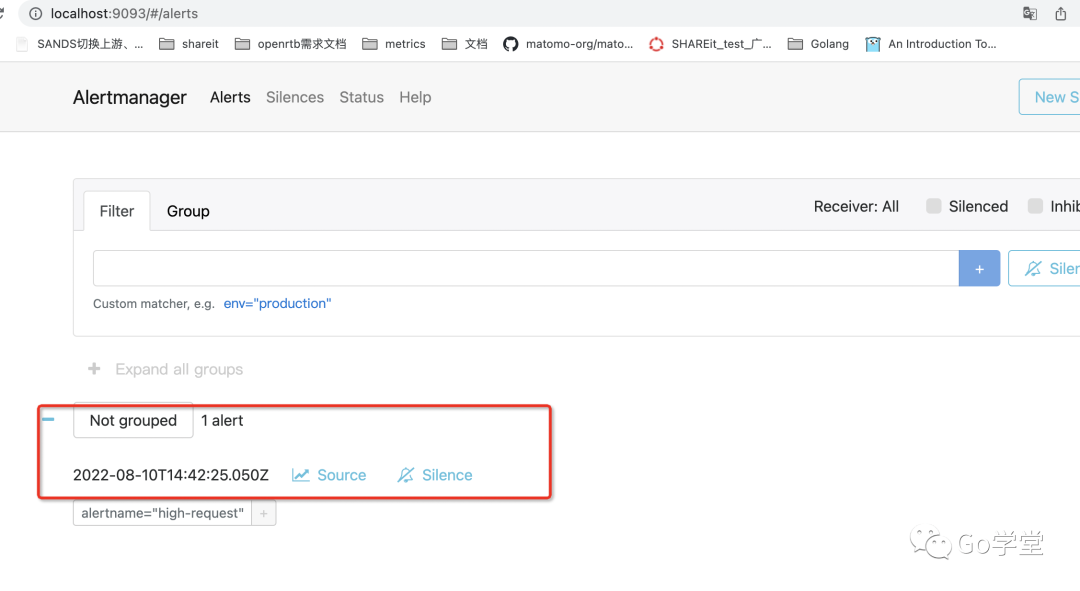
然后在网页中请求我们指标采集的url地址:http://localhost:8080?from=mobile 多请求几次。然后在alertmanager的告警页面:http://localhost:9093 中就可以看到告警的信息了:
总结
监控是在业务开发中必不可少的一部分。有了监控,就相当于给开发人员装上了眼睛和耳朵,实时的可以对服务运行状况进行监测,以及在系统出现异常时第一时间通知到相关人员以快速处理。本文目标是重点介绍各个角色的作用和搭建过程以及各角色是如何有机地结合在一起的,所以是在本地环境下搭建的。当然,若在生产环境下实际应用,大家还需借助云平台现有的服务以便降低自己搭建的复杂度。

