谈一谈 build-scripts 架构设计
一、写在前面
在 ICE、Rax 等项目研发中,我们或多或少都会接触到 build-scripts 的使用。build-scripts 是集团共建的统一构建脚手架解决方案,其除了提供基础的 start、build 和 test 命令外,还支持灵活的插件机制供开发者扩展构建配置。
本文尝试通过场景演进的方式,来由简至繁地讲解一下 build-scripts 的架构演进过程,注意下文描述的演进过程意在讲清 build-scripts 的设计原理及相关方法的作用,并不代表 build-scripts 实际设计时的演进过程,如果文中存在理解错误的地方,还望指正。
二、架构演进
0. 构建场景
我们先来构建这样一个业务场景:
假设我们团队内有一个前端项目 project-a,项目使用 webpack 来进行构建打包。
项目 project-a
project-a
  |- /dist
   |- main.js
  |- /src
    |- say.js
    |- index.js
  |- /scripts
    |- build.js
  |- package.json
  |- package-lock.json
project-a/src/say.js
const sayFun = () => {
  console.log('hello world!');
};

module.exports = sayFun;
project-a/src/index.js
const say = require('./say');

say();
project-a/scripts/build.js
const path = require('path');
const webpack = require('webpack');

// 定义 webpack 配置
const config = {
  entry: './src/index',
  output: {
    filename: 'main.js',
    path: path.resolve(__dirname, '../dist'),
  },
};

// 实例化 webpack
const compiler = webpack(config);

// 执行 webpack 编译
compiler.run((err, stats) => {
  compiler.close((closeErr) => {});
});
project-a/package.json
{
  "name": "project-a",
  "version": "1.0.0",
  "description": "",
  "main": "dist/main.js",
  "scripts": {
    "build": "node scripts/build.js",
    "test": "echo \"Error: no test specified\" && exit 1"
  },
  "keywords": [],
  "author": "",
  "license": "ISC",
  "devDependencies": {
    "webpack": "^5.74.0"
  }
}
过段时间由于业务需求,我们新建了一个前端项目 project-b。由于项目类型相同, 项目 project-b 想要复用项目 project-a 的 webpack 构建配置, 此时应该怎么办呢?

1. 拷贝配置
为了项目快速上线,我们可以先直接从项目 project-a 拷贝一份 webpack 构建配置到项目 project-b ,再配置一下 package.json 中的 build 命令,项目 project-b 即可“完美复用”。

项目 project-b
  project-b
    |- /dist
+     |- main.js
    |- /src
      |- say.js
      |- index.js
+   |- /scripts
+     |- build.js
    |- package.json
    |- package-lock.json
project-b/package.json
  {
    "name": "project-b",
    "version": "1.0.0",
    "description": "",
    "main": "dist/main.js",
    "scripts": {
+     "build": "node scripts/build.js",
      "test": "echo \"Error: no test specified\" && exit 1"
    },
    "keywords": [],
    "author": "",
    "license": "ISC",
+   "devDependencies": {
+     "webpack": "^5.74.0"
+   }
  }
2. 封装 npm 包
下面我们的场景先来演进一下:
项目 project-b 上线一段时间后,团队内推行项目 TS 化,我们首先对项目 project-a 进行了如下改造:
项目 project-a
  project-a
    |- /dist
     |- main.js
    |- /src
-     |- say.js
-     |- index.js
+     |- say.ts
+     |- index.ts
    |- /scripts
      |- build.js
+   |- tsconfig.json
    |- package.json
    |- package-lock.json
project-a/scripts/build.js
  const path = require('path');
  const webpack = require('webpack');

  // 定义 webpack 配置
  const config = {
    entry: './src/index',
+   module: {
+     rules: [
+       {
+         test: /\.ts?$/,
+         use: 'ts-loader',
+         exclude: /node_modules/,
+       },
+     ],
+   },
+   resolve: {
+     extensions: ['.ts', '.js'],
+   },

    ...

  };

  ...

  // 执行 webpack 编译
  compiler.run((err, stats) => {
    compiler.close((closeErr) => {});
  });
project-a/package.json
  {
    "name": "project-a",

     ...

    "devDependencies": {
+     "ts-loader": "^9.3.1",
+     "typescript": "^4.8.2",
+     "@types/node": "^18.7.14",
      "webpack": "^5.74.0"
    }
  }
由于项目 project-b 也需要完成 TS 化,所以我们不得不按照项目 project-a 的修改,在项目 project-b 里也重复修改一次。此时通过拷贝在项目间复用配置的问题就暴露出来了:构建配置更新时,项目间需要同步手动修改,配置维护成本较高,且存在修改不一致的风险。
一般来说,拷贝只能临时解决问题,并不是一个长期的解决方案。如果构建配置需要在多个项目间复用,我们可以考虑将其封装为一个 npm 包来独立维护。下面我们新建一个 npm 包 build-scripts 来做这件事:
npm 包 build-scripts
build-scripts
  |- /bin
   |- build-scripts.js
  |- /lib (ts 构建目录,文件同 src)
  |- /src
   |- /commands
     |- build.ts
  |- tsconfig.json
  |- package.json
  |- package-lock.json
build-scripts/bin/build-scripts.js
#!/usr/bin/env node

const program = require('commander');
const build = require('../lib/commands/build');

(async () => {

  // build 命令注册
  program.command('build').description('build project').action(build);

  // 判断是否有存在运行的命令,如果有则退出已执行命令
  const proc = program.runningCommand;
  if (proc) {
    proc.on('close', process.exit.bind(process));
    proc.on('error', () => {
      process.exit(1);
    });
  }

  // 命令行参数解析
  program.parse(process.argv);

  // 如果无子命令,展示 help 信息
  const subCmd = program.args[0];
  if (!subCmd) {
    program.help();
  }

})();
build-scripts/src/commands/build.ts
import * as path from 'path';
import * as webpack from 'webpack';

export = async () => {
  const rootDir = process.cwd();

  // 定义 webpack 配置
  const config = {
    entry: path.resolve(rootDir, './src/index'),
    module: {
      rules: [
        {
          test: /\.ts?$/,
          use: require.resolve('ts-loader'),
          exclude: /node_modules/,
        },
      ],
    },
    resolve: {
      extensions: ['.ts', '.js'],
    },
    output: {
      filename: 'main.js',
      path: path.resolve(rootDir, './dist'),
    },
  };

  // 实例化 webpack
  const compiler = webpack(config);

  // 执行 webpack 编译
  compiler.run((err, stats) => {
    compiler.close((closeErr) => {});
  });
};
build-scripts/package.json
{
  "name": "build-scripts",
  "version": "1.0.0",
  "description": "",
  "bin": {
    "build-scripts": "bin/build-scripts.js"
  },
  "scripts": {
    "build": "tsc",
    "start": "tsc -w",
    "test": "echo \"Error: no test specified\" && exit 1"
  },
  "keywords": [],
  "author": "",
  "license": "ISC",
  "dependencies": {
    "commander": "^9.4.0",
    "ts-loader": "^9.3.1",
    "webpack": "^5.74.0"
  },
  "devDependencies": {
    "@types/webpack": "^5.28.0",
    "typescript": "^4.8.2"
  }
}
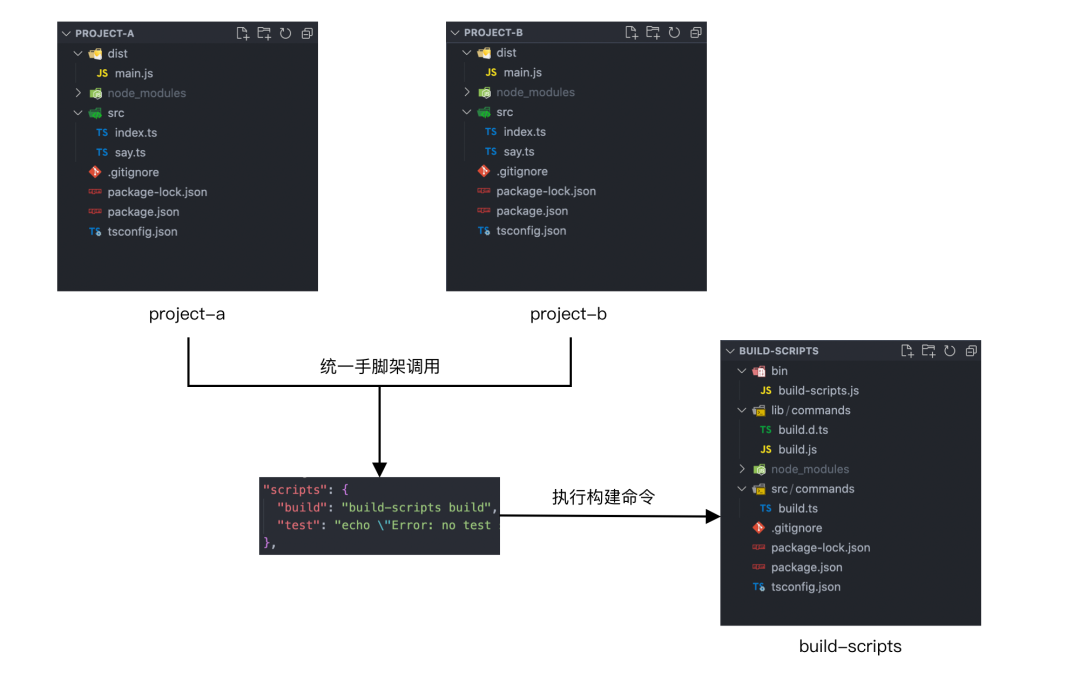
我们将项目的构建配置抽离到 npm 包 build-scripts 里进行统一维护,同时以脚手架的方式来提供项目调用,降低项目的接入成本。项目 project-a 和项目 project-b 只需做如下改造:
项目 project-a
  project-a
    |- /dist
     |- main.js
    |- /src
      |- say.ts
      |- index.ts
-   |- /scripts
-     |- build.js
    |- tsconfig.json
    |- package.json
    |- package-lock.json
project-a/package.json
  {
    "name": "project-a",

     ...

    "scripts": {
-     "build": "node scripts/build.js",
+     "build": "build-scripts build",
      "test": "echo \"Error: no test specified\" && exit 1"
    },

     ...

    "devDependencies": {
-     "ts-loader": "^9.3.1",
+     "build-scripts": "^1.0.0",
      "typescript": "^4.8.2",
      "@types/node": "^18.7.14",
-     "webpack": "^5.74.0"
    }
  }
项目 project-b 改造同项目 project-a
改造完成后,项目 project-a 和项目 project-b 不再需要在项目里独立维护构建配置,而是通过统一脚手架的方式调用 build-scripts 的 build 命令进行构建打包。后续构建配置更新时,各个项目也只需要升级 npm 包 build-scripts 版本即可,避免了之前手动拷贝带来的修改维护问题。
3. 添加用户配置
下面我们的场景再来演进一下:
由于业务需求,我们又新建了一个前端项目 project-c。项目 project-c 想要接入 build-scripts 进行构建打包,但它的打包入口并不是默认的 src/index,构建目录也不是 /dist,此时应该怎么办呢?
一般来说,不同项目对构建配置都会有一定的自定义需求,所以我们需要将一些常用的配置开放给项目进行设置,例如 entry、outputDir 等。基于这个目的,我们下面来对 build-scripts 进行一下改造:
我们首先来为项目 project-c 新增一个用户配置文件 build.json。
项目 project-c
  project-c
    |- /build
     |- main.js
    |- /src
      |- say.ts
      |- index1.ts
+   |- build.json
    |- tsconfig.json
    |- package.json
    |- package-lock.json
project-c/build.json
{
  "entry": "./src/index1",
  "outputDir": "./build"
}
然后我们来对 build-scritps 里的执行逻辑进行一下改造,让 build-scripts 在执行构建命令时,先读取当前项目下的用户配置 build.json,然后使用用户配置来覆盖默认的构建配置。
build-scripts/src/commands/build.ts
  import * as path from 'path';
  import * as webpack from 'webpack';

  export = async () => {
    const rootDir = process.cwd();

+   // 获取用户配置
+   let userConfig: { [name: string]: any } = {};
+   try {
+     userConfig = require(path.resolve(rootDir, './build.json'));
+   } catch (error) {
+     console.log('Config error: build.json is not exist.');
+     return;
+   }

+   // 用户配置非空及合法性校验
+   if (!userConfig.entry) {
+     console.log('Config error: userConfig.entry is not exist.');
+     return;
+   }
+   if (typeof userConfig.entry !== 'string') {
+     console.log('Config error: userConfig.entry is not valid.');
+     return;
+   }
+   if (!userConfig.outputDir) {
+     console.log('Config error: userConfig.outputDir is not exist.');
+     return;
+   }
+   if (typeof userConfig.outputDir !== 'string') {
+     console.log('Config error: userConfig.outputDir is not valid.');
+     return;
+   }

    // 定义 webpack 配置
    const config = {
-     entry: path.resolve(rootDir, './src/index'),
+     entry: path.resolve(rootDir, userConfig.entry),

      ...

      output: {
        filename: 'main.js',
-       path: path.resolve(rootDir, './dist'),
+       path: path.resolve(rootDir, userConfig.outputDir),
      },
    };

    ...

  };
通过上面的改造,我们就可以基本实现项目 project-c 对于构建配置的自定义需求。
但仔细观察后,我们可以发现上面的改造方式存在一些问题:
- 单个配置的判空、合法性校验及默认配置覆盖逻辑在代码中是分散的,后期配置增加不易管理。
- 单个配置的覆盖逻辑是和默认配置耦合在一起的,且单个配置判空失败后没有默认值兜底,不利于默认配置的独立维护。
基于以上问题,我们再来对 build-scripts 进行一下改造:
npm 包 build-scripts
 build-scripts
    |- /bin
     |- build-scripts.js
    |- /lib (ts 构建目录,文件同 src)
    |- /src
      |- /commands
       |- build.ts
+     |- /configs
+      |- build.ts
+     |- /core
+       |- ConfigManager.ts
    |- tsconfig.json
    |- package.json
    |- package-lock.json
我们首先将默认的构建配置抽离到一个独立的文件 configs/build.ts进行维护。
build-scripts/src/configs/build.ts
const path = require('path');
const rootDir = process.cwd();

const buildConfig = {
  entry: path.resolve(rootDir, './src/index'),
  module: {
    rules: [
      {
        test: /\.ts?$/,
        use: require.resolve('ts-loader'),
        exclude: /node_modules/,
      },
    ],
  },
  resolve: {
    extensions: ['.ts', '.js'],
  },
  output: {
    filename: 'main.js',
    path: path.resolve(rootDir, './dist'),
  },
};

export default buildConfig;
然后我们新增一个 ConfigManager 类来进行构建配置的管理,负责用户配置和默认构建配置的合并。
build-scripts/src/core/ConfigManager.ts
import _ = require('lodash');
import path = require('path');
import assert = require('assert');

// 配置类型定义
interface IConfig {
  [key: string]: any;
}

// 用户配置注册信息类型定义
interface IUserConfigRegistration {
  [key: string]: IUserConfigArgs;
}
interface IUserConfigArgs {
  name: string;
  defaultValue?: any;
  validation?: (value: any) => Promise<boolean>;
  configWebpack?: (defaultConfig: IConfig, value: any) => void;
}

class ConfigManager {
  // webpack 配置
  public config: IConfig;
  // 用户配置
  public userConfig: IConfig;
  // 用户配置注册信息
  private userConfigRegistration: IUserConfigRegistration;

  constructor(config: IConfig) {
    this.config = config;
    this.userConfig = {};
    this.userConfigRegistration = {};
  }

  /**
   * 注册用户配置
   *
   * @param {IUserConfigArgs[]} configs
   * @memberof ConfigManager
   */
  public registerUserConfig = (configs: IUserConfigArgs[]) => {
    configs.forEach((conf) => {
      const configName = conf.name;

      // 判断配置属性是否已注册
      if (this.userConfigRegistration[configName]) {
        throw new Error(
          `[Config File]: ${configName} already registered in userConfigRegistration.`
        );
      }

      // 添加配置的注册信息
      this.userConfigRegistration[configName] = conf;

      // 如果当前项目的用户配置中不存在该配置值,则使用该配置注册时的默认值
      if (
        _.isUndefined(this.userConfig[configName]) &&
        Object.prototype.hasOwnProperty.call(conf, 'defaultValue')
      ) {
        this.userConfig[configName] = conf.defaultValue;
      }
    });
  }

  /**
   * 获取用户配置
   *
   * @private
   * @return {*}
   * @memberof ConfigManager
   */
  private getUserConfig = () => {
    const rootDir = process.cwd();
    try {
      this.userConfig = require(path.resolve(rootDir, './build.json'));
    } catch (error) {
      console.log('Config error: build.json is not exist.');
      return;
    }
  }

  /**
   * 执行注册用户配置
   *
   * @param {*} configs
   * @memberof ConfigManager
   */
  private runUserConfig = async () => {
    for (const configInfoKey in this.userConfig) {
      const configInfo = this.userConfigRegistration[configInfoKey];

      // 配置属性未注册
      if (!configInfo) {
        throw new Error(
          `[Config File]: Config key '${configInfoKey}' is not supported.`
        );
      }

      const { name, validation } = configInfo;
      const configValue = this.userConfig[name];

      // 配置值校验
      if (validation) {
        const validationResult = await validation(configValue);
        assert(
          validationResult,
          `${name} did not pass validation, result: ${validationResult}`
        );
      }

      // 配置值更新到默认 webpack 配置
      if (configInfo.configWebpack) {
        await configInfo.configWebpack(this.config, configValue);
      }
    }
  }

  /**
   * webpack 配置初始化
   */
  public setup = async () => {
    // 获取用户配置
    this.getUserConfig();

    // 用户配置校验及合并
    await this.runUserConfig();
  }
}

export default ConfigManager;
然后修改 build 命令执行逻辑,通过初始化 ConfigManager 实例对构建配置进行管理。
build-scripts/src/commands/build.ts
  import * as path from 'path';
  import * as webpack from 'webpack';

+ import defaultConfig from '../configs/build';
+ import ConfigManager from '../core/ConfigManager';

  export = async () => {
    const rootDir = process.cwd();

-   // 获取用户配置
-   let userConfig: { [name: string]: any } = {};
-   try {
-     userConfig = require(path.resolve(rootDir, './build.json'));
-   } catch (error) {
-     console.log('Config error: build.json is not exist.');
-     return;
-   }

-   // 用户配置非空及合法性校验
-   if (!userConfig.entry) {
-     console.log('Config error: userConfig.entry is not exist.');
-     return;
-   }
-   if (typeof userConfig.entry !== 'string') {
-     console.log('Config error: userConfig.entry is not valid.');
-     return;
-   }
-   if (!userConfig.outputDir) {
-     console.log('Config error: userConfig.outputDir is not exist.');
-     return;
-   }
-   if (typeof userConfig.outputDir !== 'string') {
-     console.log('Config error: userConfig.outputDir is not valid.');
-     return;
-   }

-   // 定义 webpack 配置
-   const config = {
-     entry: path.resolve(rootDir, userConfig.entry),
-     module: {
-       rules: [
-         {
-           test: /\.ts?$/,
-           use: require.resolve('ts-loader'),
-           exclude: /node_modules/,
-         },
-       ],
-     },
-     resolve: {
-       extensions: ['.ts', '.js'],
-     },
-     output: {
-       filename: 'main.js',
-       path: path.resolve(rootDir, userConfig.outputDir),
-     },
-   };

+   // 初始化配置管理类
+   const manager = new ConfigManager(defaultConfig);
+
+   // 注册用户配置
+   manager.registerUserConfig([
+     {
+       // entry 配置
+       name: 'entry',
+       // 配置值校验
+       validation: async (value) => {
+         return typeof value === 'string';
+       },
+       // 配置值合并
+       configWebpack: async (defaultConfig, value) => {
+         defaultConfig.entry = path.resolve(rootDir, value);
+       },
+     },
+     {
+       // outputDir 配置
+       name: 'outputDir',
+       // 配置值校验
+       validation: async (value) => {
+         return typeof value === 'string';
+       },
+       // 配置值合并
+       configWebpack: async (defaultConfig, value) => {
+         defaultConfig.output.path = path.resolve(rootDir, value);
+       },
+     },
+   ]);
+
+   // webpack 配置初始化
+   await manager.setup();

    // 实例化 webpack
-   const compiler = webpack(config);
+   const compiler = webpack(manager.config);

    // 执行 webpack 编译
    compiler.run((err, stats) => {
      compiler.close((closeErr) => {});
    });
  };
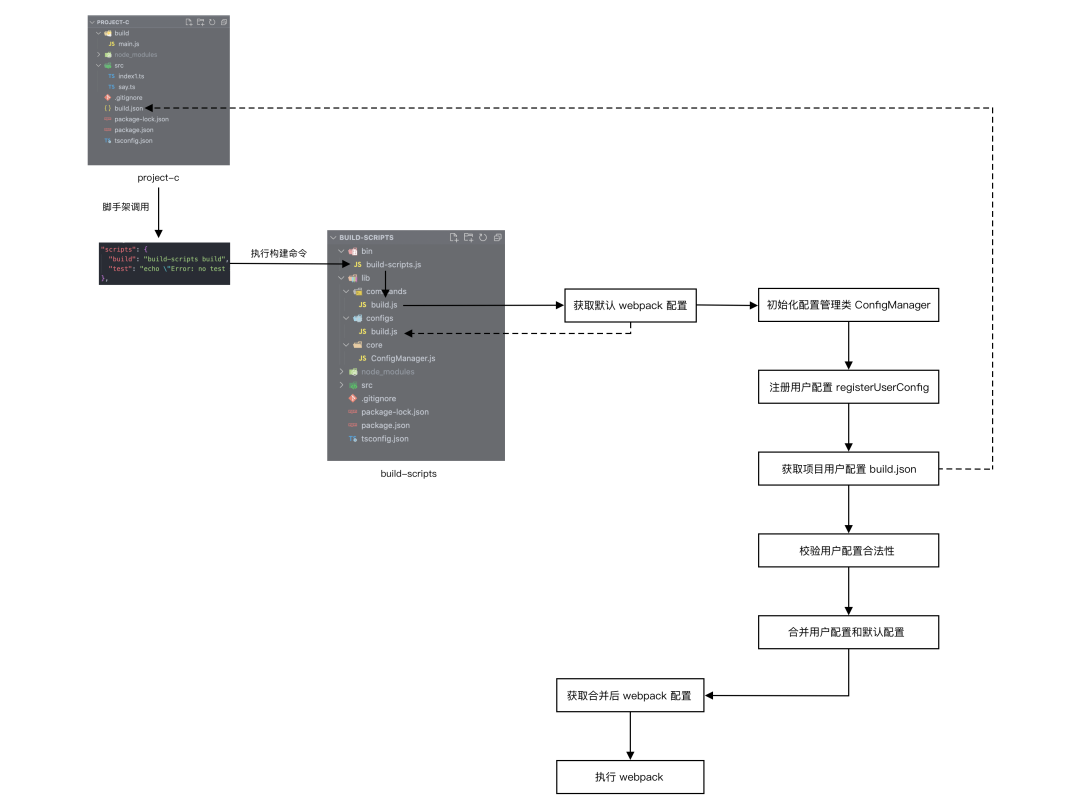
通过上面的改造,我们将用户配置的覆盖逻辑和默认构建配置进行了解耦,同时通过 ConfigManager 类的 registerUserConfig 方法将用户配置的校验、覆盖等逻辑等聚合在一起进行管理。
改造完成后,整体的执行流程如下:
4. 添加插件机制
下面我们的场景再来演进一下:
由于业务需求,项目 project-c 需要处理 xml 文件, 所以项目的构建配置中需要增加 xml 文件的处理 loader,但是 build-scripts 并不支持 config.module.rules 的扩展,此时应该怎么办呢?
我们之前新增的用户配置方案只适用于一些简单的配置覆盖,如果项目涉及到复杂的构建配置自定义操作,就无能为力了。
社区中一般的做法是将构建配置 eject 到项目中,由用户自行修改,比如 react-scripts 。但是 eject 操作是不可逆的,如果后续构建配置有更新,项目就无法直接通过升级 npm 包的方式完成更新,同时单个项目对于构建配置的扩展也无法在多个项目间复用。
理想的方式是设计一种插件机制,能够让用户可插拔式地对构建配置进行扩展,同时这些插件也可以在项目间复用。基于这个目的,我们来对 build-scripts 进行一下改造:
用户配置 build.json 中新增 plugins 字段,用于配置自定义插件列表。
project-c/build.json
  {
    "entry": "./src/index1",
    "outputDir": "./build",
+   "plugins": ["build-plugin-xml"]
  }
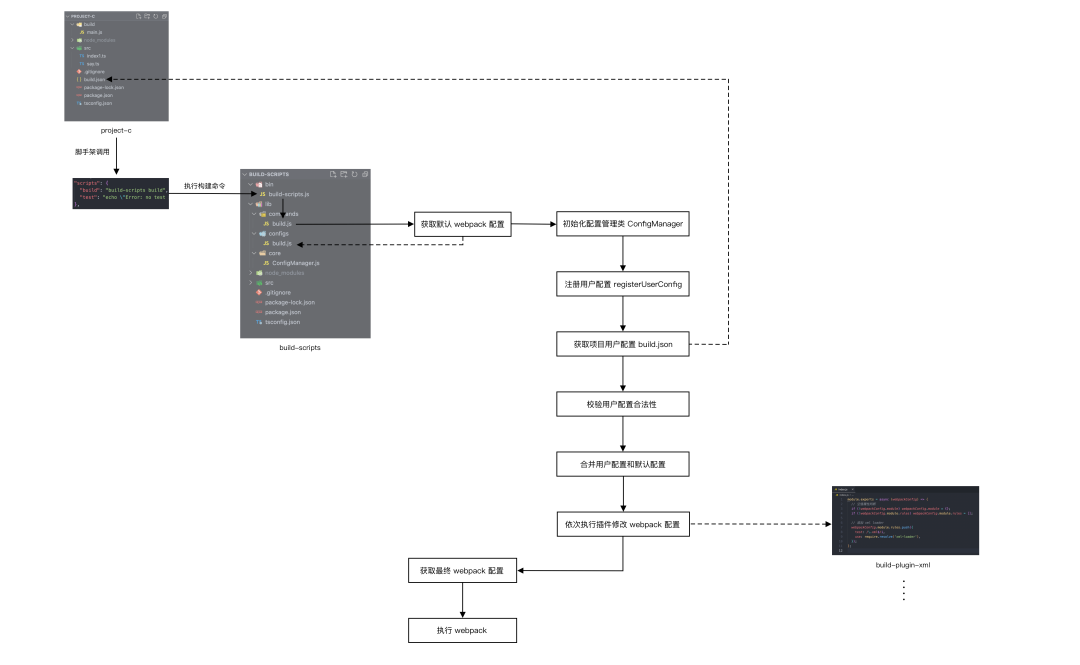
然后我们再来改造一下 ConfigManager 里的执行逻辑,让 ConfigManager 在执行完用户配置和默认配置的合并后,去依次执行项目 build.json 中定义的插件列表,并将合并后的配置以参数的形式传入插件。
build-scripts/core/ConfigManager.ts
  import _ = require('lodash');
  import path = require('path');
  import assert = require('assert');

  ...

  class ConfigManager {
    // webpack 配置
    public config: IConfig;

    ...

    /**
     * 执行注册用户配置
     *
     * @param {*} configs
     * @memberof ConfigManager
     */
    private runUserConfig = async () => {
      for (const configInfoKey in this.userConfig) {
+       if (configInfoKey === 'plugins') return;
        const configInfo = this.userConfigRegistration[configInfoKey];

        ...

      }
    }

+   /**
+    * 执行插件
+    *
+    * @private
+    * @memberof ConfigManager
+    */
+   private runPlugins = async () => {
+     for (const plugin of this.userConfig.plugins) {
+       const pluginPath = require.resolve(plugin, { paths: [process.cwd()] });
+       const pluginFn = require(pluginPath);
+       await pluginFn(this.config);
+     }
+   }

    /**
     * webpack 配置初始化
     */
    public setup = async () => {
      // 获取用户配置
      this.getUserConfig();

      // 用户配置校验及合并
      await this.runUserConfig();

+     // 执行插件
+     await this.runPlugins();
    }
  }

  export default ConfigManager;
通过插件执行时传入的构建配置,我们就可以直接在插件内部完成构建配置对于 xml-loader 的扩展。
build-plugin-xml/index.js
module.exports = async (webpackConfig) => {
  // 空值属性判断
  if (!webpackConfig.module) webpackConfig.module = {};
  if (!webpackConfig.module.rules) webpackConfig.module.rules = [];

  // 添加 xml-loader
  webpackConfig.module.rules.push({
    test: /\.xml$/i,
    use: require.resolve('xml-loader'),
  });
};基于以上的插件机制,项目可以对构建配置实现任意的自定义扩展,同时插件还可以 npm 包的形式在多个项目间复用。
改造完成后,整体的执行流程如下:
5. 引入 webpack-chain
下面我们的场景再来演进一下:
由于构建性能问题(仅为场景假设),插件 build-plugin-xml 需要将 xml-loader 的匹配规则调整到 ts-loader 的匹配规则之前,所以我们对插件 build-plugin-xml 进行了如下改造:
module.exports = async (webpackConfig) => {
  // 空值属性判断
  if (!webpackConfig.module) webpackConfig.module = {};
  if (!webpackConfig.module.rules) webpackConfig.module.rules = [];

  // 定义 xml-loader 规则
  const xmlRule = {
    test: /\.xml$/i,
    use: require.resolve('xml-loader'),
  };

  // 找到 ts-loader 规则位置
  const tsIndex = webpackConfig.module.rules.findIndex(
    (rule) => String(rule.test) === '/\\.ts?$/'
  );

  // 添加 xml-loader 规则
  if (tsIndex > -1) {
    webpackConfig.module.rules.splice(tsIndex - 1, 0, xmlRule);
  } else {
    webpackConfig.module.rules.push(xmlRule);
  }
};
改造完成后,插件 build-plugin-xml 针对 xml-loader 的扩展一共做了四件事:
- 对 webapck 进行空值属性判断和补齐。
- 定义 xml-loader 规则。
- 找到 ts-loader 规则的位置。
- 将 xml-loader 规则插入到 ts-loader 规则前。
观察上面的改造我们可以发现,虽然我们的构建配置并不复杂,但针对于它的修改和扩展还是比较繁琐的。这主要是由于 webpack 构建配置是以一个 JavaScript 对象的形式来进行维护的,一般项目中的配置对象往往很大,且内部属性间存在层层嵌套,针对配置对象的修改和扩展会涉及到各种判空、遍历、分支处理等操作,所以逻辑会显得比较复杂。
为了解决插件中构建配置修改和扩展逻辑复杂的问题,我们可以在项目中来引入 webpack-chain :
webpack-chain 是一种 webpack 的流式配置方案,通过链式调用的方式来操作配置对象。其核心是 ChainedMap 和 ChainedSet 两个对象类型,借助 ChainedMap 和 ChainedSet 提供的操作方法,我们能够很方便地对配置对象进行修改和扩展,可以避免之前手动操作 JavaScript 对象时带来的繁琐。这里不做过多介绍,感兴趣的同学可以查看官方文档[1]。
我们先来将默认的构建配置修改为 webpack-chain 的方式。
build-scripts/src/configs/build.ts
+ import * as Config from 'webpack-chain';

  const path = require('path');
  const rootDir = process.cwd();

- const buildConfig = {
-   entry: path.resolve(rootDir, './src/index'),
-   module: {
-     rules: [
-       {
-         test: /\.ts?$/,
-         use: require.resolve('ts-loader'),
-         exclude: /node_modules/,
-       },
-     ],
-   },
-   resolve: {
-     extensions: ['.ts', '.js'],
-   },
-   output: {
-     filename: 'main.js',
-     path: path.resolve(rootDir, './dist'),
-   },
- };

+ const buildConfig = new Config();
+
+ buildConfig.entry('index').add('./src/index');
+
+ buildConfig.module
+   .rule('ts')
+   .test(/\.ts?$/)
+   .use('ts-loader')
+   .loader(require.resolve('ts-loader'));
+
+ buildConfig.resolve.extensions.add('.ts').add('.js');
+
+ buildConfig.output.filename('main.js');
+ buildConfig.output.path(path.resolve(rootDir, './dist'));

  export default buildConfig;
然后我们将 ConfigManager 中涉及到构建配置的地方也切换为 webpack-chain 的方式。
src/core/ConfigManager.ts
  import _ = require('lodash');
  import path = require('path');
  import assert = require('assert');
+ import WebpackChain = require('webpack-chain');

  ...

  interface IUserConfigArgs {
    name: string;
    defaultValue?: any;
    validation?: (value: any) => Promise<boolean>;
-   configWebpack?: (defaultConfig: IConfig, value: any) => void;
+   configWebpack?: (defaultConfig: WebpackChain, value: any) => void;
  }

  class ConfigManager {
    // webpack 配置
-   public config: IConfig;
+   public config: WebpackChain;
    // 用户配置
    public userConfig: IConfig;
    // 用户配置注册信息
    private userConfigRegistration: IUserConfigRegistration;

-   constructor(config: IConfig) {
+   constructor(config: WebpackChain) {
      this.config = config;
      this.userConfig = {};
      this.userConfigRegistration = {};
    }

    ...

  }

  export default ConfigManager;
同时用户配置中涉及到构建配置的地方也切换为 webpack-chain 的方式。
src/commands/build.ts
  ...

  export = async () => {

    ...

    // 注册用户配置
    manager.registerUserConfig([
      {

        ...

        // 配置值合并
        configWebpack: async (defaultConfig, value) => {
-         defaultConfig.entry = path.resolve(rootDir, value);
+         defaultConfig.entry('index').clear().add(path.resolve(rootDir, value));
        },
      },
      {

        ...

        // 配置值合并
        configWebpack: async (defaultConfig, value) => {
-         defaultConfig.output.path = path.resolve(rootDir, value);
+         defaultConfig.output.path(path.resolve(rootDir, value));
        },
      },
    ]);

    // webpack 配置初始化
    await manager.setup();

    // 实例化 webpack
-   const compiler = webpack(manager.config);
+   const compiler = webpack(manager.config.toConfig());

    ...

  };
借助 webpack-chain ,插件 build-plugin-xml 针对 xml-loader 的扩展逻辑可以简化为:
  module.exports = async (webpackConfig) => {
-   // 空值属性判断
-   if (!webpackConfig.module) webpackConfig.module = {};
-   if (!webpackConfig.module.rules) webpackConfig.module.rules = [];
-
-   // 定义 xml 规则
-   const xmlRule = {
-     test: /\.xml$/i,
-     use: require.resolve('xml-loader'),
-   };
-
-   // 找到 ts 规则位置
-   const tsIndex = webpackConfig.module.rules.findIndex(
-     (rule) => String(rule.test) === '/\\.ts?$/'
-   );
-
-   // 添加 xml 规则
-   if (tsIndex > -1) {
-     webpackConfig.module.rules.splice(tsIndex - 1, 0, xmlRule);
-   } else {
-     webpackConfig.module.rules.push(xmlRule);
-   }

+   webpackConfig.module
+     .rule('xml')
+     .before('ts')
+     .test(/\.xml$/i)
+     .use('xml-loader')
+     .loader(require.resolve('xml-loader'));

  };
相对之前复杂的空值判断和对象遍历逻辑,webpack-chain 极大地简化了插件内部对于配置对象的修改和扩展操作,无论是代码质量,还是开发体验,相对于之前来说都有不小的提升。
6. 插件化默认构建配置
下面我们的场景再来演进一下:
假设现在接入 build-scripts 的项目都是 react 项目, 由于业务方向的调整,后续团队的技术栈会切换到 rax,新增的 rax 项目想继续使用 build-scripts 进行项目间构建配置的复用,此时应该怎么办呢?
由于 build-scripts 里默认的构建配置是基于 react 的,所以 rax 项目是没办法直接基于插件进行扩展的,难道需要基于 rax 构建配置再新建一个 build-scritps 项目吗?这样显然是没办法做到核心逻辑复用的。我们来换个思路想想,既然插件可以修改构建配置,那么能不能将构建配置的初始化也放在插件里?这样就能够实现构建配置和 build-scripts 的解耦,任意类型的项目都能够基于 build-scripts 来进行构建配置的管理和扩展。
基于这个目的,我们下面来对 build-scripts 进行一下改造:
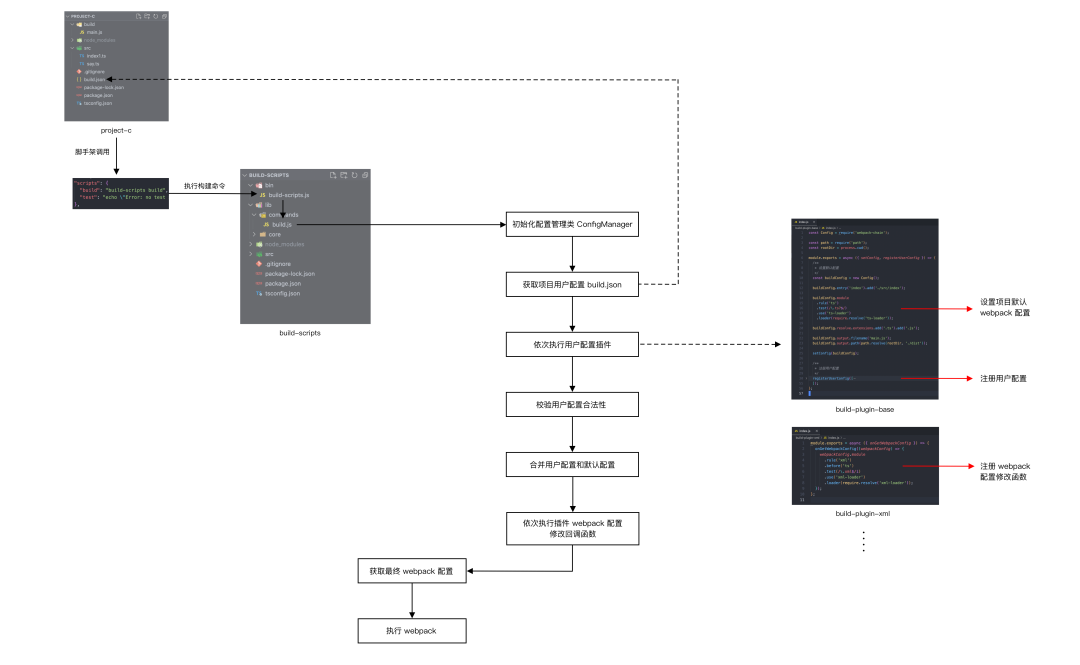
我们首先对 ConfigManager 里的逻辑进行一下调整,新增 setConfig 方法提供给插件进行构建配置的初始化,由于插件还承担修改和扩展构建配置的职责,而这部分逻辑的调用是在初始配置和用户配置合并后的,所以我们通过 onGetWebpackConfig 方法注册回调函数的方式来执行这部分逻辑。
src/core/ConfigManager.ts
  import _ = require('lodash');
  import path = require('path');
  import assert = require('assert');
  import WebpackChain = require('webpack-chain');

  ...

+ // webpack 配置修改函数类型定义
+ type IModifyConfigFn = (defaultConfig: WebpackChain) => void;

  class ConfigManager {
    // webpack 配置
    public config: WebpackChain;
    // 用户配置
    public userConfig: IConfig;
    // 用户配置注册信息
    private userConfigRegistration: IUserConfigRegistration;
+   // 已注册的 webpack 配置修改函数
+   private modifyConfigFns: IModifyConfigFn[];

-   constructor(config: WebpackChain) {
-     this.config = config;
+   constructor() {
      this.userConfig = {};
      this.userConfigRegistration = {};
+     this.modifyConfigFns = [];
    }

+   /**
+    * 设置 webpack 配置
+    *
+    * @param {WebpackChain} config
+    * @memberof ConfigManager
+    */
+   public setConfig = (config: WebpackChain) => {
+     this.config = config;
+   };

+   /**
+    * 注册 webpack 配置修改函数
+    *
+    * @param {(defaultConfig: WebpackChain) => void} fn
+    * @memberof ConfigManager
+    */
+   public onGetWebpackConfig = (fn: (defaultConfig: WebpackChain) => void) => {
+     this.modifyConfigFns.push(fn);
+   };

    /**
     * 注册用户配置
     *
     * @param {IUserConfigArgs[]} configs
     * @memberof ConfigManager
     */
    public registerUserConfig = (configs: IUserConfigArgs[]) => {

       ...

    };

    /**
     * 获取用户配置
     *
     * @private
     * @return {*}
     * @memberof ConfigManager
     */
    private getUserConfig = () => {

       ...

    };

    /**
     * 执行注册用户配置
     *
     * @param {*} configs
     * @memberof ConfigManager
     */
    private runUserConfig = async () => {

      ...

    };

    /**
     * 执行插件
     *
     * @private
     * @memberof ConfigManager
     */
    private runPlugins = async () => {
      for (const plugin of this.userConfig.plugins) {
        const pluginPath = require.resolve(plugin, { paths: [process.cwd()] });
        const pluginFn = require(pluginPath);
-       await pluginFn(this.config);
+       await pluginFn({
+         setConfig: this.setConfig,
+         registerUserConfig: this.registerUserConfig,
+         onGetWebpackConfig: this.onGetWebpackConfig,
+       });
      }
    };

+   /**
+    * 执行 webpack 配置修改函数
+    *
+    * @private
+    * @memberof ConfigManager
+    */
+   private runWebpackModifyFns = async () => {
+     this.modifyConfigFns.forEach((fn) => fn(this.config));
+   };

    /**
     * webpack 配置初始化
     */
    public setup = async () => {
      // 获取用户配置
      this.getUserConfig();

+     // 执行插件
+     await this.runPlugins();

      // 用户配置校验及合并
      await this.runUserConfig();

-     // 执行插件
-     await this.runPlugins();

+     // 执行 webpack 配置修改函数
+     await this.runWebpackModifyFns();
    };
  }

  export default ConfigManager;
然后我们将 build-scripts 里默认配置相关的逻辑给抽离出来。
npm 包 build-scripts
  build-scripts
    |- /bin
     |- build-scripts.js
    |- /lib (ts 构建目录,文件同 src)
    |- /src
      |- /commands
       |- build.ts
-     |- /configs
-      |- build.ts
      |- /core
       |- ConfigManager.ts
    |- tsconfig.json
    |- package.json
    |- package-lock.json
由于用户配置一般是跟默认构建配置走的,所以我们也抽离出来。
src/commands/build.ts
- import * as path from 'path';
  import * as webpack from 'webpack';

- import defaultConfig from '../configs/build';
  import ConfigManager from '../core/ConfigManager';

  export = async () => {
-   const rootDir = process.cwd();

    // 初始化配置管理类
-   const manager = new ConfigManager(defaultConfig);
+   const manager = new ConfigManager();

-   // 注册用户配置
-   manager.registerUserConfig([
-     {
-       // entry 配置
-       name: 'entry',
-       // 配置值校验
-       validation: async (value) => {
-         return typeof value === 'string';
-       },
-       // 配置值合并
-       configWebpack: async (defaultConfig, value) => {
-         defaultConfig.entry('index').clear().add(path.resolve(rootDir, value));
-       },
-     },
-     {
-       // outputDir 配置
-       name: 'outputDir',
-       // 配置值校验
-       validation: async (value) => {
-         return typeof value === 'string';
-       },
-       // 配置值合并
-       configWebpack: async (defaultConfig, value) => {
-         defaultConfig.output.path(path.resolve(rootDir, value));
-       },
-     },
-   ]);

    // webpack 配置初始化
    await manager.setup();

    // 实例化 webpack
    const compiler = webpack(manager.config.toConfig());

    // 执行 webpack 编译
    compiler.run((err, stats) => {
      compiler.close((closeErr) => {});
    });
  };
我们将抽离的默认构建配置的相关逻辑,封装到插件 build-plugin-base 里。
build-plugin-base/index.js
const Config = require('webpack-chain');

const path = require('path');
const rootDir = process.cwd();

module.exports = async ({ setConfig, registerUserConfig }) => {
  /**
   * 设置默认配置
   */
  const buildConfig = new Config();

  buildConfig.entry('index').add('./src/index');

  buildConfig.module
    .rule('ts')
    .test(/\.ts?$/)
    .use('ts-loader')
    .loader(require.resolve('ts-loader'));

  buildConfig.resolve.extensions.add('.ts').add('.js');

  buildConfig.output.filename('main.js');
  buildConfig.output.path(path.resolve(rootDir, './dist'));

  setConfig(buildConfig);

  /**
   * 注册用户配置
   */
  registerUserConfig([
    {
      // entry 配置
      name: 'entry',
      // 配置值校验
      validation: async (value) => {
        return typeof value === 'string';
      },
      // 配置值合并
      configWebpack: async (defaultConfig, value) => {
        defaultConfig.entry('index').clear().add(path.resolve(rootDir, value));
      },
    },
    {
      // outputDir 配置
      name: 'outputDir',
      // 配置值校验
      validation: async (value) => {
        return typeof value === 'string';
      },
      // 配置值合并
      configWebpack: async (defaultConfig, value) => {
        defaultConfig.output.path(path.resolve(rootDir, value));
      },
    },
  ]);
};
同时我们还需要调整一下 build-plugin-xml 里的逻辑,将构建配置扩展的逻辑通过 onGetWebpackConfig 方法改为回调函数的方式调用。
build-plugin-xml/index.js
- module.exports = async (webpackConfig) => {
+ module.exports = async ({ onGetWebpackConfig }) => {
+   onGetWebpackConfig((webpackConfig) => {
      webpackConfig.module
        .rule('xml')
        .test(/\.xml$/i)
        .use('xml-loader')
        .loader(require.resolve('xml-loader'));
+   });
};通过以上的改造,我们实现了默认构建配置和 build-scripts 的解耦,理论上任意类型的项目均可基于 build-scripts 来实现构建配置的项目间复用及扩展。
改造完成后,整体的执行流程如下:
7. 添加多任务机制
最后我们的场景再来扩展一下:
假设单个项目的构建产物不止一种,例如 Rax 项目需要打包构建为 H5 和 小程序两种类型,两种类型对应的是不同的构建配置,但 build-scripts 只支持一份构建配置, 此时应该怎么办呢?
webpack 其实默认是支持多构建配置执行的,我们只需要向 webpack 的 compiler 实例传入一个数组就行:
const webpack = require('webpack');

webpack([
  { entry: './index1.js', output: { filename: 'bundle1.js' } },
  { entry: './index2.js', output: { filename: 'bundle2.js' } }
], (err, stats) => {
  process.stdout.write(stats.toString() + '\n');
})
基于 webpack 的多配置执行能力,我们可以来考虑为 build-scripts 设计一种多任务机制。 基于这个目的,我们下面来对 build-scripts 进行一下改造:
首先我们来调整一下 ConfigManager 里的逻辑,将 webapck 的默认配置改为数组形式,同时新增 registerTask 方法来进行 webpack 默认配置的注册,同时调整一下 webpack 默认配置引用的相关逻辑。
build-scripts/src/commands/ConfigManager.ts
  import _ = require('lodash');
  import path = require('path');
  import assert = require('assert');
  import WebpackChain = require('webpack-chain');

  ...

  // webpack 配置修改函数类型定义
  type IModifyConfigFn = (defaultConfig: WebpackChain) => void;

+ // webpack 任务配置类型定义
+ export interface ITaskConfig {
+   name: string;
+   chainConfig: WebpackChain;
+   modifyFunctions: IModifyConfigFn[];
+ }

  class ConfigManager {
-   // webpack 配置
-   public config: WebpackChain;
+   // webpack 配置列表
+   public configArr: ITaskConfig[];
    // 用户配置
    public userConfig: IConfig;
    // 用户配置注册信息
    private userConfigRegistration: IUserConfigRegistration;
-   // 已注册的 webpack 配置修改函数
-   private modifyConfigFns: IModifyConfigFn[];

    constructor() {
+     this.configArr = [];
      this.userConfig = {};
      this.userConfigRegistration = {};
-     this.modifyConfigFns = [];
    }

-   /**
-     * 设置 webpack 配置
-    *
-    * @param {WebpackChain} config
-    * @memberof ConfigManager
-    */
-   public setConfig = (config: WebpackChain) => {
-     this.config = config;
-   };

+   /**
+    * 注册 webpack 任务
+    *
+    * @param {string} name
+    * @param {WebpackChain} chainConfig
+    * @memberof ConfigManager
+    */
+   public registerTask = (name: string, chainConfig: WebpackChain) => {
+     const exist = this.configArr.find((v): boolean => v.name === name);
+     if (!exist) {
+       this.configArr.push({
+         name,
+         chainConfig,
+         modifyFunctions: [],
+       });
+     } else {
+       throw new Error(`[Error] config '${name}' already exists!`);
+     }
+   };

    /**
     * 注册 webpack 配置修改函数
     *
+    * @param {string} name
     * @param {(defaultConfig: WebpackChain) => void} fn
     * @memberof ConfigManager
     */
-   public onGetWebpackConfig = (fn: (defaultConfig: WebpackChain) => void) => {
-     this.modifyConfigFns.push(fn);
-   };
+   public onGetWebpackConfig = (
+     name: string,
+     fn: (defaultConfig: WebpackChain) => void
+   ) => {
+     const config = this.configArr.find((v): boolean => v.name === name);
+
+     if (config) {
+       config.modifyFunctions.push(fn);
+     } else {
+       throw new Error(`[Error] config '${name}' does not exist!`);
+     }
+   };

    /**
     * 注册用户配置
     *
     * @param {IUserConfigArgs[]} configs
     * @memberof ConfigManager
     */
    public registerUserConfig = (configs: IUserConfigArgs[]) => {

      ...

    };

    /**
     * 获取用户配置
     *
     * @private
     * @return {*}
     * @memberof ConfigManager
     */
    private getUserConfig = () => {

      ...

    };

    /**
     * 执行注册用户配置
     *
     * @param {*} configs
     * @memberof ConfigManager
     */
    private runUserConfig = async () => {
      for (const configInfoKey in this.userConfig) {

       ...

        // 配置值更新到默认 webpack 配置
        if (configInfo.configWebpack) {
-         await configInfo.configWebpack(this.config, configValue);
+         // 遍历已注册的 webapck 任务
+         for (const webpackConfigInfo of this.configArr) {
+           await configInfo.configWebpack(
+             webpackConfigInfo.chainConfig,
+             configValue
+           );
+         }
        }
      }
    };

    /**
     * 执行插件
     *
     * @private
     * @memberof ConfigManager
     */
    private runPlugins = async () => {
      for (const plugin of this.userConfig.plugins) {
        const pluginPath = require.resolve(plugin, { paths: [process.cwd()] });
        const pluginFn = require(pluginPath);
        await pluginFn({
-         setConfig: this.setConfig,
+         registerTask: this.registerTask,
          registerUserConfig: this.registerUserConfig,
          onGetWebpackConfig: this.onGetWebpackConfig,
        });
      }
    };

    /**
     * 执行 webpack 配置修改函数
     *
     * @private
     * @memberof ConfigManager
     */
    private runWebpackModifyFns = async () => {
-     this.modifyConfigFns.forEach((fn) => fn(this.config));
+     for (const webpackConfigInfo of this.configArr) {
+       webpackConfigInfo.modifyFunctions.forEach((fn) =>
+         fn(webpackConfigInfo.chainConfig)
+       );
+     }
    };

    /**
     * webpack 配置初始化
     */
    public setup = async () => {
      // 获取用户配置
      this.getUserConfig();

      // 执行插件
      await this.runPlugins();

      // 用户配置校验及合并
      await this.runUserConfig();

      // 执行 webpack 配置修改函数
      await this.runWebpackModifyFns();
    };
  }

  export default ConfigManager;
build 命令执行时的构建配置获取也需要改为数组的形式。
build-scripts/src/commands/build.ts
import * as webpack from 'webpack';

  import ConfigManager from '../core/ConfigManager';

  export = async () => {
    // 初始化配置管理类
    const manager = new ConfigManager();

    // webpack 配置初始化
    await manager.setup();

    // 实例化 webpack
-   const compiler = webpack(manager.config.toConfig());
+   const compiler = webpack(
+     manager.configArr.map((config) => config.chainConfig.toConfig())
+   );

    // 执行 webpack 编译
    compiler.run((err, stats) => {
      compiler.close((closeErr) => {});
    });
  };
插件 build-plugin-base 也需要调整默认构建配置的注册方式。
build-plugin-base/index.js
  const Config = require('webpack-chain');

  const path = require('path');
  const rootDir = process.cwd();

- module.exports = async ({ setConfig, registerUserConfig }) => {
+ module.exports = async ({ registerTask, registerUserConfig }) => {
    /**
     * 设置默认配置
     */
    const buildConfig = new Config();

    ...

-   setConfig(buildConfig)
+   registerTask('base', buildConfig);

    /**
     * 注册用户配置
     */
    registerUserConfig([

     ...

    ]);
  };
插件 build-plugin-xml 也需要添加上对应的 webpack 任务名称参数。
build-plugin-xml/index.js
  module.exports = async ({ onGetWebpackConfig }) => {
-   onGetWebpackConfig((webpackConfig) => {
+   onGetWebpackConfig('base', (webpackConfig) => {
      webpackConfig.module
        .rule('xml')
        .before('ts')
        .test(/\.xml$/i)
        .use('xml-loader')
        .loader(require.resolve('xml-loader'));
    });
  };
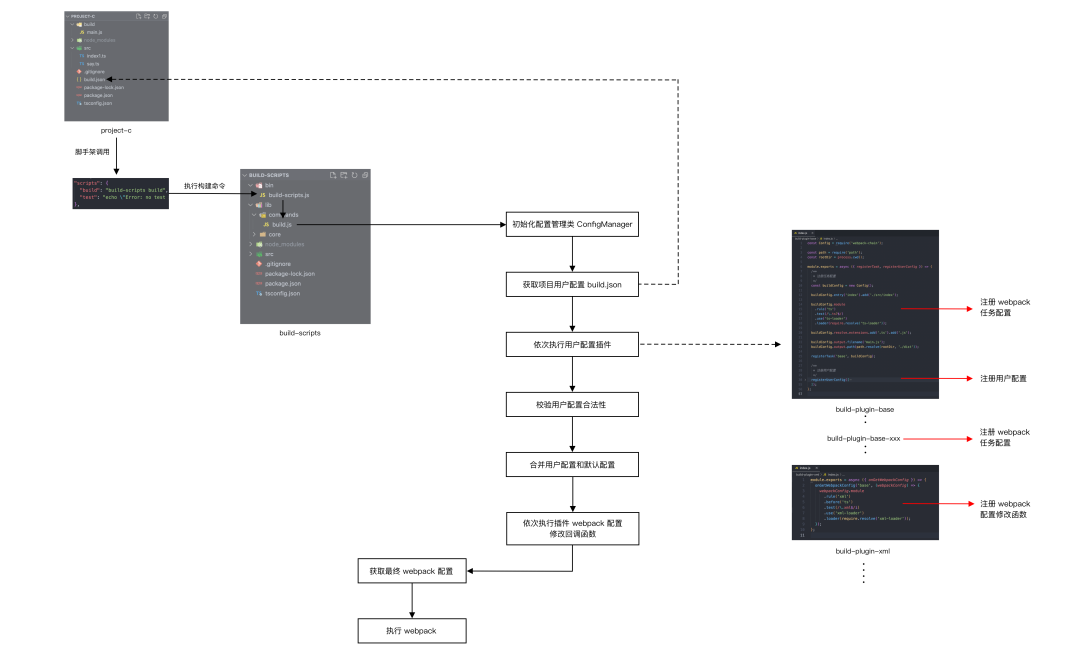
通过以上的改造,我们为 build-scripts 增加了多任务执行的机制,可以实现单个项目下的多构建任务执行。
改造完成后,整体的执行流程如下:
三、写在最后
以上我们通过场景演进的方式,对 build-scripts 核心的设计原理和相关方法进行了讲解。通过以上的分析,我们可以看出 build-scripts 本质上是一个具有灵活插件机制的配置管理方案,不仅仅局限于 webpack 配置,任何有跨项目间配置复用及扩展的场景,都可以借助 build-scripts 的设计思路。
注:文中涉及示例代码可通过仓库 _ build-scripts-demo_[2] 查看,同时 build-scripts 中未介绍到的相关方法,感兴趣的同学也可以通过仓库 _build-scripts_[3] 阅读相关源码。
参考资料
[1] 官方文档: https://github.com/neutrinojs/webpack-chain
[2] _ build-scripts-demo_: https://github.com/CavsZhouyou/build-scripts-demo
[3] build-scripts: https://github.com/ice-lab/build-scripts