跟踪元素可视?试试Intersection Observer
本文将讲解Intersection Observer的用法及其polyfill的原理,我们一起来看下。
背景
现在有以下几种场景。
- 页面滚动时懒加载图片
- 实现无线滚动页面(Infinite scrolling)
- 根据某个元素是否出现在视窗从而执行某些逻辑
对于这些传统的实现方法是,监听到scroll事件后,调用目标元素的getBoundingClientRect()方法,得到它对应于视口左上角的坐标,再判断是否在视口之内。这种方法的缺点是,由于scroll事件是同步事件,在滚动时密集发生,计算量很大,容易造成性能问题。经常需要配合节流一起使用。
这时候 Intersection Observer 就可以优秀的解决我们上述问题。
getBoundingClientRect()(地址:https://developer.mozilla.org/en-US/docs/Web/API/Element/getBoundingClientRect)
Intersection Observer概念及用法
Intersection Observer是w3c提出的一种 Observer API,属于浏览器中全局可访问对象,Intersection Observer 能够更好地支持上述场景,因为 Observer 并不在主线程中执行,降低了资源消耗,优化了网页性能。
Intersection Observer为web开发者提供了一种异步查询元素相对于其他元素或窗口位置的能力。它常应用于解决追踪一个元素在窗口的可视问题。
注:一旦 IntersectionObserver 被创建,则无法更改其配置,所以一个给定的观察者对象只能用来监听可见区域的特定变化值;但是,你可以在同一个观察者对象中配置监听多个目标元素。
API
const observer = new IntersectionObserver(callback[, options]);
// 方法
// 开始观察某个目标元素
observer.observe(target)
// 停止观察某个目标元素
observer.unobserve(target)
// 关闭监视器
observer.disconnect()
// 获取所有 IntersectionObserver 观察的 targets
observer.takeRecords()
// 注:该方法是同步获取所有targets,一旦调用,callback回调将不再执行
options 为可选参数。
未指定时,observer实例默认使用文档视口作为root,margin为0,阈值为0%。(即一像素的改变都会触发回调函数)
可以配置的参数有三个:
| 参数 | 含义 | 默认值 |
|---|---|---|
| root | 指定根(root)元素,用于检查目标的可见性。必须是目标元素的父级元素。 | 默认为顶级文档的视窗。 |
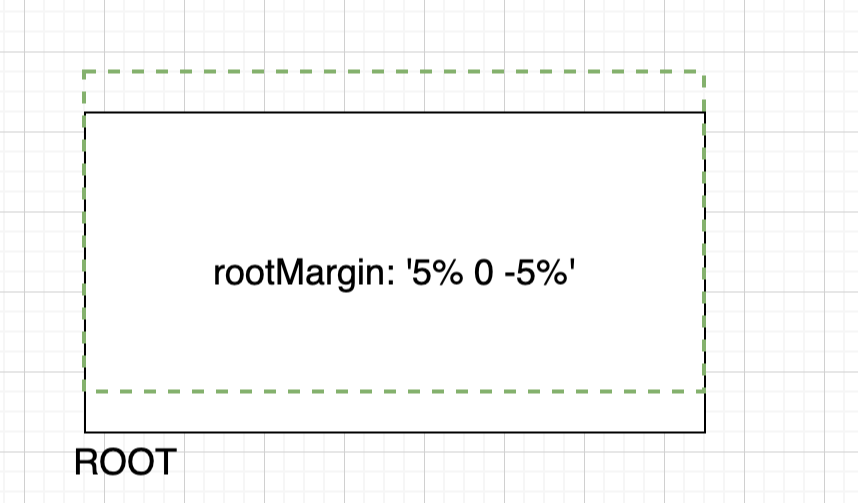
| rootMargin | 根(root)元素的外边距,类似于css的margin属性,该属性值是用作 root 元素和 target 发生交集时候的计算交集的区域范围,使用该属性可以控制 root 元素每一边的收缩或者扩张。 |
默认为"0px 0px 0px 0px"(top, right, bottom, left)。 |
| threshold | 类型为number或number组成的数组。该值为 1.0 含义是当 target 完全出现在 root 元素中时候回调才会被执行。[0, 0.25, 0.5, 0.75, 1]就表示目标元素 0%、25%、50%、75%、100% 可见时,会触发回调函数。 | 默认值为0。 |
callback:当元素可见比例超过指定阈值(threshold)后,会调用回调函数,此回调函数接受两个参数:
entries:一个IntersectionObserverEntry对象组成的数组。intersectionObserverEntry提供目标元素的信息,有以下六个属性:
time:可见性发生变化的时间,是一个高精度时间戳,单位为毫秒
target:被观察的目标元素,是一个 DOM 节点对象
rootBounds:根元素的矩形区域的信息,getBoundingClientRect()方法的返回值,如果没有根元素(即直接相对于视口滚动),则返回null
boundingClientRect:目标元素的矩形区域的信息
intersectionRect:目标元素与视口(或根元素)的交叉区域的信息
intersectionRatio:目标元素的可见比例,即intersectionRect占boundingClientRect的比例,完全可见时为1,完全不可见时小于等于0
observer:被调用的IntersectionObserver实例。
IntersectionObserver地址:https://developer.mozilla.org/zh-CN/docs/Web/API/IntersectionObserver
浏览器兼容性
我们在使用该api时,一定要判断浏览器是否支持,如果不支持,需要我们引入pollify来解决, 我们本篇主要介绍:Intersection Observer polyfill的原理,来了解一下其具体实现。
对Intersection Observer底层源码感兴趣的同学可以看:intersection observe实现
intersection observe实现地址:https://source.chromium.org/chromium/chromium/src/+/main:third_party/blink/renderer/core/intersection_observer/intersection_observer.cc
Observe实现原理
observe方法定义在IntersectionObserver原型上
IntersectionObserver.prototype.observe = function(target) {
  var isTargetAlreadyObserved = this._observationTargets.some(function(item) {
    return item.element == target;
  });

  if (isTargetAlreadyObserved) {
    return;
  }

  if (!(target && target.nodeType == 1)) {
    throw new Error('target must be an Element');
  }

  this._registerInstance();
  this._observationTargets.push({element: target, entry: null});
  this._monitorIntersections();
  this._checkForIntersections();
}
该函数接收的参数就是我们需要监测的dom元素(目标元素)。
首先会遍历this._observationTargets数组,这步就是为了判断当前的元素是否已经通过observe方法监测过。如果已经监测过,(isTargetAlreadyObserved为true)就直接return,防止同一个observer实例对同一个target元素进行多次监测。
如果没有监测过target元素,这里会对target的类型进行判断。如果不是一个dom结点(nodeType !== 1),同样会抛出一个错误。
▐ _registerInstance函数做了什么呢?
IntersectionObserver.prototype._registerInstance = function() {
  if (registry.indexOf(this) < 0) {
    registry.push(this);
  }
};顾名思义,如果我们的observe实例不存在,即将该实例加入到全局registry数组中,避免被垃圾回收机制回收。
▐ _monitorIntersections函数
该函数主要用来实现对目标元素的检测,可以看下具体实现,摘除了一些边界值判断的逻辑,如判断dom已经销毁,判断重复监听等,直接看核心逻辑
IntersectionObserver.prototype._monitorIntersections = function() {
  if (this.POLL_INTERVAL) {
    this._monitoringInterval = setInterval(
        this._checkForIntersections, this.POLL_INTERVAL);
  }
  else {
    addEvent(window, 'resize', this._checkForIntersections, true);
    addEvent(document, 'scroll', this._checkForIntersections, true);

    if (this.USE_MUTATION_OBSERVER && 'MutationObserver' in window) {
      this._domObserver = new MutationObserver(this._checkForIntersections);
      this._domObserver.observe(document, {
        attributes: true,
        childList: true,
        characterData: true,
        subtree: true
      });
    }
  }
}
实现监听的方式有两种
poll_interval:如果设置了轮询时间,则按每隔n秒进行轮询,观察dom变化,这种方式简单粗暴且轮询较耗费性能,因而默认是关闭的。MutationObserver:这种监听方式是监听窗口的resize和页面的scroll事件,当然,这两种监听满足不了所有的场景,比如:某一个元素的显隐,因而,它使用了是MutationObserve这个api,监听document元素下所有节点的attributes,childList和characterData的变化,每当有children节点发生变化时都会去检测target元素和root元素的交集状态。
▐ _checkForIntersections函数
上述的_monitorIntersections中有四个地方调用了_checkForIntersection
- setInterval轮询监听dom变化时
- window的resize
- document的scroll
- MutationObserver api监听dom变化时作为回调触发
还有就是第一个讲解的observe函数中,作为callback回调触发。该函数的作用是,判断root和target的交集是否发生变化,发生变化则触发observe的回调。
IntersectionObserver.prototype._checkForIntersections = function() {
  if (!this.root && crossOriginUpdater && !crossOriginRect) {
    // Cross origin monitoring, but no initial data available yet.
    return;
  }

  // 判断root是否在dom结构中,传入的root一定要是target的祖先元素
  var rootIsInDom = this._rootIsInDom();
  var rootRect = rootIsInDom ? this._getRootRect() : getEmptyRect();

  this._observationTargets.forEach(function(item) {
    var target = item.element;
    var targetRect = getBoundingClientRect(target);
    var rootContainsTarget = this._rootContainsTarget(target);
    var oldEntry = item.entry;
    var intersectionRect = rootIsInDom && rootContainsTarget &&
        this._computeTargetAndRootIntersection(target, targetRect, rootRect);

    var rootBounds = null;
    if (!this._rootContainsTarget(target)) {
      rootBounds = getEmptyRect();
    } else if (!crossOriginUpdater || this.root) {
      rootBounds = rootRect;
    }

    var newEntry = item.entry = new IntersectionObserverEntry({
      time: now(),
      target: target,
      boundingClientRect: targetRect,
      rootBounds: rootBounds,
      intersectionRect: intersectionRect
    });

    if (!oldEntry) {
      this._queuedEntries.push(newEntry);
    } else if (rootIsInDom && rootContainsTarget) {
      // If the new entry intersection ratio has crossed any of the
      // thresholds, add a new entry.
      if (this._hasCrossedThreshold(oldEntry, newEntry)) {
        this._queuedEntries.push(newEntry);
      }
    } else {
      // If the root is not in the DOM or target is not contained within
      // root but the previous entry for this target had an intersection,
      // add a new record indicating removal.
      if (oldEntry && oldEntry.isIntersecting) {
        this._queuedEntries.push(newEntry);
      }
    }
  }, this);

  if (this._queuedEntries.length) {
    this._callback(this.takeRecords(), this);
  }
};this._observationTargets这个属性用来保存被observer所监听的所有的target元素。
_getRootRect是获取root元素的区域,这个区域是rootRect和rootMargin结合计算出新的rootRect区域的大小。
接着遍历this._observationTargets。
在这个forEach遍历中,主要动作就是:搜集root元素和target元素的交集状态,并把他们存入到_queuedEntries数组中。
而计算目标元素和root元素相交区域的核心就是 _computeTargetAndRootIntersection函数
▐ _computeTargetAndRootIntersection函数
IntersectionObserver.prototype._computeTargetAndRootIntersection =
function(target, rootRect) {


  // If the element isn't displayed, an intersection can't happen.
  if (window.getComputedStyle(target).display == 'none') return;


  var targetRect = getBoundingClientRect(target);
  var intersectionRect = targetRect;
  var parent = getParentNode(target);
  // 标志位
  var atRoot = false;


  while (!atRoot) {
    var parentRect = null;
    var parentComputedStyle = parent.nodeType == 1 ?
    window.getComputedStyle(parent) : {};


    // 如果parentRect display为none,target和root元素同样是不可能存在交集的
    if (parentComputedStyle.display == 'none') return;


    if (parent == this.root || parent == document) {
      atRoot = true;
      parentRect = rootRect;
    } else {
      // If the element has a non-visible overflow, and it's not the <body>
      // or <html> element, update the intersection rect.
      // Note: <body> and <html> cannot be clipped to a rect that's not also
      // the document rect, so no need to compute a new intersection.
      if (parent != document.body &&
      parent != document.documentElement &&
      parentComputedStyle.overflow != 'visible') {
        parentRect = getBoundingClientRect(parent);
      }
    }

    // If either of the above conditionals set a new parentRect
    // calculate new intersection data.
    if (parentRect) {
      intersectionRect = computeRectIntersection(parentRect, intersectionRect);
      if (!intersectionRect) break;
    }
      parent = getParentNode(parent);
  }
    return intersectionRect;
}


  function getParentNode(node) {
    var parent = node.parentNode;

    if (parent && parent.nodeType == 11 && parent.host) {
      // If the parent is a shadow root, return the host element.
      return parent.host;
    }

    if (parent && parent.assignedSlot) {
      // If the parent is distributed in a <slot>, return the parent of a slot.
      return parent.assignedSlot.parentNode;
    }

    return parent;
  }
这里判断如果元素是隐藏的,则不可能会相交,直接return。通过atRoot标志位,判断while循环是否循环到了this.root或者是document。
如果我们采用默认的root即document,而且parentNode就是document,那么循环将会进入if分支,并将parentRect被赋值为rootRect,atRoot设置为true。接着执行第44行代码逻辑。
computeRectIntersection 函数
function computeRectIntersection(rect1, rect2) {
    var top = Math.max(rect1.top, rect2.top);
    var bottom = Math.min(rect1.bottom, rect2.bottom);
    var left = Math.max(rect1.left, rect2.left);
    var right = Math.min(rect1.right, rect2.right);
    var width = right - left;
    var height = bottom - top;


    return (width >= 0 && height >= 0) && {
      top: top,
      bottom: bottom,
      left: left,
      right: right,
      width: width,
      height: height
    };
  }
这里就是在计算两个区域rect1和rect2的交集
红框部分即相交部分的区域~
如果target.parentNode不是document,那么while循环会执行else分支。其中执行else分支有一个条件parentComputedStyle.overflow != 'visible'。如果parentComputedStyle.overflow的值为visible,那么target和root最大的交叉面积就是target的大小。
交叉面积算出来之后,使用IntersectionObserverEntry函数计算出各个属性值
function IntersectionObserverEntry(entry) {
  this.time = entry.time;
  this.target = entry.target;
  this.rootBounds = entry.rootBounds;
  this.boundingClientRect = entry.boundingClientRect;
  this.intersectionRect = entry.intersectionRect || getEmptyRect();
  this.isIntersecting = !!entry.intersectionRect;


  // Calculates the intersection ratio.
  var targetRect = this.boundingClientRect;
  var targetArea = targetRect.width * targetRect.height;
  var intersectionRect = this.intersectionRect;
  var intersectionArea = intersectionRect.width * intersectionRect.height;


// Sets intersection ratio.
if (targetArea) {
  // Round the intersection ratio to avoid floating point math issues:
  // https://github.com/w3c/IntersectionObserver/issues/324
  this.intersectionRatio = Number((intersectionArea / targetArea).toFixed(4));
  } else {
  // If area is zero and is intersecting, sets to 1, otherwise to 0
  this.intersectionRatio = this.isIntersecting ? 1 : 0;
  }
}然后计算出intersectionRatio和isIntersecting的值。
总结到这里,_checkForIntersections函数第11行的遍历完成啦
遍历完成,后面还有两行逻辑~
if (this._queuedEntries.length) {
  this._callback(this.takeRecords(), this);
}
this._queuedEntries 是一个数组,其中每一个元素都是IntersectionObserverEntry实例对象。只有当这个属性的长度大于 0 的时候,才会触发回调函数。
回调函数第一个参数是this.takeRecords()获取到的值,回忆一下上面讲解intersection observe概念的时候,我们说过callback回调的第一个参数entrys,是由IntersectionObserverEntry对象组成的数组,他就是takeRecords方法的返回值,那么takeRecords方法做了什么~
IntersectionObserver.prototype.takeRecords = function() {
  var records = this._queuedEntries.slice();
  this._queuedEntries = [];
  return records;
}方法实现很简单,使用数组的slice方法对this._queuedEntries进行了一个拷贝,然后清空了this._queuedEntries。我们知道,intersection observe的回调触发和takeRecords的调用都可以用来获取entries(IntersectionObserverEntry对象数组),每个对象的目标元素都包含每次相交的信息,可以显式通过调用takeRecords方法或隐式地通过观察者的回调(oberve的callback第一个参数)自动调用。当我们调用takeRecords后,有一步清空操作,可以看出如果显示调用takeRecords,则callback不会再被调用。
IntersectionObserverEntry地址:https://developer.mozilla.org/zh-CN/docs/Web/API/IntersectionObserverEntry
引用官网的一句话就是:
调用此方法会清除挂起的相交状态列表,因此不会运行回调
以上是处理所有 Observer 的主体逻辑啦。
展望
Intersection Observer, version 2
目前兼容性还不是很好,期待未来征服各主流浏览器
我们不禁要思考,v1版有哪些不足?
Intersection Observer v1 API 可以告诉您元素何时滚动到窗口的视口中,但它不会告诉您该元素是否被任何其他页面内容覆盖(即元素何时被遮挡)或该元素的可视显示已被 transform,opacity有效filter等css属性修改地使其不可见。
Intersection Observer v2 引入了跟踪目标元素的实际“可见性”的概念,就像人类定义的那样。IntersectionObserver通过在构造函数中设置一个选项,相交的IntersectionObserverEntry实例将包含一个名为 isVisible的新布尔字段,isVisible是true,即目标元素完全不被其他内容遮挡,并且没有应用会改变或扭曲其在屏幕上的显示的视觉效果。相反,一个false意味着不能保证。
最后
附上pollify完整源码的github地址:intersection observe pollify源码(地址:https://github.com/GoogleChromeLabs/intersection-observer/blob/main/intersection-observer.js)


