探索组件在线预览和调试
背景
前端人员在开发过程中,如何快速感知到组件的功能和属性?现状是通过阅读组件相关文档,好在基础组件库的文档相对完整和清晰,手动补全示例。业务组件相关文档目前只能在内部 NPM 私库上查看,静态的 API 文档,没有组件的 Demo。对于非前端人员,如何预览和调试组件呢?比如:某一天,产品想提前调研其它业务线的业务组件功能能否满足业务诉求;业务组件开发完成,测试和设计可以介入组件相关功能的验证;运营人员可以在低代码搭建平台,预览和调试相关组件等。
基于以上痛点问题,我们从需求点出发,逐步探索实现方案。
需求
场景分析
功能
- 组件预览
- 组件调试 面向不同的用户群体,组件功能调试的交互分为两种,一种是代码调试,即通过代码编辑器修改示例代码,另一种是组件 schema 调试,通过 schema JSON 数据来描述组件的属性,然后 通过 schema 渲染器渲染成组件属性面板,这样非研发人员也可以方便的调试组件功能。
分类
- 基础组件
- 业务组件
- 低代码组件 大致整理了下:
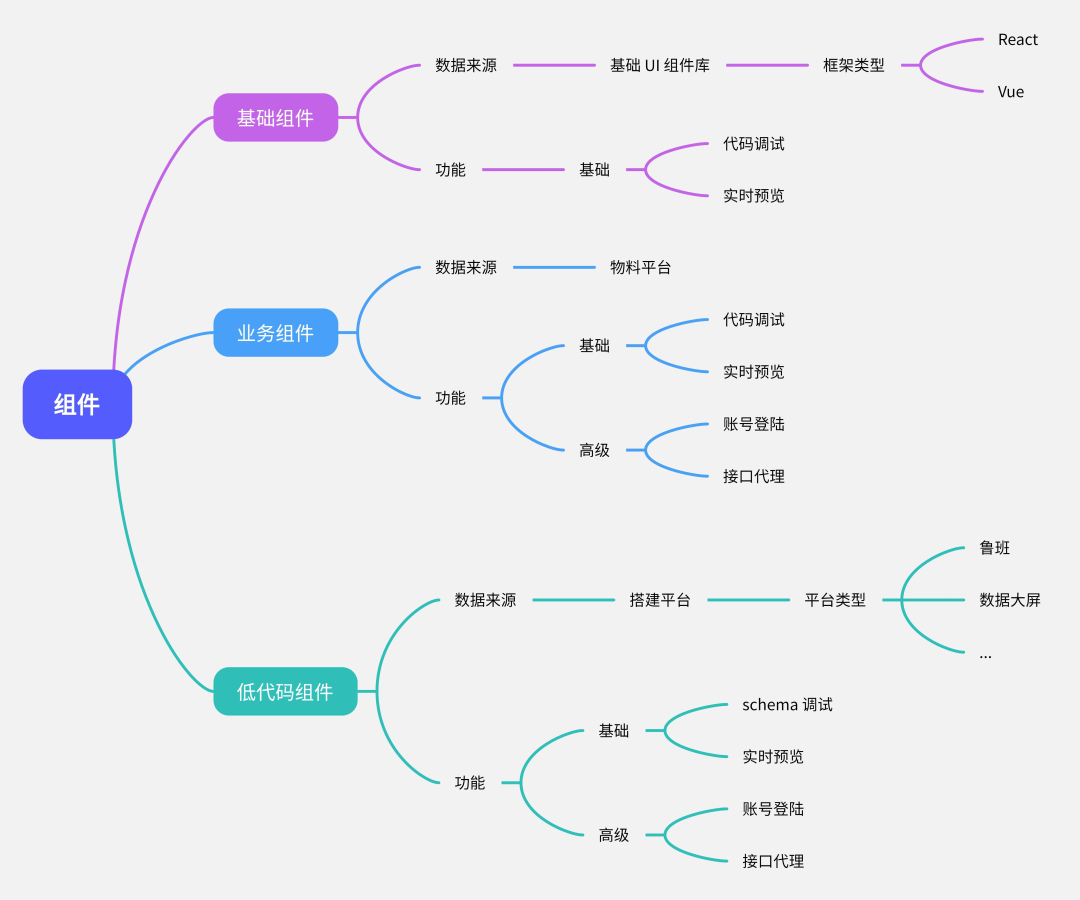
针对组件 schema 调试,低代码组件本身自带 schema 文件,如:“鲁班”自定义组件会有一份 schema.json 文件,需要开发者去编写和维护这份文件。
如:
{
  "props": {
    "linkList": {
      "group": "链接配置",
      "title": "链接列表",
      "type": "array",
      "fields": [
        {
          "name": "imageAddress",
          "title": "图链接图片地址",
          "type": "string"
        },
        {
          "name": "imageLink",
          "title": "链接跳转地址",
          "type": "string"
        }
      ]
    }
  },
  "models": {
    "linkList": [
      {
        "imageAddress": "",
        "imageLink": ""
      },
      {
        "imageAddress": "",
        "imageLink": ""
       }
    ]
  }
}
同样,业务组件也需要同一份 schema 协议的 JSON 文件,这样就可以动态调试组件的属性。但是,不会让开发组件的同学去手动编写。
自动生成 schema 文件大致思路:
应用
- 基础组件的示例在线预览和调试
- 业务组件的 Demo 在线预览和调试
面向人群
- 研发
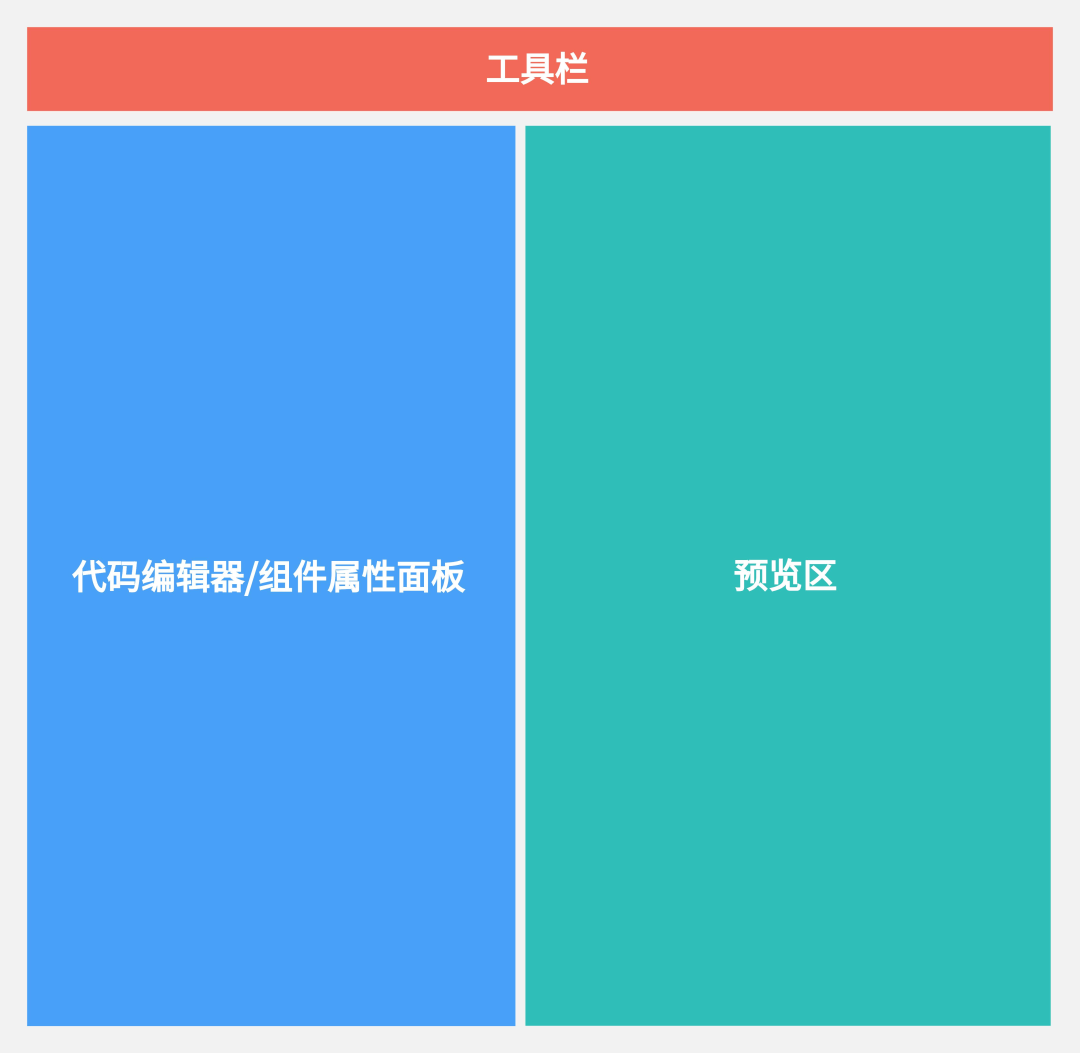
- 非研发:产品、测试、运营 研发主要用到组件的调试功能,而像运营和产品这样非研发人员,他们的诉求简单快捷,就是直接预览该组件,并且可以通过修改组件的 props 看到实时效果,那么问题来了,如何修改组件当前的 props 属性?玩过低代码的同学应该很清楚,有个组件属性面板。基于以上,我们可能需要代码编辑面板、组件属性面板以及组件功能模块。
大致画了下页面的结构图:
调研
市面上成熟的产品
- Stackblitz 一款非常优秀的在线 IDE,移植了很多 VS Code 的功能和特性。目前支持了很多框架模版,如:React、Angular、Vue3、Next.js、Nuxt3 及自定义模版等,其中, StackBlitz 提供的 WebContainers 可以在浏览器端运行 Node.js 环境。
- CodeSandbox 为 Web 应用程序而开发而构建的在线编辑器,同样也提供了多种模版方便开发者使用。大部分核心代码也开源了,网上也有相关的原理解析和搭建在线 IDE 方案的资料,有兴趣的同学可以去看看。
小结
需求和应用场景已经很明确了,考虑到不同的用户群体,交互方式也有差别,重点是组件调试功能的差异性,对于研发人员可通过代码编辑器去修改代码达到调试效果,非研发人员则通过修改属性面板的组件属性值。而市面上的成熟产品会提供一些设计思路,具体实现方案下面会细讲。
方案
从页面结构图,我们先聊下代码编辑器、组件属性面板、工具栏、预览区的设计方案。
代码编辑器
目前主流的有两种:
- MonacoEditor
- Codemirror MonacoEditor 相对来说功能强大,集成度高,但随之带来的是比较重,而 Codemirror 轻量小巧,核心文件压缩后仅 70+ KB 左右,根据所需要支持的语言按需打包。
两种代码编辑器都能满足我们的需求,在线修改一些组件 Demo 的部分代码,其实 Codemirror 够用了。
组件属性面板
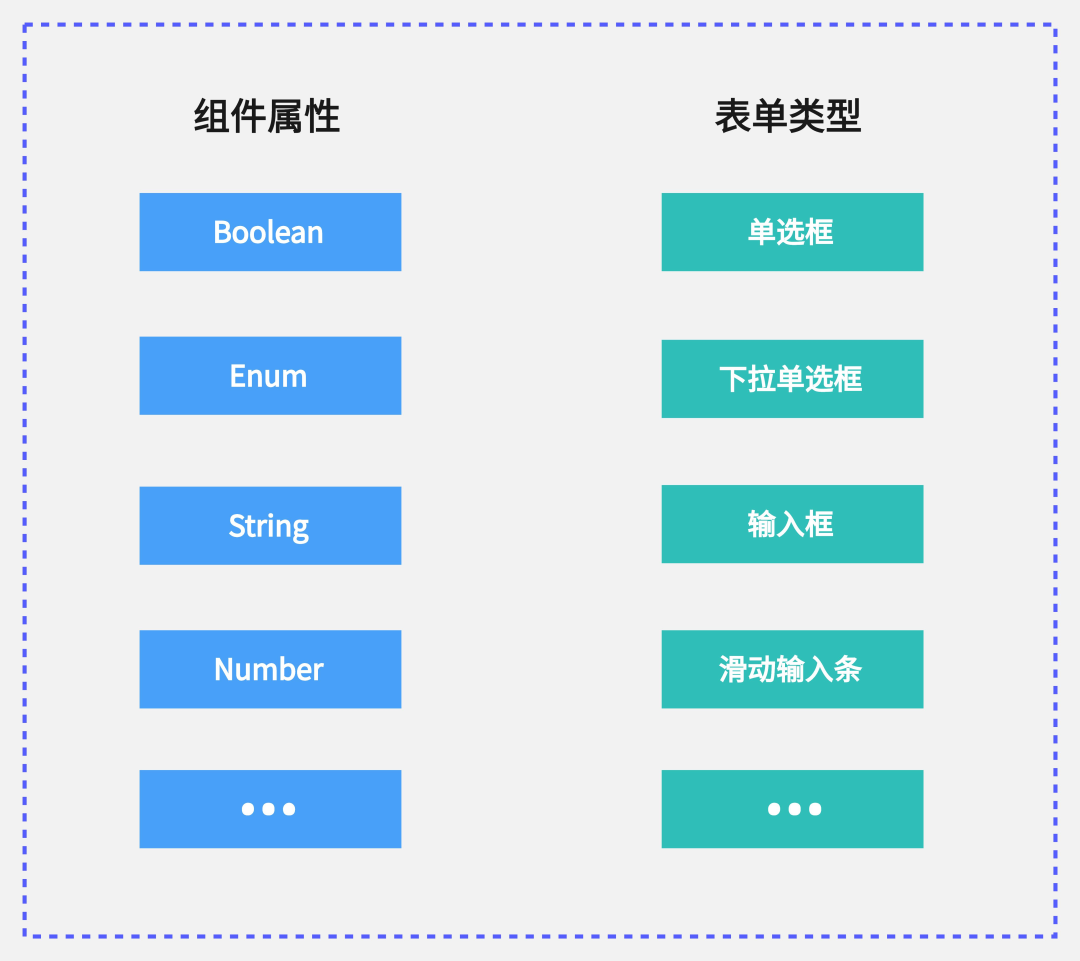
了解低代码搭建平台的朋友应该很熟悉了,其实就是通过表单去动态修改组件的属性参数,因此,需要一份通用的 schema 协议,来描述组件的自定义属性。可以由鲁班和大数据搭建平台那边提供 schema 数据,我们负责渲染即可。
大致列了下组件属性的类型和操作表单类型的对应关系:
工具栏
工具栏包含的主要功能有:
- 账号登陆
- 接口代理 业务组件和低代码组件需要被调试时,比如测试人员需要介入测试组件功能,需要用到账号登陆和接口代理功能。组件内涉及到业务接口的请求头需要携带当前登陆用户的 token 信息,先通过请求 oauth 接口拿到对应的 token,然后塞到请求头的 Authorization 字段上。
上面实现的前提是需要一个代理服务,在本地开发环境我们可以用 http-proxy 插件创建本地代理服务,那么问题来了,在浏览器端如何做代理服务?
目前主流的方案都是通过 Chrome 插件形式,需要用户手动填写代理接口等信息。在我们的场景下,这个方案对用户体验显然不够友好。还有个方案可以利用浏览器的黑科技 —— Service Worker,它可以拦截网页发出的请求,并能自定义返回内容,相当于在浏览器内部实现了一个反向代理。
预览区
核心会涉及到两点:
- 容器
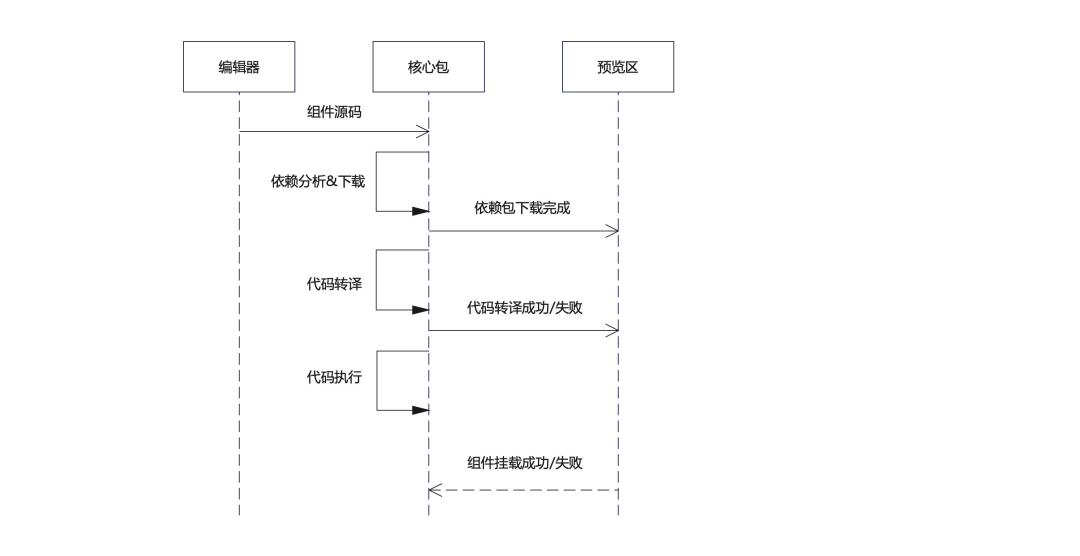
- 通信 容器是指页面容器,业界通用做法都是通过 iframe,将编译好的组件代码挂载到 iframe 里一个 root 节点上,主要有环境隔离和动态生成预览页面的访问链接作用。编辑器、核心包、预览区之间的通信可以用 postMessage。
通信时序图:
核心包
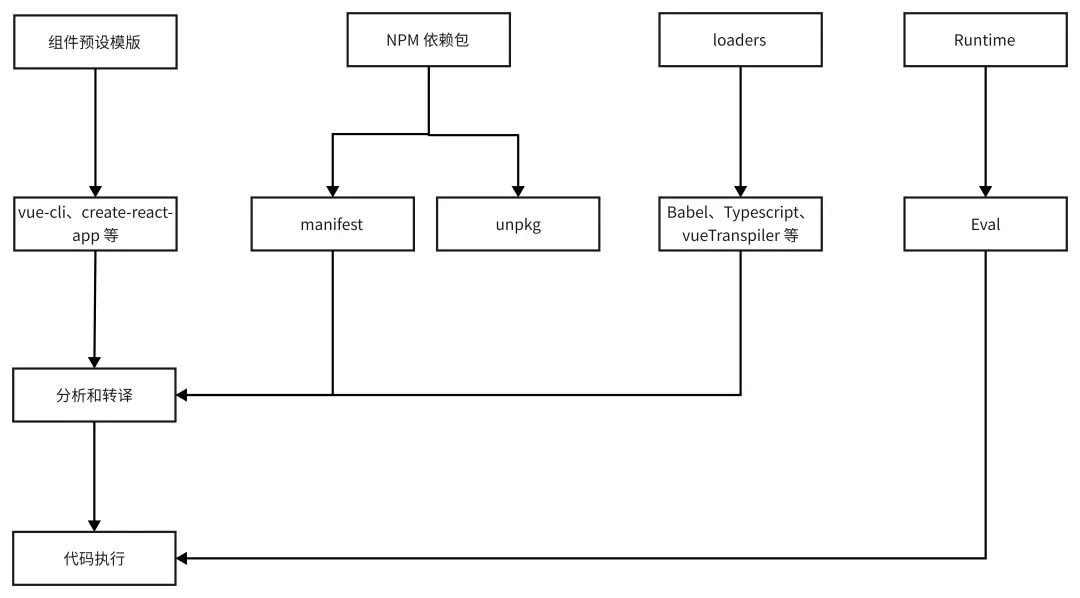
设计思路,主要参考了 CodeSandbox 的核心源码,主要涉及到代码转译和代码执行。核心模块有 Manger、Transpiler、Preset、Transpiled-module、Runtime。
架构图:
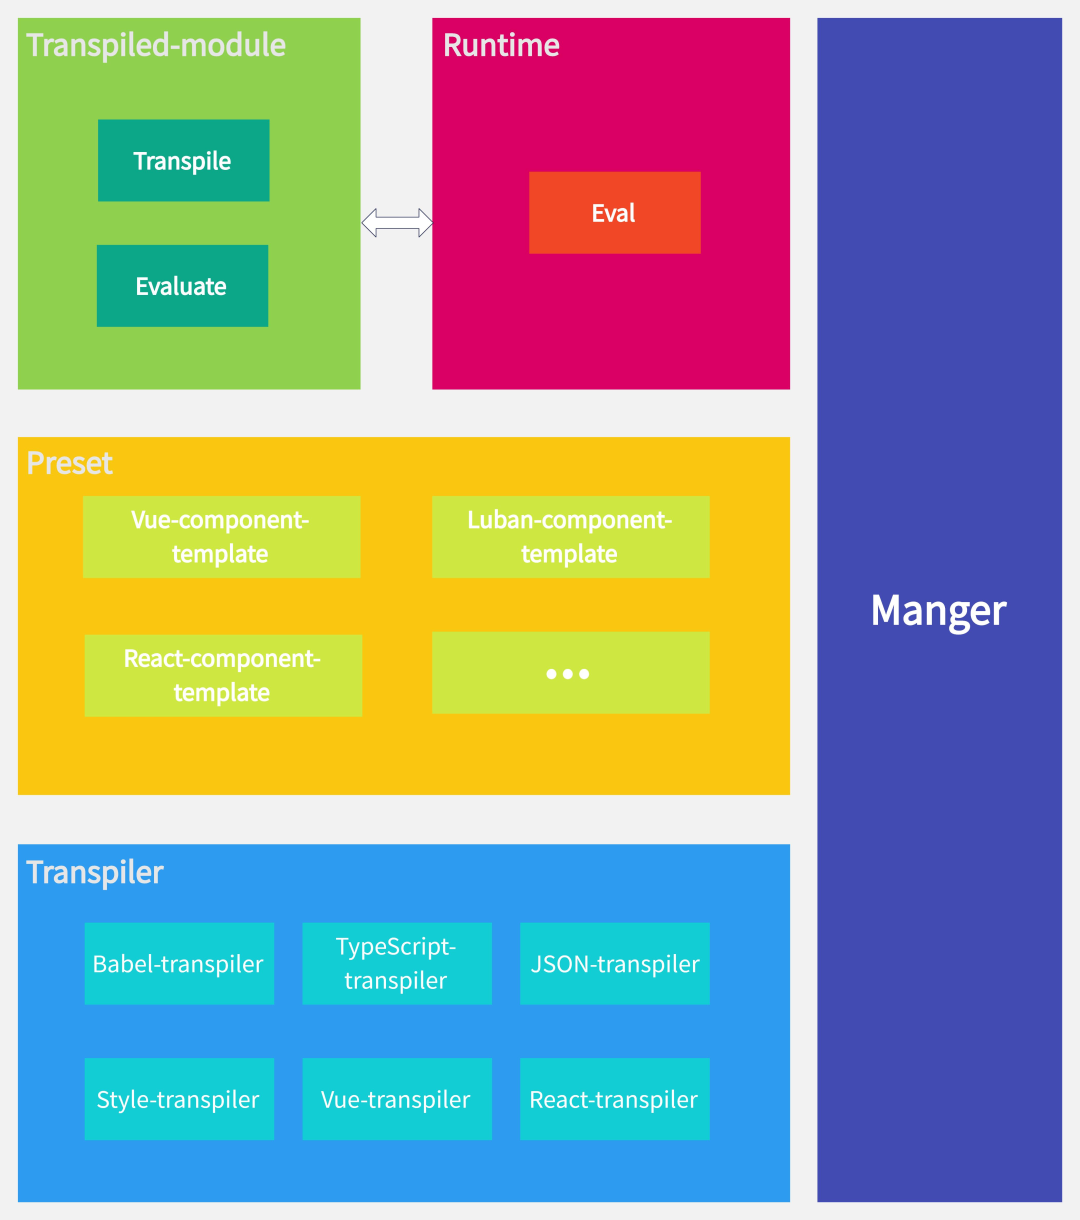
Manger 模块
顾名思义“管理者“,即管理其它核心模块,主要负责代码转译和执行的一系列过程。
核心方法有:
addTranspiledModuleresolveTranspiledModuleSyncresolveTranspiledModuleAsyncevaluateTranspiledModule首先将转译后的模块缓存起来放到transpiledModules对象 ,需要的话可以从缓存里同步或异步加载转译后的模块,如果需要执行转译的模块,可以调用evaluateTranspiledModule方法。
transpiledModules 的类型定义:
type IModule = {
  path: string;
  url?: any;
  code: string;
  requires?: Array<string>;
  parent?: Module;
};

interface ITranspiledModules {
    [path: string]: {
      module: IModule;
      tModules: {
        [query: string]: ITranspiledModule; // ITranspiledModule 类型定义放在 Transpiled-module 模块
      };
    };
  }
Transpiler 模块
类比 Webpack 的 loader,对指定类型的文件进行编译,如:Babel、Typescript、vue、tsx、jsx 等。
介绍下部分内置的 Transpiler 模块:
babelTranspilerstylesTranspilerrawTranspilernoopTranspilervueTranspiler``rawTranspiler跟 Webpack 的 raw-loader 作用一样,将模块的内容作为字符串导入,从而实现静态资源内联。
实现原理也很简单:
module.exports = JSON.stringify(sourceCode)
babelTranspiler 这里实现了简化版,script 标签引入 bable-standalone.js,拿到全局对象 Babel。
部分核心代码:
import babelPluginRenameImports from './plugins/babel-plugin-rename-imports';

const transpiledCode = window.Babel.transform(code, {
  plugins: [babelPluginRenameImports],
  presets: ['es2015', 'es2016', 'es2017'],
}).code;
vueTranspiler ,这里默认是 vue2.0 版本,核心依赖了 vue-template-compiler、vue-template-es2015-compiler。
将 vue 单文件组件转换为 SFC 对象:
import * as compiler from 'vue-template-compiler';
import type {SFCDescriptor} from 'vue-template-compiler';

const sfc:SFCDescriptor = compiler.parseComponent(content, { pad: 'line' });
解析 Vue template 部分核心代码:
import * as compiler from 'vue-template-compiler';
import transpile from 'vue-template-es2015-compiler';

function vueTemplateCompiler(html, options) {
  const bubleOptions = options.buble;
  const vueOptions = options.vueOptions || {};
  const userModules = vueOptions.compilerModules || options.compilerModules;
  const stripWith = bubleOptions.transforms.stripWith !== false;
  const { stripWithFunctional } = bubleOptions.transforms;
  const staticRenderFns = compiled.staticRenderFns.map((fn) =>
     toFunction(fn, stripWithFunctional)
 ); // 静态渲染函数放到数组中
  const compilerOptions: compiler.CompilerOptionsWithSourceRange = {
    preserveWhitespace: options.preserveWhitespace, // 是否保留 HTML 标记之间的所有空白字符
    modules: defaultModules.concat(userModules || []), // 自定义编译模版
    directives: vueOptions.compilerDirectives || options.compilerDirectives || {}, // 自定义指令
    comments: options.hasComment, // 是否保留注释
    scopeId: options.hasScoped ? options.id : null, /
  };
 const compiled = compiler.compile(html, compilerOptions);

  // 生成渲染函数和静态子树
 let code = transpile(
    'var render = ' +
     toFunction(compiled.render, stripWithFunctional) +
    '\n' +
    'var staticRenderFns = [' +
    staticRenderFns.join(',') +
     ']') + '\n';
    // mark with stripped (this enables Vue to use correct runtime proxy detection)
    if (stripWith) {
      code += `render._withStripped = true\n`;
    }

    const exports = `{ render: render, staticRenderFns: staticRenderFns }`;
    code += `module.exports = ${exports}`;

   return code;
}

function toFunction(code, stripWithFunctional) {
  return 'function (' + (stripWithFunctional ? '_h,_vm' : '') + ') {' + code + '}';
}
Vue 在渲染阶段将模板编译为 AST,然后根据 AST 生成 render 函数,底层通过调用 render 函数会生成 VNode 创建虚拟 DOM。
Preset 模块
组件预设构建模版,针对不同组件的框架类型,如:Vue2、React 等,预设默认该类型组件所需的 Transpiler 模块。类似于 vue-cli、create-react-app。
核心方法:
registerTranspilergetTranspilers``registerTranspiler作用是注册 Transpiler 模块。
部分伪代码:
vuePreset.registerTranspiler(
  (module) => /\.(m|c)?jsx?$/.test(module.path),
  [{ transpiler: babelTranspiler }]
);
vuePreset.registerTranspiler(
  (module) => /\.vue$/.test(module.path),
  [{ transpiler: vueTranspiler }]
);
Transpiled-module 模块
即转译后的模块,维护转译的结果、代码执行的结果、依赖的模块信息,负责驱动具体模块的转译(调用 Transpiler)和执行。
Runtime 模块
执行转译后的模块入口,使用 eval 执行入口文件,若遇到 require 函数,加载转译后的依赖模块然后使用 eval 执行执行。
核心代码:
export default function (
  code: string,
  require: Function,
  module: { exports: any },
  env: Object = {},
  globals: Object = {},
  { asUMD = false }: { asUMD?: boolean } = {}
) {
  const { exports } = module;

  const g = typeof window === 'undefined' ? self : window;
  const global = g;
  g.global = global;

  // 兼容 Node.js 环境,列举了一部分
  const process = {
    env: { NODE_ENV: 'development', ...env },
    cwd: () => { return '/' },
    umask: () => { return 0 }
  };

  // 全局变量
  const allGlobals: { [key: string]: any } = {
    require, // require 函数
    module,
    exports,
    process,
    global,
    ...globals,
  };

  // 是否 UMD 模块
  if (asUMD) {
    delete allGlobals.module;
    delete allGlobals.exports;
    delete allGlobals.global;
  }

  const allGlobalKeys = Object.keys(allGlobals);
  const globalsCode = allGlobalKeys.length ? allGlobalKeys.join(', ') : '';
  const globalsValues = allGlobalKeys.map((k) => allGlobals[k]);

  const newCode = `(function $csb$eval(` + globalsCode + `) {` + code + `\\n})`;
 (0, eval)(newCode).apply(allGlobals.global, globalsValues);

}
小结
从页面功能模块到组件的构建核心包设计,相信各位看官已经有了初步的了解。有两点没有提到,在这里简单补充下。
第一点是依赖包的数据源问题,简单粗暴点就是创建 manifest 文件,事先预存一份底层通用的依赖包数据,如:Babel 插件相关等,如果需要动态添加依赖包,可以使用 import-maps 特性。
第二点在 Transpiler 模块没有提到针对 react 组件的构建方案,添加相关 Babel 插件就好了,如:transform-runtime 、@babel/plugin-transform-react-jsx-source 等。
最后
背景、需求、调研、方案这四个层面,其中背景和需求更多是从产品的角度去思考和设计,这样做出来的东西才更符合用户需求和提升用户体验。我们技术人员不仅仅只关心技术层面的设计,更多时候还要从产品的角度去思考。
组件作为项目开发不可分割的一部分,从基础组件到业务组件,我们前端开发人员每天都在跟组件打交道。围绕着组件我们可以有很多专题,如何打造高质量组件?如何提升组件的复用率?如何提升组件的感知度?等等,贯穿组件的整个生命周期,那么如何治理好组件,需要我们共同努力和思考。
参考资料
CodeSandbox 核心源码:https://github.com/codesandbox/codesandbox-client/tree/master/packages/sandpack-core
CodeSandbox 浏览器端的 webpack 是如何工作的?:https://www.yuque.com/wangxiangzhong/aob8up/nb1gp2

