快速打开Nest.js的世界
从引用官方介绍开始: Nest(NestJS)是一个用于构建高效、可扩展的Node.js服务器端应用程序的框架。它使用渐进式JavaScript,使用TypeScript构建并完全支持TypeScript(但仍然允许开发人员使用纯JavaScript编码),并结合了OOP(面向对象编程)、FP(功能编程)和FRP(功能反应编程)的元素。
快速创建项目
全局安装脚手架并启用严格模式创建项目;
# 全局安装脚手架
npm i -g @nestjs/cli
# 启用 Typescript 严格模式创建项目
nest new project01 --strict
熟悉关键文件
src目录是主要的源码目录,主要由入口文件 main.ts 和 一组 module,service,controller构成。
project01
├─ src
│  ├─ app.controller.ts       # 业务数据交互的入口,实现数据在前后端的交互
│  ├─ app.service.ts           # 封装业务逻辑,将重复的业务逻辑在服务层进行封装
│  ├─ app.module.ts            # 负责模块的管理,通常 app.module 负责全局模块的管理
│  └─ main.ts                  # 入口文件,创建应用实例
├─ README.md
├─ nest-cli.json
├─ package.json
├─ tsconfig.build.json
└─ tsconfig.json
运行应用程序
- 普通启动模式:
npm run start - 监听启动模式:
npm run start:dev - 调试启动模式:
npm run start:debug
从模块管理开始
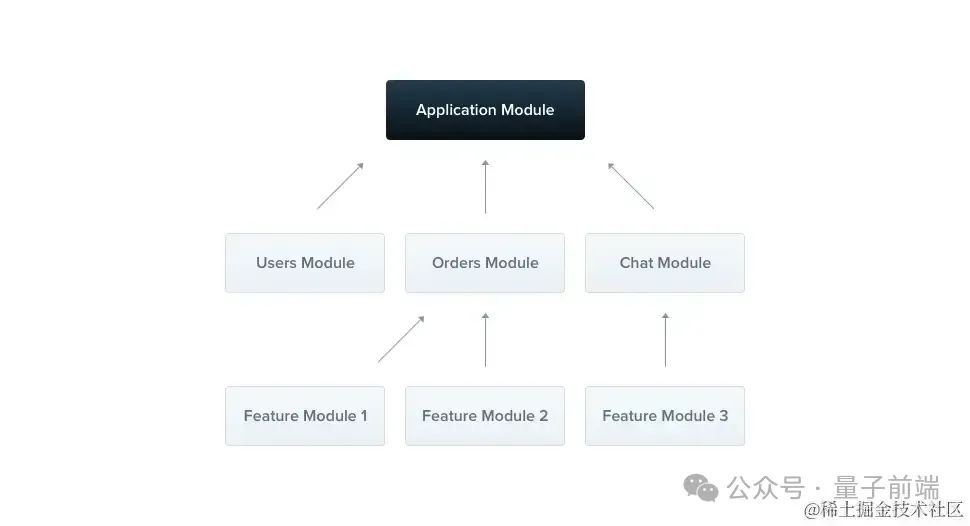
图片来自:docs.nestjs.com/modules
Nestjs 是典型的采用模块化组织应用结构的框架,通过上图可以看到,整个应用由一个根模块(Application Module)和多个功能模块共同组成。
创建模块:
- 完整命令:
nest generate module <module-name> - 简写命令:
nest g mo <module-name>
每个模块都是一个由@Module()装饰器注释的类,应用中模块间的关系将由@Module()装饰器中携带的所有元数据描述。
import { Module } from '@nestjs/common';

@Module({
  providers: [],
  imports: [],
  controllers: [],
  exports: [],
})
export class OrdersModule {}
@Module() 元数据
通过 Orders 模块了解@Module()元数据如何组织模块:
| providers | 注册订单提供者模块,如:负责订单 CRUD 的服务; |
|---|---|
| controllers | 注册订单控制器模块,如:负责订单 CRUD 的路由处理; |
| imports | 注册与订单相关联的模块,如:与订单关联的用户查询服务; |
| exports | 导出订单提供者模块,如:用户查询需要订单提供者统计订单数量; |
Orders 模块通过
exports将订单提供者模块导出的行为称为模块共享;
模块再导出
一个模块仅负责将一系列相关联的模块通过imports导入,紧接着就通过exports全部导出的行为就是模块在导出,利用 模块再导出 的能力,可以减少大量关联模块重复导入造成的负担。
@Module({
  imports: [DatabaseModule, RedisModule, MongoModule],
  exports: [DatabaseModule, RedisModule, MongoModule],
})
export class ConnectionModule {}
PS:在需要同时使用数据库连接、Redis连接、Mongo连接的情况下仅需要导 ConnectionModule 模块即可。
全局模块
如果需要 ConnectionModule 模块在任何地方都能开箱即用,那可以为其增加 @Global()装饰器;
@Global()
@Module({
  imports: [DatabaseModule, RedisModule, MongoModule],
  exports: [DatabaseModule, RedisModule, MongoModule],
})
export class ConnectionModule {}
学习控制器的使用
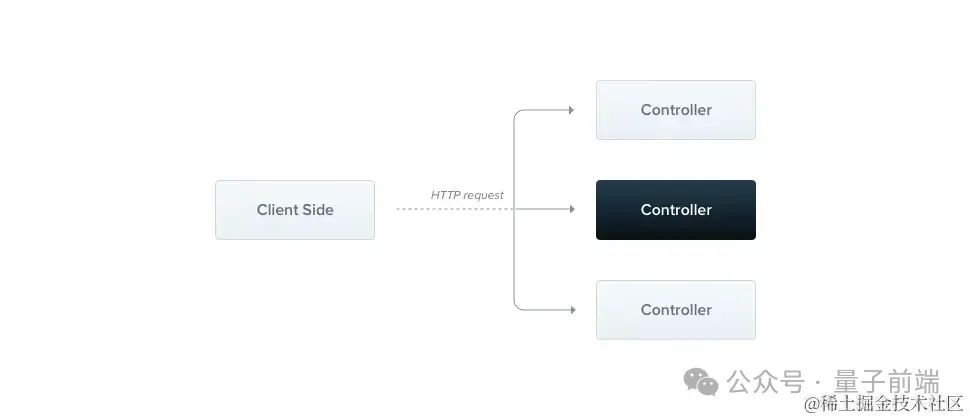
图片来自:docs.nestjs.com/controllers
控制器用来接收和处理客户端发起的特定请求,不同的客户端请求将由 Nestjs 路由机制分配到对应的控制器进行处理。
创建控制器
- 完整命令:
nest generate controller <controller-name> - 简写命令:
nest g co <controller-name>
控制器是使用@Controller(’path’)装饰器注释的类,其中path是一个可选的路由路径前缀,通过path可以将相关的路由进行分组。
import { Controller, Get } from '@nestjs/common';

@Controller('orders')
export class OrdersController {
  @Get()
  index() {
    return 'This is the order controller';
  }
}
小结:
- 当客户端通过 GET 方法对
orders路由发送请求时将由index()处理函数响应。 - 除
@Get()装饰器外,Nestjs 还为 HTTP 标准方法提供的装饰有@Post()、@Put()、@Delete()、@Patch()、@Options()和@Head(),以及@All()用来处理所有的情况。 @Controller(’path’)中的path从设计上虽为可选参数,但在实际项目中未避免混乱会在创建控制器后优先分配path。
读取请求对象
请求对象表示一个 HTTP 请求所携带的数据信息,如请求数据中的查询参数、路由参数、请求头、请求体等数据。下面列出的内置装饰器将简化请求数据信息的读取:
| @Request(), @Req() | req |
|---|---|
| @Response(), @Res()***** | res |
| @Next() | next |
| @Session() | req.session |
| @Param(key?: string) | req.params / req.params[key] |
| @Body(key?: string) | req.body / req.body[key] |
| @Query(key?: string) | req.query / req.query[key] |
| @Headers(name?: string) | req.headers / req.headers[name] |
| @Ip() | req.ip |
| @HostParam() | req.hosts |
在 OrdersController 控制器中编写更多的处理方法来演示接收不同的 HTTP 方法和不同位置的参数:
- 通过 GET 方法获取订单列表数据,并通过查询参数传递订单分页数据:
@Get('list')
list(@Query('page') page: number, @Query('limit') limit: number) {
  return `获取第${page}页,每页${limit}条订单`;
}
curl --request GET \
--url 'http://localhost:3000/orders/list?page=1&limit=20'- 通过 GET 方法查询指定 ID 的订单详情,并通过路由参数传递订单 ID;
@Get('detail/:id')
findById(@Param() param: { id: number }) {
  return `获取 ID 为 ${param.id} 的订单详情`;
}
curl --request GET \
--url http://localhost:3000/orders/detail/1- 通过 PATCH 方法更新指定 ID 订单的最新状态,并通过路由参数传递订单 ID 及最新状态;
@Patch(':id/:status')
updateByIdAndStatus(
  @Param('id') id: number,
  @Param('status') status: string,
) {
  return `将 ID 为 ${id} 订单状态更新为 ${status}`;
}
curl --request PATCH \
--url 'http://localhost:3000/orders/1/已退款'- 通过 POST 方法创建一个新的订单,并通过请求体 Body 接收订单数据;
interface ICreateOrder {
  article: string;
  price: number;
  count: number;
  source: string;
}

@Post()
create(@Body() order: ICreateOrder) {
  return `创建订单,订单信息为 ${JSON.stringify(order)}`;
}
curl --request POST \
--url http://localhost:3000/orders \
--header 'content-type: application/json' \
--data '{
"article": "HUAWEI-Meta60",
"price": 5999,
"count": 1,
"source": "Made in China"
}'小结:
- 控制器中不同的处理函数可以通过 HTTP 方法来区分;
- 当多个处理函数需要使用相同的 HTTP 方法时需要添加处理函数级别的路由以示区分;
@Param()未指定参数时表示所有路由参数的集合,指定参数时表示对应指定的参数,@Query()与@Param()具有相同的特点。
更多装饰器
- @Header(key, value):
@Post()
@Header('Cache-Control', 'none')
create(@Body() createOrderDto: CreateOrderDto) {
  return this.ordersService.create(createOrderDto);
}- @Redirect(res, statusCode)
@Get(':id')
@Redirect('https://nestjs.com/', 301)
findOne(@Param('id') id: string) {
  return this.ordersService.findOne(+id);
}
小结:
- 301:资源被永久重定向到新的资源,客户端需要考虑同步更新;
- 302:资源被临时重定向到新的资源,如:服务端升级时会启用临时资源;
学习提供者的使用
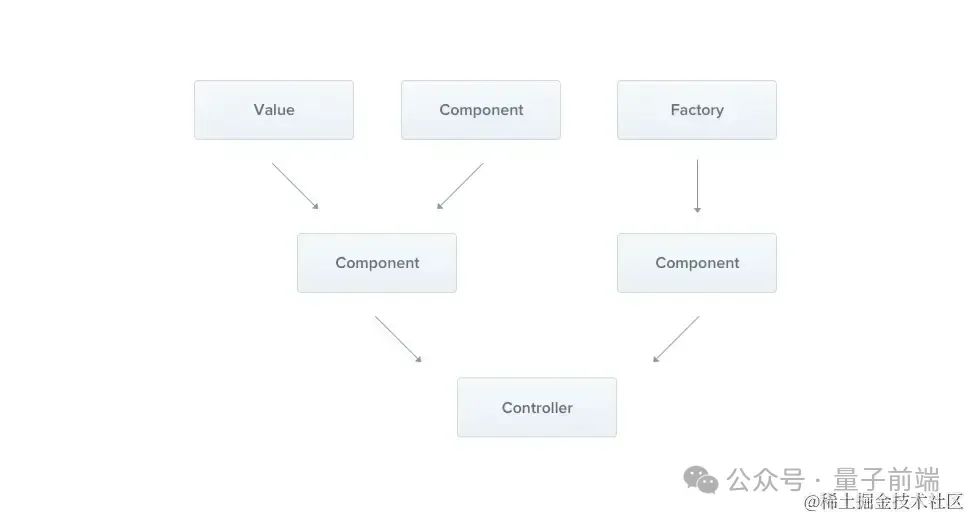
图片来自:docs.nestjs.com/providers
在 Nestjs 中将提供服务的类及一些工厂类、助手类等称作提供者,它们同时均可以通过注入的方式作为依赖模块;
创建服务
- 完整命令:
nest generate service orders; - 简写命令:
nest g s orders;
服务是典型的提供者,HTTP 请求在经过控制器处理后应该将复杂的任务交由服务层进行处理,如:将复杂的订单生成、查询、更新及删除等操作进行封装。
import { Injectable } from '@nestjs/common';
import { CreateOrderDto } from './dto/create-order.dto';
import { UpdateOrderDto } from './dto/update-order.dto';

@Injectable()
export class OrdersService {
  create(createOrderDto: CreateOrderDto) {
    return 'This action adds a new order';
  }

  findAll() {
    return `This action returns all orders`;
  }

  findOne(id: number) {
    return `This action returns a #${id} order`;
  }

  update(id: number, updateOrderDto: UpdateOrderDto) {
    return `This action updates a #${id} order`;
  }

  remove(id: number) {
    return `This action removes a #${id} order`;
  }
}
Nestjs 应用启动时必须解析全部依赖,因此每个提供者都将实例化完成,同时在应用停止后每个提供者将全部被销毁,所以默认的提供者生命周期同应用的生命周期。
注入并使用
将 OrdersService 通过构造函数注入到 OrdersController 控制器,这样就得到了初始化后的 ordersService 成员,接着就可以在不同的处理函数调用服务中提供的能力。
import { Controller, Get, Post, Body, Param } from '@nestjs/common';
import { OrdersService } from './orders.service';
import { CreateOrderDto } from './dto/create-order.dto';

@Controller('orders')
export class OrdersController {
  constructor(private readonly ordersService: OrdersService) {}

  @Post()
  create(@Body() createOrderDto: CreateOrderDto) {
    return this.ordersService.create(createOrderDto);
  }

  @Get()
  findAll() {
    return this.ordersService.findAll();
  }

  @Get(':id')
  findOne(@Param('id') id: string) {
    return this.ordersService.findOne(+id);
  }
}
PS: 除构造函数注入的这种方式外,还可以通过属性注入:
@Inject()
private readonly ordersService: OrdersService;
学习中间件的使用
图片来自:docs.nestjs.com/middleware
中间件是在路由处理程序前调用的函数,除了可以访问请求对象和响应对象以外还有中间件提供的 next() 函数。
创建中间件
使用 CLI 命令:nest g middleware logger 或简写命令 nest g mi logger创建logger中间件。
import { Injectable, NestMiddleware } from '@nestjs/common';

@Injectable()
export class LoggerMiddleware implements NestMiddleware {
  use(req: Request, res: Response, next: () => void) {
    console.log('Request...');
    next();
  }
}
绑定消费者
中间件的使用方通常被称作为消费,将中间件和消费者(cats) 的链接可以在 app 模块中进行处理,app 模块必须实现NestModule中的configure()函数,并在这个函数中完成关联。
export class AppModule implements NestModule {
  configure(consumer: MiddlewareConsumer) {
    consumer.apply(LoggerMiddleware).forRoutes('cats');
  }
}
路由匹配和排除
通过为forRoutes和exclude传入不同的参数可以实现中间件对路由范围的灵活控制。
// 基于模式匹配的应用方案
forRoutes({ path: 'ab*cd', method: RequestMethod.ALL });
// 基于具体路由配置及模式匹配的排除方案
consumer
.apply(LoggerMiddleware)
.exclude(
{ path: 'cats', method: RequestMethod.GET },
{ path: 'cats', method: RequestMethod.POST },
'cats/(.*)',
)
.forRoutes(CatsController);功能类中间件
对于一些功能简单,没有额外的属性及函数,也没有其他依赖关系时,那么就可以使用功能类中间件来简化基于类的中间件。
export function logger(req: Request, res: Response, next: () => void) {
  console.log(`Request...`);
  next();
}
全局中间件
中间件同样支持全局注册,那么它的消费者将是每个路由,将app模块中的接口及接口实现移除,在main.ts中当 app 实例化完成后通过调用 use 函数进行注册。
const app = await NestFactory.create(AppModule);
app.use(logger);
await app.listen(3000);
在全局中间件中访问DI容器是不可能的。你可以在使用
app.use()时使用功能性中间件。或者,你可以使用类中间件,并在AppModule(或任何其他模块)中使用.forroutes('*')来消费它。
学习异常过滤器的使用
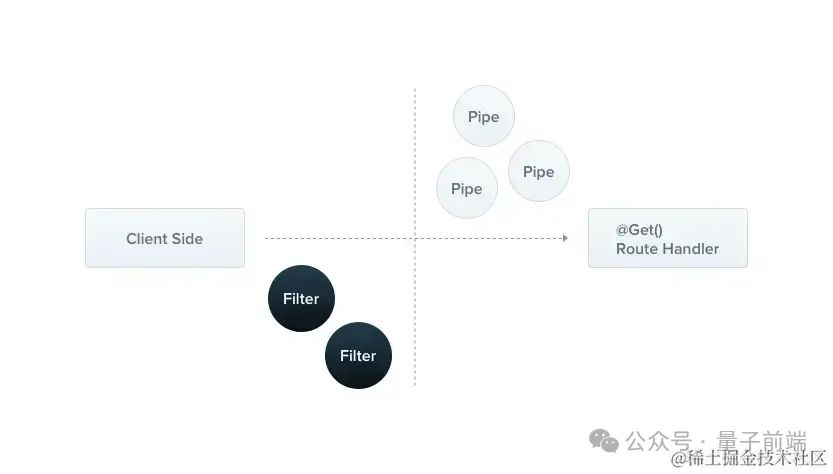
异常层由开箱即用的全局异常过滤器还行,负责处理应用程序中所有未处理的异常。通过内置的HttpException类可以轻松抛出一个标准异常。
@Get('find')
findCatById(@Query('id') id: string): Cat | undefined {
  try {
    // TODO
  } catch (error) {
    throw new HttpException('Forbidden', HttpStatus.FORBIDDEN, {
      cause: error,
    });
  }
  return this.catsService.findCatById(Number(id));
}
在触发异常后客户端将收到一份 JSON 格式的数据,cause 作为可选项虽然不会序列化后发送到客户端,但可作为日志记录使用:
{
  "statusCode": 403,
  "message": "Forbidden"
}
自定义异常
使用内置的HttpException实现了标准异常的抛出,为了进一步简化代码,定制符合业务层的异常,可以基于HttpException进行封装,当然下面的代码仅仅是一段示例。
// src/forbidden/forbidden.exception.ts
import { HttpException, HttpStatus } from '@nestjs/common';

export class ForbiddenException extends HttpException {
  constructor(error: unknown) {
    super('Forbidden', HttpStatus.FORBIDDEN, {
      cause: error,
    });
  }
}
内置 HTTP 异常
下面这些是内置 HTTP 异常,它们与上面自定义异常一样都是继承自HttpException。
- BadRequestException
- UnauthorizedException
- NotFoundException
- ForbiddenException
- NotAcceptableException
- RequestTimeoutException
- ConflictException
- GoneException
- HttpVersionNotSupportedException
- PayloadTooLargeException
- UnsupportedMediaTypeException
- UnprocessableEntityException
- InternalServerErrorException
- NotImplementedException
- ImATeapotException
- MethodNotAllowedException
- BadGatewayException
- ServiceUnavailableException
- GatewayTimeoutException
- PreconditionFailedException
异常过滤器
通过 CLI 命令:nest g filter http-exceptionhuo 简写命令 nest g f http-exception创建一个用来接管内置异常过滤器的指定过滤器,通过重写catch()实现具体的拦截处理。 catch()方法的参数中,exception参数是当前正在处理的异常对象。host参数是一个ArgumentsHost对象,从host参数获取对传递给原始请求处理程序(在异常产生的控制器中)的Request和Response对象的引用。
import {
  ArgumentsHost,
  Catch,
  ExceptionFilter,
  HttpException,
} from '@nestjs/common';

@Catch(HttpException)
export class HttpExceptionFilter implements ExceptionFilter {
  catch(exception: HttpException, host: ArgumentsHost) {
    const ctx = host.switchToHttp();
    const resp = ctx.getResponse();
    const req = ctx.getRequest();
    const status = exception.getStatus();
    resp.status(status).json({
      statusCode: status,
      timestamp: new Date().toISOString(),
      path: req.url,
    });
  }
}将@UseFilters(HttpExceptionFilter)绑定到需要拦截的控制器处理函数上;
 @Get('find')
  @UseFilters(HttpExceptionFilter)
  findCatById(@Query('id') id: string): Cat | undefined {
    return this.catsService.findCatById(Number(id));
}或者将@UseFilters(HttpExceptionFilter)绑定到需要拦截的控制器类上;
@UseFilters(HttpExceptionFilter)
@Controller('cats')
export class CatsController {
  // TODO
}还可以在app实例化后通过useGlobalFilters()函数进行设置;
async function bootstrap() {
  const app = await NestFactory.create(AppModule);
  app.useGlobalFilters(new HttpExceptionFilter());
  await app.listen(3000);
}
bootstrap();
当然如果需要在模块级别设置异常过滤器可以这么做:
@Module({
  controllers: [CatsController],
  providers: [
    CatsService,
    // 设置异常过滤器
    {
      provide: APP_FILTER,
      useClass: HttpExceptionFilter,
    },
  ],
  exports: [CatsService],
})
export class CatsModule {}
全局异常过滤器
上面的异常过滤器在编写时使用了@Catch(HttpException)进行约束,所以说这个过滤器仅拦截HttpException相关的异常,那么要想拦截包含HttpException的所有异常就需要进一步的处理。 创建一个新的全局异常过滤器(nest g f all-exceptions),并注入HttpAdapterHost适配器来处理异常情况。
import {
  ArgumentsHost,
  Catch,
  ExceptionFilter,
  HttpException,
  HttpStatus,
} from '@nestjs/common';
import { AbstractHttpAdapter } from '@nestjs/core';

@Catch()
export class AllExceptionsFilter implements ExceptionFilter {
  constructor(private readonly httpAdapter: AbstractHttpAdapter) {}
  catch(exception: unknown, host: ArgumentsHost): void {
    const ctx = host.switchToHttp();
    const httpStatus =
      exception instanceof HttpException
        ? exception.getStatus()
        : HttpStatus.INTERNAL_SERVER_ERROR;
    const responseBody = {
      statusCode: httpStatus,
      timestamp: new Date().toISOString(),
      path: this.httpAdapter.getRequestUrl(ctx.getRequest()),
    };
    this.httpAdapter.reply(ctx.getResponse(), responseBody, httpStatus);
  }
}
将它绑定到 app 实例:
import { HttpAdapterHost, NestFactory } from '@nestjs/core';
import { AppModule } from './app.module';
import { AllExceptionsFilter } from './all-exceptions/all-exceptions.filter';

async function bootstrap() {
  const app = await NestFactory.create(AppModule);

  const { httpAdapter } = app.get(HttpAdapterHost);
  app.useGlobalFilters(new AllExceptionsFilter(httpAdapter));

  await app.listen(3000);
}
bootstrap();
学习管道的使用
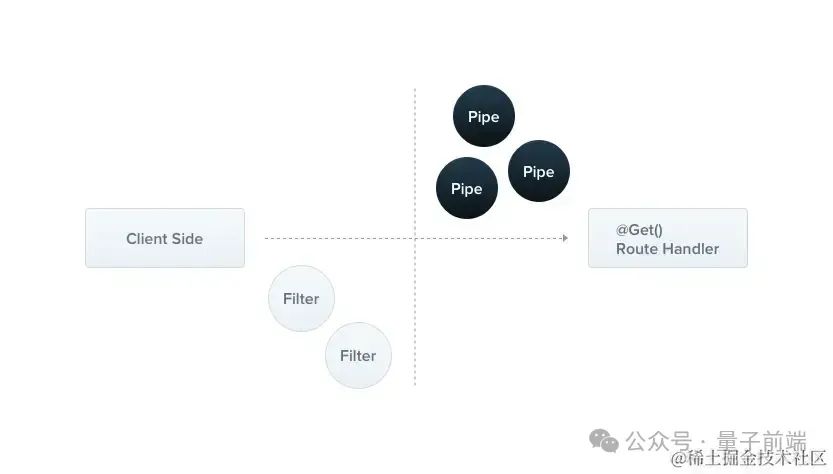
图片来自:docs.nestjs.com/pipes
管道在 Nestjs 中提供转换(将输入数据转换为所需的形式)和验证(验证输入数据是否有效,有效则向下传递,反之抛出异常)两大类功能。
内置管道
- ValidationPipe
- DefaultValuePipe
- ParseIntPipe
- ParseFloatPipe
- ParseBoolPipe
- ParseArrayPipe
- ParseUUIDPipe
- ParseEnumPipe
- ParseFilePipe
尝试绑定管道
下面的控制器处理函数的参数虽然申明为number类型,但typeof id 仍然收到的是一个string类型的数据,这样的数据传递到服务层去做处理是很危险的,现在就来尝试绑定Parse*Pipe管道解决这个问题;
@Get('find')
findCatById(@Query('id') id: number): Cat | undefined {
  return this.catsService.findCatById(id);
}绑定ParseIntPipe管道到findCatById处理函数,当路由到此处理函数是,ParseIntPipe管道将尝试解析ID数据number 类型,解析成功将正常的调用服务层逻辑,解析失败将触发异常(Validation failed (numeric string is expected)):
@Get('find')
findCatById(@Query('id', ParseIntPipe) id: number): Cat | undefined {
  return this.catsService.findCatById(id);
}
在绑定管道的时候还可以直接传递管道实例,通过其构造函数提供的选项进行定制:
@Get('find')
findCatById(
  @Query(
    'id',
    new ParseIntPipe({
      errorHttpStatusCode: HttpStatus.NOT_ACCEPTABLE,
    }),
  )
  id: number,
): Cat | undefined {
  return this.catsService.findCatById(id);
}
自定义管道
使用 CLI 命令nest g pipe validation或简写命令nest g pi validation创建一个验证类管道,并绑定管道到findCatById处理函数,注意导入为自定义的管道:
@Get('find')
findCatById(
  @Query('id', ValidationPipe)
  id: number,
): Cat | undefined {
  return this.catsService.findCatById(id);
}
在自定义管理的代码中添加两条输出代码:
import { ArgumentMetadata, Injectable, PipeTransform } from '@nestjs/common';

@Injectable()
export class ValidationPipe implements PipeTransform {
  transform(value: any, metadata: ArgumentMetadata) {
    console.log('value', value); // 2
    console.log('metadata', metadata); // { metatype: [Function: Number], type: 'query', data: 'id' }
    return value;
  }
}- value:处理函数的参数,当请求发送的
id为 2 时,value将输入为 2; - metadata:处理函数参数的元数据:
- type:表示参数来自 Body、Query、Param 还是自定义参数;
- data:传递给装饰器的值;
- metatype:提供参数的元类型;
基于对象模式验证
下面是创建新 Cat 数据的create处理函数,在穿如若服务层之前仍然缺少验证 cat 数据完整且有效步骤,在遵守单一责任原则就可以通过自定义验证管道的方法做来;
export interface Cat {
  id: number;
  name: string;
  age: number;
}

@Post('create')
create(@Body() cat: Cat): Cat[] | undefined {
  return this.catsService.create(cat);
}首先执行npm install --save zod安装Zod模块,使用其提供可读的API以简单的方式来创建模式,并完善验证管道:
import { BadRequestException, Injectable, PipeTransform } from '@nestjs/common';
import { ZodObject } from 'zod';

@Injectable()
export class ValidationPipe implements PipeTransform {
  constructor(private schema: ZodObject<any>) {}

  transform(value: unknown) {
    try {
      this.schema.parse(value);
    } catch (error) {
      throw new BadRequestException('Validation failed');
    }
    return value;
  }
}
接着为 Cat 对象定义 Schema:
import { z } from 'zod';

export const createCatSchema = z
  .object({
    name: z.string(),
    age: z.number(),
  })
  .required();

export type CreateCatDto = z.infer<typeof createCatSchema>;最后将更新后的验证管道使用@UsePipes装饰器绑定到create处理函数上;
@Post('create')
@UsePipes(new ValidationPipe(createCatSchema))
create(@Body() cat: Cat): Cat[] | undefined {
  return this.catsService.create(cat);
}
基于 Class 的验证
除了上述基于模式的验证方案以外,还可以选择使用装饰器对 Class 的属性进行表述来实现基于 Class 的验证。同样还是先来执行命令npm i --save class-validator class-transformer安装必要的模块后将 Cat 接口改为 Cat 类:
export class Cat {
  id: number;
  name: string;
  age: number;
}接着从class-validator模块导入IsString和IsInt装饰器,并安装到对应的属性上:
import { IsString, IsInt } from 'class-validator';

export class Cat {
  @IsInt()
  id: number;

  @IsString()
  name: string;

  @IsInt()
  age: number;
}
现在要对验证管道进行重构,让它可以基于类验证器进行工作:
import {
  ArgumentMetadata,
  BadRequestException,
  Injectable,
  PipeTransform,
} from '@nestjs/common';
import { plainToInstance } from 'class-transformer';
import { validate } from 'class-validator';

@Injectable()
export class ValidationPipe implements PipeTransform<any> {
  async transform(value: any, { metatype }: ArgumentMetadata) {
    // ① 初筛 处理预期内的数据类型
    if (!metatype || !this.toValidate(metatype)) {
      return value;
    }

    // ② 将 value 和 元类型 转为实例对象
    const object = plainToInstance(metatype, value);
    // ③ 通过 validate 验证结果
    const errors = await validate(object);
    if (errors.length > 0) {
      throw new BadRequestException('Validation failed');
    }
    return value;
  }

  private toValidate(metatype: any): boolean {
    const types: any[] = [String, Boolean, Number, Array, Object];
    return !types.includes(metatype);
  }
}
在绑定这个验证管道时还可以同下面这样做,因为这个处理函数仅接收这一个参数:
@Post('create')
create(@Body(new ValidationPipe()) cat: Cat): Cat[] | undefined {
  return this.catsService.create(cat);
}
全局绑定管道
async function bootstrap() {
  const app = await NestFactory.create(AppModule);
  app.useGlobalPipes(new ValidationPipe());
  await app.listen(3000);
}
bootstrap();
从依赖注入方面来看,从任何模块外注册的全局管道(如上例中的 useGlobalPipes())无法注入依赖,因为绑定是在任何模块的上下文之外完成的。 为了解决这个问题,你可以使用以下构造设置全局管道 直接从任何模块
import { Module } from '@nestjs/common';
import { APP_PIPE } from '@nestjs/core';

@Module({
  providers: [
    {
      provide: APP_PIPE,
      useClass: ValidationPipe,
    },
  ],
})
export class AppModule {}
学习守卫的使用
图片来自:docs.nestjs.com/guards
在服务运行时根据特定的条件来允许或阻止请求是否要被路由程序处理的任务是由守卫承担。如常见的权限、角色的身份验证场景。 使用 CLI 命令nest g guard roles或简写命令nest g gu roles创建一个与角色相关的守卫:
import { CanActivate, ExecutionContext, Injectable } from '@nestjs/common';
import { Observable } from 'rxjs';

@Injectable()
export class RolesGuard implements CanActivate {
  canActivate(
    context: ExecutionContext,
  ): boolean | Promise<boolean> | Observable<boolean> {
    return true;
  }
}
绑定守卫
控制器范围绑定:
@Controller('cats')
@UseGuards(RolesGuard)
export class CatsController {}

// or

@Controller('cats')
@UseGuards(new RolesGuard())
export class CatsController {}
全局范围绑定:
const app = await NestFactory.create(AppModule);
app.useGlobalGuards(new RolesGuard());

// or

@Module({
  providers: [
    {
      provide: APP_GUARD,
      useClass: RolesGuard,
    },
  ],
})
export class AppModule {}
分配角色
现在创建一个 Roles 装饰器,使用这个装饰器来为不同的控制器处理函数分配不同的角色:
import { Reflector } from '@nestjs/core';

export const Roles = Reflector.createDecorator<string[]>();
绑定装饰器到处理函数:
@Roles(['admin'])
@Post('create')
create(@Body(new ValidationPipe()) cat: Cat): Cat[] | undefined {
  return this.catsService.create(cat);
}
完善守卫
通过Reflector接续处理函数所分配的角色并与请求头中所携带的角色相比较,决定是否允许控制器处理函数执行:
import { CanActivate, ExecutionContext, Injectable } from '@nestjs/common';
import { Reflector } from '@nestjs/core';
import { Roles } from './roles.decorator';
import { Request } from 'express';

@Injectable()
export class RolesGuard implements CanActivate {
  constructor(private reflector: Reflector) {}

  canActivate(context: ExecutionContext): boolean {
    // 获取 Roles 装饰器分配的角色
    const roles = this.reflector.get(Roles, context.getHandler());
    console.log(roles);
    if (!roles) {
      return true;
    }
    const request: Request = context.switchToHttp().getRequest();
    // 获取请求头中的角色
    const role = request.headers['role'] || '';
    return roles.includes(role as string);
  }
}
学习拦截器的使用
图片来自:docs.nestjs.com/interceptor…
拦截器是一个 APO 切面编程技术,应用拦截器可以获得下面所列出的一系列能力:
- 在方法执行之前/之后绑定额外的逻辑
- 转换函数返回的结果
- 转换函数抛出的异常
- 扩展基本功能行为
- 根据特定条件完全覆盖函数(例如,出于缓存目的)
统计处理函数执行时间
使用拦截器在不侵入处理函数的前提下计算处理函数执行的时长,这是一个典型的切面编程案例。 现在使用 CLI 命令nest g interceptor logging或简写命令nest g itc logging创建logging拦截器:
import {
  CallHandler,
  ExecutionContext,
  Injectable,
  NestInterceptor,
} from '@nestjs/common';
import { Observable, tap } from 'rxjs';

@Injectable()
export class LoggingInterceptor implements NestInterceptor {
  intercept(context: ExecutionContext, next: CallHandler): Observable<any> {
    console.log('Before...');
    const now = Date.now();
    return next
      .handle()
      .pipe(tap(() => console.log(`After... ${Date.now() - now}ms`)));
  }
}在拦截器中使用到了Rxj 技术,在tap运算符将在处理函数执行结束后计算所执行的时间。
绑定拦截器
控制器范围绑定:
@UseInterceptors(LoggingInterceptor)
export class CatsController {}

// or

@UseInterceptors(new LoggingInterceptor())
export class CatsController {}
全局范围绑定:
const app = await NestFactory.create(AppModule);
app.useGlobalInterceptors(new LoggingInterceptor());

// or

@Module({
  providers: [
    {
      provide: APP_INTERCEPTOR,
      useClass: LoggingInterceptor,
    },
  ],
})
export class AppModule {}
响应映射
使用Rxjs提供的map操作符对处理函数返回的数据做二次加工:
@Injectable()
export class TransformInterceptor implements NestInterceptor {
  intercept(context: ExecutionContext, next: CallHandler): Observable<any> {
    return next.handle().pipe(
      map((data) => {
        return {
          time: new Date().toISOString(),
          data,
        };
      }),
    );
  }
}
异常映射
使用Rxjs提供的catchError操作符抛出指定的异常:
@Injectable()
export class ErrorsInterceptor implements NestInterceptor {
  intercept(context: ExecutionContext, next: CallHandler): Observable<any> {
    return next
      .handle()
      .pipe(catchError((err) => throwError(() => new BadGatewayException())));
  }
}
处理函数超时
使用Rxjs提供的timeout和catchError共同实现处理函数超时:
@Injectable()
export class TimeoutInterceptor implements NestInterceptor {
  intercept(context: ExecutionContext, next: CallHandler): Observable<any> {
    return next.handle().pipe(
      timeout(5 * 1000),
      catchError((err) => {
        if (err instanceof TimeoutError) {
          return throwError(() => new RequestTimeoutException());
        }
        return throwError(() => err);
      }),
    );
  }
}
总结
- 使用
@nestjs/cli创建项目及模块; - 控制器的使用:处理每次客户端的请求。
- 服务的使用:封装复杂的业务逻辑,并提供此能力给其它模块;
- 模块的使用:负责项目所有控制器、提供者的管理工作;
- 中间件的使用:更改请求响应对象和执行下一个中间件;
- 异常过滤器的使用:处理项目所有未处理的异常;
- 管道的使用:对客户端的数据进行转换和验证;
- 守卫的使用:根据特定的权限角色决定是否进行处理;
- 拦截器的使用:对处理函数进行切面上的扩展;
